• Skip to primary navigation
  • Skip to main content
  • Skip to primary sidebar
  • Skip to footer

 logo

  • Recipes
    • Breakfast
    • Sides
    • Soup
    • Main Meals
    • Healthy
    • Dessert
    • Drinks
  • Eating Out
  • About Me
    • Privacy Policy
  • Resources
    • Must Have Kitchen Tools
  • Nav Social Menu

    • Email
    • Facebook
    • Instagram
    • Pinterest

Makloubeh

Feb 11, 2021 · Leave a Comment

Jump to Recipe

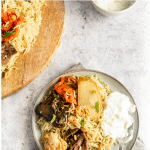
Makloubeh is a Middle Eastern upside down rice dish, with spiced rice cooked in meat broth, meat pieces, eggplant and cauliflower. It’s a delicious hearty meal, that’s visually stunning. Makloubeh is a classic and so delicious!

What is makloubeh?

Makloubeh is also known as maqlooba, maqluba, maklouba, maqlooba, makloubeh, maqlouba. It has many spellings that basically mean the same thing. Makloubeh literally translates to “upside down”. The rice is arranged in a deep pot with layers of vegetables and meat, and when the cooking is over, it’s flipped onto a serving plate. Ideally, it remains standing tall like an upside down rice cake. Even when the rice tower breaks though, it doesn’t matter because this is delicious in any form!

A very common dish in Middle Eastern cuisine, Makloubeh is a little more labor intensive than some dishes, so is always a happy event when it’s made. It’s often served on special occasions and everyone has their own twist.

The base of makloubeh is always rice, some vegetables, and chicken or meat (lamb or beef), arranged in layers.

Maqluba is commonly made in Palestine, Jordan, Syria and Iraq. Everyone has their preference but I’m personally convinced my Grandma made the best maqluba ever! She was known for her authentic Palestinian makloubeh made with so much love.

Why should I make this makloubeh?

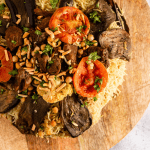
It is a visually stunning dish that’s full of layers of textures and flavors.

It’s utterly comforting! Nothing like the spiced rice cooked in meat broth until full of flavor with roasted vegetables coming up with every few bites.

The vegetables are completely flexible according to your preference and what you have on hand. I love my makloubeh recipe because it has both eggplant and cauliflower (you’d usually use one or the other), as well as potatoes and tomatoes. The perfect combination! I like to include a lot of the roasted veggies so you don’t have to dig around to find a good piece.

What ingredients do I need to make maqluba?

Rice: I use basmati rice, but you can also do a mix of short grain and basmati. Short grain or Egyptian rice tends to be a little mushier, so you have to be careful not too add to much broth to it.

Veggies: I like using cauliflower, eggplants, and potatoes. Most recipes use either eggplants OR cauliflower, but using both is majorly delicious. We also use tomato slices and chickpeas when assembling the actual maklouba in the pan.

Meat: I used boneless lamb chunks, you can also use bone in lamb pieces or beef pieces.

Aromatics for the broth: An onion and a whole head of garlic, cut into half for the broth as well as whole spices like cloves, cardamom, bay leaves and cinnamon sticks.

Spices: After the broth is strained, we mix in salt, pepper, turmeric, seven spice or all spice, and cumin powder.

Steps in making makloubeh:

  1. Roast the vegetables. Arrange the potato slices, eggplant slices, and cauliflower florets onto parchment paper lined baking sheets in a single layer, and roast for around 30 minutes until golden brown and cooked through. Set aside.
  2. Prepare the meat broth by browning the meat, adding the aromatics and enough water to cover and simmering until meat is cooked through and tender. You can also cook the meat in a pressure cooker. Once the meat is cooked, strain the stock to get rid of the whole spices, place the meat pieces aside, and add spices to the strained stock. Set aside.
  3. Assemble!

How to assemble makloubeh:

There are a few different ways to do this, but I’ll take you through my preferred way.

  • Coat the bottom of the pan with oil, and layer with tomatoes. The tomatoes will help prevent sticking, and also they sweeten and almost caramelize while cooking- absolutely delicious!
  • Add the eggplant on top of the tomatoes. You can either arrange them in the center in a concentric shape, or arrange them so that the eggplant comes up the side of the pan a little. When you flip the pan, this means the eggplant will sort of wrap the top of the rice cake. You can see the video below the recipe card to really demonstrate this!
Tip:
  • I like to season every layer of vegetables with a little salt to really bring out the flavor. Just sprinkle some salt as you assemble.
  • Add the meat cubes on top of the eggplant, evenly spread out.
  • Sprinkle some chickpeas on top. They are such yummy little nuggets to bite into.
  • Add half the strained rice and spread it out in an even layer. The reason I like to add the rice in two different batches, is that you have a good proportion of rice to vegetables while scooping into the maklouba, instead of a big layer of rice and layer of vegetables. I think this distributes everything a little better.
  • Add all the potato slices and cauliflower. Sprinkle with salt.
  • Add the second half of rice on top of these vegetables, spread evenly, and pat firmly with the back of a wooden spoon. Pressing it firmly down helps it maintain it’s cake like shape when you flip the pan after cooking.
  • Pour all the prepared stock on top of the rice until it comes up to 1/2 inch above the rice. If you need to, add a little more water to accomplish this. Now it’s all assembled and ready to cook!

Cooking the maklouba:

Bring the large assembled pot to a boil over medium high heat, then lower the heat to low, and cover with a tightly fitting lid. If you have a gap between the lid and the pot you can add a kitchen towel before closing to seal off any air.

Once the pot is covered and the maklouba is simmering, cook for 50-55 minutes, or until the rice has absorbed all the water when you lift the lid. Remove from the heat and set aside for about 10 minutes to rest.

Flipping the maqluba:

The goal is to flip the pot over, and have a standing rice cake, at least for a few minutes for everyone to ooh and ahh over. It’ll drop down pretty fast, or get destroyed by hungry humans but it is a fun moment where everyone waits with bated breath to see if the makloubeh will hold it’s shape.

To help the chances of that happening, follow these steps:

After the rice has stood for 10 minutes after cooking, remove the lid and place a large serving platter or tray as the lid. Go to the table you’ll serve the dish on, and using the pot handles, flip the pot upside down, and place the serving dish on the table with the upside down pot still on it.

Leave the pot to stand for a few minutes to get the rice to drop down, then slowly, using the handles of the pot, lift it up off the maqluba. Hopefully, you’ll reveal a large stack of layered rice. And even if you don’t? It’ll still be absolutely delicious!

How to garnish:

The garnish is so important. You have to have lots of toasted pine nuts and/or almonds as well as chopped parsley. The toasted nuts really complete the dish.

To toast the nuts, just heat a little olive oil in a small skillet over medium heat. If using both almonds and pine nuts, add the almonds first because they took longer to cook. When they start to turn a light beige, add the pine nuts. Stir constantly until golden brown, then immediately remove from the heat to another paper towel lined plate so they don’t burn. Set aside until ready to use.

What to serve this with:

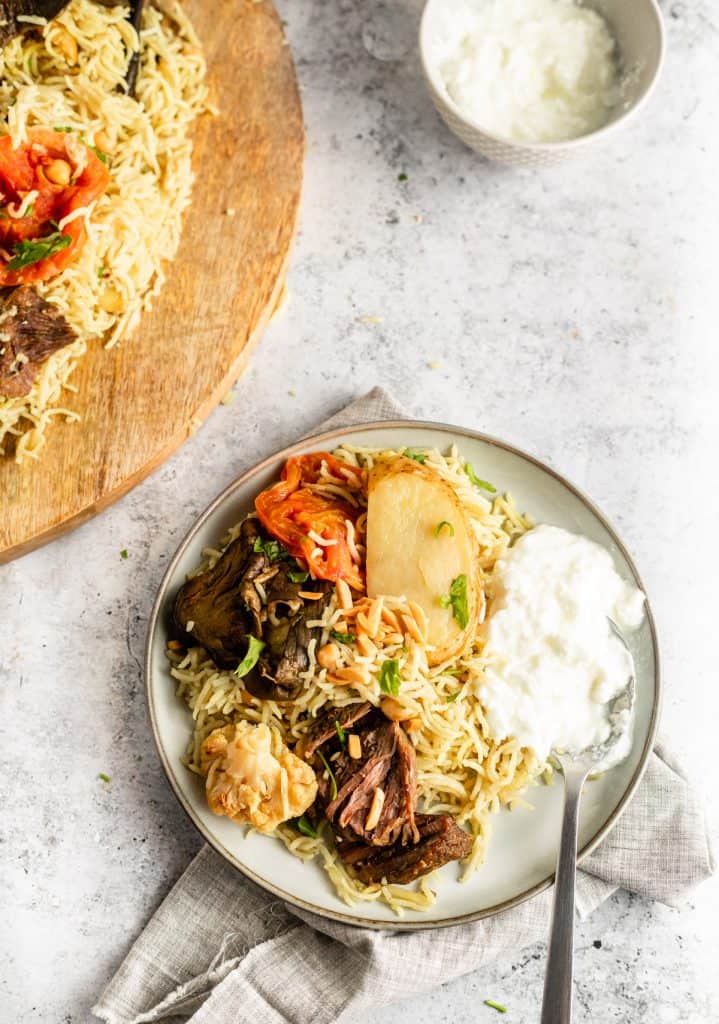
Maqluba is very commonly served with yogurt. The creaminess of the yogurt works so well with the warm spiced meat and rice.

It’s also usually eaten with a zingy green salad, the acidity of which cuts through the heaviness of the rice.

I prefer serving with both! One scoop of yogurt, and a big scoop of salad- just a simple salad made with lettuce, tomatoes, cucumbers, and carrots, with a lemon olive oil dressing.

You can also serve this with a cucumber yogurt salad, like the one in this recipe.

If you liked this recipe, you might enjoy these other traditional Middle Eastern main dishes:

Malfouf- stuffed cabbage rolls

Bazella- Pea and meat stew

Mulukhiya

Dawood Basha- Meatballs in tomato pomegranate molasses stew

Or these Middle Eastern rice dishes:

Chicken Kabsa

Lamb Haneeth

Sayadieh- Lebanese fish and rice

Lebanese Hashweh Rice

Ouzi- filo wrapped rice parcels

Instant Pot Mujaddara

Makloubeh

A pot of rice, stewed meat and vegetables that's flipped upside down and garnished with toasted nuts. It's a very common dish in the Middle East and absolutely delicious!
Print Pin
Rate
Course: Main Course
Cuisine: Middle Eastern
Keyword: rice, middle eastern
Prep Time: 40 minutes
Cook Time: 50 minutes
Servings: 6 people
Calories: 408kcal
Author: Farah Abumaizar

Ingredients

For the roasted vegetables:

  • 2-3 tbsp olive oil or vegetable oil for drizzling on the vegetables
  • 1 tsp salt for seasoning the vegetables
  • 2-3 potatoes, peeled and sliced,
  • 2 medium sized eggplants, peeled into strips and sliced lengthwise into strips
  • 1 medium head cauliflower, cut into large florets

For the meat broth:

  • 1 tbsp vegetable oil or olive oil
  • 1.5 lb lamb pieces, boneless or bone in 700g
  • 1 onion, cut into half
  • 1 head garlic, cut into half
  • 2 bay leaves
  • 4 whole cardamom pods
  • 4 cloves
  • 2 cinnamon sticks
  • 4 cups water
  • 1 tsp seven spices or allspice powder
  • 2 tsps salt
  • 1/2 tsp black pepper
  • 1/2 tsp cumin powder
  • 1/2 tsp turmeric powder

For assembling:

  • 2 tbsp olive oil or vegetable oil
  • 2 tomatoes, sliced
  • 1/2 can chickpeas, rinsed and drained 7 oz total (200g)
  • 2.5 cups basmati rice, rinsed and drained well
  • salt for sprinkling

Instructions

Prepare the vegetables:

  • Preheat the oven to 425 C (220C). Add the cauliflower florets and potato slices to one baking sheet lined with parchment paper, spread out. Add the eggplant slices to another baking sheet lined with parchment paper, in a single layer. Drizzle both trays of vegetables with oil and sprinkle with salt. Place both trays in the oven at the same time.
  • Roast for around 30 minutes or until vegetables are golden brown and cooked through. they'll probably need around 30 minutes. You can flip the potato slices around halfway through, but it's not necessary. Once vegetables have roasted, remove from the oven and set aside until it's time for assembling.

For the meat:

  • Add the oil to a large saucepan over medium heat. Once hot, add the meat pieces and cook, stirring until browned on each side. Add the onion and garlic, the bay leaves, cardamom pods, cloves, and cinnamon sticks.
  • Add enough water to the pot to cover the meat completely. I used 4 cups of water. Bring to a boil, then skim off any foam that accumulates on the surface and discard it.
  • Cover the pot, reduce heat to a medium low simmer, and cook for 40-45 minutes or until lamb pieces are cooked through and tender. Alternately, you could cook the meat in an pressure cooker or instant pot according to your preference.
  • Once the meat is cooked, pour the stock over a strainer, catching the stock in a bowl. Discard the whole spices, and keep the meat pieces aside.
  • To the strained stock, stir in the seven spices or all spice, salt, black pepper, cumin powder and turmeric powder. Taste it, it should taste pretty salty. Set stock aside.

To assemble:

  • In a large clean saucepan (you can clean the one you used to make the stock), drizzle the oil to coat the bottom. Layer the tomato slices on the bottom, this will help keep the rice from sticking.
  • Arrange the eggplant slices evenly around the pan, coming up the sides of the pan if you can so that they'll sort of end up wrapping the rice mixture (see video below for clarification).
  • Sprinkle the eggplants with salt, and add all the meat cubes to the pan. Add the chickpeas on top of the meat. Add half the rice and spread it out evenly. Add the cooked potato slices and half the cauliflower florets. Season these vegetables with a sprinkle of salt.
  • Add the second half of the rice on top of the vegetables, and pat with the pack of a wooden spoon to firmly press it into the pan.
  • Pour the meat stock over the rice. It should cover the top of the rice by about 1/2 inch. If you need to, add a little water in order to submerge the rice, maybe 1/2 cup or so. Place the pot of rice on medium high heat until the water in it comes to a boil, about 5 minutes or so, then tightly cover (if your lid doesn't fit tightly, you can place a kitchen towel under the lid before covering).
  • Reduce heat to low, and cook for 50-55 minutes, until all the broth has been absorbed and the rice is fluffy. Remove from heat and let the pot stand for 5-10 minutes.
  • After the rice has rested, remove the lid and place a serving platter or tray on top of the pot. Flip the pot upside down, but don't lift the pot up for a few minutes to give the rice time to drop. After a few minutes pass, slowly use the pot handles to lift and remove the pot.
  • Garnish your makloubeh with plenty of toasted nuts and parsley. Enjoy immediately! We like this with yogurt and/or a simple green salad.

Notes

You can substitute bone in chicken pieces for the meat. You’ll need less time to cook it, maybe 30 minutes or so.
You can do this with all eggplants or all cauliflower, and omit the potatoes if you like.
You can use a mix of short grain and long grain rice, a 50/50 ration if you like.
See post above for instructions on toasting nuts. The toasted nuts add so much flavor toe the dish!
 
 
Tried this recipe?Mention @everylittlecrumb or tag #everylittlecrumb!

Nutrition

Calories: 408kcal

Main Meals, Recipes

Previous Post: « Baked Feta Pasta
Next Post: Death By Chocolate Zucchini Bread »

Reader Interactions

Leave a Reply Cancel reply

Your email address will not be published. Required fields are marked *

Recipe Rating


Primary Sidebar

Get more stuff

Subscribe to our mailing list and get interesting stuff and updates to your email inbox.

Thank you for subscribing.

Something went wrong.

we respect your privacy and take protecting it seriously

FeedFeed

Featured Recipes

Nana tea

Halal Guys Chicken and Rice

Aish El Saraya

Instant Pot Enchilada Soup

Death By Chocolate Zucchini Bread

More

Footer

everylittlecrumb

Farah Abu Maizar | Food Lover
Very excited that restaurants are opening back up Very excited that restaurants are opening back up for dine in in Saudi! To celebrate, here’s a photo of gorgeous cronuts and pastries from @savorbakery . The blueberry cronut is insanely sweet, a little too much so, but also flaky golden brown and buttery, so that qualifies as a win in my book. Anywhere you’ve been waiting to go to and actually sit in or have you even functioning just fine with delivery? I definitely missed the whole restaurant vibe! 
.
.
.
.
.
#cronut #cronuts #donuts #pastries #zaatar #croissants #coffeeshopsoftheworld #foodfluffer #blueberrycake #carbs #carblife #breadporn #cafe #coffeeshopvibes #breakfast #morningslikethis #morningcoffee #nutella #nutellalovers #tasty #tastingtable #foodphotography #foodstylist #foodphotos
Good morning! If there’s one thing we like doing Good morning! If there’s one thing we like doing, it’s experimenting with breakfast dishes 🍳.These beauties are froached eggs- poached eggs that are lightly fried and seasoned with breadcrumbs. Best of both worlds! Creamy poached eggs, runny yolk but a little crisp on the white part of the eggs. So good! Inspired by @sveverything , we used our sous vide machine for this but you can do this with regular poached eggs. Recipe can be found linked in bio or at https://everylittlecrumb.com/froached-eggs/ . Team runny yolk anyone? 
.
.
.
.
.
#eggs #poachedeggs #poachedegg #eggsontoast #beautifulcuisines #tasty #delish #foodphotography #foodstyling #foodstylingandphotography #cheeseontoast #foodblogger #foodie #breakfast #brunch #instayum #yum #brunch #tastingtable #f52community #food52 #yolkporn #friday
How I spend a lot of my weekends😂. Nothing like How I spend a lot of my weekends😂. Nothing like a big bowl of cookie dough to say weekend mode on! Are you like me and end up eating more dough than actual cookies? My foolproof recipe I use and post time and time again 👇🏼(and often double the batch so I can store some in the freezer!)

Ingredients:
1 stick butter, softened 113 g
3/4 cup tightly packed brown sugar (I like using 1/2 cup light brown and 1/4 cup dark brown, but you can use either or) 150 g total
1/4 cup white sugar 50 g
1 egg, room temperature
1 tsp vanilla extract
1 3/4 cup all purpose flour 220 g
3/4 tsp baking soda
1/4 tsp salt
1 cup semi-sweet chocolate chips or chunks
flaky salt for topping, optional

Instructions:
-In the bowl of a stand mixer fitted with a paddle attachment, or a handheld mixer, cream together butter, brown sugar, and white sugar for 5 minutes on medium speed until light and fluffy.
-Once five minutes is over, add in egg and vanilla and mix until combined.
In a separate bowl, mix flour, baking soda, and salt, and mix until combined. Add these dry ingredients to the butter mixture on low speed, and mix until just combined.
-Using a wooden spoon or spatula, mix in chocolate chips or chunks until just combined. Place bowl of dough in fridge for at least 30 minutes to chill.
-While dough is chilling, heat oven to 180 C (350F). Portion dough out into heaped 1 tbsp-2 tbsp sized dough pieces on parchment paper lined baking sheets. 
-Bake for 11-12 minutes or until golden brown on the edges but still soft in the center. Cool until cookies firm up, then enjoy, still warm.
.
.
.
.
.

#chocolatecake #cookiemonster #cakestagram #cakephotos #layercake #chocolate #weekendbaking #foodblog #instayum #yummy #bakery #foodporn #foodtographyschool #foodphotography #chocolatechips #delish #foodfluffer #damnthatsdelish #cookiedough #chocatechipcookies #bakes #bakestagram #doughbowl #chocolatechips #hersheys
Bbq salmon bowls with mango avocado salsa- unbelie Bbq salmon bowls with mango avocado salsa- unbelievable! And start to finish, you can be eating these in 15-20 minutes. Save this recipe for your next meal, you don’t want to miss out!

I’ve partnered with @kilosamak to produce a few recipes with their quality seafood- I’ve tried several of their items and genuinely loved them all! They deliver seafood straight to your door for you to enjoy and cook at home. Takes all the guesswork out of trying to choose and clean fish yourself, perfect solution for someone like me who loves seafood but isn’t so great at prepping it! Check out their Instagram page on how to order, or head to the link in my bio.

This salmon has a smoky slightly sweet rub, is baked in the oven for ultimate ease, and gets piled on to rice and topped with an easy, addictive, zingy mango and avocado salsa. Adapted from @pinchofyum , I’ll make this again and again!

Ingredients:
For the salmon:
2 fillets, about 250 g each 
Spice Rub:
2 tbsp brown sugar
1.5 tsp paprika 
1 tsp garlic powder
1 tsp onion powder, optional 
1/2 tsp chili powder
1/2 tsp salt 
2 tbsp olive oil 

Mango avocado salsa:
1 diced mangos 
1 diced avocado
1/4 cup finely diced coriander 
1/4 cup finely diced red onion 
1 inch spicy green chili pepper, finely chopped
1 tsp honey
Juice and zest of one lime
Salt to taste

Method:
- Make the salsa by mixing together all the salsa ingredients and placing bowl in fridge while you make the salmon.
- Heat oven to 240C, and line a baking sheet with parchment paper. 
-Mix together all the ingredients for the salmon rub, and rub thoroughly all over the salmon, both sides.
- Bake for 10-12 minutes until salmon is opaque and cooked all the way through.
-Assemble bowls with rice, flaked pieces of salmon,and plenty of mango avocado salsa. Enjoy 😍

Catch the steps in my story!
Have you tried this pasta yet? Save this for your Have you tried this pasta yet? Save this for your next weeknight meal! Saucy macarona iltaybeen, can’t get much more comforting.  Adapted from @jedir3waish , makes for an easy delicious main that’ll make your family including kids very happy! Can find a step by step linked bio, or at https://everylittlecrumb.com/macarona/ , or in my story!

INGREDIENTS:
 
2 tbsp olive oil, divided
big pinch of salt
3 heaped tbsp tomato paste, divided 2 oz or 70 g
1 pack elbow macaroni 14 oz or 400 g
1 onion, very finely diced
1 zucchini, finely diced
1 carrot, finely diced
4-5 garlic cloves, minced
250 g ground beef
1 tsp seven spices
1 tsp turmeric
1/2 tsp paprika powder
1/4 tsp basil
1/4 tsp cinnamon powder
1/4 tsp garlic powder
1/2 tsp black pepper
1 tsp salt
1 can crushed tomatoes 14.5oz (400g)

NSTRUCTIONS
 
Bring a large pot of water to boil, add 1 tbsp olive oil and the salt, one tbsp of tomato paste, then the pack of pasta. Cook until al dente, then drain the pasta, reserving the pasta water. Set cooked pasta aside.

In a large skillet, heat the remaining tbsp of olive oil. Once hot, add the diced onion, and cook for 4-5 minutes until softened. Add the diced zucchini and carrots, and garlic and cook for a further 4-5 minutes until softened slightly.

Add the ground beef, and cook, smushing with a wooden spoon to break up the meat. Keep cooking until the beef is browned and cooked through, then optionally, drain the fat.
Add in the salt, pepper, and all the spices. Cook for another minute or so. Add the remaining 2 tbsp of tomato paste, and stir.

Add the can of crushed tomatoes and stir to combine. Bring to a simmer, then add a big ladleful of the reserved pasta water and simmer for 2-3 minutes on low heat.

Add the pasta to the sauce (I don't always add all the pasta, maybe 3/4 of the cooked amount until the finished dish is as saucy as I like). Stir to coat, cook for another minute or so until the pasta is warmed through, then enjoy!
This gorgeous tiramisu was so kindly sent to me by This gorgeous tiramisu was so kindly sent to me by @cadysweets.sa on my birthday, and we enjoyed every light fluffy bite of it. Their old account got hacked so follow along and support their new account ! They have a bunch of cakes and sweets for every occasion, so make someone or yourself happy and order one for a treat🤩! Send this to the tiramisu lover in your life 🍰.
.
.
.
.
.

#chocolatecake #magnoliabakery #cakestagram #cakephotos #layercake #chocolate #ganache #foodblog #instayum #yummy #bakery #foodporn #foodtographyschool #foodphotography #slice #delish #foodfluffer #damnthatsdelish #tiramisu #birthdaytreat #dessertbae #dessertoftheday #scoop #foodstyling #foodstylingandphotography
Easiest at home crusty bread with a great open cru Easiest at home crusty bread with a great open crumb texture. It’s the no knead bread from @breadin5 and has yet to fail me. Check my story for the step by step, and swipe for a video reveal.

Ingredients for two small loaves:
1.5 cups lukewarm water 
1/2 tbsp any type of yeast
1/2 tbsp salt
3 1/4 cup plain flour (450g)

Method:
In a large bowl, stir together the water with the yeast and salt. Try to dissolve but it’s fine if you have clumps.
2. Add flour all at once and stir, just until no flour patches remain.
3. Cover loosely with a kitchen cloth and leave it to rest for 2 hours in a warm place until risen and bubbly.
After this rest you can:
- Use dough immediately if impatient, but it’s easier to work with if cold, so maybe pop in fridge briefly
- Or, their recommended method and the one I do, leave in the fridge loosely covered for 12 hours or overnight. 
Refrigerated dough lasts up to two weeks, and flavor depends over time!
4. The next day, the dough might look deflated. That’s fine! When ready to bake, divide dough in half (I got two 400g dough balls)- it might be easier to handle if you sprinkle the dough lightly with flour, and take the half you are going to bake out of the fridge. Let it rest on a parchment paper lined baking sheet 40-90 minutes. The longer the more interior bubbles you should have. Preheat oven to 235C (450F), and after rest, make a few deep slashes in the dough with a sharp knife.
5. Place in the middle rack of the oven, and on the bottom rack place a roasting pan that had about a cup of hot water in it. This will create steam which gives a crustier crust!
6. Bake for 30-35 minutes or until deep golden brown.
7. Let it cool completely before enjoying!
.
.

.
.
.

#damnthatsdelish #foodfluffer #thebakefeed #feedfeed #tastingtable #forthemaking #BHGfood #foodblogfeed #bakedfromscratch #bakinglove #f52grams #foodbloggerpro #bakersofinstagram #TOHfoodie #foodphotography #canonphotos #bread #instayummy #kitchn #huffposttaste #food #dough #foodie #nokneadbread #homemadebread #doughter
Good morning! With dine in still closed in Saudi, Good morning! With dine in still closed in Saudi, Friday pancakes are fast becoming a tradition. And honestly, I don’t think I’ve had better pancakes at any restaurant recently! The easiest, fluffiest diner style pancakes are a huge hit in our family, find the recipe below adapted from @allrecipes . I like to barely warm the oven (110C or so) and keep the finished pancakes in a pan in the oven until I’m done with all the batter so they stay warm and perfect 👌🏼.

Ingredients
3/4 cup milk 170g
1 tbsp white vinegar
1 cup flour 125g
2 tbsp sugar 25g
1 tsp baking powder
1/2 tsp baking soda
1/4 tsp salt
1 egg room temperature
1/2 tsp vanilla
2 tbsp butter, melted 28g

Instructions:
-In a large bowl, combine the milk and vinegar, and let aside to stand for 5 minutes until curdled. Whisk to combine.
-In a separate large bowl, mix together the flour, sugar, baking powder, baking soda and salt.
-Add an egg, the vanilla and the melted butter to the buttermilk and whisk to combine.
-Add the dry ingredients all at once to the wet, and whisk until flour patches disappear. A few lumps are fine, but don't over mix.
-Let the batter rest for 5-10 minutes while you heat a pan on the stove.
lightly grease the pan with nonstick spray or butter, and pour about 1/4 cup of batter on the pan. Cook for 2-3 minutes on each side or until golden brown. (Flip the first time once you see bubbles form and the edges of the pancake dry up).
-Enjoy with toppings of your choice!
.
.
.
.
.
#pancakes #pancakerecipe #blueberrypancakes #maplesyrup #breakfast #morningslikethese #fridaymorning #flatlay #foodfluffer #breakfastrecipes #breakfastfood #breakfastofchampions #pancakelover #food #foodtography #foodtographyschool #foodphotography #delish #foodphotos #weekendbreakfast #eatingathome #recipeoftheday #foodporn #foodflatlay #blueberries #trayoftheday
Load More... Follow on Instagram

Copyright © 2019 on the Seasoned Pro Theme