• Skip to primary navigation
  • Skip to main content
  • Skip to primary sidebar
  • Skip to footer

 logo

  • Recipes
    • Breakfast
    • Sides
    • Soup
    • Main Meals
    • Healthy
    • Dessert
    • Drinks
  • Eating Out
  • About Me
    • Privacy Policy
  • Resources
    • Must Have Kitchen Tools
  • Nav Social Menu

    • Email
    • Facebook
    • Instagram
    • Pinterest

Malfouf

Dec 14, 2020 · Leave a Comment

Jump to Recipe
stuffed cooked malfouf cabbage in a gray dish

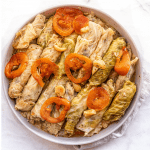
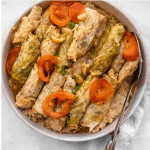
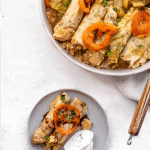
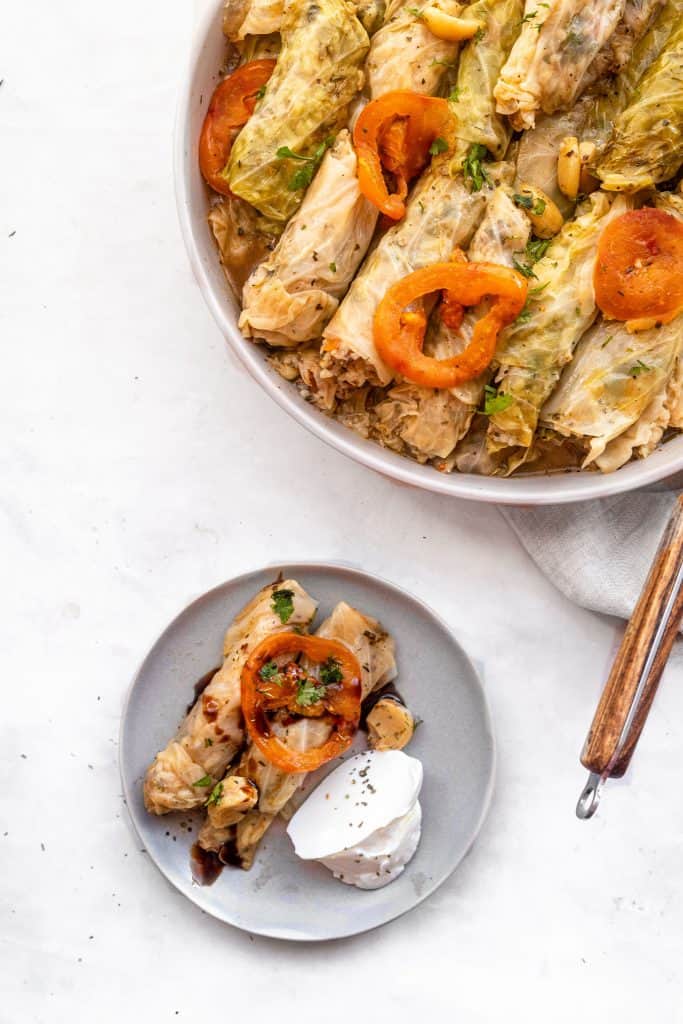
Malfouf is a classic Middle Eastern dish, also known as malfoof, or stuffed cabbage rolls. The cabbage leaves are stuffed with a spiced rice, and cooked in a tangy lemony broth. Cabbage has never been this exciting!

What is malfouf? (malfoof)

Malfouf literally translates to rolled in the Arabic language. We specifically refer to this dish of rice stuffed cabbage as malfouf. Cabbage is boiled until tender enough to roll, and stuffed with a meat and rice mixture.

It’s such a comfort dish, and made with plenty of garlic and lemon that really amp up what can be a very bland flavor of cabbage. I have a few little tricks in this recipe to make it even more delicious and punchy!

stuffed cooked malfouf in gray dish with kitchen towel under

Why should I make these stuffed cabbage rolls?

They are healthy and filling. The cabbage is full of fiber, and keeps you full for hours!

They are adaptable. You can add more or less of any herbs/spices you like. You can swap the ground beef out for lamb, or omit the meat entirely. Add more tomato paste for a more tomato-y flavor, leave out the pomegranate molasses, do whatever you like for taste preference.

They are delicious! The herbs and spices and olive oil and tomato paste really give lots of flavor to the dish, and the cabbage softens and soaks up the acidity of the lemon juice.

Where does malfouf originate?

Many would think of malfoof as Lebanese stuffed cabbage rolls, but actually the dish is common across the Levant. It’s a staple in Palestinian, Lebanese and Syrian households, and commonly consumed across the Middle East.

What ingredients do you need for malfouf?

ingredients needed to make malfouf

For the filling:

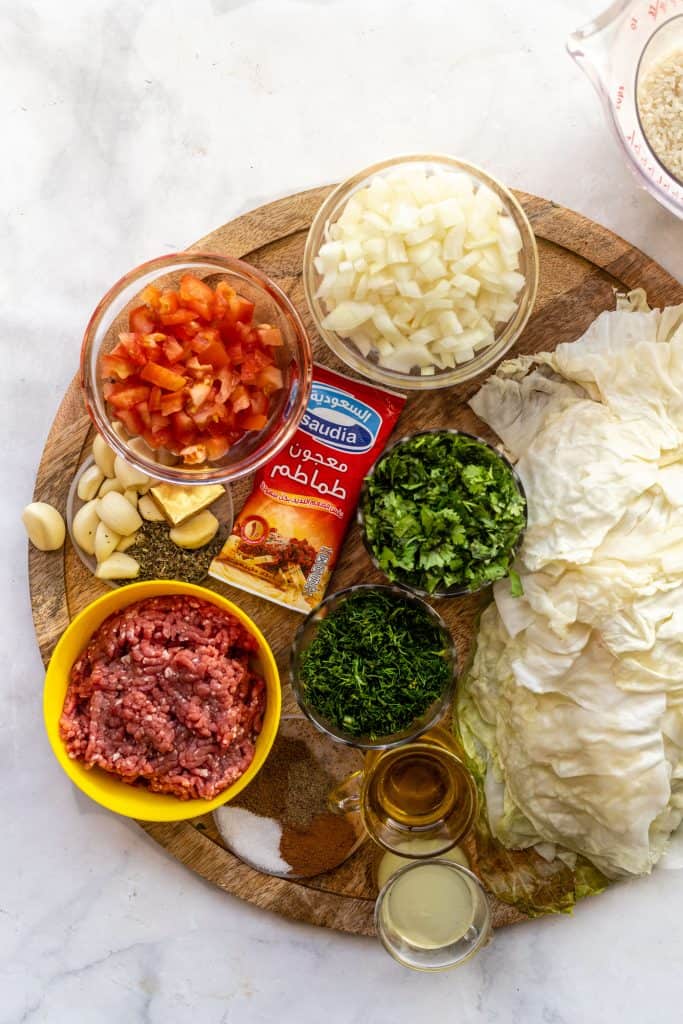
Calrose rice, like Egyptian rice.

Meat: We tend to favor ground beef, but you can definitely use ground lamb instead. It’s only a small amount of meat. the filling is definitely more rice than meat.

Spices: The main one is cumin. Cumin is known in Middle Eastern culture to help aid digestion, helpful in gas forming foods like cabbage. The flavor goes perfectly with the cabbage! I also added a dash of paprika, cinnamon, and seven spices (mixed spice or all spice) for flavor, as well as salt and pepper.

Olive Oil: A drizzle of good quality olive oil to help bind together the filling.

Herbs: I think fresh herbs really add to the flavor of the filling. This isn’t a must, but a handful of chopped parsley, and/or dill like I added really keep this dish from being bland.

Veggies: A diced onion, tomato, and a few cloves of garlic for flavor. I’d recommend dicing very finely, or even grating, so that the chunks aren’t too obvious when biting into the cabbage roll.

filling for malfouf in a bowl

For the assembly:

Cabbage for the cabbage part obviously. I’d go for a big leafy white cabbage.

Garlic Cloves: Whole garlic cloves are a very important part of malfouf. You scatter them among the stuffed cabbage rolls as they cook, and the garlic softens and becomes sweet and tender. It’s my favorite part of the whole dish!

You can use peeled garlic cloves, or garlic cloves still in the peel. Traditionally, you’d probably keep them unpeeled, and squeeze them out while eating, but I prefer having them ready to eat.

Broth ingredients: a stock cube, hot water, dried mint, tomato paste, and lemon juice. This is what gets poured onto the stuffed cabbage rolls in the pot and what the cabbage is cooked in.

For topping:

This is optional, but I love topping with a drizzle of olive oil and pomegranate molasses before cooking. After cooking, it’s very traditional to squeeze even more lemon juice onto the cabbage rolls. Delicious!

How to assemble and cook stuffed cabbage rolls:

assembled cabbage rolls in pot with broth in a measuring cup on the side

First step is getting the cabbage leaves soft enough to even roll.

How to blanch cabbage leaves:

Chop off the bottom stalk of the cabbage, so that the leaves can separate, then drop them in a large pot of hot water. Bring to a simmer, and simmer 30 minutes or so until the leaves are pliable enough to roll. Don’t overcook, because they will cook fully once stuffed.

Make the filling:

This is the easiest part! All you need to do is mix together all the filling ingredients in a large bowl. I like using gloved hands to really get in there and work the mixture so that it’s smooth and combine and the ground meat is evenly distributed throughout.

Some recipes pre-cook the meat before adding it to the filling, but I find that to be too time consuming, messy, and unnecessary. The meat definitely has time to cook through on the stove top inside the cabbage leaves.

Get the pot ready:

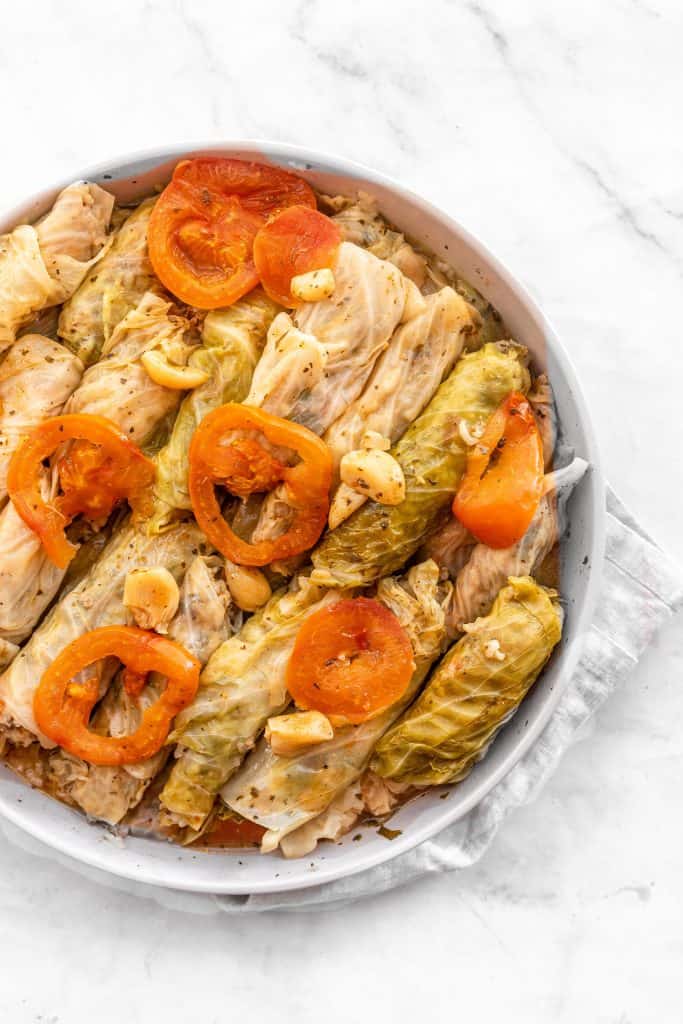
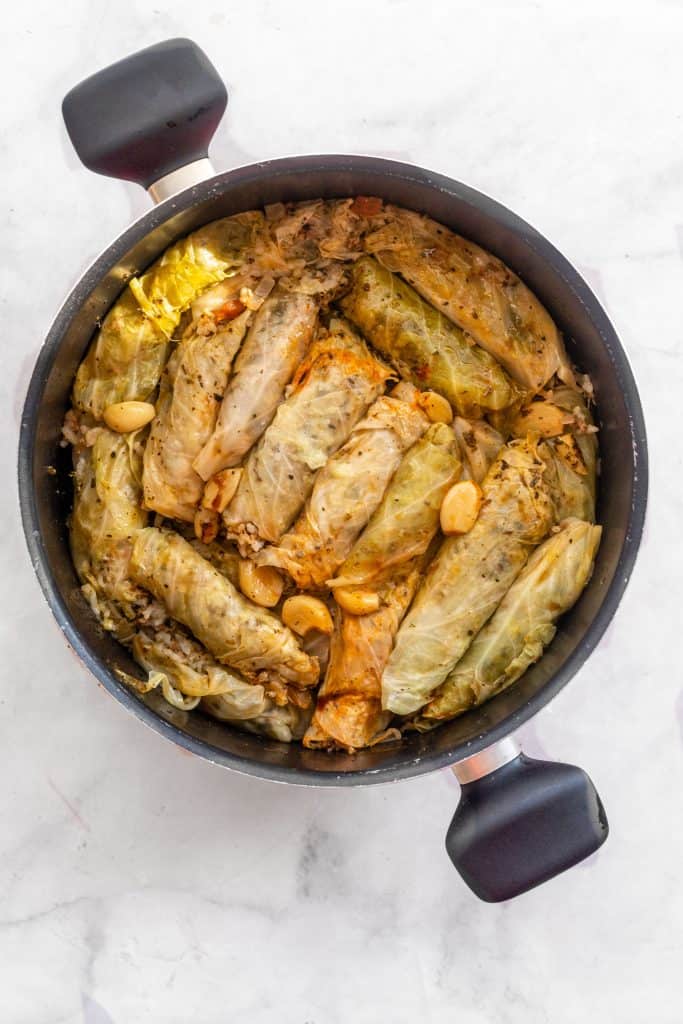
Any blanched cabbage leaves that are too small, torn, or oddly shaped to roll with can line the bottom of the pan (this keeps the rolled stuffed cabbage from sticking). I also like to add slices of tomatoes to the top of this cabbage lining to cook through and add some pretty color and great flavor to the dish.

Stuff the cabbage leaves:

Lay each cabbage leaf out flat, then take a good 2 tbsp of filling and place it in a sort of line down the center. Roll the cabbage leaf up, the long way, until a little cabbage wrap has formed. You don’t need to tuck the ends in like you would with stuffed vine leaves. Squeeze the rolled cabbage tightly to hold it’s shape, and place in the pan. I pile them as neatly as I can in a sort of concentric shape into the pan, but don’t stress the arrangement so much. Be gentle with them so they don’t tear.

Make the broth:

Mix together hot water, tomato paste, a stock cube, dried mint, lemon juice, and you can even add the whole garlic cloves to this liquid mix.

Pour the broth on top of the stuffed cabbage rolls in the pot. The liquid should fill the pot in a way that most of the cabbage leaves submerged. The top layer of cabbage leaves may not be fully under water. You can see the video under the nutritional facts for reference.

Cook the malfouf:

Drizzle a little extra olive oil, and optionally some pomegranate molasses on top of the stuffed cabbage. Cover with a small plate, to hold the rolls in place as they boil, and allow mixture to come to a boil.

Once it boils, reduce the heat to low, cover, and simmer for a good 1.5-2 hours, until cabbage is tender and rice is cooked through.

Let the dish stand for 10-15 minutes. If there’s too much water, you can drain a little water out of the side of the pot, then flip onto a serving plate. Squeeze extra lemon juice on top before eating, and enjoy warm!

cooked malfouf in a large pot

What to serve malfouf with:

I like having this with yogurt. You can also do a cucumber mint salad, like the one in this post.

Serve with a simple green salad, and maybe some pita bread to sop up the juices.

Storing extra malfouf:

Leftover malfouf tastes great, cold or reheated! It’ll last 3-4 days tightly covered in the fridge.

To freeze cooked cabbage rolls, place them first single layer on a baking sheet for 30-45 minutes until cold, so that they won’t stick together in a freezer bag. Then, place in a freezer bag tightly sealed for up to 4 months. Thaw overnight in the fridge, and reheat stove top, microwave, or in the oven.

plate of malfouf with yogurt with serving dish in background

For more Middle Eastern stuffed vegetables, try:

Warak Enab- Stuffed Grape Leaves

Middle Eastern Stuffed Zucchini

and for more Middle Eastern Classics, try:

Middle Eastern Yogurt Sauce

Mujaddarah

Bamia- Okra Stew

Bazella- Pea and Meat Stew

Mulukhiyah

Malfouf

Middle Eastern stuffed cabbage rolls, malfouf or malfoof is a hearty and delicious dish, and a classic in Middle Eastern cuisine.
Print Pin
Rate
Course: Main Course
Cuisine: Middle Eastern
Keyword: cabbage
Prep Time: 20 minutes
Cook Time: 1 hour 1 minute
Servings: 6 people
Calories: 398kcal
Author: Farah Abumaizar

Ingredients

For assembling:

  • 1 head cabbage, bottom removed so that leaves come apart
  • 2 sliced tomatoes
  • 4 cups hot water
  • 2 tbsp tomato paste
  • 1 tbsp dried mint
  • 1 chicken bouillon cube
  • 1 lemon squeezed, juice of
  • 1 head of garlic, peeled
  • drizzle olive oil
  • drizzle pomegranate molasses, optional

For the stuffing:

  • 1.5 cups Egyptian or short grain rice, rinsed and drained
  • 2 tsp cumin powder
  • 1 lemon squeezed, juice of
  • 1 tomato, finely diced
  • 1 onion, finely diced
  • 1 tsp seven spices
  • 1 tsp salt
  • 1/2 tsp black pepper
  • 1/2 tsp cinnamon powder
  • 1/2 tsp paprika
  • 1/4 cup chopped parsley
  • 1/4 cup chopped dill (optional)
  • 3 garlic cloves, minced
  • 0.5 lbs ground beef 250 g
  • 2 tbsp olive oil

Instructions

To prepare the cabbage:

  • Place the cabbage leaves in a large pot of hot water. Simmer slowly for 30 minutes or so, until the leaves have softened enough that you'll be able to roll them easily. Drain, and set cabbage leaves aside. While this is happening, you can prepare your stuffing mixture.

To prepare the stuffing:

  • In a large bowl, mix together all the stuffing ingredients thoroughly until well combined and mixture is cohesive. You might find it easier to use your hands to work the meat through the mixture. Set aside.

To assemble and cook:

  • Choose a few cabbage leaves that are too stiff, torn, or too small too roll and use them to line the bottom of a large pan. Place the sliced tomatoes evenly on top of this cabbage leaf lining. The tomatoes will soften as they cook and are a delicious addition!
  • Lay flat all the remaining cabbage leaves. Scoop out about 2 tablespoons of rice filling into the center of each cabbage leaf, and roll the cabbage leaf up. You don't need to tuck in the ends, just roll up to conceal the rice, squeeze to tighten, then place seam side down into the lined pot. Repeat with all remaining cabbage leaves and filling.
  • In a separate bowl, mix together the hot water, the bouillon cube, the tomato paste, the dried mint, the lemon juice, and the whole garlic cloves. Pour this mixture over the stuffed cabbage leaves in the pot. The cabbage leaves should be nearly submerged in water, with the top layer maybe not fully underwater.
  • Drizzle the top of the pot with olive oil and pomegranate molasses, and place a small plate on top of the stuffed cabbage leaves to hold them in place while the water around them boils. Cover the pot with the lid.
  • Bring the water to a boil, then reduce heat to a low simmer. Simmer for 1.5-2 hours, or until cabbage leaves are tender enough to be cut with a fork, and rice is cooked through. Serve warm and enjoy!

Notes

For substitutions and storage instructions, see post above.
Tried this recipe?Mention @everylittlecrumb or tag #everylittlecrumb!

Nutrition

Calories: 398kcal
 

Malfouf by everylittlecrumb on Jumprope.

Did you make this? Tag @everylittlecrumb or hashtag #everylittlecrumb and I’ll share your images!

Healthy, Main Meals, Recipes

Previous Post: « Macarona
Next Post: Pumpkin Bread with Streusel Topping »

Reader Interactions

Leave a Reply Cancel reply

Your email address will not be published. Required fields are marked *

Recipe Rating


Primary Sidebar

Get more stuff

Subscribe to our mailing list and get interesting stuff and updates to your email inbox.

Thank you for subscribing.

Something went wrong.

we respect your privacy and take protecting it seriously

FeedFeed

Featured Recipes

Tamriyeh

Nescafe Cake

Berries and Cream Sara Lee Cake

Kebab Karaz

Eggplant Fatteh

More

Footer

everylittlecrumb

Farah Abu Maizar | Food Lover
Another recipe from @tamimimarkets ‘s catalogue, Another recipe from @tamimimarkets ‘s catalogue, this easy berry trifle has such a Ramadan vibe, this easy berry uses all the ingredients I associate with quick and easy no-bake Ramadan desserts. Thick cream ✅ Dream whip ✅ Condensed milk ✅ . All the things you need for creamy, light goodness. Layer this with buttery Sara Lee pound cake and lots of fresh berries and this will be a dessert you won’t to be able to stop eating😍 Send this to a someone who’d appreciate a quick and easy dessert and look out for the IGTV coming today!

Ingredients
2 containers thick cream  250 g each
1 sachet dream whip powder  28 g
1 sachet creme caramel, powder only (not syrup)  50 g
1/2 cup heavy whipping cream 120 ml
3 tbsp milk
Sweetened condensed milk 200 g, 1/2 large can
For assembling:
1 pack strawberries, halved 227 g,
1 pack raspberries 170 g
1 pack blueberries 170 g
1 pack blackberries 170 g
1 Sara Lee vanilla pound cake, thawed 300 g)

Instructions
-In an electric mixer, add the thick cream, dream whip, creme caramel, whipping cream, and condensed milk. -Beat until thick and fluffy, with soft peaks, about 3 minutes or so.
-Gently rinse the berries and pat dry, and cut the pound cake into large cubes.
-Cut the pound cake into cubes, and layer a trifle dish like so: 1 layer of pound cake cubes, half the cream, 1/2 the cream, and half the berries (a mix of all the berries). 
-Repeat with the second half of pound cake cubes, the second half of the cream and top with the remaining berries. Add whole strawberries and mint leaves to garnish, optional.
-Let the trifle set for a few hours or overnight before enjoying!
.
.
.
.
.
#berries #trifle #triflecake #poundcake #saralee #layercake #creamy #nobake #nobakedessert  #aprilisforarabfood #f52grams #foodfluffer #foodflatlay #foodphotography #foodphotographer #foodstylist #thefeedfeed #ramadan #ramadanrecipes #ramadan2021 #strawberry #strawberrycake #dessert #cakestagram #dessertpic #dessertphotography
You have to know, if I post a chicken recipe it me You have to know, if I post a chicken recipe it means it’s reaaaaaally good. This copy cat Halal guys chicken and rice is unbelievable dish! I got the turmeric rice recipe from @seriouseats and its buttery and perfectly spiced and fluffy and addictive, topped with juicy grilled spiced chicken cubes and a tangy, creamy dressing, tomatoes and parsley. AMAZING! Recipe below and in the @tamimimarkets catalogue❤️.

INGREDIENTS:

For the chicken marinade:
900 g chicken breasts
1/4 cup olive oil
2 tbsp lemon juice
1 tbsp white vinegar
3 garlic cloves, minced
1 tsp salt
1/2 tsp black pepper
1 tsp oregano powder
1 tsp seven spices
1/2 tsp ginger powder
1/2 tsp cumin powder
1/2 tsp paprika powder

For the white sauce:
3/4 cup Greek yogurt 170g (6oz)
1/2 cup mayonnaise 115 g
1 tbsp white vinegar
1 tbsp water
1 tsp lemon juice
1-2 tsp sugar
1/2 tsp salt
1/4 tsp black pepper

For the rice:
2 tbsp unsalted butter
1/2 tsp turmeric powder
1/4 tsp cumin powder
1 1/2 cups basmati rice, soaked for 20 minutes then rinsed
2 1/2 cups chicken stock or 1 stock cube dissolved in 2.5 cups hot water
salt and pepper to taste, a pinch of each

To assemble:
1 chopped tomato
handful chopped parsley
sriracha sauce

INSTRUCTIONS: 
For the chicken:
In a bowl, mix all the ingredients for chicken marinade. Add chicken breast and toss to coat evenly. Cover and marinade for 1-2 hours.

Heat 1 tbsp oil in a large skillet on medium high heat, and cook chicken for 5-6 min each side, or until golden brown and cooked.
Remove chicken to a cutting board, and rest for 10 minutes, before chopping roughly into 2 inch cubes.

For the white sauce:
Mix all ingredients and store in the fridge until ready to serve.

For the rice:
Add butter to a large saucepan over medium heat. Once melted, add the turmeric and cumin, and stir for 1 minutes.
Add the rice, and toast the rice by stirring for 4 minutes. Add chicken stock, salt and pepper to season. Stir and bring to a boil, then reduce heat to a simmer, cover and cook for 15 min, then set aside 15 min and fluff with a fork.

To assemble:
Place the rice in your serving platter, top with the chicken, the white sauce, and chopped tomatoes and parsley. Sriracha too!
This is my go to baked creamy cheesecake. It’s s This is my go to baked creamy cheesecake. It’s so good and rich and easy, topped with a sweet and tangy simple strawberry sauce (sauce recipe from @sallysbakeblog ). I used my new @kenwood_bahrain stand mixer and it was excellent- gave me silky smooth lump free filling. Another winner for my @digitrolley collab- all my new appliances are from them❤️ Check IGTV for recipe video!

For the strawberry topping:
-1 tbsp cornstarch
-3 tbsp water
-450 g strawberries, halved (big pack)
-zest and juice from 1/2 small lemon 
-1/4 cup (50g) sugar

-Whisk together cornstarch and water, then add to a saucepan along with all other ingredients, over medium heat.
-Bring to a simmer, stirring constantly and breaking up strawberries as they cook, 5 minutes or so until thickened. Set aside to cool, can be stored in fridge up to one week.

For the cheesecake:

Ingredients
For the crust:
* 250 g crushed digestive biscuits 2 cups 
* 135 g melted butter 1 stick and 1 tablespoon
* 1/2 tsp cinnamon

For the cheesecake:
* 900 g cream cheese (3 3/4 cup)
* 1 1/2 cup white sugar 300 g
* 3/4 cup milk, room temp
* 4 eggs, room temp
* 1 cup sour cream 240 g
* 1 tbsp vanilla extract
* 1/4 cup all purpose flour 32g

Instructions:

For the crust:
* In a mixing bowl, combine crushed biscuits, the melted butter, and the cinnamon with a fork until crumbs are moistened evenly throughout. Press along the bottom and sides of a lightly greased 9 inch springform pan. Let the crust chill a little in the fridge while you prepare cheesecake.

For the cheesecake:
-Preheat the oven to 180 C
-In  stand mixer, combine the cream cheese with the sugar in a large bowl and mix on medium speed until well combined and fluffy. Blend in the milk, then add the eggs one at a time, mixing briefly after each addition.

-Mix in sour cream, vanilla and flour until smooth. It may be easier to sift in the flour.

-Pour filling into prepared crust. Bake at 180 C for 1 hour, then turn off the oven and leave cheesecake inside for another 5 hours or so until oven has completely cooled. This is to prevent cracking.

* Store cheesecake in fridge after this time period is over until chilled, then top with the strawberry topping.
This, to me, is the sambosa that best embodies Bah This, to me, is the sambosa that best embodies Bahrain- the first- actually the only-place I have these cheesy corn sambosa ❤️. No fancy cheese goes in this, it’s literally the stuff out of a can and take SO melty and cheesy and good. I mix in a little mashed potatoes and it just makes these 💯 times better, creamy and delicious. Posting the full steps on IGTV, it’s so easy you prob won’t need them! Recipe below and tell me- what’s your go to sambosa cheese?

Ingredients
2 small potatoes, peeled and cut into cubes 8 oz total, 235 g
1/2 cup corn kernels, from a can, drained
12 oz American cheese, like Velveeta or Kraft, grated 340 g (2 170g cans of Kraft processed cheese)
pinch salt
pinch black pepper
1/2 pack samosa wrappers each pack is 500 g

Instructions:
-Cover potato cubes with water, and bring to a boil. Reduce heat and simmer until potatoes are completely cooked through. Drain, and mash.

-Let potatoes cool slightly then combine mashed potatoes with the grated cheese, drained corn, salt and pepper. Mix well until the mixture is evenly combined. Taste for and adjust seasoning.

-Fill each samosa wrapper with a tbsp of mixture on the bottom corner, then fold the corner of the samosa up and over the filling to the other side, to make a triangle. Keep folding this triangle over all the way up the top (check the video at the bottom of this recipe card to see how). Mix together the flour and water to form a thick paste, and seal the ends of the samosa to prevent them from opening up while frying.

-Place vegetable oil in a skillet, about 2 inches deep and heat on medium high heat. Once hot enough, add the sambosa and fry for around 2 minutes a side until golden brown. Remove to a paper towel lined plate to absorb some of the excess oil, then enjoy warm.

.
.
.
.
.

#harira #soup #ramadanrecipes #ramadan2021 #ramadan #ramadankareem #vegetablesoup #soupseason #soupsofinstagram #delishkitchen #friedfood #aprilisforarabfood #f52grams #foodfluffer #foodflatlay #foodphotography #foodphotographer #foodstylist #thefeedfeed #middleeasternfood #vegetarian #tasty #tastingtable #tastemade #samosa #sambosa
This is one of my top 5 recipes from this Ramadan’s recipe prep. One of my features does the @tamimimarkets recipe catalogue! Click the link in their bio to access this gorgeous (free!) catalogue.

This harira soup is unbelievable. Hearty and delicious and beautifully spiced- I’ve never been obsessed with harira soup until this one. It’s a simple one because it’s meat free, so it’s perfect to start your iftar with but also hearty enough to totally serve as a meal alongside some sambosas. Recipe below, and IGTV video coming in a bit!

Ingredients
3 tbsp olive oil
1 large onion, diced
3 celery stalks, diced
2 carrots, diced
1 tsp cinnamon powder
1/2 tsp salt
1/2 tsp black pepper
pinch red chili flakes
1/2 cup chopped parsley
1/2 cup chopped coriander(cilantro)
1 can tomato sauce 15 oz (430g)
7 cups vegetable stock or 2 stock cubes dissolved in 7 cups water
1 can drained chickpeas 15 oz (400 g)
1 cup green lentils
1/2 cup vermicelli noodles 50 g
2 lemons, juiced 1/4 cup juice
2 tbsp flour, dissolved in 1/4 cup water* use cornstarch if gluten free

Instructions:
-Start by adding the lentils to a bowl of water and soaking as you prepare the rest of the ingredients, this helps them cook through faster.
-Heat oil in a large saucepan over medium heat, and add the onions, celery and carrots. Saute for 6-8 minutes, until onions soften and turn golden brown.
-Add all the spices, the chopped parsley and chopped coriander, the tomato sauce, and the vegetable stock. Bring the pot to a boil, then add the drained chickpeas and drained lentils. Reduce heat and simmer for 25 minutes or until chickpeas and lentils are tender.
-Add the vermicelli, and let it boil for 3-4 minutes or until tender. Add the lemon juice, and the flour water mixture. Let it simmer another minute or until it thickens, then taste for seasoning and add salt and pepper if necessary.
.
.
.
.
.
#harira #soup #ramadanrecipes #ramadan2021 #ramadan #ramadankareem #vegetablesoup #soupseason #soupsofinstagram #moroccan #moroccanfood #aprilisforarabfood #f52grams #foodfluffer #foodflatlay #foodphotography #foodphotographer #foodstylist #thefeedfeed #veganrecipes #vegan #tasty #tastingtable #tastemade #lentils
Never ever liked vimto until I had it like this 🍧. Vimto smoothies means that the sweetness of vimto is tempered by that cold crunchy shaved ice. Could not stop eating/drinking these vimto slushees! So easy, you just need water, ice, vimto and a high speed blender- my @ninjakitchenme did so well breaking down huge ice chunks👏🏼. Save this for a little twist on your classic iftar drink🥳

Ingredients:
-3/4 cup water
- 3/4 cup vimto 
- 2 cups ice 

Method:
Add the ingredients to your blender in the order listed, and blend on frozen drink mode until slushy like consistency. Add more ice or water if you need to, and enjoy immediately with a spoon/straw. Yum!
.
.
.
.
.

#ramadan #ramadan2021 #ramadanrecipes #iceddrinks #slush #slushy #slushii #berries #syrup #cordial #drinkphotography #damnthatsdelish #foodfluffer #pour #dripshot #foodphotography #foodphotographyandstyling #foodstylist #foodstyling #thefeedfeed #vimto #foodtographyschool #foodtography #beautifulcuisines
A biscuit base topped with a super easy smooth, cr A biscuit base topped with a super easy smooth, creamy pistachio cheesecake and the crowning touch,  @mayadelices ‘s luscious milk chocolate melted and poured over the top. I mean- heavenly! Recipe below, adapted from @savoryandsweetfood ,, IGTV will be uploaded today. I am absolutely loving @mayadelices couverture, great quality baking chocolate thats so fun experimenting with! They have sugar free and vegan options too, and best of all it’s easily available in their shop in Bahrain 🍫👏🏼

Ingredients:

For the crust:
2 cups digestive biscuit crumbs (250 g)
1/2 cup butter melted, 115g
Pinch cinnamon powder

For the pistachio cheesecake filling:

1 cup pistachio powder (140g)
12 Kiri squares or cream cheese (215g)
250 ml thick cream
1/2 of a 400 g tin of sweetened condensed milk, more if you like it sweeter

To top:
1 cup Maya milk chocolate (160g)
pistachios to garnish

Method:
1. Preheat oven to 180C. Grease and line a 8x8 inch pan with parchment paper with extra paper hanging over the sides so you can easily lift out the bars.

2. Mix digestive crumbs with melted butter and cinnamon. Press this firmly into the base of the pan. Refrigerate for 10 minutes.

3. In a food processor, add the pistachio powder, kiri cheese cubes, thick cream, and condensed milk. Blend until well combined and smooth. Pour this mixture into the crust base and bake for 15-20 minutes until set but center is still a little jiggly. Let cool at room temperature for 1 hour then refrigerate for several hours.

4. Melt the milk chocolate gently in the microwave, in 10 second bursts, stirring after each increment. Once smooth and melted, spread over the top of the cheesecake, and refrigerate until set. Enjoy!
.
.
.
.
.
#ramadan #ramadan2021 #ramadanrecipes #cheesecakebars #cheesecakebites #chocolateporn #pistachio #chocolatelover #chocolaterecipes #cheesecakelovers #cheesecakelove #damnthatsdelish #foodfluffer #pour #chocolatedrip #dripshot #foodphotography #foodphotographyandstyling #foodstylist #foodstyling #thefeedfeed #thebakefeed #foodtographyschool #foodtography #beautifulcuisines
Want a Ramadan dessert that takes minutes to make Want a Ramadan dessert that takes minutes to make and tastes amazing? Yeah we all do - I got you! Try this coffee biscuit cake (barely adapted from the wonderful @littlesunnykitchen). Layers of coffee soaked biscuits and a super easy fluffy cream 👌🏼. I used my new @braun_bahrain handheld electric whisk, one of the attachments in the minipimer set-It whips the cream so fast, much faster than my stand mixer and it’s so convenient to be able to use any bowl to prep the cream in. I’ve partnered with @digitrolley to bring you lots of good recipes with their range of kitchen appliances, so keep following along! Recipe below , and IGTV video coming today in my Ramadan series!

Ingredients
2 tbsp nescafe powder dissolved in 1 cup hot water
1 cup heavy whipping cream 250ml
3 tbsp sweetened condensed milk
splash vanilla extract, optional
1 creme caramel sachet, powder only 49g
1 pack tea biscuits or graham crackers 7 oz or 200 g
2 tbsp cocoa powder for topping

Instructions:
-Add the heavy cream, sweetened condensed milk, vanilla and creme caramel powder to a bowl and beat until soft peaks form. Set this cream mixture aside.
-Dip the tea biscuits into the coffee briefly until they soak up the coffee but before they start to break apart. -Layer in a 7×11 or 9×9 inch clear pyrex dish, then top with half the cream mixture.
-Repeat another layer of coffee soaked biscuits on top of the heavy cream, followed by the remaining half of the cream. Sift the cocoa powder on to the top, then refrigerate for several hours until set. This is even better the next day!

.
.
.
.
.
#nescafe #nescafegold #coffeecake #biscuit #biscuitcake #nobake #nobakedessert #nobakecake #tiramisu #damnthatsdelish #tastingtable #beautifulcuisines #foodphotography #foodphotographyandstyling #tastyfood #easydessert #ramadankareem #ramadan2021 #ramadanrecipes #cream
Load More... Follow on Instagram

Copyright © 2019 on the Seasoned Pro Theme