• Skip to primary navigation
  • Skip to main content
  • Skip to primary sidebar
  • Skip to footer

 logo

  • Recipes
    • Breakfast
    • Sides
    • Soup
    • Main Meals
    • Healthy
    • Dessert
    • Drinks
  • Eating Out
  • About Me
    • Privacy Policy
  • Resources
    • Must Have Kitchen Tools
  • Nav Social Menu

    • Email
    • Facebook
    • Instagram
    • Pinterest

Chicken Kabsa

May 11, 2019 · 6 Comments

Jump to Recipe
Chicken on a bed of spiced kabsa rice with mixed nuts and raisins, with two small bowls of tomato sauce and yogurt on the side.

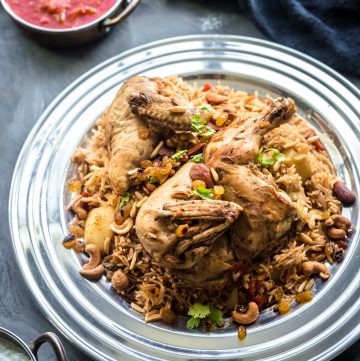
Chicken kabsa is a traditional spiced rice dish originating from Saudi Arabia. Famous for a good reason: rich chicken flavor, fragrant spice, sweetness from shredded carrots and raisins. The chicken is boiled to make it’s own stock, then broiled in the oven till golden brown and crispy. Topped with fried golden nuts, and fresh herbs, it’s a revelation.

Making kabsa intimidated me, as tasty as it is. Gulf-centric dishes are definitely not my area of expertise. It took long enough for me to get the hang of Palestinian dishes. Then, my Saudi friend forwarded me this video. My friend raved about it, so it got the stamp of approval of someone very familiar with kabsa, and the video itself has almost 2 million views. Sold! I adapted quite a few things to suit my own preferences, but this was a great base to start with.

Chicken kabsa- the cooking process:

First, cook onions and ginger in oil until fragrant. Brown the raw chicken in this deliciousness, and add some spices, diced tomatoes, tomato paste, and water to cover the chicken. Boil the chicken until cooked through, then transfer the chicken to the oven to crisp it up. Cook the rice and shredded carrots in the same tomato spiced chicken stock.

The herbs:

Feel free to riff, but this recipe calls for homemade kabsa spice consisting of cardamom, dried black lime(loumi), cinnamon powder and cloves powder. I also added some store bought kabsa spice because I had it sitting around and figured why not. Loumi, or dried preserved lime is used in a lot of Gulf recipes. It’s hard to explain what it is, so if you don’t know check out this link. It gives a strong, citrusy and pungent flavor to your dish. Lots of umami!

The rice:

Rice gets all its flavor from being cooked in the chicken stock sauce, with some shredded carrot that give it some barely detectable sweetness. Soak and rinse the rice well to make sure it cooks perfectly. Mine was a bit mushy, I might have had too much liquid in the first place but we loved it regardless.

The chicken:

Traditionally, kabsa is made with skin on chicken. My husband has a thing with chicken skin, so we did ours with skinless chicken. The butcher removed the skin and quartered the chicken for us, so he did all the hard work. It still comes out great, but it won’t look as brown in the oven. You do have the option of cooking it with or without skin depending on preference. The chicken needs to finish cooking stove top in the water, so by the time you broil it in the oven all it really needs to do is get some color and crisp on it.

The garnish:

Very important. I’m usually pretty flexible with garnishing. I’ll tell you it’s optional or if desired. In this case, toasted nuts are NOT optional. They are absolutely essential for a delicious chicken kabsa. You can however choose what nuts you use. I recommend cashews, peeled whole almonds and pine nuts. Toast them in some hot olive oil until golden brown and crispy, and keep them aside. You’ll also toast some golden raisins until they kind of plump up and turn golden brown. I used to push the raisins on kabsa to the side (yes, I also avoid them in um ali) but now I embrace that little burst of sweetness that comes through when I bite into one. For some color, sprinkle some fresh herbs like coriander on top.

Serve with:

Chicken kabsa is usually served with daqous, which is a Gulf flavored spiced tomato sauce. You can also eat it with yogurt, a yogurt and cucumber salad, or a green salad.

So without further ado, I hope you make and enjoy this kabsa! If you have any kabsa making tips or anything else on your mind please leave a comment below.

Chicken on a bed of spiced kabsa rice with mixed nuts and raisins, with two small bowls of tomato sauce and yogurt on the side.

Chicken Kabsa

A traditional Gulf dish of flavorful spiced rice with golden roasted chicken, garnished with toasted nuts and raisins
5 from 2 votes
Print Pin
Rate
Course: Main Course
Cuisine: Middle Eastern
Keyword: rice, chicken, middle eastern
Prep Time: 20 minutes
Cook Time: 40 minutes
Servings: 6 people
Calories: 700kcal
Author: Farah Abumaizar

Ingredients

For the Chicken:

  • 1/3 cup oil
  • 1-2 potatoes cut into cubes, optional
  • 2 cups onion, diced
  • 1 tbsp fresh grated ginger
  • 1 chicken, quartered
  • 1 tbsp salt
  • 3/4 tsp black pepper
  • 1 tsp orange zest
  • 3/4 tsp cardamom powder
  • 1/2 tsp ground cumin
  • 1/2 tsp ground coriander
  • 1/2 tsp cinnamon
  • 3 whole cloves or 1/4 tsp clove powder
  • 1 piece dried lemon (loumi)
  • 2 tbsp tomato paste
  • 2 cans diced tomatoes, or 2 cups fresh diced tomatoes
  • 1-2 bay leaves
  • A little vegetable oil to coat the chicken

For the Rice:

  • 1 1/2 cup basmati rice soaked in water for 45 min
  • 2 cups shredded carrots

For Topping:

  • 1/2 cup peeled whole almonds
  • 1/4 cup pine nuts
  • 1/4 cup cashew nuts
  • 1/3 cup light brown raisins

Instructions

For the chicken:

  • Preheat oven to 200 C (400F). This is to brown your chicken once it has boiled.
  • Heat the oil over medium high heat in a large saucepan. If using potatoes, add them now and cook for 3-5 minutes, then add the onions and grated ginger. Cook until light golden brown.
  • Add the chicken pieces, and cook till lightly browned. Add the spices (salt, pepper, orange zest, cardamom, cumin, coriander, cinnamon, cloves or clove powder, loumi, and add the tomato paste and diced or canned tomatoes. Let this come to a boil.
  • Once mixture boils, add 1 litre of water until chicken is submerged. Reduce heat to medium, cover and cook chicken for 25 minutes or so until cooked through, then remove just the chicken pieces to a baking pan, coat very lightly with oil and put in the oven. Roast for 20-25 minutes or until browned. You can turn on the ovens broil function for the last few minutes to brown even more. Keep the tomato stock mixture on the stove to make your rice with.

For the rice:

  • Place the soaked and drained rice in the tomato stock mixture, along with the shredded carrots. Bring to a boil, then cover with the lid (you can also place a kitchen towel tightly under the lid to further absorb moisture) and cook over medium low heat for 25 minutes or until rice has fully absorbed the liquid.

For the kabsa garnish:

  • In a medium skillet, add a small amount of oil, then add the almonds and cashews, stirring for a few minutes until starting to turn golden brown. If using pine nuts, add them now because they cook faster. Stir nuts and cook until golden brown, then immediately remove from skillet to a paper towel lined plate to prevent them from burning.
  • Add the golden raisins, and stir, cooking for a few minutes until they brown and inflate a little. Remove from skillet to a paper towel lined plate.

To assemble:

  • Place the rice first onto your serving plate. Put the chicken pieces on top, then scatter the toasted nuts and raisins evenly on top. You can garnish with coriander right before serving. Serve with daqous (spicy tomato sauce) or yogurt or a green salad.

Notes

Recipe loosely adapted from : Saudi Food with Eman
Tried this recipe?Mention @everylittlecrumb or tag #everylittlecrumb!

Nutrition

Calories: 700kcal

Main Meals, Recipes arabic, middle eastern, rice

Previous Post: « Bamia بامية – Middle Eastern Okra and Meat Stew
Next Post: Sticky Toffee Cake »

Reader Interactions

Comments

  1. raida says

    May 12, 2019 at 8:59 am

    looks amazing!

    Reply
    • Farah Abumaizar says

      May 12, 2019 at 9:20 am

      Thank you! Try it and tell me how it !

      Reply
  2. Ali says

    May 13, 2019 at 9:56 am

    5 stars
    wow!

    Reply
  3. Mohammad Mulla says

    March 29, 2020 at 12:45 pm

    5 stars
    I loved this dish

    Reply
    • Farah Abumaizar says

      March 29, 2020 at 3:49 pm

      Awww!!!

      Reply

Trackbacks

  1. Over the Hummus – My Nomadic Pulse says:
    April 8, 2020 at 9:10 am

    […] a flavourful taste, not forgetting all the spices and herbs used in it. Here’s a nice simple Chicken Kabsa […]

    Reply

Leave a Reply Cancel reply

Your email address will not be published. Required fields are marked *

Recipe Rating


Primary Sidebar

Get more stuff

Subscribe to our mailing list and get interesting stuff and updates to your email inbox.

Thank you for subscribing.

Something went wrong.

we respect your privacy and take protecting it seriously

FeedFeed

Featured Recipes

Nana tea

Halal Guys Chicken and Rice

Aish El Saraya

Instant Pot Enchilada Soup

Death By Chocolate Zucchini Bread

More

Footer

everylittlecrumb

Farah Abu Maizar | Food Lover
Good morning! If there’s one thing we like doing Good morning! If there’s one thing we like doing, it’s experimenting with breakfast dishes 🍳.These beauties are froached eggs- poached eggs that are lightly fried and seasoned with breadcrumbs. Best of both worlds! Creamy poached eggs, runny yolk but a little crisp on the white part of the eggs. So good! Inspired by @sveverything , we used our sous vide machine for this but you can do this with regular poached eggs. Recipe can be found linked in bio or at https://everylittlecrumb.com/froached-eggs/ . Team runny yolk anyone? 
.
.
.
.
.
#eggs #poachedeggs #poachedegg #eggsontoast #beautifulcuisines #tasty #delish #foodphotography #foodstyling #foodstylingandphotography #cheeseontoast #foodblogger #foodie #breakfast #brunch #instayum #yum #brunch #tastingtable #f52community #food52 #yolkporn #friday
How I spend a lot of my weekends😂. Nothing like How I spend a lot of my weekends😂. Nothing like a big bowl of cookie dough to say weekend mode on! Are you like me and end up eating more dough than actual cookies? My foolproof recipe I use and post time and time again 👇🏼(and often double the batch so I can store some in the freezer!)

Ingredients:
1 stick butter, softened 113 g
3/4 cup tightly packed brown sugar (I like using 1/2 cup light brown and 1/4 cup dark brown, but you can use either or) 150 g total
1/4 cup white sugar 50 g
1 egg, room temperature
1 tsp vanilla extract
1 3/4 cup all purpose flour 220 g
3/4 tsp baking soda
1/4 tsp salt
1 cup semi-sweet chocolate chips or chunks
flaky salt for topping, optional

Instructions:
-In the bowl of a stand mixer fitted with a paddle attachment, or a handheld mixer, cream together butter, brown sugar, and white sugar for 5 minutes on medium speed until light and fluffy.
-Once five minutes is over, add in egg and vanilla and mix until combined.
In a separate bowl, mix flour, baking soda, and salt, and mix until combined. Add these dry ingredients to the butter mixture on low speed, and mix until just combined.
-Using a wooden spoon or spatula, mix in chocolate chips or chunks until just combined. Place bowl of dough in fridge for at least 30 minutes to chill.
-While dough is chilling, heat oven to 180 C (350F). Portion dough out into heaped 1 tbsp-2 tbsp sized dough pieces on parchment paper lined baking sheets. 
-Bake for 11-12 minutes or until golden brown on the edges but still soft in the center. Cool until cookies firm up, then enjoy, still warm.
.
.
.
.
.

#chocolatecake #cookiemonster #cakestagram #cakephotos #layercake #chocolate #weekendbaking #foodblog #instayum #yummy #bakery #foodporn #foodtographyschool #foodphotography #chocolatechips #delish #foodfluffer #damnthatsdelish #cookiedough #chocatechipcookies #bakes #bakestagram #doughbowl #chocolatechips #hersheys
Bbq salmon bowls with mango avocado salsa- unbelie Bbq salmon bowls with mango avocado salsa- unbelievable! And start to finish, you can be eating these in 15-20 minutes. Save this recipe for your next meal, you don’t want to miss out!

I’ve partnered with @kilosamak to produce a few recipes with their quality seafood- I’ve tried several of their items and genuinely loved them all! They deliver seafood straight to your door for you to enjoy and cook at home. Takes all the guesswork out of trying to choose and clean fish yourself, perfect solution for someone like me who loves seafood but isn’t so great at prepping it! Check out their Instagram page on how to order, or head to the link in my bio.

This salmon has a smoky slightly sweet rub, is baked in the oven for ultimate ease, and gets piled on to rice and topped with an easy, addictive, zingy mango and avocado salsa. Adapted from @pinchofyum , I’ll make this again and again!

Ingredients:
For the salmon:
2 fillets, about 250 g each 
Spice Rub:
2 tbsp brown sugar
1.5 tsp paprika 
1 tsp garlic powder
1 tsp onion powder, optional 
1/2 tsp chili powder
1/2 tsp salt 
2 tbsp olive oil 

Mango avocado salsa:
1 diced mangos 
1 diced avocado
1/4 cup finely diced coriander 
1/4 cup finely diced red onion 
1 inch spicy green chili pepper, finely chopped
1 tsp honey
Juice and zest of one lime
Salt to taste

Method:
- Make the salsa by mixing together all the salsa ingredients and placing bowl in fridge while you make the salmon.
- Heat oven to 240C, and line a baking sheet with parchment paper. 
-Mix together all the ingredients for the salmon rub, and rub thoroughly all over the salmon, both sides.
- Bake for 10-12 minutes until salmon is opaque and cooked all the way through.
-Assemble bowls with rice, flaked pieces of salmon,and plenty of mango avocado salsa. Enjoy 😍

Catch the steps in my story!
Have you tried this pasta yet? Save this for your Have you tried this pasta yet? Save this for your next weeknight meal! Saucy macarona iltaybeen, can’t get much more comforting.  Adapted from @jedir3waish , makes for an easy delicious main that’ll make your family including kids very happy! Can find a step by step linked bio, or at https://everylittlecrumb.com/macarona/ , or in my story!

INGREDIENTS:
 
2 tbsp olive oil, divided
big pinch of salt
3 heaped tbsp tomato paste, divided 2 oz or 70 g
1 pack elbow macaroni 14 oz or 400 g
1 onion, very finely diced
1 zucchini, finely diced
1 carrot, finely diced
4-5 garlic cloves, minced
250 g ground beef
1 tsp seven spices
1 tsp turmeric
1/2 tsp paprika powder
1/4 tsp basil
1/4 tsp cinnamon powder
1/4 tsp garlic powder
1/2 tsp black pepper
1 tsp salt
1 can crushed tomatoes 14.5oz (400g)

NSTRUCTIONS
 
Bring a large pot of water to boil, add 1 tbsp olive oil and the salt, one tbsp of tomato paste, then the pack of pasta. Cook until al dente, then drain the pasta, reserving the pasta water. Set cooked pasta aside.

In a large skillet, heat the remaining tbsp of olive oil. Once hot, add the diced onion, and cook for 4-5 minutes until softened. Add the diced zucchini and carrots, and garlic and cook for a further 4-5 minutes until softened slightly.

Add the ground beef, and cook, smushing with a wooden spoon to break up the meat. Keep cooking until the beef is browned and cooked through, then optionally, drain the fat.
Add in the salt, pepper, and all the spices. Cook for another minute or so. Add the remaining 2 tbsp of tomato paste, and stir.

Add the can of crushed tomatoes and stir to combine. Bring to a simmer, then add a big ladleful of the reserved pasta water and simmer for 2-3 minutes on low heat.

Add the pasta to the sauce (I don't always add all the pasta, maybe 3/4 of the cooked amount until the finished dish is as saucy as I like). Stir to coat, cook for another minute or so until the pasta is warmed through, then enjoy!
This gorgeous tiramisu was so kindly sent to me by This gorgeous tiramisu was so kindly sent to me by @cadysweets.sa on my birthday, and we enjoyed every light fluffy bite of it. Their old account got hacked so follow along and support their new account ! They have a bunch of cakes and sweets for every occasion, so make someone or yourself happy and order one for a treat🤩! Send this to the tiramisu lover in your life 🍰.
.
.
.
.
.

#chocolatecake #magnoliabakery #cakestagram #cakephotos #layercake #chocolate #ganache #foodblog #instayum #yummy #bakery #foodporn #foodtographyschool #foodphotography #slice #delish #foodfluffer #damnthatsdelish #tiramisu #birthdaytreat #dessertbae #dessertoftheday #scoop #foodstyling #foodstylingandphotography
Easiest at home crusty bread with a great open cru Easiest at home crusty bread with a great open crumb texture. It’s the no knead bread from @breadin5 and has yet to fail me. Check my story for the step by step, and swipe for a video reveal.

Ingredients for two small loaves:
1.5 cups lukewarm water 
1/2 tbsp any type of yeast
1/2 tbsp salt
3 1/4 cup plain flour (450g)

Method:
In a large bowl, stir together the water with the yeast and salt. Try to dissolve but it’s fine if you have clumps.
2. Add flour all at once and stir, just until no flour patches remain.
3. Cover loosely with a kitchen cloth and leave it to rest for 2 hours in a warm place until risen and bubbly.
After this rest you can:
- Use dough immediately if impatient, but it’s easier to work with if cold, so maybe pop in fridge briefly
- Or, their recommended method and the one I do, leave in the fridge loosely covered for 12 hours or overnight. 
Refrigerated dough lasts up to two weeks, and flavor depends over time!
4. The next day, the dough might look deflated. That’s fine! When ready to bake, divide dough in half (I got two 400g dough balls)- it might be easier to handle if you sprinkle the dough lightly with flour, and take the half you are going to bake out of the fridge. Let it rest on a parchment paper lined baking sheet 40-90 minutes. The longer the more interior bubbles you should have. Preheat oven to 235C (450F), and after rest, make a few deep slashes in the dough with a sharp knife.
5. Place in the middle rack of the oven, and on the bottom rack place a roasting pan that had about a cup of hot water in it. This will create steam which gives a crustier crust!
6. Bake for 30-35 minutes or until deep golden brown.
7. Let it cool completely before enjoying!
.
.

.
.
.

#damnthatsdelish #foodfluffer #thebakefeed #feedfeed #tastingtable #forthemaking #BHGfood #foodblogfeed #bakedfromscratch #bakinglove #f52grams #foodbloggerpro #bakersofinstagram #TOHfoodie #foodphotography #canonphotos #bread #instayummy #kitchn #huffposttaste #food #dough #foodie #nokneadbread #homemadebread #doughter
Good morning! With dine in still closed in Saudi, Good morning! With dine in still closed in Saudi, Friday pancakes are fast becoming a tradition. And honestly, I don’t think I’ve had better pancakes at any restaurant recently! The easiest, fluffiest diner style pancakes are a huge hit in our family, find the recipe below adapted from @allrecipes . I like to barely warm the oven (110C or so) and keep the finished pancakes in a pan in the oven until I’m done with all the batter so they stay warm and perfect 👌🏼.

Ingredients
3/4 cup milk 170g
1 tbsp white vinegar
1 cup flour 125g
2 tbsp sugar 25g
1 tsp baking powder
1/2 tsp baking soda
1/4 tsp salt
1 egg room temperature
1/2 tsp vanilla
2 tbsp butter, melted 28g

Instructions:
-In a large bowl, combine the milk and vinegar, and let aside to stand for 5 minutes until curdled. Whisk to combine.
-In a separate large bowl, mix together the flour, sugar, baking powder, baking soda and salt.
-Add an egg, the vanilla and the melted butter to the buttermilk and whisk to combine.
-Add the dry ingredients all at once to the wet, and whisk until flour patches disappear. A few lumps are fine, but don't over mix.
-Let the batter rest for 5-10 minutes while you heat a pan on the stove.
lightly grease the pan with nonstick spray or butter, and pour about 1/4 cup of batter on the pan. Cook for 2-3 minutes on each side or until golden brown. (Flip the first time once you see bubbles form and the edges of the pancake dry up).
-Enjoy with toppings of your choice!
.
.
.
.
.
#pancakes #pancakerecipe #blueberrypancakes #maplesyrup #breakfast #morningslikethese #fridaymorning #flatlay #foodfluffer #breakfastrecipes #breakfastfood #breakfastofchampions #pancakelover #food #foodtography #foodtographyschool #foodphotography #delish #foodphotos #weekendbreakfast #eatingathome #recipeoftheday #foodporn #foodflatlay #blueberries #trayoftheday
One of my photos from my shoot @tackle.baks . How One of my photos from my shoot @tackle.baks . How insane does this tom yum soup look? For those who haven’t tried this casual seafood spot yet, you really should! The food is great and priced very reasonably, and they have some menu items I’m obsessed with like their crispy fish burger, the salmon poke salad and the creamy truffle shrimp👌🏼. They currently have a delivery offer going for only 5SAR on HungerStation, so no time like the present! Have I tempted you with this photo of the tom yum soup? I’m hungry just writing this caption🤤.
.
.
.
.
.
#soup #tomyum #tomyumsoup #food #foodphotography #canonphotography #canon #seafood #seafoodlover #shrimp #delish #beautifulcuisines #foodtographyschool #foodtography #foodblogger #instayum #lonelyplanetfood #dametravelerfoodie #soupseason #restaurantphotography #khobar #tastemade #tastingtable #foodfluffer
Load More... Follow on Instagram

Copyright © 2019 on the Seasoned Pro Theme