• Skip to primary navigation
  • Skip to main content
  • Skip to primary sidebar
  • Skip to footer

 logo

  • Recipes
    • Breakfast
    • Sides
    • Soup
    • Main Meals
    • Healthy
    • Dessert
    • Drinks
  • Eating Out
  • About Me
    • Privacy Policy
  • Resources
    • Must Have Kitchen Tools
  • Nav Social Menu

    • Email
    • Facebook
    • Instagram
    • Pinterest

Salted Caramel Apple Dutch Baby

Nov 21, 2019 · 10 Comments

Jump to Recipe

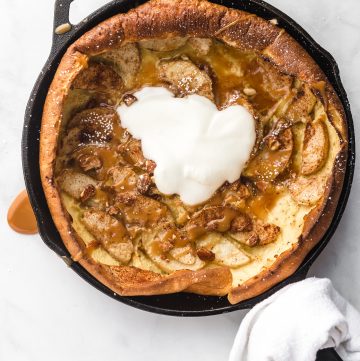
A puffy golden brown oven baked pancake topped with cinnamon coated apple slices and drizzled with the perfect homemade salted caramel sauce. Tastes like apple pie in a skillet, breakfast can’t get any more special than this caramel apple dutch baby!

I fell in love with dutch babies after making this recipe. An easier pancake that happens to be giant and doesn’t require standing over the stove for 20 minutes flipping? Sign me up! Dutch babies are as easy as blending together a few ingredients and pouring them in a hot skillet. This skillet gets baked at a high temperature, giving a beautiful puffy golden brown delight.

How to make a dutch baby:

First step is heating your oven. The dutch baby must go in a hot oven to rise properly. While it’s heating, in a blender (or vigorously by hand), combine all ingredients except for butter. Eggs, flour, milk, sugar, vanilla and nutmeg all get combined.

Butter gets placed in an ovenproof skillet and this skillet goes into the oven until the butter melts. Then, your batter gets poured into the same skillet, apple slices arranged on top, and this goes in the oven for 20-25 minutes until puffy and golden brown and delicious.

How to make homemade salted caramel sauce?

Jar of rose water and orange blossom water salted caramel sauce with a spoon dripping some salted caramel off of it

It’s so much easier than you think. I have a whole post on just that! I love adding orange blossom water and rose water to my salted caramel for just a hint of fragrance, but you can completely omit those and follow the rest of the recipe for a standard salted caramel.

Why add apples to a dutch baby?

My experiments with dutch babies thus far have all been super simple. I top them with maple syrup and fresh berries and yes that is DELICIOUS. However, I wanted something that worked for autumn and there are few better flavor matches for me than salted caramel and apples, so I used those in this recipe. It came out so good- my daughter kept telling me how much it tasted like apple pie, one of her favorites. I totally see it! It’s like a 20 minute apple pie for breakfast!

I always tend to use granny smith or green apples in my desserts because I love the contrast that the tartness of their flavor gives. Feel free to switch the apple type up to your preferred one.

Dutch babies are best enjoyed immediately, while they are still puffed up, as they will fall, but I stored a slice in the fridge and microwaved it the next day and I can’t deny I enjoyed every bite. Salted caramel apple dutch babies should be your next breakfast!

Salted caramel apple dutch baby in skillet with vanilla ice cream

Salted Caramel Apple Dutch Baby

A puffy dutch baby topped with homemade salted caramel and oven baked apple slices turns into a beautiful morning treat- almost like an easy apple pie!
5 from 5 votes
Print Pin
Rate
Course: Breakfast
Cuisine: American
Keyword: apple, breakfast
Prep Time: 5 minutes
Cook Time: 25 minutes
Servings: 4 people
Calories: 328kcal
Author: Farah Abumaizar

Ingredients

For the salted caramel sauce:

  • 1 cup sugar
  • 1/2 cup water
  • 3/4 cup heavy cream (whipping cream)
  • 2 tbsp butter
  • 1/2 tsp sea salt
  • 1/2 tsp each rose water and orange blossom water (optional)

For the apples:

  • 1 green apple, peeled and very thinly sliced (about 16 slices)
  • 1/2 tsp cinnamon powder

For the dutch baby:

  • 3 eggs
  • 1/2 cup flour 62 g
  • 1/2 cup milk 117 g
  • 1 tbp sugar
  • 1/4 tsp vanilla extract
  • pinch nutmeg, optional
  • 4 tbsp butter 57g

Instructions

For the salted caramel sauce:

  • In a medium saucepan, combine the sugar and the water. Stir, then place the saucepan on the stove over medium high heat. Let it cook without stirring until sugar dissolves, then turns into the amber brown color of caramel. This will take around 10 minutes.
  • Removing the pan from the heat, drizzle in the heavy cream slowly whisking while doing so. Return to the heat, and continue whisking. The caramel might seize up initially but will then smooth out over the heat.
  • Add the butter, and whisk until combined. Remove from the heat, and whisk in the salt, rose water, and orange blossom water if using. Set aside to cool while you continue with the recipe (Leftovers can be stored in the fridge for two weeks or so.)

For the apples:

  • Toss the apple slices with cinnamon powder until evenly coated. Set aside.

For the dutch baby:

  • Preheat the oven to 225 C (425 F)
  • Combine the eggs, sugar, milk, flour, vanilla extract, and nutmeg and blend until smooth. You can also just whisk thoroughly by hand.
  • In a heavy 10 inch skillet or baking pan, put the butter. Place it in the oven until the butter melts. watching carefully so it doesn’t burn. One butter is melted, remove pan from oven and pour in all the batter. Layer the apple slices evenly on top of the batter, leaving the edges of the pan empty, much like a pizza crust.
  • Return the pan to the oven, and bake for 20 minutes until puffed and golden. Reduce oven temperature to 150 C (300 F) and bake for 5 minutes longer.
  • Drizzle with salted caramel sauce, top with your choice of ice cream, whipped cream, icing sugar and pecans/walnuts if desired and serve immediately.

Notes

Salted caramel sauce adapted from Maureen Abood, and full instructions are in this post.
Dutch baby recipe is from Florence Fabricant of the New York Times.
Tried this recipe?Mention @everylittlecrumb or tag #everylittlecrumb!

Nutrition

Calories: 328kcal

If you liked this recipe, you might like:

Salted Caramel Apple Crumble

Easy Apple Pie

Salted Caramel Sauce with Rose water and Orange blossom

Dutch Baby


Did you make this? Tag @everylittlecrumb or hashtag #everylittlecrumb and I’ll share your images!

Breakfast, Recipes apple, dutch baby

Previous Post: « Air Fryer Sweet Potato Fries
Next Post: Roasted Garlic Mashed Cauliflower »

Reader Interactions

Comments

  1. Megan says

    November 21, 2019 at 12:53 pm

    5 stars
    There is not an image on this recipe I dont want to lick the screen. This looks so delicious and is going on my list x. Thanks for sharing

    Reply
    • Farah Abumaizar says

      November 22, 2019 at 7:29 am

      Loool thanks so much Megan! Perfect compliment!

      Reply
  2. Angela Allison says

    November 21, 2019 at 2:34 pm

    5 stars
    Oh my, this looks so divine!! The perfect holiday recipe. My family will go crazy for this… and that caramel sauce is pure perfection! Thanks so much for sharing!

    Reply
    • Farah Abumaizar says

      November 22, 2019 at 7:29 am

      It would make a lovely holiday breakfast and so easy too! Thanks Angela!

      Reply
  3. Danielle says

    November 21, 2019 at 2:43 pm

    5 stars
    oh wow….this is something i need in my life. Its sounds just incredible – i love a dutch baby. And that salted caramel would be just perfect. Plus, your photos are gorgeous!

    Reply
    • Farah Abumaizar says

      November 22, 2019 at 7:30 am

      Thanks so much Danielle! Means a lot XX

      Reply
  4. Lisa | Garlic & Zest says

    November 21, 2019 at 3:24 pm

    5 stars
    This dutch baby looks positively sublime and that caramel sauce is over the top with the orange blossom and rosewater.

    Reply
    • Farah Abumaizar says

      November 22, 2019 at 7:28 am

      Thanks Lisa !

      Reply
  5. Amy says

    November 21, 2019 at 4:44 pm

    5 stars
    What a perfect autumn dessert, love it!

    Reply
    • Farah Abumaizar says

      November 22, 2019 at 7:30 am

      Thank you Any!

      Reply

Leave a Reply Cancel reply

Your email address will not be published. Required fields are marked *

Recipe Rating


Primary Sidebar

Get more stuff

Subscribe to our mailing list and get interesting stuff and updates to your email inbox.

Thank you for subscribing.

Something went wrong.

we respect your privacy and take protecting it seriously

FeedFeed

Featured Recipes

Nana tea

Halal Guys Chicken and Rice

Aish El Saraya

Instant Pot Enchilada Soup

Death By Chocolate Zucchini Bread

More

Footer

everylittlecrumb

Farah Abu Maizar | Food Lover
Good morning! If there’s one thing we like doing Good morning! If there’s one thing we like doing, it’s experimenting with breakfast dishes 🍳.These beauties are froached eggs- poached eggs that are lightly fried and seasoned with breadcrumbs. Best of both worlds! Creamy poached eggs, runny yolk but a little crisp on the white part of the eggs. So good! Inspired by @sveverything , we used our sous vide machine for this but you can do this with regular poached eggs. Recipe can be found linked in bio or at https://everylittlecrumb.com/froached-eggs/ . Team runny yolk anyone? 
.
.
.
.
.
#eggs #poachedeggs #poachedegg #eggsontoast #beautifulcuisines #tasty #delish #foodphotography #foodstyling #foodstylingandphotography #cheeseontoast #foodblogger #foodie #breakfast #brunch #instayum #yum #brunch #tastingtable #f52community #food52 #yolkporn #friday
How I spend a lot of my weekends😂. Nothing like How I spend a lot of my weekends😂. Nothing like a big bowl of cookie dough to say weekend mode on! Are you like me and end up eating more dough than actual cookies? My foolproof recipe I use and post time and time again 👇🏼(and often double the batch so I can store some in the freezer!)

Ingredients:
1 stick butter, softened 113 g
3/4 cup tightly packed brown sugar (I like using 1/2 cup light brown and 1/4 cup dark brown, but you can use either or) 150 g total
1/4 cup white sugar 50 g
1 egg, room temperature
1 tsp vanilla extract
1 3/4 cup all purpose flour 220 g
3/4 tsp baking soda
1/4 tsp salt
1 cup semi-sweet chocolate chips or chunks
flaky salt for topping, optional

Instructions:
-In the bowl of a stand mixer fitted with a paddle attachment, or a handheld mixer, cream together butter, brown sugar, and white sugar for 5 minutes on medium speed until light and fluffy.
-Once five minutes is over, add in egg and vanilla and mix until combined.
In a separate bowl, mix flour, baking soda, and salt, and mix until combined. Add these dry ingredients to the butter mixture on low speed, and mix until just combined.
-Using a wooden spoon or spatula, mix in chocolate chips or chunks until just combined. Place bowl of dough in fridge for at least 30 minutes to chill.
-While dough is chilling, heat oven to 180 C (350F). Portion dough out into heaped 1 tbsp-2 tbsp sized dough pieces on parchment paper lined baking sheets. 
-Bake for 11-12 minutes or until golden brown on the edges but still soft in the center. Cool until cookies firm up, then enjoy, still warm.
.
.
.
.
.

#chocolatecake #cookiemonster #cakestagram #cakephotos #layercake #chocolate #weekendbaking #foodblog #instayum #yummy #bakery #foodporn #foodtographyschool #foodphotography #chocolatechips #delish #foodfluffer #damnthatsdelish #cookiedough #chocatechipcookies #bakes #bakestagram #doughbowl #chocolatechips #hersheys
Bbq salmon bowls with mango avocado salsa- unbelie Bbq salmon bowls with mango avocado salsa- unbelievable! And start to finish, you can be eating these in 15-20 minutes. Save this recipe for your next meal, you don’t want to miss out!

I’ve partnered with @kilosamak to produce a few recipes with their quality seafood- I’ve tried several of their items and genuinely loved them all! They deliver seafood straight to your door for you to enjoy and cook at home. Takes all the guesswork out of trying to choose and clean fish yourself, perfect solution for someone like me who loves seafood but isn’t so great at prepping it! Check out their Instagram page on how to order, or head to the link in my bio.

This salmon has a smoky slightly sweet rub, is baked in the oven for ultimate ease, and gets piled on to rice and topped with an easy, addictive, zingy mango and avocado salsa. Adapted from @pinchofyum , I’ll make this again and again!

Ingredients:
For the salmon:
2 fillets, about 250 g each 
Spice Rub:
2 tbsp brown sugar
1.5 tsp paprika 
1 tsp garlic powder
1 tsp onion powder, optional 
1/2 tsp chili powder
1/2 tsp salt 
2 tbsp olive oil 

Mango avocado salsa:
1 diced mangos 
1 diced avocado
1/4 cup finely diced coriander 
1/4 cup finely diced red onion 
1 inch spicy green chili pepper, finely chopped
1 tsp honey
Juice and zest of one lime
Salt to taste

Method:
- Make the salsa by mixing together all the salsa ingredients and placing bowl in fridge while you make the salmon.
- Heat oven to 240C, and line a baking sheet with parchment paper. 
-Mix together all the ingredients for the salmon rub, and rub thoroughly all over the salmon, both sides.
- Bake for 10-12 minutes until salmon is opaque and cooked all the way through.
-Assemble bowls with rice, flaked pieces of salmon,and plenty of mango avocado salsa. Enjoy 😍

Catch the steps in my story!
Have you tried this pasta yet? Save this for your Have you tried this pasta yet? Save this for your next weeknight meal! Saucy macarona iltaybeen, can’t get much more comforting.  Adapted from @jedir3waish , makes for an easy delicious main that’ll make your family including kids very happy! Can find a step by step linked bio, or at https://everylittlecrumb.com/macarona/ , or in my story!

INGREDIENTS:
 
2 tbsp olive oil, divided
big pinch of salt
3 heaped tbsp tomato paste, divided 2 oz or 70 g
1 pack elbow macaroni 14 oz or 400 g
1 onion, very finely diced
1 zucchini, finely diced
1 carrot, finely diced
4-5 garlic cloves, minced
250 g ground beef
1 tsp seven spices
1 tsp turmeric
1/2 tsp paprika powder
1/4 tsp basil
1/4 tsp cinnamon powder
1/4 tsp garlic powder
1/2 tsp black pepper
1 tsp salt
1 can crushed tomatoes 14.5oz (400g)

NSTRUCTIONS
 
Bring a large pot of water to boil, add 1 tbsp olive oil and the salt, one tbsp of tomato paste, then the pack of pasta. Cook until al dente, then drain the pasta, reserving the pasta water. Set cooked pasta aside.

In a large skillet, heat the remaining tbsp of olive oil. Once hot, add the diced onion, and cook for 4-5 minutes until softened. Add the diced zucchini and carrots, and garlic and cook for a further 4-5 minutes until softened slightly.

Add the ground beef, and cook, smushing with a wooden spoon to break up the meat. Keep cooking until the beef is browned and cooked through, then optionally, drain the fat.
Add in the salt, pepper, and all the spices. Cook for another minute or so. Add the remaining 2 tbsp of tomato paste, and stir.

Add the can of crushed tomatoes and stir to combine. Bring to a simmer, then add a big ladleful of the reserved pasta water and simmer for 2-3 minutes on low heat.

Add the pasta to the sauce (I don't always add all the pasta, maybe 3/4 of the cooked amount until the finished dish is as saucy as I like). Stir to coat, cook for another minute or so until the pasta is warmed through, then enjoy!
This gorgeous tiramisu was so kindly sent to me by This gorgeous tiramisu was so kindly sent to me by @cadysweets.sa on my birthday, and we enjoyed every light fluffy bite of it. Their old account got hacked so follow along and support their new account ! They have a bunch of cakes and sweets for every occasion, so make someone or yourself happy and order one for a treat🤩! Send this to the tiramisu lover in your life 🍰.
.
.
.
.
.

#chocolatecake #magnoliabakery #cakestagram #cakephotos #layercake #chocolate #ganache #foodblog #instayum #yummy #bakery #foodporn #foodtographyschool #foodphotography #slice #delish #foodfluffer #damnthatsdelish #tiramisu #birthdaytreat #dessertbae #dessertoftheday #scoop #foodstyling #foodstylingandphotography
Easiest at home crusty bread with a great open cru Easiest at home crusty bread with a great open crumb texture. It’s the no knead bread from @breadin5 and has yet to fail me. Check my story for the step by step, and swipe for a video reveal.

Ingredients for two small loaves:
1.5 cups lukewarm water 
1/2 tbsp any type of yeast
1/2 tbsp salt
3 1/4 cup plain flour (450g)

Method:
In a large bowl, stir together the water with the yeast and salt. Try to dissolve but it’s fine if you have clumps.
2. Add flour all at once and stir, just until no flour patches remain.
3. Cover loosely with a kitchen cloth and leave it to rest for 2 hours in a warm place until risen and bubbly.
After this rest you can:
- Use dough immediately if impatient, but it’s easier to work with if cold, so maybe pop in fridge briefly
- Or, their recommended method and the one I do, leave in the fridge loosely covered for 12 hours or overnight. 
Refrigerated dough lasts up to two weeks, and flavor depends over time!
4. The next day, the dough might look deflated. That’s fine! When ready to bake, divide dough in half (I got two 400g dough balls)- it might be easier to handle if you sprinkle the dough lightly with flour, and take the half you are going to bake out of the fridge. Let it rest on a parchment paper lined baking sheet 40-90 minutes. The longer the more interior bubbles you should have. Preheat oven to 235C (450F), and after rest, make a few deep slashes in the dough with a sharp knife.
5. Place in the middle rack of the oven, and on the bottom rack place a roasting pan that had about a cup of hot water in it. This will create steam which gives a crustier crust!
6. Bake for 30-35 minutes or until deep golden brown.
7. Let it cool completely before enjoying!
.
.

.
.
.

#damnthatsdelish #foodfluffer #thebakefeed #feedfeed #tastingtable #forthemaking #BHGfood #foodblogfeed #bakedfromscratch #bakinglove #f52grams #foodbloggerpro #bakersofinstagram #TOHfoodie #foodphotography #canonphotos #bread #instayummy #kitchn #huffposttaste #food #dough #foodie #nokneadbread #homemadebread #doughter
Good morning! With dine in still closed in Saudi, Good morning! With dine in still closed in Saudi, Friday pancakes are fast becoming a tradition. And honestly, I don’t think I’ve had better pancakes at any restaurant recently! The easiest, fluffiest diner style pancakes are a huge hit in our family, find the recipe below adapted from @allrecipes . I like to barely warm the oven (110C or so) and keep the finished pancakes in a pan in the oven until I’m done with all the batter so they stay warm and perfect 👌🏼.

Ingredients
3/4 cup milk 170g
1 tbsp white vinegar
1 cup flour 125g
2 tbsp sugar 25g
1 tsp baking powder
1/2 tsp baking soda
1/4 tsp salt
1 egg room temperature
1/2 tsp vanilla
2 tbsp butter, melted 28g

Instructions:
-In a large bowl, combine the milk and vinegar, and let aside to stand for 5 minutes until curdled. Whisk to combine.
-In a separate large bowl, mix together the flour, sugar, baking powder, baking soda and salt.
-Add an egg, the vanilla and the melted butter to the buttermilk and whisk to combine.
-Add the dry ingredients all at once to the wet, and whisk until flour patches disappear. A few lumps are fine, but don't over mix.
-Let the batter rest for 5-10 minutes while you heat a pan on the stove.
lightly grease the pan with nonstick spray or butter, and pour about 1/4 cup of batter on the pan. Cook for 2-3 minutes on each side or until golden brown. (Flip the first time once you see bubbles form and the edges of the pancake dry up).
-Enjoy with toppings of your choice!
.
.
.
.
.
#pancakes #pancakerecipe #blueberrypancakes #maplesyrup #breakfast #morningslikethese #fridaymorning #flatlay #foodfluffer #breakfastrecipes #breakfastfood #breakfastofchampions #pancakelover #food #foodtography #foodtographyschool #foodphotography #delish #foodphotos #weekendbreakfast #eatingathome #recipeoftheday #foodporn #foodflatlay #blueberries #trayoftheday
One of my photos from my shoot @tackle.baks . How One of my photos from my shoot @tackle.baks . How insane does this tom yum soup look? For those who haven’t tried this casual seafood spot yet, you really should! The food is great and priced very reasonably, and they have some menu items I’m obsessed with like their crispy fish burger, the salmon poke salad and the creamy truffle shrimp👌🏼. They currently have a delivery offer going for only 5SAR on HungerStation, so no time like the present! Have I tempted you with this photo of the tom yum soup? I’m hungry just writing this caption🤤.
.
.
.
.
.
#soup #tomyum #tomyumsoup #food #foodphotography #canonphotography #canon #seafood #seafoodlover #shrimp #delish #beautifulcuisines #foodtographyschool #foodtography #foodblogger #instayum #lonelyplanetfood #dametravelerfoodie #soupseason #restaurantphotography #khobar #tastemade #tastingtable #foodfluffer
Load More... Follow on Instagram

Copyright © 2019 on the Seasoned Pro Theme