• Skip to primary navigation
  • Skip to main content
  • Skip to primary sidebar
  • Skip to footer

 logo

  • Recipes
    • Breakfast
    • Sides
    • Soup
    • Main Meals
    • Healthy
    • Dessert
    • Drinks
  • Eating Out
  • About Me
    • Privacy Policy
  • Resources
    • Must Have Kitchen Tools
  • Nav Social Menu

    • Email
    • Facebook
    • Instagram
    • Pinterest

Salted Caramel Apple Crumble

Sep 17, 2019 · 10 Comments

Jump to Recipe
Apple crumble in a cast iron skillet with a scoop taken out

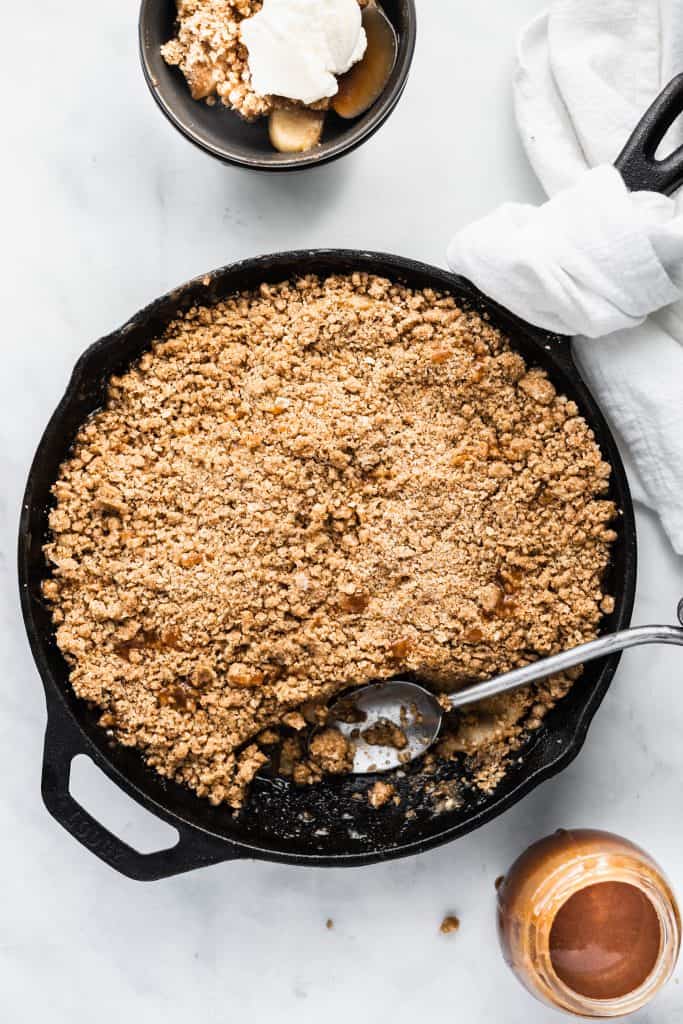
A decadent twist on a classic apple crumble, this salted caramel apple crumble has apple slices that are coated with a salted caramel sauce and generously topped with the perfect golden brown crispy crumble. The smell as this bakes! This will be an immediate hit with everyone.

What’s the difference between a crisp, crumble, and a cobbler?

I had to scour the internet for the answer to this. Basically, these are all delicious desserts based off of baked fruit topped with some sort of buttery golden topping.

Crisps and Crumbles: Very similar! Some say crumbles never have oats while crisps do, I think crumble sounds more comforting so that’s why I named this recipe as that 🙂

Cobbler: Fruit filling topped with biscuit dough and baked until golden brown and puffy.

Brown Betty: I’ve never had this and now I don’t know why. It’s basically a crispy, but with a layer of crumbs UNDER the fruit a well as over. Heaven for crumb lovers. Me me!

Why add salted caramel to your typical apple crumble?

Apples and caramel sauce are a match made in heaven. This crumble takes that pairing one step further. Instead of just drizzling your crumble with caramel sauce (which you absolutely should), we also toss the apple slices with homemade caramel sauce. This makes the finished crumble so saucy and delicious. My caramel sauce is made extra special with the addition of a little rose water and orange blossom water- you can completely omit these and replace with vanilla.

How to make salted caramel sauce?

For more comprehensive information, visit this post, but the recipe below tells you all you need to know. You basically melt together sugar and water over medium high heat and let them cook without stirring for 10 minutes or until they turn amber brown. Heavy cream and butter get whisked in, then the salt and rose water and orange blossom water or vanilla.

Jar of rose water and orange blossom water salted caramel sauce with a spoon dripping some salted caramel off of it

Ingredients in the apple crumble:

Raw apple slices sprinkled with cinnamon in a cast iron skillet

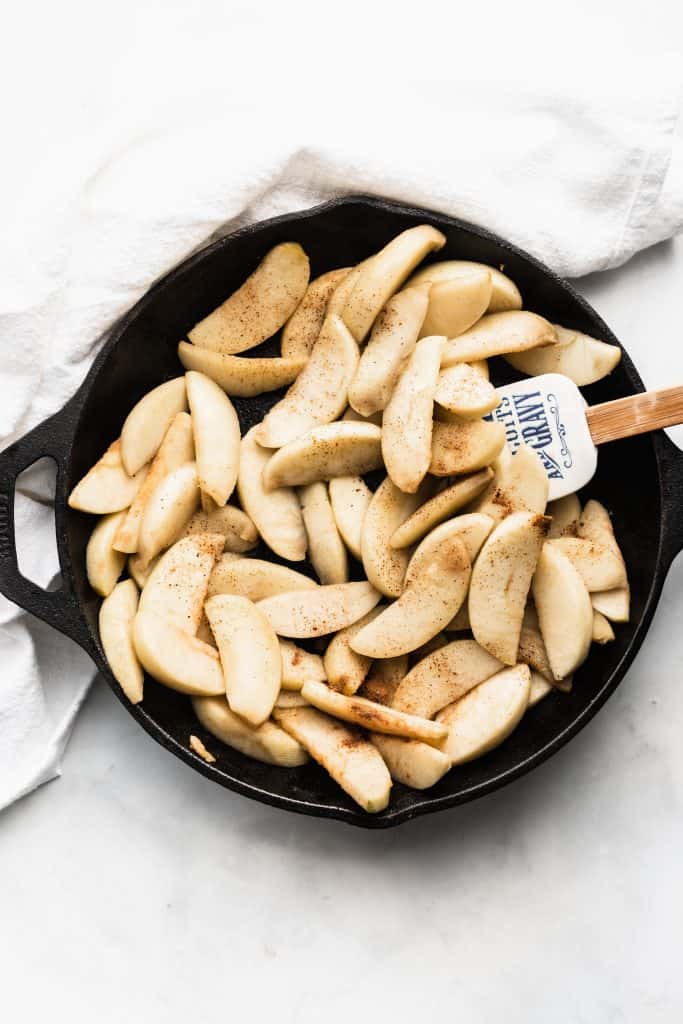
Apples: I like using granny smith apples, because the tartness contrasts perfectly with the sweetness of the caramel and crumble. You want the apples to be thinly sliced so they cook through (about 16 slices per apple). I use this handy contraption from Amazon, but you can go old school and just slice away.

In other crumble or crisp recipes, you might notice the apples remain raw until going in the oven. A difference here is the apples are sauteed briefly before going in the oven. The reason is we don’t want the caramel sauce that’s tossed with the apples to dry out or burn, so we bake it a little less than a more typical crumble. The apples still need to fully cooked though, so we help them out a little by cooking on the stove top in a little butter.

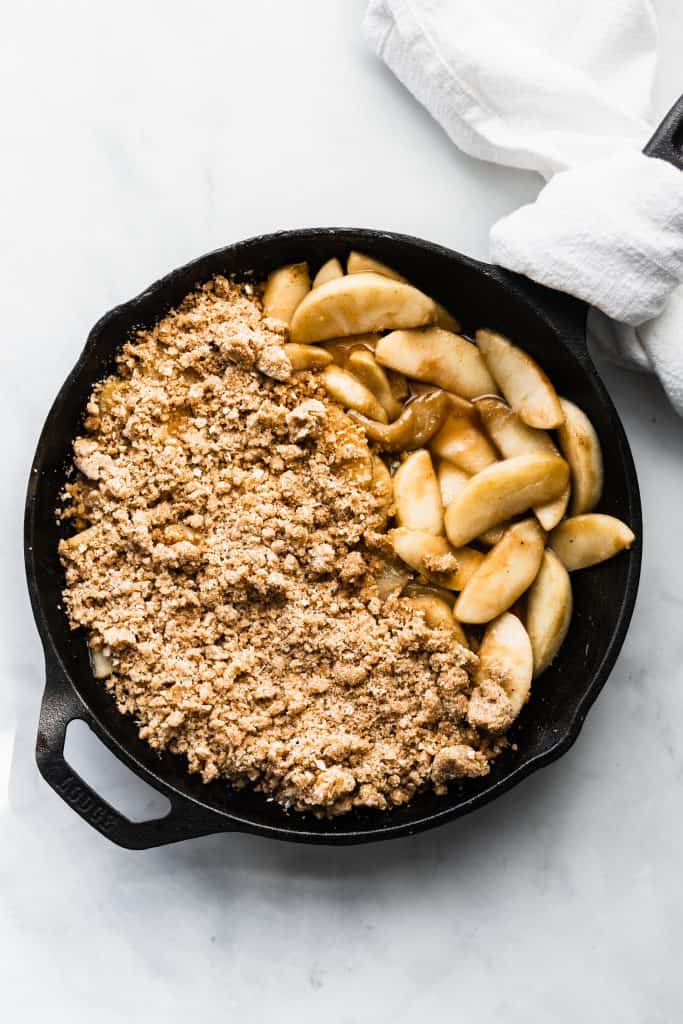
Homemade Caramel Sauce: We toss the apple slices in a homemade caramel sauce until evenly coated, as discussed above.

Crumb Topping: Flour, quick cooking oats, brown sugar (light or dark), white sugar, cinnamon, nutmeg, and butter. The butter is cubed into tbsp sized pieces and softened, to make it easier to work into the dry ingredients. Massage the butter with your fingertips into the whisked dry ingredients to get the perfect crumb topping.

Half covered apple slices with apple crumble in cast iron skillet

What do I do with leftover apple crumble?

Store it in the fridge tightly covered, and reheat it in the microwave or oven. The oven is your best bet at keeping it crispy.

You can also freeze any leftovers tightly wrapped, thaw overnight, then reheat for 30 minutes.

Salted Caramel Apple Crumble in a cast iron skillet with a scoop taken out and a plate with crumble and ice cream on teh side

Salted Caramel Apple Crumble

This apple crumble is epic! Apple slices are tossed with homemade salted caramel sauce, layered into a baking dish and topped with the perfect crispy buttery golden crumble.
5 from 5 votes
Print Pin
Rate
Course: Dessert
Cuisine: American
Keyword: apple, dessert, caramel
Prep Time: 15 minutes
Cook Time: 30 minutes
Total Time: 45 minutes
Servings: 6 people
Calories: 374kcal
Author: Farah Abumaizar

Ingredients

For the salted caramel:

  • 1 cup sugar
  • 1/2 cup water
  • 3/4 cup heavy cream (whipping cream)
  • 2 tbsp butter
  • 1/2 tsp sea salt
  • 1/2 tsp orange blossom water optional
  • 1/2 tsp rose water optional

For the apples:

  • 2 tbsp butter
  • 4 apples, peeled, and sliced 1/4 inch thick (about 16 slices per apple)
  • 1/4 tsp cinnamon

For the crumble:

  • 1 cup flour
  • 1/3 cup oats
  • 1/3 cup brown sugar
  • 1/3 cup white sugar
  • 1/2 tsp cinnamon
  • 1/4 tsp nutmeg
  • 1/4 tsp salt
  • 1 stick butter, cubed and softened 100 g

Instructions

  • Preheat oven to 180 C (350F)

To make the salted caramel:

  • In a medium saucepan, stir together the sugar and the water. Place the saucepan on the stove over medium high heat. Cook without stirring until sugar dissolves, then turns into the amber brown color of caramel. This will take around 10 minutes.
  • Removing the pan from the heat, drizzle in the heavy cream slowly whisking while doing so. Return to the heat, and continue whisking. The caramel might seize up initially but will then smooth out over the heat.
  • Add the butter, and whisk until combined. Remove from the heat, and whisk in the salt, rose water, and orange blossom water (if using). Let the caramel cool while you prepare the apples.

For the apples:

  • In a large skillet over medium heat (a 10 inch cast iron skillet if you have one), heat the 2 tbsp of butter until melted. Add the apple slices, and cook, stirring occasionally until apples have slightly softly, around 5-7 minutes. They don't need to fully soften as they will be baked in the oven.
  • After apple slices have cooked, sprinkle with the cinnamon. Add 1/2 cup of your prepared salted caramel sauce and stir to thoroughly coat the apples.

For the crumble:

  • Mix together the flour, oats, brown sugar, white sugar, cinnamon, nutmeg and salt until well combined. Add the cubed softened butter and using your fingertips, work the butter into the mix until the mixture looks like clumpy wet sand.

To assemble:

  • If using a cast iron skillet, evenly distribute the crumb topping right over the apple caramel mix in the skillet. If using a baking pan, transfer the apples to an 8 or 9 inch square baking pan, then cover with the crumb topping. Bake for 20-25 minutes until crumble is golden brown and apples are bubbling. Remove from oven and serve warm with extra caramel sauce and vanilla ice cream if desired.
Tried this recipe?Mention @everylittlecrumb or tag #everylittlecrumb!

Nutrition

Calories: 374kcal

If you liked this recipe, you might like:

Healthy Blueberry Crisp

The Best Sticky Toffee Pudding

Brownie Skillet

Dessert, Recipes apple, caramel

Previous Post: « Salted Caramel Sauce with Rose Water and Orange Blossom
Next Post: Persian Saffron Chicken with Barberry Rice »

Reader Interactions

Comments

  1. Sylvie says

    September 17, 2019 at 11:55 am

    5 stars
    Apple crumble is one of my favourite easy dessert ever and I can’t believe I have never tried it with salted caramel! It simply sounds heavenly – I have to try it asap 🙂

    Reply
    • Farah Abumaizar says

      September 17, 2019 at 1:18 pm

      I hope you do and love it thanks Sylvie!

      Reply
  2. Jeannette says

    September 17, 2019 at 12:56 pm

    5 stars
    This is absolutely divine! What a phenomenal combination!

    Reply
    • Farah Abumaizar says

      September 17, 2019 at 1:18 pm

      Thanks so much Jeannette!

      Reply
  3. Danielle says

    September 17, 2019 at 1:45 pm

    5 stars
    I only needed to look at the photo to know I needed to make this! I love an apple crumble, and the caramel addition is such a great idea!

    Reply
    • Farah Abumaizar says

      September 17, 2019 at 9:43 pm

      Thanks so much Danielle!

      Reply
  4. Katie Crenshaw | A Fork's Tale says

    September 17, 2019 at 1:51 pm

    5 stars
    That is some pretty salted caramel sauce! I know it has to be AMAZING over those apples! I can’t wait to make this for my next dinner party. It is PERFECT for fall!

    Reply
    • Farah Abumaizar says

      September 17, 2019 at 9:43 pm

      Thanks so much Katie! Just the way to usher in the fall season

      Reply
  5. Megan says

    September 17, 2019 at 2:16 pm

    5 stars
    All the best things in life in one dish. Thanks for the deliciousness.

    Reply
    • Farah Abumaizar says

      September 17, 2019 at 9:43 pm

      Anytime Megan 🙂

      Reply

Leave a Reply Cancel reply

Your email address will not be published. Required fields are marked *

Recipe Rating


Primary Sidebar

Get more stuff

Subscribe to our mailing list and get interesting stuff and updates to your email inbox.

Thank you for subscribing.

Something went wrong.

we respect your privacy and take protecting it seriously

FeedFeed

Featured Recipes

Nana tea

Halal Guys Chicken and Rice

Aish El Saraya

Instant Pot Enchilada Soup

Death By Chocolate Zucchini Bread

More

Footer

everylittlecrumb

Farah Abu Maizar | Food Lover
Good morning! If there’s one thing we like doing Good morning! If there’s one thing we like doing, it’s experimenting with breakfast dishes 🍳.These beauties are froached eggs- poached eggs that are lightly fried and seasoned with breadcrumbs. Best of both worlds! Creamy poached eggs, runny yolk but a little crisp on the white part of the eggs. So good! Inspired by @sveverything , we used our sous vide machine for this but you can do this with regular poached eggs. Recipe can be found linked in bio or at https://everylittlecrumb.com/froached-eggs/ . Team runny yolk anyone? 
.
.
.
.
.
#eggs #poachedeggs #poachedegg #eggsontoast #beautifulcuisines #tasty #delish #foodphotography #foodstyling #foodstylingandphotography #cheeseontoast #foodblogger #foodie #breakfast #brunch #instayum #yum #brunch #tastingtable #f52community #food52 #yolkporn #friday
How I spend a lot of my weekends😂. Nothing like How I spend a lot of my weekends😂. Nothing like a big bowl of cookie dough to say weekend mode on! Are you like me and end up eating more dough than actual cookies? My foolproof recipe I use and post time and time again 👇🏼(and often double the batch so I can store some in the freezer!)

Ingredients:
1 stick butter, softened 113 g
3/4 cup tightly packed brown sugar (I like using 1/2 cup light brown and 1/4 cup dark brown, but you can use either or) 150 g total
1/4 cup white sugar 50 g
1 egg, room temperature
1 tsp vanilla extract
1 3/4 cup all purpose flour 220 g
3/4 tsp baking soda
1/4 tsp salt
1 cup semi-sweet chocolate chips or chunks
flaky salt for topping, optional

Instructions:
-In the bowl of a stand mixer fitted with a paddle attachment, or a handheld mixer, cream together butter, brown sugar, and white sugar for 5 minutes on medium speed until light and fluffy.
-Once five minutes is over, add in egg and vanilla and mix until combined.
In a separate bowl, mix flour, baking soda, and salt, and mix until combined. Add these dry ingredients to the butter mixture on low speed, and mix until just combined.
-Using a wooden spoon or spatula, mix in chocolate chips or chunks until just combined. Place bowl of dough in fridge for at least 30 minutes to chill.
-While dough is chilling, heat oven to 180 C (350F). Portion dough out into heaped 1 tbsp-2 tbsp sized dough pieces on parchment paper lined baking sheets. 
-Bake for 11-12 minutes or until golden brown on the edges but still soft in the center. Cool until cookies firm up, then enjoy, still warm.
.
.
.
.
.

#chocolatecake #cookiemonster #cakestagram #cakephotos #layercake #chocolate #weekendbaking #foodblog #instayum #yummy #bakery #foodporn #foodtographyschool #foodphotography #chocolatechips #delish #foodfluffer #damnthatsdelish #cookiedough #chocatechipcookies #bakes #bakestagram #doughbowl #chocolatechips #hersheys
Bbq salmon bowls with mango avocado salsa- unbelie Bbq salmon bowls with mango avocado salsa- unbelievable! And start to finish, you can be eating these in 15-20 minutes. Save this recipe for your next meal, you don’t want to miss out!

I’ve partnered with @kilosamak to produce a few recipes with their quality seafood- I’ve tried several of their items and genuinely loved them all! They deliver seafood straight to your door for you to enjoy and cook at home. Takes all the guesswork out of trying to choose and clean fish yourself, perfect solution for someone like me who loves seafood but isn’t so great at prepping it! Check out their Instagram page on how to order, or head to the link in my bio.

This salmon has a smoky slightly sweet rub, is baked in the oven for ultimate ease, and gets piled on to rice and topped with an easy, addictive, zingy mango and avocado salsa. Adapted from @pinchofyum , I’ll make this again and again!

Ingredients:
For the salmon:
2 fillets, about 250 g each 
Spice Rub:
2 tbsp brown sugar
1.5 tsp paprika 
1 tsp garlic powder
1 tsp onion powder, optional 
1/2 tsp chili powder
1/2 tsp salt 
2 tbsp olive oil 

Mango avocado salsa:
1 diced mangos 
1 diced avocado
1/4 cup finely diced coriander 
1/4 cup finely diced red onion 
1 inch spicy green chili pepper, finely chopped
1 tsp honey
Juice and zest of one lime
Salt to taste

Method:
- Make the salsa by mixing together all the salsa ingredients and placing bowl in fridge while you make the salmon.
- Heat oven to 240C, and line a baking sheet with parchment paper. 
-Mix together all the ingredients for the salmon rub, and rub thoroughly all over the salmon, both sides.
- Bake for 10-12 minutes until salmon is opaque and cooked all the way through.
-Assemble bowls with rice, flaked pieces of salmon,and plenty of mango avocado salsa. Enjoy 😍

Catch the steps in my story!
Have you tried this pasta yet? Save this for your Have you tried this pasta yet? Save this for your next weeknight meal! Saucy macarona iltaybeen, can’t get much more comforting.  Adapted from @jedir3waish , makes for an easy delicious main that’ll make your family including kids very happy! Can find a step by step linked bio, or at https://everylittlecrumb.com/macarona/ , or in my story!

INGREDIENTS:
 
2 tbsp olive oil, divided
big pinch of salt
3 heaped tbsp tomato paste, divided 2 oz or 70 g
1 pack elbow macaroni 14 oz or 400 g
1 onion, very finely diced
1 zucchini, finely diced
1 carrot, finely diced
4-5 garlic cloves, minced
250 g ground beef
1 tsp seven spices
1 tsp turmeric
1/2 tsp paprika powder
1/4 tsp basil
1/4 tsp cinnamon powder
1/4 tsp garlic powder
1/2 tsp black pepper
1 tsp salt
1 can crushed tomatoes 14.5oz (400g)

NSTRUCTIONS
 
Bring a large pot of water to boil, add 1 tbsp olive oil and the salt, one tbsp of tomato paste, then the pack of pasta. Cook until al dente, then drain the pasta, reserving the pasta water. Set cooked pasta aside.

In a large skillet, heat the remaining tbsp of olive oil. Once hot, add the diced onion, and cook for 4-5 minutes until softened. Add the diced zucchini and carrots, and garlic and cook for a further 4-5 minutes until softened slightly.

Add the ground beef, and cook, smushing with a wooden spoon to break up the meat. Keep cooking until the beef is browned and cooked through, then optionally, drain the fat.
Add in the salt, pepper, and all the spices. Cook for another minute or so. Add the remaining 2 tbsp of tomato paste, and stir.

Add the can of crushed tomatoes and stir to combine. Bring to a simmer, then add a big ladleful of the reserved pasta water and simmer for 2-3 minutes on low heat.

Add the pasta to the sauce (I don't always add all the pasta, maybe 3/4 of the cooked amount until the finished dish is as saucy as I like). Stir to coat, cook for another minute or so until the pasta is warmed through, then enjoy!
This gorgeous tiramisu was so kindly sent to me by This gorgeous tiramisu was so kindly sent to me by @cadysweets.sa on my birthday, and we enjoyed every light fluffy bite of it. Their old account got hacked so follow along and support their new account ! They have a bunch of cakes and sweets for every occasion, so make someone or yourself happy and order one for a treat🤩! Send this to the tiramisu lover in your life 🍰.
.
.
.
.
.

#chocolatecake #magnoliabakery #cakestagram #cakephotos #layercake #chocolate #ganache #foodblog #instayum #yummy #bakery #foodporn #foodtographyschool #foodphotography #slice #delish #foodfluffer #damnthatsdelish #tiramisu #birthdaytreat #dessertbae #dessertoftheday #scoop #foodstyling #foodstylingandphotography
Easiest at home crusty bread with a great open cru Easiest at home crusty bread with a great open crumb texture. It’s the no knead bread from @breadin5 and has yet to fail me. Check my story for the step by step, and swipe for a video reveal.

Ingredients for two small loaves:
1.5 cups lukewarm water 
1/2 tbsp any type of yeast
1/2 tbsp salt
3 1/4 cup plain flour (450g)

Method:
In a large bowl, stir together the water with the yeast and salt. Try to dissolve but it’s fine if you have clumps.
2. Add flour all at once and stir, just until no flour patches remain.
3. Cover loosely with a kitchen cloth and leave it to rest for 2 hours in a warm place until risen and bubbly.
After this rest you can:
- Use dough immediately if impatient, but it’s easier to work with if cold, so maybe pop in fridge briefly
- Or, their recommended method and the one I do, leave in the fridge loosely covered for 12 hours or overnight. 
Refrigerated dough lasts up to two weeks, and flavor depends over time!
4. The next day, the dough might look deflated. That’s fine! When ready to bake, divide dough in half (I got two 400g dough balls)- it might be easier to handle if you sprinkle the dough lightly with flour, and take the half you are going to bake out of the fridge. Let it rest on a parchment paper lined baking sheet 40-90 minutes. The longer the more interior bubbles you should have. Preheat oven to 235C (450F), and after rest, make a few deep slashes in the dough with a sharp knife.
5. Place in the middle rack of the oven, and on the bottom rack place a roasting pan that had about a cup of hot water in it. This will create steam which gives a crustier crust!
6. Bake for 30-35 minutes or until deep golden brown.
7. Let it cool completely before enjoying!
.
.

.
.
.

#damnthatsdelish #foodfluffer #thebakefeed #feedfeed #tastingtable #forthemaking #BHGfood #foodblogfeed #bakedfromscratch #bakinglove #f52grams #foodbloggerpro #bakersofinstagram #TOHfoodie #foodphotography #canonphotos #bread #instayummy #kitchn #huffposttaste #food #dough #foodie #nokneadbread #homemadebread #doughter
Good morning! With dine in still closed in Saudi, Good morning! With dine in still closed in Saudi, Friday pancakes are fast becoming a tradition. And honestly, I don’t think I’ve had better pancakes at any restaurant recently! The easiest, fluffiest diner style pancakes are a huge hit in our family, find the recipe below adapted from @allrecipes . I like to barely warm the oven (110C or so) and keep the finished pancakes in a pan in the oven until I’m done with all the batter so they stay warm and perfect 👌🏼.

Ingredients
3/4 cup milk 170g
1 tbsp white vinegar
1 cup flour 125g
2 tbsp sugar 25g
1 tsp baking powder
1/2 tsp baking soda
1/4 tsp salt
1 egg room temperature
1/2 tsp vanilla
2 tbsp butter, melted 28g

Instructions:
-In a large bowl, combine the milk and vinegar, and let aside to stand for 5 minutes until curdled. Whisk to combine.
-In a separate large bowl, mix together the flour, sugar, baking powder, baking soda and salt.
-Add an egg, the vanilla and the melted butter to the buttermilk and whisk to combine.
-Add the dry ingredients all at once to the wet, and whisk until flour patches disappear. A few lumps are fine, but don't over mix.
-Let the batter rest for 5-10 minutes while you heat a pan on the stove.
lightly grease the pan with nonstick spray or butter, and pour about 1/4 cup of batter on the pan. Cook for 2-3 minutes on each side or until golden brown. (Flip the first time once you see bubbles form and the edges of the pancake dry up).
-Enjoy with toppings of your choice!
.
.
.
.
.
#pancakes #pancakerecipe #blueberrypancakes #maplesyrup #breakfast #morningslikethese #fridaymorning #flatlay #foodfluffer #breakfastrecipes #breakfastfood #breakfastofchampions #pancakelover #food #foodtography #foodtographyschool #foodphotography #delish #foodphotos #weekendbreakfast #eatingathome #recipeoftheday #foodporn #foodflatlay #blueberries #trayoftheday
One of my photos from my shoot @tackle.baks . How One of my photos from my shoot @tackle.baks . How insane does this tom yum soup look? For those who haven’t tried this casual seafood spot yet, you really should! The food is great and priced very reasonably, and they have some menu items I’m obsessed with like their crispy fish burger, the salmon poke salad and the creamy truffle shrimp👌🏼. They currently have a delivery offer going for only 5SAR on HungerStation, so no time like the present! Have I tempted you with this photo of the tom yum soup? I’m hungry just writing this caption🤤.
.
.
.
.
.
#soup #tomyum #tomyumsoup #food #foodphotography #canonphotography #canon #seafood #seafoodlover #shrimp #delish #beautifulcuisines #foodtographyschool #foodtography #foodblogger #instayum #lonelyplanetfood #dametravelerfoodie #soupseason #restaurantphotography #khobar #tastemade #tastingtable #foodfluffer
Load More... Follow on Instagram

Copyright © 2019 on the Seasoned Pro Theme