• Skip to primary navigation
  • Skip to main content
  • Skip to primary sidebar
  • Skip to footer

 logo

  • Recipes
    • Breakfast
    • Sides
    • Soup
    • Main Meals
    • Healthy
    • Dessert
    • Drinks
  • Eating Out
  • About Me
    • Privacy Policy
  • Resources
    • Must Have Kitchen Tools
  • Nav Social Menu

    • Email
    • Facebook
    • Instagram
    • Pinterest

Dutch Baby

Apr 8, 2019 · 15 Comments

Jump to Recipe
5 minutes of prep, and you get a delicious golden puffy oven baked pancake.

Pancakes are good right? We can all agree on that. A reliable weekend morning starter, great mood picker up. Crepes are good too. I don’t think I’ve ever met anyone who doesn’t like crepes. So, a hybrid pancake and crepe must be delicious. Meet the Dutch Baby.

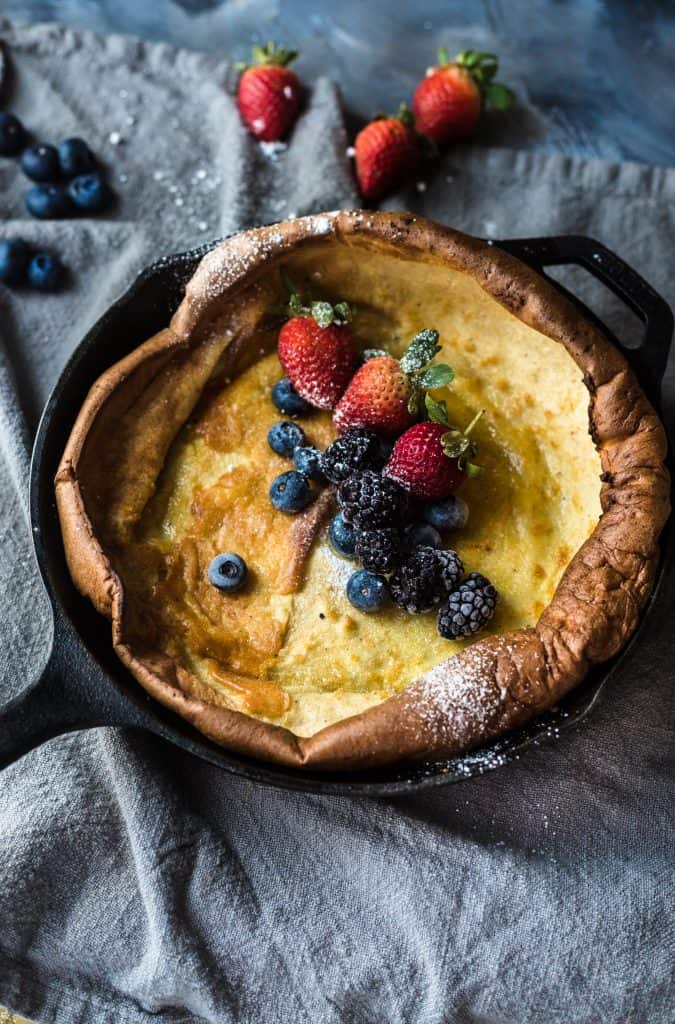
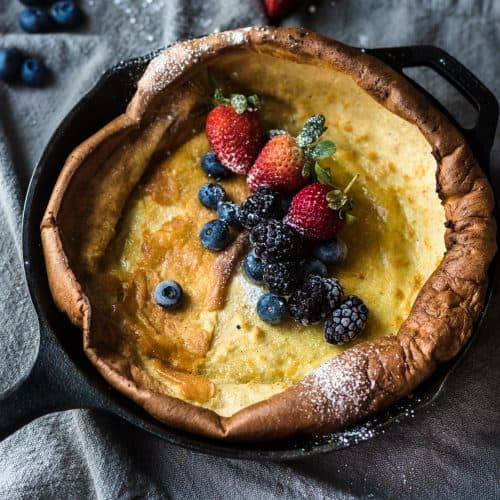
Have you ever tried a Dutch Baby? It’s like a light as air huge puffy pancake that kind of looks like a crepe exploded. Made without any leavening agent, but rises sky high. It’s unbelievably easy to make but spectacular to look at. It falls quickly so eat it right when it comes out of the oven!

They are light, buttery, delicious and different. Just toss all the ingredients (except the butter which you’ll melt directly in your pan) into a blender if you have one. If you don’t, just whisk them vigorously. Blend, pour, bake. Eat, enjoy! Voila. They look much more intimidating than they actually are. The New York Times made the recipe super easy!

The Ingredients:

The interesting thing is that there’s no leavening agent in a dutch baby (baking powder, baking soda). That’s part of what makes them different than pancakes. The base is similar, eggs, flour, milk, sugar and melted butter. The pinch of freshly grated nutmeg really gives these a great flavor but feel free to leave it out, or substitute some other spice. Can we stop to picture how amazing a saffron dutch baby would be?

Baking the baby:

Imagine a world where you could get the glory of pancakes without standing at the stove for foreveeeer. You can! Just pour the dutch baby batter into a cast iron skillet that’s been coated in melted butter, go do something for 25 minutes, then come back and enjoy.

Dutch Baby topping ideas:

These just scream berries to me, but they’d be excellent with just a little lemon juice and sugar, some jam, or maple syrup. The baby is your playground so go wild!

5 minutes of prep, and you get a delicious golden puffy oven baked pancake.

Dutch Baby

A puffy hybrid between a crepe and a pancake that’s baked up in an oven skillet. Delightful!
4.72 from 7 votes
Print Pin
Rate
Course: Breakfast
Cuisine: American
Keyword: blueberries, dessert, berry, healthy, gluten free, oats,, breakfast, crepe, dutch baby, pancakes
Prep Time: 5 minutes
Cook Time: 25 minutes
Total Time: 30 minutes
Servings: 4
Calories: 133kcal
Author: Farah Abumaizar

Ingredients

  • 3 eggs
  • 1/2 cup flour
  • 1/2 cup milk
  • 1 tablespoon sugar
  • 1/4 tsp vanilla extract
  • pinch nutmeg optional
  • 4 tbsp butter

Instructions

  • Preheat oven to 220 C (425F).
  • Combine the eggs, sugar, milk, flour, vanilla, and nutmeg and blend until smooth. You can also just whisk thoroughly by hand.
  • In a heavy 10 inch skillet or baking pan, put the butter. Place it in the oven until the butter melts. watching carefully so it doesn’t burn. One butter is melted, remove pan from oven and pour in all the batter.
  • Return the pan to the oven, and bake for 20 minutes until puffed and golden. Reduce oven temperature to 150 C (300 F) and bake for 5 minutes longer.
  • Remove from oven and serve immediately by cutting into wedges and top with toppings of your choice. Berries and maple syrup are always a good idea! You can also try jam, butter and sugar, honey.

Notes

Recipe from Florence Fabricant for the New York Times.
Tried this recipe?Mention @everylittlecrumb or tag #everylittlecrumb!

Nutrition

Calories: 133kcal

Breakfast, Recipes berries, breakfast, pancakes

Previous Post: « Homemade Chicken Broth
Next Post: Chocolate Date Truffles »

Reader Interactions

Comments

  1. Ranya says

    April 12, 2019 at 8:36 am

    5 stars
    Loved these! So much easier than I expected.

    Reply
  2. Ron says

    November 8, 2019 at 10:13 pm

    3 stars
    As someone who loves making Dutch Babies, this recipe just does not work. You will not get those wonderful puffy crispy edges they have in the picture (I think that’s a stock photo of a Dutch Baby, there’s no way that came out from this recipe). The whole thing came out as just a flat cake with an almond flour texture.

    Reply
    • Farah Abumaizar says

      November 12, 2019 at 8:52 am

      Hi Ron! So sorry to hear that, I can assure you this is absolutely my own photograph of the same recipe that I posted. I’m not sure why it didn’t work out for you! I just made it again this weekend with a caramel apple topping I’m about to post and it worked out just fine as well. Are you sure our pan and oven were very hot when you poured the batter in?

      Reply
      • KAREN says

        February 16, 2020 at 6:17 pm

        Making this recipe this morning… actually 2…almost ready to take out of oven…high crispy sides. Can’t fail…ingredients should’ve room temp.

        Reply
        • Farah Abumaizar says

          February 17, 2020 at 11:14 am

          Great! Did you enjoy it Karen?

          Reply
  3. Michelle Miller says

    November 12, 2019 at 9:56 am

    5 stars
    As a huge pancake fan, I cannot tell you how this is making my mouth water 🙂 Absolutely amazing!!!! I am trying this asap.

    Reply
    • Farah Abumaizar says

      November 12, 2019 at 10:13 am

      Thanks Michelle for your comment! Hope you love this 🙂

      Reply
  4. katherine says

    November 12, 2019 at 1:37 pm

    5 stars
    This is such a gorgeous Dutch Baby! Thanks for the recipe.

    Reply
    • Farah Abumaizar says

      November 13, 2019 at 8:57 am

      Thanks Katherine!

      Reply
  5. Danielle says

    November 12, 2019 at 2:40 pm

    5 stars
    I LOVE dutch babies! I’ve never tried making one at home though – I’m definitely going to try this. Your photos are gorgeous too!

    Reply
    • Farah Abumaizar says

      November 13, 2019 at 8:57 am

      It’s the easiest thing ever! Thanks Danielle!

      Reply
  6. Kacie says

    November 12, 2019 at 3:56 pm

    5 stars
    Mmm, you’re making me hungry. I have some fresh whole nutmeg in my cupboard which I bought when I visited Grenada (the Spice Island!) earlier this year. Maybe I’ll just have to give your recipe a go!

    Reply
    • Farah Abumaizar says

      November 13, 2019 at 8:57 am

      Oh wow that must be some glorious nutmeg! I hope you do and love it!

      Reply
  7. kim says

    November 12, 2019 at 4:02 pm

    5 stars
    Absolutely phenomenal! Will definitely make again. My husband it too!

    Reply
    • Farah Abumaizar says

      November 13, 2019 at 8:56 am

      So glad to hear it Kim:))

      Reply

Leave a Reply Cancel reply

Your email address will not be published. Required fields are marked *

Recipe Rating


Primary Sidebar

Get more stuff

Subscribe to our mailing list and get interesting stuff and updates to your email inbox.

Thank you for subscribing.

Something went wrong.

we respect your privacy and take protecting it seriously

FeedFeed

Featured Recipes

Nana tea

Halal Guys Chicken and Rice

Aish El Saraya

Instant Pot Enchilada Soup

Death By Chocolate Zucchini Bread

More

Footer

everylittlecrumb

Farah Abu Maizar | Food Lover
Good morning! If there’s one thing we like doing Good morning! If there’s one thing we like doing, it’s experimenting with breakfast dishes 🍳.These beauties are froached eggs- poached eggs that are lightly fried and seasoned with breadcrumbs. Best of both worlds! Creamy poached eggs, runny yolk but a little crisp on the white part of the eggs. So good! Inspired by @sveverything , we used our sous vide machine for this but you can do this with regular poached eggs. Recipe can be found linked in bio or at https://everylittlecrumb.com/froached-eggs/ . Team runny yolk anyone? 
.
.
.
.
.
#eggs #poachedeggs #poachedegg #eggsontoast #beautifulcuisines #tasty #delish #foodphotography #foodstyling #foodstylingandphotography #cheeseontoast #foodblogger #foodie #breakfast #brunch #instayum #yum #brunch #tastingtable #f52community #food52 #yolkporn #friday
How I spend a lot of my weekends😂. Nothing like How I spend a lot of my weekends😂. Nothing like a big bowl of cookie dough to say weekend mode on! Are you like me and end up eating more dough than actual cookies? My foolproof recipe I use and post time and time again 👇🏼(and often double the batch so I can store some in the freezer!)

Ingredients:
1 stick butter, softened 113 g
3/4 cup tightly packed brown sugar (I like using 1/2 cup light brown and 1/4 cup dark brown, but you can use either or) 150 g total
1/4 cup white sugar 50 g
1 egg, room temperature
1 tsp vanilla extract
1 3/4 cup all purpose flour 220 g
3/4 tsp baking soda
1/4 tsp salt
1 cup semi-sweet chocolate chips or chunks
flaky salt for topping, optional

Instructions:
-In the bowl of a stand mixer fitted with a paddle attachment, or a handheld mixer, cream together butter, brown sugar, and white sugar for 5 minutes on medium speed until light and fluffy.
-Once five minutes is over, add in egg and vanilla and mix until combined.
In a separate bowl, mix flour, baking soda, and salt, and mix until combined. Add these dry ingredients to the butter mixture on low speed, and mix until just combined.
-Using a wooden spoon or spatula, mix in chocolate chips or chunks until just combined. Place bowl of dough in fridge for at least 30 minutes to chill.
-While dough is chilling, heat oven to 180 C (350F). Portion dough out into heaped 1 tbsp-2 tbsp sized dough pieces on parchment paper lined baking sheets. 
-Bake for 11-12 minutes or until golden brown on the edges but still soft in the center. Cool until cookies firm up, then enjoy, still warm.
.
.
.
.
.

#chocolatecake #cookiemonster #cakestagram #cakephotos #layercake #chocolate #weekendbaking #foodblog #instayum #yummy #bakery #foodporn #foodtographyschool #foodphotography #chocolatechips #delish #foodfluffer #damnthatsdelish #cookiedough #chocatechipcookies #bakes #bakestagram #doughbowl #chocolatechips #hersheys
Bbq salmon bowls with mango avocado salsa- unbelie Bbq salmon bowls with mango avocado salsa- unbelievable! And start to finish, you can be eating these in 15-20 minutes. Save this recipe for your next meal, you don’t want to miss out!

I’ve partnered with @kilosamak to produce a few recipes with their quality seafood- I’ve tried several of their items and genuinely loved them all! They deliver seafood straight to your door for you to enjoy and cook at home. Takes all the guesswork out of trying to choose and clean fish yourself, perfect solution for someone like me who loves seafood but isn’t so great at prepping it! Check out their Instagram page on how to order, or head to the link in my bio.

This salmon has a smoky slightly sweet rub, is baked in the oven for ultimate ease, and gets piled on to rice and topped with an easy, addictive, zingy mango and avocado salsa. Adapted from @pinchofyum , I’ll make this again and again!

Ingredients:
For the salmon:
2 fillets, about 250 g each 
Spice Rub:
2 tbsp brown sugar
1.5 tsp paprika 
1 tsp garlic powder
1 tsp onion powder, optional 
1/2 tsp chili powder
1/2 tsp salt 
2 tbsp olive oil 

Mango avocado salsa:
1 diced mangos 
1 diced avocado
1/4 cup finely diced coriander 
1/4 cup finely diced red onion 
1 inch spicy green chili pepper, finely chopped
1 tsp honey
Juice and zest of one lime
Salt to taste

Method:
- Make the salsa by mixing together all the salsa ingredients and placing bowl in fridge while you make the salmon.
- Heat oven to 240C, and line a baking sheet with parchment paper. 
-Mix together all the ingredients for the salmon rub, and rub thoroughly all over the salmon, both sides.
- Bake for 10-12 minutes until salmon is opaque and cooked all the way through.
-Assemble bowls with rice, flaked pieces of salmon,and plenty of mango avocado salsa. Enjoy 😍

Catch the steps in my story!
Have you tried this pasta yet? Save this for your Have you tried this pasta yet? Save this for your next weeknight meal! Saucy macarona iltaybeen, can’t get much more comforting.  Adapted from @jedir3waish , makes for an easy delicious main that’ll make your family including kids very happy! Can find a step by step linked bio, or at https://everylittlecrumb.com/macarona/ , or in my story!

INGREDIENTS:
 
2 tbsp olive oil, divided
big pinch of salt
3 heaped tbsp tomato paste, divided 2 oz or 70 g
1 pack elbow macaroni 14 oz or 400 g
1 onion, very finely diced
1 zucchini, finely diced
1 carrot, finely diced
4-5 garlic cloves, minced
250 g ground beef
1 tsp seven spices
1 tsp turmeric
1/2 tsp paprika powder
1/4 tsp basil
1/4 tsp cinnamon powder
1/4 tsp garlic powder
1/2 tsp black pepper
1 tsp salt
1 can crushed tomatoes 14.5oz (400g)

NSTRUCTIONS
 
Bring a large pot of water to boil, add 1 tbsp olive oil and the salt, one tbsp of tomato paste, then the pack of pasta. Cook until al dente, then drain the pasta, reserving the pasta water. Set cooked pasta aside.

In a large skillet, heat the remaining tbsp of olive oil. Once hot, add the diced onion, and cook for 4-5 minutes until softened. Add the diced zucchini and carrots, and garlic and cook for a further 4-5 minutes until softened slightly.

Add the ground beef, and cook, smushing with a wooden spoon to break up the meat. Keep cooking until the beef is browned and cooked through, then optionally, drain the fat.
Add in the salt, pepper, and all the spices. Cook for another minute or so. Add the remaining 2 tbsp of tomato paste, and stir.

Add the can of crushed tomatoes and stir to combine. Bring to a simmer, then add a big ladleful of the reserved pasta water and simmer for 2-3 minutes on low heat.

Add the pasta to the sauce (I don't always add all the pasta, maybe 3/4 of the cooked amount until the finished dish is as saucy as I like). Stir to coat, cook for another minute or so until the pasta is warmed through, then enjoy!
This gorgeous tiramisu was so kindly sent to me by This gorgeous tiramisu was so kindly sent to me by @cadysweets.sa on my birthday, and we enjoyed every light fluffy bite of it. Their old account got hacked so follow along and support their new account ! They have a bunch of cakes and sweets for every occasion, so make someone or yourself happy and order one for a treat🤩! Send this to the tiramisu lover in your life 🍰.
.
.
.
.
.

#chocolatecake #magnoliabakery #cakestagram #cakephotos #layercake #chocolate #ganache #foodblog #instayum #yummy #bakery #foodporn #foodtographyschool #foodphotography #slice #delish #foodfluffer #damnthatsdelish #tiramisu #birthdaytreat #dessertbae #dessertoftheday #scoop #foodstyling #foodstylingandphotography
Easiest at home crusty bread with a great open cru Easiest at home crusty bread with a great open crumb texture. It’s the no knead bread from @breadin5 and has yet to fail me. Check my story for the step by step, and swipe for a video reveal.

Ingredients for two small loaves:
1.5 cups lukewarm water 
1/2 tbsp any type of yeast
1/2 tbsp salt
3 1/4 cup plain flour (450g)

Method:
In a large bowl, stir together the water with the yeast and salt. Try to dissolve but it’s fine if you have clumps.
2. Add flour all at once and stir, just until no flour patches remain.
3. Cover loosely with a kitchen cloth and leave it to rest for 2 hours in a warm place until risen and bubbly.
After this rest you can:
- Use dough immediately if impatient, but it’s easier to work with if cold, so maybe pop in fridge briefly
- Or, their recommended method and the one I do, leave in the fridge loosely covered for 12 hours or overnight. 
Refrigerated dough lasts up to two weeks, and flavor depends over time!
4. The next day, the dough might look deflated. That’s fine! When ready to bake, divide dough in half (I got two 400g dough balls)- it might be easier to handle if you sprinkle the dough lightly with flour, and take the half you are going to bake out of the fridge. Let it rest on a parchment paper lined baking sheet 40-90 minutes. The longer the more interior bubbles you should have. Preheat oven to 235C (450F), and after rest, make a few deep slashes in the dough with a sharp knife.
5. Place in the middle rack of the oven, and on the bottom rack place a roasting pan that had about a cup of hot water in it. This will create steam which gives a crustier crust!
6. Bake for 30-35 minutes or until deep golden brown.
7. Let it cool completely before enjoying!
.
.

.
.
.

#damnthatsdelish #foodfluffer #thebakefeed #feedfeed #tastingtable #forthemaking #BHGfood #foodblogfeed #bakedfromscratch #bakinglove #f52grams #foodbloggerpro #bakersofinstagram #TOHfoodie #foodphotography #canonphotos #bread #instayummy #kitchn #huffposttaste #food #dough #foodie #nokneadbread #homemadebread #doughter
Good morning! With dine in still closed in Saudi, Good morning! With dine in still closed in Saudi, Friday pancakes are fast becoming a tradition. And honestly, I don’t think I’ve had better pancakes at any restaurant recently! The easiest, fluffiest diner style pancakes are a huge hit in our family, find the recipe below adapted from @allrecipes . I like to barely warm the oven (110C or so) and keep the finished pancakes in a pan in the oven until I’m done with all the batter so they stay warm and perfect 👌🏼.

Ingredients
3/4 cup milk 170g
1 tbsp white vinegar
1 cup flour 125g
2 tbsp sugar 25g
1 tsp baking powder
1/2 tsp baking soda
1/4 tsp salt
1 egg room temperature
1/2 tsp vanilla
2 tbsp butter, melted 28g

Instructions:
-In a large bowl, combine the milk and vinegar, and let aside to stand for 5 minutes until curdled. Whisk to combine.
-In a separate large bowl, mix together the flour, sugar, baking powder, baking soda and salt.
-Add an egg, the vanilla and the melted butter to the buttermilk and whisk to combine.
-Add the dry ingredients all at once to the wet, and whisk until flour patches disappear. A few lumps are fine, but don't over mix.
-Let the batter rest for 5-10 minutes while you heat a pan on the stove.
lightly grease the pan with nonstick spray or butter, and pour about 1/4 cup of batter on the pan. Cook for 2-3 minutes on each side or until golden brown. (Flip the first time once you see bubbles form and the edges of the pancake dry up).
-Enjoy with toppings of your choice!
.
.
.
.
.
#pancakes #pancakerecipe #blueberrypancakes #maplesyrup #breakfast #morningslikethese #fridaymorning #flatlay #foodfluffer #breakfastrecipes #breakfastfood #breakfastofchampions #pancakelover #food #foodtography #foodtographyschool #foodphotography #delish #foodphotos #weekendbreakfast #eatingathome #recipeoftheday #foodporn #foodflatlay #blueberries #trayoftheday
One of my photos from my shoot @tackle.baks . How One of my photos from my shoot @tackle.baks . How insane does this tom yum soup look? For those who haven’t tried this casual seafood spot yet, you really should! The food is great and priced very reasonably, and they have some menu items I’m obsessed with like their crispy fish burger, the salmon poke salad and the creamy truffle shrimp👌🏼. They currently have a delivery offer going for only 5SAR on HungerStation, so no time like the present! Have I tempted you with this photo of the tom yum soup? I’m hungry just writing this caption🤤.
.
.
.
.
.
#soup #tomyum #tomyumsoup #food #foodphotography #canonphotography #canon #seafood #seafoodlover #shrimp #delish #beautifulcuisines #foodtographyschool #foodtography #foodblogger #instayum #lonelyplanetfood #dametravelerfoodie #soupseason #restaurantphotography #khobar #tastemade #tastingtable #foodfluffer
Load More... Follow on Instagram

Copyright © 2019 on the Seasoned Pro Theme