• Skip to primary navigation
  • Skip to main content
  • Skip to primary sidebar
  • Skip to footer

 logo

  • Recipes
    • Breakfast
    • Sides
    • Soup
    • Main Meals
    • Healthy
    • Dessert
    • Drinks
  • Eating Out
  • About Me
    • Privacy Policy
  • Resources
    • Must Have Kitchen Tools
  • Nav Social Menu

    • Email
    • Facebook
    • Instagram
    • Pinterest

Homemade Chicken Broth

Apr 1, 2019 · 2 Comments

Jump to Recipe
Easy Homemade Chicken Broth made with Whole Chickens and Vegetables

What’s the difference between chicken broth and chicken stock?

I actually didn’t know this before setting out to write this post! So, I googled. Stock is usually made with just the bones of the animal (sometimes roasted in advance to enhance the flavor). Homemade chicken broth is made using both the meat and bones and usually takes less time- 3 hours as opposed to 8 hours! It’s also usually thinner. Both are very healthy and delicious!

Benefits of Homemade Chicken Broth:

Bone Broth has come into fashion recently in the nutritional world as being an all around powerhouse. We all know chicken soup is good for us when we are fighting a cold, but there’s a myriad of benefits. Bone broth can boost immunity, improve gut function, maintain healthy skin and joints, and detoxify our body. It contains over 19 amino acids. Every part of our body benefits from these, from our gut to our brain, muscles and ligaments.

Different Ways to Make Chicken Broth:

You can make chicken stock out of leftover chicken bones from a previous meal. Or, you can boil the chicken with the bones in, cooking the chicken at the same time as making the stock. I prefer this method because you’ll end up getting perfectly cooked chicken so that’ll be the method reflected below.

What do you need to make chicken broth?

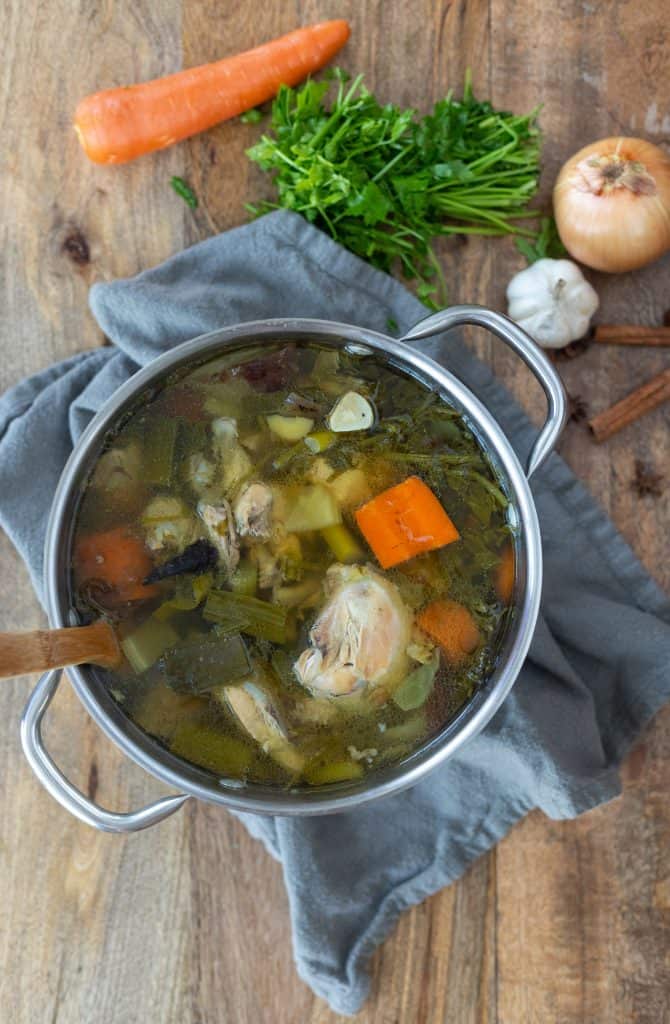
You need good quality chicken, either whole or cut into pieces. The bones of said chicken, a bunch of fresh herbs. Some aromatics like bay leaves, cinnamon sticks, peppercorn and star anise if you have that on hand. You basically need a mixture of fresh herbs, aromatics, and root vegetables. We like to throw in carrots, celery, and parsnips, but this heavily depends on what you have available! Onions and garlic are a must.

Storing Chicken Broth:

Homemade chicken stock can be stored for 3-4 days in an airtight jar in the fridge, or up to 6 months in the freezer. I love having chicken stock in the freezer in airtight freezer bags.. You don’t even need to thaw it before cooking. Just dump it in the sauce pan and it’ll melt quickly over a low heat.

Using Chicken Broth:

Once you make homemade chicken stock, and smell how fragrant and delicious it is, you’ll have no problems drinking it just as it is. Otherwise, this is amazing to have in the freezer and use for homemade soups and stews, to cook up grains like rice, freekeh, quinoa, or bulgur with lots of extra flavor and nutritions, as the base for sauces, etc. There’s a lot of ways to use this up so don’t hesitate to make big batches then portion and freeze as discussed above.

Easy Homemade Chicken Broth made with Whole Chickens and Vegetables

Homemade Chicken Broth

Farah Abumaizar
Easy and very nutritious chicken broth, made in one pot. You’ll get the bone broth and cooked shredded chicken out of this. Great starting point for many recipes!
Print Recipe Pin Recipe
Prep Time 10 mins
Cook Time 3 hrs
Total Time 3 hrs 10 mins
Course Main Course
Cuisine American
Servings 4 people
Calories 40 kcal

Ingredients
  

  • 1 chicken, whole or cut into pieces We had the butcher remove the skin
  • 2 large carrots, thickly sliced
  • 2 onions cut into wedges
  • 1 bunch fresh herbs of your choice, I like parsley or coriander
  • 1 head garlic, roughly chopped
  • 2 large celery, roughly chopped
  • 1 parsnip roughly chopped (optional)
  • 2 bay leaves
  • 3 star anise
  • 2 cinnamon sticks
  • 10 whole black peppercorns
  • 4 pieces whole cardamom

Instructions
 

  • Place all the ingredients in a large pot, then add enough water to just cover everything.
  • Bring to a boil over medium heat, then reduce to a simmer.
  • Skim off the foam that accumulates on top and discard. You may have to do this several times during the cooking process. Simmer for 3-4 hours.
  • Once stock is ready and chicken is cooked, Strain the chicken stock to separate chicken from the broth.
  • Remove all the aromatics and vegetables and discard. Set chicken aside to cool until you can handle it, then shred the chicken meat off the bones. You can use this immediately, refrigerate for 3-4 days, or freeze for 4-6 months.
  • Let the broth cool slightly then store in refrigerator for 8 hours or overnight. After chilling, skim the fat off the surface, and your broth is ready to be used, or refrigerated in a tightly stored container for 3-4 days, or frozen for 6 months.

Notes

The below nutritional label includes a portion of the shredded chicken meat as well as the broth.
Keyword broth, chicken, healthy, stock, vegetables

Healthy, Recipes broth, chicken, healthy, stock, vegetable

Reader Interactions

Comments

  1. Shannel says

    November 18, 2019 at 1:15 pm

    Can I make this recipe using back bone and breast chicken only ? Ofcourse along side the vegis.
    Looks really delicious and easy especially the freezing up to 6months part lol. I’m a goto kinda person so I kinda sometimes freeze my food (alotta times)

    Reply
    • Farah Abumaizar says

      November 18, 2019 at 8:33 pm

      You absolutely can! This recipe is completely adaptable and flexible. I love freezing my food in advance and finding treasures in the freezer for those busy days!

      Reply

Leave a Reply Cancel reply

Your email address will not be published. Required fields are marked *

Recipe Rating


Primary Sidebar

Get more stuff

Subscribe to our mailing list and get interesting stuff and updates to your email inbox.

Thank you for subscribing.

Something went wrong.

we respect your privacy and take protecting it seriously

FeedFeed

Featured Recipes

Egyptian Goulash

Pink Hummus

Orange Blossom Cake

Arayes

Sahleb

More

Footer

everylittlecrumb

Farah Abu Maizar | Food Lover
Magic bars. Addictive! And so easy to make- a dige Magic bars. Addictive! And so easy to make- a digestive biscuit crust topped with chocolate chips and butterscotch chips, walnuts or pecans, sweetened coconut and condensed milk and baked until golden brown and bubbly. I dare you to stop at one! This weeks recipe for @tamimimarkets is a keeper- they have the best range of chocolate chips!

Ingredients:

2 cups digestive biscuit crumbs (200g)
1/2 cup butter, melted (113g)
1 cup semi sweet chocolate chips (150g)
1 cup butterscotch chips (150g)
3/4 cup chopped walnuts or pecans (100g)
1 cup sweetened shredded coconut (signature select)
1/2-2/3 container sweetened condensed milk (400g container)

Method:
1. Preheat oven to 180C. Mix the biscuit crumbs and melted butter until well combined, then press into a parchment paper lined 9x13 inch pan.
2. Layer by scattering the chocolate chips on top of the biscuits, followed by the butterscotch chips, the walnuts, then the shredded coconut. Evenly drizzle the condensed milk on top.
3. Bake for 25-38 minutes or until edges are golden brown and the condensed milk is bubbling. Cool completely before slicing.
I know that the weekend is over, but you can keep I know that the weekend is over, but you can keep the party going with easy sheet pan nachos. For a recent game night, we actually made our nacho chips from scratch and it was so easy (and yum!), I’ll probably never buy store bought tortilla chips again. To make homemade tortilla chips:

Ingredients:
As many corn tortillas as you want, we used 12 small corn tortillas 
Some salt for sprinkling.

Method: 
-Heat the oven to 190C (375F). Cut the tortillas into wedges, each tortilla will give you six wedges. 
- Lay in a single layer on a baking sheet. Bake for 6-7 minutes until starting to turn golden brown, then sprinkle with salt and turn over for another 6-7 minutes until golden brown and crunchy.
- Make nachos by sprinkling the tortilla chips with shredded cheddar cheese, and adding optionally refried beans and cooked ground beef. Bake until cheese is melted then remove from oven and top with anything you like:
- We used diced tomatoes, diced avocados, jalapeños, sliced black olives and chopped coriander. Serve with sour cream and salsa on the side 😍🥳 
.
.
.
.
.

#cakephotos #layercake #chocolate #ganache #foodblog #instayum #yummy #bakery #foodporn #foodtographyschool #foodphotography #slice #delish #foodfluffer #damnthatsdelish #nachos #tortilla #tortillachips #partyfood #chipsandsalsa #mexicanfood #gamenight #sheetpan
We celebrated my husbands birthday with lots of tr We celebrated my husbands birthday with lots of treats, but this cake from home business @littlecakecompanyy really stood out! The talented young woman behind this home business made him a gorgeously decorated cake we devoured. Moist and fluffy chocolate cake layered with Oreo cheesecake filling. Dreamy! I loved the alternative to a regular buttercream filling and the cake itself is so soft and moist. Definitely check out her page fir her flavors and range- like the Nutella cake pops that my kids fought over lol. Swipe to see the inside, would definitely order a cake from her again! Save this to remind you for your next occasion 🎂🥳.
.
.
.
.
.

#chocolatecake #magnoliabakery #cakestagram #cakephotos #layercake #chocolate #ganache #foodblog #instayum #yummy #bakery #foodporn #foodtographyschool #foodphotography #slice #delish #foodfluffer #damnthatsdelish
I’m totally living the bbq life here. It’s bec I’m totally living the bbq life here. It’s become my mission to grill as many times as possible until it gets too hot to be outdoors. Lots of places in Khobar make it easy! We got these mini slider patties, potato buns, burger sauce and all the prepped and ready cut up veggies from @redmarblesa a newly opened premium butchery. Making hamburgers at home has never been this simple and convenient. I really like that it’s a one stop shot for your complete burger. Their burger sauce is really good too! Save this post for next time a burger craving hits!
.
.
.
.
.

#delish #shishtaouk #cakestagram #skewers #bbqporn #chocolate #bbqseason #foodblog #instayum #yummy #winter #foodporn #foodtographyschool #foodphotography #grill #delish #foodfluffer #damnthatsdelish #coleslaw #kebab #fries #grills #bbq #lebanesefood #middleeasternfood #lamb #sliders #burgers
Definitely one of my favorite ways to start the da Definitely one of my favorite ways to start the day. A cup of black coffee and a slice of cake 😍. Thank you @espresso_bh for always spoiling me with goodies and testing out your baked goods on me. I also have to shout out @azulmarblewll for their gorgeous marble trays. Wishing you all a happy Wednesday!
.
.
.
.
.

#chocolatecake #magnoliabakery #cakestagram #cakephotos #layercake #chocolate #ganache #foodblog #instayum #yummy #bakery #foodporn #foodtographyschool #foodphotography #slice #delish #foodfluffer #damnthatsdelish #espresso #blackcoffee
La Gondola is a classic Italian restaurant in Khob La Gondola is a classic Italian restaurant in Khobar. Every khobari I know has been going to @lagondolaksa since their childhood. The best thing about this restaurant is that it stands the test of time! It’s still as good as it’s been, with excellent service, a varied menu and delicious food. I really love it and always leave happy! Their salads were perfect (caprese and roasted eggplant with yogurt dressing). They have a comforting pumpkin soup in a bread bowl, amazing flatbreads served complimentary as a starter, and great pasta dishes. We had the seafood pasta which was light and tasty (could have used a tad more sauce though), and an off menu penne rose I ask them to make when I’m craving pasta. Excellent meal! My only tip is try hard not to fill up on the starter bread, I always do 😂.
.
.
.
.
.

#carbs #pastalover #pastapasta #linguine #hummus #italianfood #shrimp #penne #veggies #seafoodpasta #pasta #instayum #yummy #bakery #foodporn #foodtographyschool #foodphotography #slice #delish #foodfluffer #damnthatsdelish #foodie #foodies #foodofinstagram
Two of my favorite easy dips, recipes below! I got Two of my favorite easy dips, recipes below! I got you sorted with the ultimate chips and dip platter for all your BBQs and gatherings. @tamimimarkets #brandpartner has the best selection of chips, crackers and pretzels so you can mix and match with healthy and more indulgent types. Could not stop snacking, and the three ingredient labneh dip and creamy beetroot hummus were stars! I also got the ready made Signature salsa👌🏼 and Save this post and send it to your snack loving friends. Which would you go for the labneh or the beetroot?

Beetroot Hummus:
1 roasted beetroot (ready roasted, or roast a whole beetroot in a 200 C oven wrapped in foil for 1 hour or until tender) You can also get the ready cooked ones to save time!
1 can chickpeas, rinsed and drained
2 garlic cloves minced
Juice and zest of one lemon
1/4 cup olive oil
2-3 tbsp of tahini
big pinch salt and pepper
1/4 tsp ground cumin

Blend all ingredients in a blender until well mixed and creamy. If you want it looser, add a little more olive oil at a time. Store in fridge until ready to use.

Labneh Dip:
250 g Labneh
2 170g containers of Laban (yogurt)
1 pack dry vegetable soup mix, no noodles.

Mix all ingredients together until creamy and smooth. Store in fridge until ready to use.

Assemble your platter with the chips, crackers and veggies of your choice. Enjoy!! 
.
.
.
.
.
#chips #dip #chip #beetroot #hummus #hummusrecipe #labneh #healthysnack #veggies #snacks #snackplatter #instayum #yummy #bakery #foodporn #foodtographyschool #foodphotography #slice #delish #foodfluffer #damnthatsdelish #foodie #foodies #foodofinstagram
Arayes make the best lunch. You can grill them (pe Arayes make the best lunch. You can grill them (perfect for bbq season) or oven bake them like I did here. They are basically kafta(Lebanese meat mix) stuffed pita bread baked until crunchy and golden and served with extra pomegranate molasses. Yum! I always dip mine in yogurt 👌🏼

For the kafta:
1/2 lb ground beef 250g
1/2 lb ground lamb 250g
1/2 onion grated or pulsed in food processor
1 handful parsley, finely chopped
1 tbsp pomegranate molasses
1 tsp salt
1.5 tsp seven spices or all spice
1/2 tsp cinnamon powder
1/4 tsp cumin powder
1/4 tsp black pepper
pinch red chili flakes
To assemble:
4-5 large pita breads
olive oil
tomato paste optional
salt for sprinkling

INSTRUCTIONS
 
-Preheat oven to 200C. Prepare baking sheet by lining with parchment paper.
-Add all the ingredients into a large bowl and mix well until combined. You can use a spoon, or gloved hands to mix.
-Cut each pita bread in half, and fill each pita pocket with about 1/4 cup of meat mixture. Cut each half into quarter ( I like using kitchen scissors for this). You can also peel open a pita bread to separate the two halves, spread the meat filling all over evenly, top with the other half then cut into quarters.
-Place all stuffed pita quarters evenly spaced onto the baking sheet, and drizzle both sides with olive oil (you can brush the oil on if you want). I like to rub a little tomato paste on some of the outside of the pita breads, it gives a little color and flavor. -Sprinkle salt onto the pita bread. Bake for 18-20 minutes, flipping over halfway through until both sides are crisp and golden brown.
-Serve warm, preferably drizzled with pomegranate molasses, with a side of yogurt or a simple salad.

#delish #lebanese #kafta #skewers #bbqporn #chocolate #chickenrecipes #foodblog #instayum #yummy #winter #foodporn #foodtographyschool #foodphotography #grill #delish #foodfluffer #damnthatsdelish #foodie #kebab #hummus #grills #bbq #lebanesefood #middleeasternfood #lamb #redmeat #pitabread  #pita
Load More... Follow on Instagram

Copyright © 2019 on the Seasoned Pro Theme