• Skip to primary navigation
  • Skip to main content
  • Skip to primary sidebar
  • Skip to footer

 logo

  • Recipes
    • Breakfast
    • Sides
    • Soup
    • Main Meals
    • Healthy
    • Dessert
    • Drinks
  • Eating Out
  • About Me
    • Privacy Policy
  • Resources
    • Must Have Kitchen Tools
  • Nav Social Menu

    • Email
    • Facebook
    • Instagram
    • Pinterest

Instant Pot Oatmeal

Sep 10, 2020 · 11 Comments

Jump to Recipe
bowl of instant pot oatmeal with blueberries and oatmeal

Using an instant pot to cook oatmeal gives you the creamiest and most delicious oatmeal in a flash! The best way to cook old fashioned or rolled oats, you’ll never go back to a regular saucepan again.

Why cook oatmeal in an instant pot anyway?

oatmeal inside the instant pot

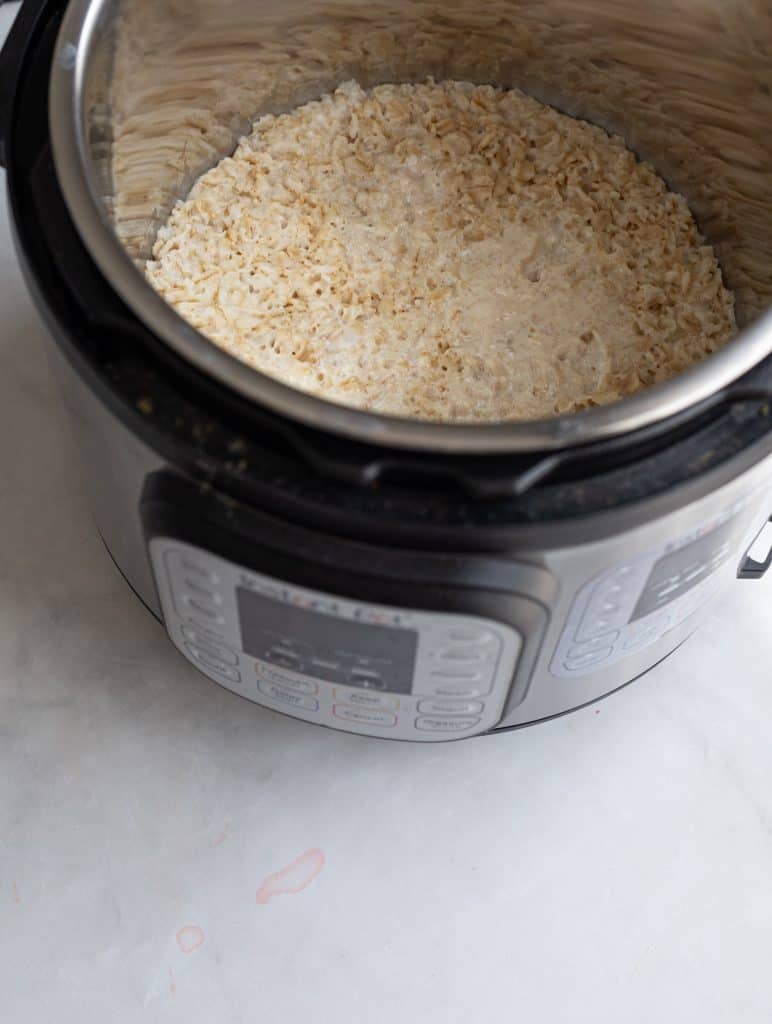
The intense pressure cooking of the instant pot really seals in the milk and water to the oats and fluffs the oats up so beautifully. It really does make a difference. You won’t have any chewy bits, and the oatmeal thickens to perfection.

This is the perfect way to cook oats that usually take longer to cook like rolled or old fashioned oats.

Health benefits of oatmeal:

Oatmeal is a great source of good carbs and fiber. The type of carbs that slowly release into your blood instead of giving you a quick spike.

The fiber in oats can help reduce blood sugar and total cholesterol levels.

Whole oats are rich in antioxidants.

Also, oats are so filling! They keep you satiated and provide you with plenty of energy to go through your day.

How do I make oatmeal in an instant pot?

oatmeal being scooped out of the instant pot

It’s the easiest thing ever! You just need to combine the oatmeal with milk, water, and a pinch of salt in the body of the instant pot.

Using the manual settings, place the Instant pot on high pressure for 3 minutes. Make sure that the valve is set to seal. It’ll take 5-10 minutes to come to pressure, then start to cook and countdown from 3 minutes. Once the countdown is complete, the Instant pot will beep.

After this, let the pressure release naturally for 15-20 minutes, then push the valve to vent to release any remaining steam, and open the Instant pot.

Enjoy the oatmeal immediately!

What’s the difference between rolled and old fashioned oats?

plain oatmeal in a white bowl on a linen napkin

There is no difference. They are the same thing, just different names.

Steel cut oats are different though, as well as quick cooking oats. You can use steel cut oats in this recipe, see the substitution section below but I wouldn’t recommend quick cooking oats which cook too fast and won’t withstand well to the high pressure.

What to top oatmeal with?

complete bowl of oatmeal and berries with a spoon scooping out

The possibilities are endless.

I like some sweetness with my oatmeal, so I often add honey or maple syrup. I also like adding a little sprinkle of brown sugar. It’ll melt on top and give little puddles of indulgent sweetness.

I sometimes add a splash of milk to make the oatmeal a little looser.

I added a dollop of cream to the bowl pictured above and it was next level. It made the oatmeal so creamy and so rich! I loved the combination. I also added fresh blueberries and blackberries and a sprinkle of cinnamon and it was the perfect bowl.

Berry Oatmeal: Top oatmeal with fresh or frozen berries, and a drizzle of honey or maple syrup.

Peanut butter and Banana Oatmeal: Top oatmeal with sliced bananas, a big spoon of peanut (or almond) butter, and some granola for good measure.

Date and nut oatmeal: Top oatmeal with chopped dates or mix in some date paste, add a sprinkle of cinnamon, and some chopped pecans or walnuts.

Chocolate Chip Oatmeal: I firmly believe a square of dark chocolate or handful of chocolate chips is delightful on oatmeal, especially when they become a little melty and warm. Add some along with some nuts and honey or maple syrup if you like.

Savory oatmeal: you can even make savory oatmeal by adding sauteed mushrooms, spinach or kale, and a fried egg on top. It’ll be really good!

Can you double the recipe?

Yes, just double all the ingredients. Cooking time will remain the same!

How to reheat leftover oatmeal:

When reheating, you’ll probably need to add a splash of milk sine it’ll thicken up when stored in the fridge. You can reheat over low heat on the stove top or in the microwave until warmed through.

Substitutions:

You can sub the regular milk with plant milk like almond milk, soy milk, or even oat milk for double the oatiness.

You can substitute rolled oats for steel cut oats. The only thing you’ll need to do is add an extra cup of water! Cooking time and everything else will remain the same.

complete bowl of oatmeal and berries with a spoon scooping out

Instant Pot Oatmeal

The creamiest and easiest old fashioned oatmeal you could have, made easy in an Instant pot!
5 from 5 votes
Print Pin
Rate
Course: Breakfast
Cuisine: American
Keyword: oatmeal, instant pot
Prep Time: 1 minute
Cook Time: 3 minutes
Pressure Release Time: 20 minutes
Servings: 2 people
Calories: 192kcal
Author: Farah Abumaizar

Equipment

  • Instant Pot

Ingredients

  • 1 cup old fashioned oats
  • 1 cup milk
  • 1 cup water
  • pinch of salt

Instructions

  • Add the oats, milk, water and salt to the instant pot. Place the lid on the instant pot and seal.
  • Press manual and set the cooking time for 3 minutes on high. Make sure the pressure valve is sealed. Once the instant pot beeps that the cooking time is up, let the oatmeal sit in the pot for 15-20 minutes for the pressure to naturally release, then flip the pressure valve to vent to release any remaining pressure.
  • Enjoy immediately with toppings of your choice. If you like it creamier you can add an extra splash of milk. Leftover oatmeal can be refrigerated in a tight compartment for 3-5 days.
Tried this recipe?Mention @everylittlecrumb or tag #everylittlecrumb!

Nutrition

Calories: 192kcal

If you liked this recipe, you might like:

Caramelized Banana Oatmeal

Chocolate Avocado Smoothie Bowl

Super Healthy Blueberry Muffins

And check out these other Instant pot recipes:

Instant Pot Orange Chicken

Instant Pot Beef and Broccoli Noodles

Breakfast, Healthy, Instant Pot, Recipes

Previous Post: « Chicken fatteh
Next Post: Philly Cheesesteak Sliders »

Reader Interactions

Comments

  1. Alexandra says

    September 10, 2020 at 10:11 am

    5 stars
    This is the best way to start the day! Such a clever idea to use the IP!

    Reply
    • Farah Abumaizar says

      September 10, 2020 at 10:26 am

      Thank you Alexandra!

      Reply
  2. Priya Shiva says

    September 10, 2020 at 10:23 am

    5 stars
    I have never tried cooking oatmeal in instant pot but Im going to try it out after reading this post.

    Reply
    • Farah Abumaizar says

      September 10, 2020 at 10:23 am

      Creamy perfection

      Reply
    • Farah Abumaizar says

      September 14, 2020 at 12:03 pm

      H wAQQ B

      B
      C

      F

      CGYCC

      Reply
  3. veenaazmanov says

    September 10, 2020 at 11:32 am

    5 stars
    Lovely and delicious breakfast option. Instant pot makes life easier too. I love your description and idea to enjoying Oatmeal with various combinations.

    Reply
    • Farah Abumaizar says

      September 10, 2020 at 12:29 pm

      Thanks so much Veena!

      Reply
  4. Nart at Cooking with Nart says

    September 10, 2020 at 11:57 am

    5 stars
    Such a lovely breakfast recipe. I need to start cooking oats in my instant pot!

    Reply
    • Farah Abumaizar says

      September 10, 2020 at 12:29 pm

      Total game changer!

      Reply
  5. Rachna says

    September 10, 2020 at 12:16 pm

    5 stars
    This is oatmeal as I remember having it in my childhood. So tasty and comforting!

    Reply
    • Farah Abumaizar says

      September 10, 2020 at 12:29 pm

      Thanks Rachna!

      Reply

Leave a Reply Cancel reply

Your email address will not be published. Required fields are marked *

Recipe Rating


Primary Sidebar

Get more stuff

Subscribe to our mailing list and get interesting stuff and updates to your email inbox.

Thank you for subscribing.

Something went wrong.

we respect your privacy and take protecting it seriously

FeedFeed

Featured Recipes

Tamriyeh

Nescafe Cake

Berries and Cream Sara Lee Cake

Kebab Karaz

Eggplant Fatteh

More

Footer

everylittlecrumb

Farah Abu Maizar | Food Lover
Another recipe from @tamimimarkets ‘s catalogue, Another recipe from @tamimimarkets ‘s catalogue, this easy berry trifle has such a Ramadan vibe, this easy berry uses all the ingredients I associate with quick and easy no-bake Ramadan desserts. Thick cream ✅ Dream whip ✅ Condensed milk ✅ . All the things you need for creamy, light goodness. Layer this with buttery Sara Lee pound cake and lots of fresh berries and this will be a dessert you won’t to be able to stop eating😍 Send this to a someone who’d appreciate a quick and easy dessert and look out for the IGTV coming today!

Ingredients
2 containers thick cream  250 g each
1 sachet dream whip powder  28 g
1 sachet creme caramel, powder only (not syrup)  50 g
1/2 cup heavy whipping cream 120 ml
3 tbsp milk
Sweetened condensed milk 200 g, 1/2 large can
For assembling:
1 pack strawberries, halved 227 g,
1 pack raspberries 170 g
1 pack blueberries 170 g
1 pack blackberries 170 g
1 Sara Lee vanilla pound cake, thawed 300 g)

Instructions
-In an electric mixer, add the thick cream, dream whip, creme caramel, whipping cream, and condensed milk. -Beat until thick and fluffy, with soft peaks, about 3 minutes or so.
-Gently rinse the berries and pat dry, and cut the pound cake into large cubes.
-Cut the pound cake into cubes, and layer a trifle dish like so: 1 layer of pound cake cubes, half the cream, 1/2 the cream, and half the berries (a mix of all the berries). 
-Repeat with the second half of pound cake cubes, the second half of the cream and top with the remaining berries. Add whole strawberries and mint leaves to garnish, optional.
-Let the trifle set for a few hours or overnight before enjoying!
.
.
.
.
.
#berries #trifle #triflecake #poundcake #saralee #layercake #creamy #nobake #nobakedessert  #aprilisforarabfood #f52grams #foodfluffer #foodflatlay #foodphotography #foodphotographer #foodstylist #thefeedfeed #ramadan #ramadanrecipes #ramadan2021 #strawberry #strawberrycake #dessert #cakestagram #dessertpic #dessertphotography
You have to know, if I post a chicken recipe it me You have to know, if I post a chicken recipe it means it’s reaaaaaally good. This copy cat Halal guys chicken and rice is unbelievable dish! I got the turmeric rice recipe from @seriouseats and its buttery and perfectly spiced and fluffy and addictive, topped with juicy grilled spiced chicken cubes and a tangy, creamy dressing, tomatoes and parsley. AMAZING! Recipe below and in the @tamimimarkets catalogue❤️.

INGREDIENTS:

For the chicken marinade:
900 g chicken breasts
1/4 cup olive oil
2 tbsp lemon juice
1 tbsp white vinegar
3 garlic cloves, minced
1 tsp salt
1/2 tsp black pepper
1 tsp oregano powder
1 tsp seven spices
1/2 tsp ginger powder
1/2 tsp cumin powder
1/2 tsp paprika powder

For the white sauce:
3/4 cup Greek yogurt 170g (6oz)
1/2 cup mayonnaise 115 g
1 tbsp white vinegar
1 tbsp water
1 tsp lemon juice
1-2 tsp sugar
1/2 tsp salt
1/4 tsp black pepper

For the rice:
2 tbsp unsalted butter
1/2 tsp turmeric powder
1/4 tsp cumin powder
1 1/2 cups basmati rice, soaked for 20 minutes then rinsed
2 1/2 cups chicken stock or 1 stock cube dissolved in 2.5 cups hot water
salt and pepper to taste, a pinch of each

To assemble:
1 chopped tomato
handful chopped parsley
sriracha sauce

INSTRUCTIONS: 
For the chicken:
In a bowl, mix all the ingredients for chicken marinade. Add chicken breast and toss to coat evenly. Cover and marinade for 1-2 hours.

Heat 1 tbsp oil in a large skillet on medium high heat, and cook chicken for 5-6 min each side, or until golden brown and cooked.
Remove chicken to a cutting board, and rest for 10 minutes, before chopping roughly into 2 inch cubes.

For the white sauce:
Mix all ingredients and store in the fridge until ready to serve.

For the rice:
Add butter to a large saucepan over medium heat. Once melted, add the turmeric and cumin, and stir for 1 minutes.
Add the rice, and toast the rice by stirring for 4 minutes. Add chicken stock, salt and pepper to season. Stir and bring to a boil, then reduce heat to a simmer, cover and cook for 15 min, then set aside 15 min and fluff with a fork.

To assemble:
Place the rice in your serving platter, top with the chicken, the white sauce, and chopped tomatoes and parsley. Sriracha too!
This is my go to baked creamy cheesecake. It’s s This is my go to baked creamy cheesecake. It’s so good and rich and easy, topped with a sweet and tangy simple strawberry sauce (sauce recipe from @sallysbakeblog ). I used my new @kenwood_bahrain stand mixer and it was excellent- gave me silky smooth lump free filling. Another winner for my @digitrolley collab- all my new appliances are from them❤️ Check IGTV for recipe video!

For the strawberry topping:
-1 tbsp cornstarch
-3 tbsp water
-450 g strawberries, halved (big pack)
-zest and juice from 1/2 small lemon 
-1/4 cup (50g) sugar

-Whisk together cornstarch and water, then add to a saucepan along with all other ingredients, over medium heat.
-Bring to a simmer, stirring constantly and breaking up strawberries as they cook, 5 minutes or so until thickened. Set aside to cool, can be stored in fridge up to one week.

For the cheesecake:

Ingredients
For the crust:
* 250 g crushed digestive biscuits 2 cups 
* 135 g melted butter 1 stick and 1 tablespoon
* 1/2 tsp cinnamon

For the cheesecake:
* 900 g cream cheese (3 3/4 cup)
* 1 1/2 cup white sugar 300 g
* 3/4 cup milk, room temp
* 4 eggs, room temp
* 1 cup sour cream 240 g
* 1 tbsp vanilla extract
* 1/4 cup all purpose flour 32g

Instructions:

For the crust:
* In a mixing bowl, combine crushed biscuits, the melted butter, and the cinnamon with a fork until crumbs are moistened evenly throughout. Press along the bottom and sides of a lightly greased 9 inch springform pan. Let the crust chill a little in the fridge while you prepare cheesecake.

For the cheesecake:
-Preheat the oven to 180 C
-In  stand mixer, combine the cream cheese with the sugar in a large bowl and mix on medium speed until well combined and fluffy. Blend in the milk, then add the eggs one at a time, mixing briefly after each addition.

-Mix in sour cream, vanilla and flour until smooth. It may be easier to sift in the flour.

-Pour filling into prepared crust. Bake at 180 C for 1 hour, then turn off the oven and leave cheesecake inside for another 5 hours or so until oven has completely cooled. This is to prevent cracking.

* Store cheesecake in fridge after this time period is over until chilled, then top with the strawberry topping.
This, to me, is the sambosa that best embodies Bah This, to me, is the sambosa that best embodies Bahrain- the first- actually the only-place I have these cheesy corn sambosa ❤️. No fancy cheese goes in this, it’s literally the stuff out of a can and take SO melty and cheesy and good. I mix in a little mashed potatoes and it just makes these 💯 times better, creamy and delicious. Posting the full steps on IGTV, it’s so easy you prob won’t need them! Recipe below and tell me- what’s your go to sambosa cheese?

Ingredients
2 small potatoes, peeled and cut into cubes 8 oz total, 235 g
1/2 cup corn kernels, from a can, drained
12 oz American cheese, like Velveeta or Kraft, grated 340 g (2 170g cans of Kraft processed cheese)
pinch salt
pinch black pepper
1/2 pack samosa wrappers each pack is 500 g

Instructions:
-Cover potato cubes with water, and bring to a boil. Reduce heat and simmer until potatoes are completely cooked through. Drain, and mash.

-Let potatoes cool slightly then combine mashed potatoes with the grated cheese, drained corn, salt and pepper. Mix well until the mixture is evenly combined. Taste for and adjust seasoning.

-Fill each samosa wrapper with a tbsp of mixture on the bottom corner, then fold the corner of the samosa up and over the filling to the other side, to make a triangle. Keep folding this triangle over all the way up the top (check the video at the bottom of this recipe card to see how). Mix together the flour and water to form a thick paste, and seal the ends of the samosa to prevent them from opening up while frying.

-Place vegetable oil in a skillet, about 2 inches deep and heat on medium high heat. Once hot enough, add the sambosa and fry for around 2 minutes a side until golden brown. Remove to a paper towel lined plate to absorb some of the excess oil, then enjoy warm.

.
.
.
.
.

#harira #soup #ramadanrecipes #ramadan2021 #ramadan #ramadankareem #vegetablesoup #soupseason #soupsofinstagram #delishkitchen #friedfood #aprilisforarabfood #f52grams #foodfluffer #foodflatlay #foodphotography #foodphotographer #foodstylist #thefeedfeed #middleeasternfood #vegetarian #tasty #tastingtable #tastemade #samosa #sambosa
This is one of my top 5 recipes from this Ramadan’s recipe prep. One of my features does the @tamimimarkets recipe catalogue! Click the link in their bio to access this gorgeous (free!) catalogue.

This harira soup is unbelievable. Hearty and delicious and beautifully spiced- I’ve never been obsessed with harira soup until this one. It’s a simple one because it’s meat free, so it’s perfect to start your iftar with but also hearty enough to totally serve as a meal alongside some sambosas. Recipe below, and IGTV video coming in a bit!

Ingredients
3 tbsp olive oil
1 large onion, diced
3 celery stalks, diced
2 carrots, diced
1 tsp cinnamon powder
1/2 tsp salt
1/2 tsp black pepper
pinch red chili flakes
1/2 cup chopped parsley
1/2 cup chopped coriander(cilantro)
1 can tomato sauce 15 oz (430g)
7 cups vegetable stock or 2 stock cubes dissolved in 7 cups water
1 can drained chickpeas 15 oz (400 g)
1 cup green lentils
1/2 cup vermicelli noodles 50 g
2 lemons, juiced 1/4 cup juice
2 tbsp flour, dissolved in 1/4 cup water* use cornstarch if gluten free

Instructions:
-Start by adding the lentils to a bowl of water and soaking as you prepare the rest of the ingredients, this helps them cook through faster.
-Heat oil in a large saucepan over medium heat, and add the onions, celery and carrots. Saute for 6-8 minutes, until onions soften and turn golden brown.
-Add all the spices, the chopped parsley and chopped coriander, the tomato sauce, and the vegetable stock. Bring the pot to a boil, then add the drained chickpeas and drained lentils. Reduce heat and simmer for 25 minutes or until chickpeas and lentils are tender.
-Add the vermicelli, and let it boil for 3-4 minutes or until tender. Add the lemon juice, and the flour water mixture. Let it simmer another minute or until it thickens, then taste for seasoning and add salt and pepper if necessary.
.
.
.
.
.
#harira #soup #ramadanrecipes #ramadan2021 #ramadan #ramadankareem #vegetablesoup #soupseason #soupsofinstagram #moroccan #moroccanfood #aprilisforarabfood #f52grams #foodfluffer #foodflatlay #foodphotography #foodphotographer #foodstylist #thefeedfeed #veganrecipes #vegan #tasty #tastingtable #tastemade #lentils
Never ever liked vimto until I had it like this 🍧. Vimto smoothies means that the sweetness of vimto is tempered by that cold crunchy shaved ice. Could not stop eating/drinking these vimto slushees! So easy, you just need water, ice, vimto and a high speed blender- my @ninjakitchenme did so well breaking down huge ice chunks👏🏼. Save this for a little twist on your classic iftar drink🥳

Ingredients:
-3/4 cup water
- 3/4 cup vimto 
- 2 cups ice 

Method:
Add the ingredients to your blender in the order listed, and blend on frozen drink mode until slushy like consistency. Add more ice or water if you need to, and enjoy immediately with a spoon/straw. Yum!
.
.
.
.
.

#ramadan #ramadan2021 #ramadanrecipes #iceddrinks #slush #slushy #slushii #berries #syrup #cordial #drinkphotography #damnthatsdelish #foodfluffer #pour #dripshot #foodphotography #foodphotographyandstyling #foodstylist #foodstyling #thefeedfeed #vimto #foodtographyschool #foodtography #beautifulcuisines
A biscuit base topped with a super easy smooth, cr A biscuit base topped with a super easy smooth, creamy pistachio cheesecake and the crowning touch,  @mayadelices ‘s luscious milk chocolate melted and poured over the top. I mean- heavenly! Recipe below, adapted from @savoryandsweetfood ,, IGTV will be uploaded today. I am absolutely loving @mayadelices couverture, great quality baking chocolate thats so fun experimenting with! They have sugar free and vegan options too, and best of all it’s easily available in their shop in Bahrain 🍫👏🏼

Ingredients:

For the crust:
2 cups digestive biscuit crumbs (250 g)
1/2 cup butter melted, 115g
Pinch cinnamon powder

For the pistachio cheesecake filling:

1 cup pistachio powder (140g)
12 Kiri squares or cream cheese (215g)
250 ml thick cream
1/2 of a 400 g tin of sweetened condensed milk, more if you like it sweeter

To top:
1 cup Maya milk chocolate (160g)
pistachios to garnish

Method:
1. Preheat oven to 180C. Grease and line a 8x8 inch pan with parchment paper with extra paper hanging over the sides so you can easily lift out the bars.

2. Mix digestive crumbs with melted butter and cinnamon. Press this firmly into the base of the pan. Refrigerate for 10 minutes.

3. In a food processor, add the pistachio powder, kiri cheese cubes, thick cream, and condensed milk. Blend until well combined and smooth. Pour this mixture into the crust base and bake for 15-20 minutes until set but center is still a little jiggly. Let cool at room temperature for 1 hour then refrigerate for several hours.

4. Melt the milk chocolate gently in the microwave, in 10 second bursts, stirring after each increment. Once smooth and melted, spread over the top of the cheesecake, and refrigerate until set. Enjoy!
.
.
.
.
.
#ramadan #ramadan2021 #ramadanrecipes #cheesecakebars #cheesecakebites #chocolateporn #pistachio #chocolatelover #chocolaterecipes #cheesecakelovers #cheesecakelove #damnthatsdelish #foodfluffer #pour #chocolatedrip #dripshot #foodphotography #foodphotographyandstyling #foodstylist #foodstyling #thefeedfeed #thebakefeed #foodtographyschool #foodtography #beautifulcuisines
Want a Ramadan dessert that takes minutes to make Want a Ramadan dessert that takes minutes to make and tastes amazing? Yeah we all do - I got you! Try this coffee biscuit cake (barely adapted from the wonderful @littlesunnykitchen). Layers of coffee soaked biscuits and a super easy fluffy cream 👌🏼. I used my new @braun_bahrain handheld electric whisk, one of the attachments in the minipimer set-It whips the cream so fast, much faster than my stand mixer and it’s so convenient to be able to use any bowl to prep the cream in. I’ve partnered with @digitrolley to bring you lots of good recipes with their range of kitchen appliances, so keep following along! Recipe below , and IGTV video coming today in my Ramadan series!

Ingredients
2 tbsp nescafe powder dissolved in 1 cup hot water
1 cup heavy whipping cream 250ml
3 tbsp sweetened condensed milk
splash vanilla extract, optional
1 creme caramel sachet, powder only 49g
1 pack tea biscuits or graham crackers 7 oz or 200 g
2 tbsp cocoa powder for topping

Instructions:
-Add the heavy cream, sweetened condensed milk, vanilla and creme caramel powder to a bowl and beat until soft peaks form. Set this cream mixture aside.
-Dip the tea biscuits into the coffee briefly until they soak up the coffee but before they start to break apart. -Layer in a 7×11 or 9×9 inch clear pyrex dish, then top with half the cream mixture.
-Repeat another layer of coffee soaked biscuits on top of the heavy cream, followed by the remaining half of the cream. Sift the cocoa powder on to the top, then refrigerate for several hours until set. This is even better the next day!

.
.
.
.
.
#nescafe #nescafegold #coffeecake #biscuit #biscuitcake #nobake #nobakedessert #nobakecake #tiramisu #damnthatsdelish #tastingtable #beautifulcuisines #foodphotography #foodphotographyandstyling #tastyfood #easydessert #ramadankareem #ramadan2021 #ramadanrecipes #cream
Load More... Follow on Instagram

Copyright © 2019 on the Seasoned Pro Theme