• Skip to primary navigation
  • Skip to main content
  • Skip to primary sidebar
  • Skip to footer

 logo

  • Recipes
    • Breakfast
    • Sides
    • Soup
    • Main Meals
    • Healthy
    • Dessert
    • Drinks
  • Eating Out
  • About Me
    • Privacy Policy
  • Resources
    • Must Have Kitchen Tools
  • Nav Social Menu

    • Email
    • Facebook
    • Instagram
    • Pinterest

Instant Pot Orange Chicken

Aug 10, 2020 · 10 Comments

Jump to Recipe
Orange chicken in a bowl with brown rice with broccoli on the side

This easy recipe for instant pot orange chicken takes next to no time, and is much healthier than traditional orange chicken with barely any added sugar. It’s tangy, a little sweet and a little spicy and absolutely delicious. Your next instant pot meal!

What’s so good about orange chicken made in an instant pot?

For one, the ease! It’s such a simple recipe to make, and can all be done in one magic pot.

The flavors are a great mix of sweet and a tiny bit spicy and a little tangy. It’s a crowdpleaser, and the level of heat is such that this is still a very kid friendly dish

It’s healthy! A lot of orange chicken recipes call for anywhere between 1/2 cup to 1 full up of added sugar. This just uses 2 tbsp of white and 2 tbsp of brown.

This is also made with sautéed chicken breast instead of the deep fried chicken thighs that are the norm with this recipe, so that makes a big difference calorie wise.

It’s bright and vibrant, and a lot of fun to make and eat.

What ingredients do you need to make orange chicken?

ingredients needed to make instant pot orange chicken

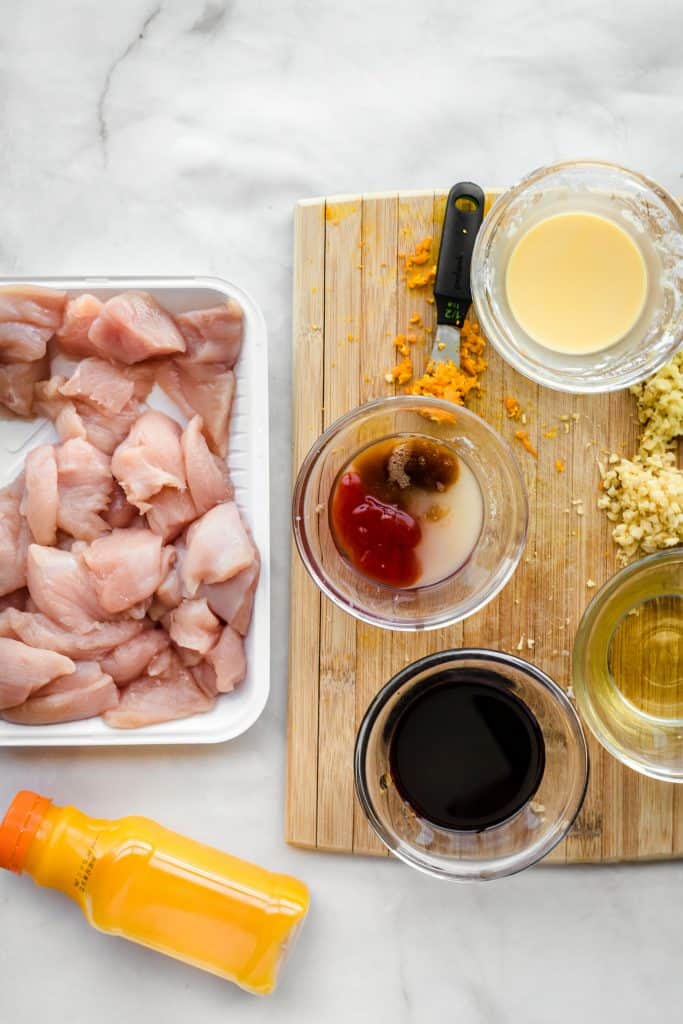
Chicken: Boneless, skinless chicken that you cut into large-ish 1.5-2inch cubes. We like to use chicken breasts, but you can use thighs instead.

Orange Juice: I use no sugar added orange juice, since the recipe is sweet enough anyway. This is the main body of the sauce and gives the orange chicken its signature flavor.

Ginger and Garlic: Hallmarks of Asian cuisine, they add so much flavor. You can modify the amount of garlic based on preference. I used six cloves, you can go down to four.

Apple Cider Vinegar: for a little tang

Ketchup: To add a little tomato undertone, and a little extra sweetness

White sugar and brown sugar: for sweetness, feel free to use either/or.

Sweet Chili Sauce: For a little heat, you can substitute sriracha instead if you like!

Zest of one orange: This adds a lot of brightness to the dish and enhances the orange flavor.

To thicken the sauce: Cornstarch dissolved in a little extra orange juice.

How to make orange chicken in an instant pot:

Orange chicken after cooking in an instant pot

The first step is to slightly brown the chicken pieces. You can do this in some hot vegetable oil either in the instant pot itself, on sauté mode, or in another pan on the stovetop.

After the chicken has cooked for 2-3 minutes and started to turn golden brown, all the remaining sauce ingredients are added to the instant pot.

Turn the instant pot on to high pressure for 5 minutes. Note, this will take longer than 5 minutes to cook because the instant pot needs around 10 minutes to come to pressure and start counting down.

Once the instant pot has beeped that the cooking time has ended, let it sit for around 10 minutes during which time the pressure will be naturally releasing.

After 10 minutes, you can switch the vent to pressure release and force release any remaining pressure to open the lid.

Mix the cornstarch and orange juice together to form a slurry, and add this to the sauce. Stir to combine, switch the pot back to sauté mode and simmer for 2-3 minute to let the sauce thicken.

How can I make this without an instant pot?

When browning the chicken, cook for longer, around 6 minutes until chicken is fully cooked through. Then, add all the sauce ingredients INCLUDING the cornstarch slurry and bring to a simmer for a few minutes until sauce has thickened.

Can I make this in a slow cooker?

Yes! Brown the chicken pieces on the stove top, then place in a slow cooker with all the sauce ingredients. Cook on low heat for 4 hours, but check at 3 hours. Once the chicken is fully cooked, remove the lid, turn the slow cooker or crockpot to high, and add the cornstarch slurry. Simmer for a few minutes until sauce has thickened, then turn off slow cooker.

Orange chicken in a bowl with brown rice with broccoli on the side

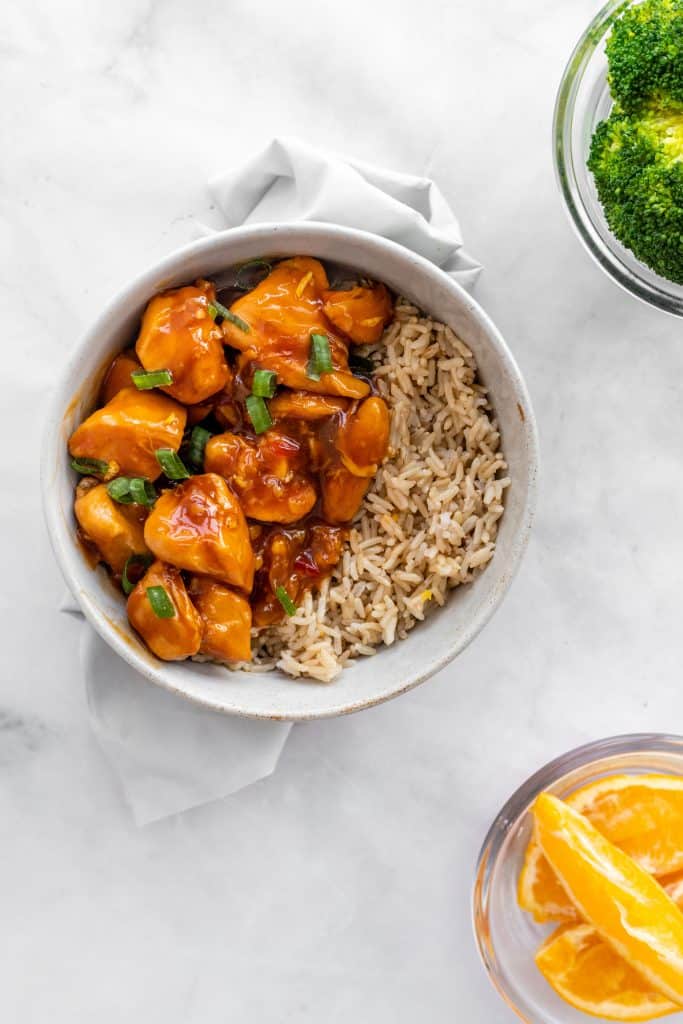
What to serve orange chicken with:

I served this with brown rice, and the nuttiness of the rice really complemented the dish. It was a great healthy side!

I also steamed some broccoli and served that alongside. Broccoli works so well with Asian inspired dishes.

You can serve this with any type of rice, like plain white rice or jasmine rice.

This would be really great with noodles too, or even quinoa for a healthier take.

Orange chicken in a bowl with brown rice with broccoli on the side and oranges in a bowl

Instant Pot Orange Chicken

Easy orange chicken made in an instant pot, a healthy version that gives you all the flavor with less calories.
5 from 5 votes
Print Pin
Rate
Course: Main Course
Cuisine: Asian
Keyword: chicken, asian, instant pot
Prep Time: 15 minutes
Cook Time: 15 minutes
Servings: 6 people
Calories: 290kcal
Author: Farah Abumaizar

Equipment

  • Instant Pot

Ingredients

  • 2 lb chicken breasts, cut into 1.5-2 inch cubes 900 g
  • 2 tbsp vegetable oil
  • 1 cup orange juice
  • 1 tbsp ginger, grated
  • 4-6 cloves garlic, minced I used all 6, if you prefer less garlic you can use only 4
  • 1 tbsp apple cider vinegar
  • 2-3 tbsp ketchup
  • 2 tbsp white sugar
  • 2 tbsp brown sugar
  • 1 tbsp sweet chili sauce
  • zest of one orange

For the slurry to thicken the sauce:

  • 2 tbsp cornstarch
  • 2 tbsp orange juice

Instructions

  • Pat dry the chicken thoroughly, heat the vegetable oil in either in the instant pot on saute mode, or in a regular pan on medium high heat on the stove. Cook the chicken 2-3 minutes, stirring throughout until starting to turn golden brown then remove the chicken. If using the instant pot, make sure theres no chicken bits stuck to the bottom so you don't get a burn notice. If there are any stuck bits, add a splash of orange juice and stir to deglaze.
  • Add the sauce ingredients to the pot, the orange juice, garlic, ginger, soy sauce, white sugar, brown sugar, apple cider vinegar, ketchup, orange zest and sweet chili sauce. Stir to coat the chicken evenly with the sauce.
  • Close instant pot lid, make sure vent is closed, and select high pressure, 5 minute cooking time. After the cooking time is over, naturally release the pressure for 10 minutes, then switch the vent to release and force release any remaining pressure.
  • Mix together the cornstarch and the orange juice, and add to the instant pot, stir gently to combine with the sauce. Turn instant pot to saute mode and simmer for 2-3 minutes or until sauce has thickened. Turn off the instant pot, the orange chicken will thicken further if you let it stand for 10 minutes.
  • Garnish with chopped chives or green onions and extra orange zest. Serve with white rice, brown rice, or noodles. Enjoy!

Notes

You can also use chicken thighs if you prefer, we always use chicken breast due to personal preference
Tried this recipe?Mention @everylittlecrumb or tag #everylittlecrumb!

Nutrition

Calories: 290kcal

If you liked this recipe, you might like:

Beef and Broccoli Instant Pot Noodles

Lebanese Chicken with Potatoes

Sesame Salmon Soba Noodle Salad

Chrissy Teigan’s Garlic Honey Prawns

Did you make this? Tag @everylittlecrumb or hashtag #everylittlecrumb and I’ll share your images!

Healthy, Main Meals, Recipes

Previous Post: « Dawood Basha
Next Post: Prawn Biryani »

Reader Interactions

Comments

  1. Emily says

    August 10, 2020 at 9:53 am

    5 stars
    Sometimes we make the orange chicken freezer meal from Trader Joes, but this instant pot orange chicken is so much better! My whole family loved it!

    Reply
    • Farah Abumaizar says

      August 10, 2020 at 12:10 pm

      It’s easy healthy and so tasty! Thanks Emily!

      Reply
  2. Beth Sachs says

    August 10, 2020 at 12:15 pm

    5 stars
    A delicious family-friendly recipe that my whole family loves. Best of all, almost all of the ingredients for the sauce are in my store cupboard already!

    Reply
    • Farah Abumaizar says

      August 10, 2020 at 12:17 pm

      Yay so happy to hear that Beth!

      Reply
  3. Laura says

    August 10, 2020 at 1:15 pm

    5 stars
    I love orange chicken, but recipes are usually way too sweet for me. I appreciate that this recipe has a smaller amount. It’s about the orange flavor, not the sugar!

    Reply
    • Farah Abumaizar says

      August 10, 2020 at 10:35 pm

      So true! That was the goal, that made Laura!

      Reply
  4. Danielle Wolter says

    August 10, 2020 at 1:39 pm

    5 stars
    Your instructions were perfect, this came out just great! It was easy to make and the flavor tasted just like takeout orange chicken!

    Reply
    • Farah Abumaizar says

      August 10, 2020 at 10:35 pm

      So happy to hear that Danielle thank you!

      Reply
  5. kim says

    August 10, 2020 at 2:38 pm

    5 stars
    What a great recipe! This was so easy and tasty. The whole family gobbled up!

    Reply
    • Farah Abumaizar says

      August 10, 2020 at 10:35 pm

      So happy to hear it Kim! Happy eating!

      Reply

Leave a Reply Cancel reply

Your email address will not be published. Required fields are marked *

Recipe Rating


Primary Sidebar

Get more stuff

Subscribe to our mailing list and get interesting stuff and updates to your email inbox.

Thank you for subscribing.

Something went wrong.

we respect your privacy and take protecting it seriously

FeedFeed

Featured Recipes

Nana tea

Halal Guys Chicken and Rice

Aish El Saraya

Instant Pot Enchilada Soup

Death By Chocolate Zucchini Bread

More

Footer

everylittlecrumb

Farah Abu Maizar | Food Lover
How I spend a lot of my weekends😂. Nothing like How I spend a lot of my weekends😂. Nothing like a big bowl of cookie dough to say weekend mode on! Are you like me and end up eating more dough than actual cookies? My foolproof recipe I use and post time and time again 👇🏼(and often double the batch so I can store some in the freezer!)

Ingredients:
1 stick butter, softened 113 g
3/4 cup tightly packed brown sugar (I like using 1/2 cup light brown and 1/4 cup dark brown, but you can use either or) 150 g total
1/4 cup white sugar 50 g
1 egg, room temperature
1 tsp vanilla extract
1 3/4 cup all purpose flour 220 g
3/4 tsp baking soda
1/4 tsp salt
1 cup semi-sweet chocolate chips or chunks
flaky salt for topping, optional

Instructions:
-In the bowl of a stand mixer fitted with a paddle attachment, or a handheld mixer, cream together butter, brown sugar, and white sugar for 5 minutes on medium speed until light and fluffy.
-Once five minutes is over, add in egg and vanilla and mix until combined.
In a separate bowl, mix flour, baking soda, and salt, and mix until combined. Add these dry ingredients to the butter mixture on low speed, and mix until just combined.
-Using a wooden spoon or spatula, mix in chocolate chips or chunks until just combined. Place bowl of dough in fridge for at least 30 minutes to chill.
-While dough is chilling, heat oven to 180 C (350F). Portion dough out into heaped 1 tbsp-2 tbsp sized dough pieces on parchment paper lined baking sheets. 
-Bake for 11-12 minutes or until golden brown on the edges but still soft in the center. Cool until cookies firm up, then enjoy, still warm.
.
.
.
.
.

#chocolatecake #cookiemonster #cakestagram #cakephotos #layercake #chocolate #weekendbaking #foodblog #instayum #yummy #bakery #foodporn #foodtographyschool #foodphotography #chocolatechips #delish #foodfluffer #damnthatsdelish #cookiedough #chocatechipcookies #bakes #bakestagram #doughbowl #chocolatechips #hersheys
Bbq salmon bowls with mango avocado salsa- unbelie Bbq salmon bowls with mango avocado salsa- unbelievable! And start to finish, you can be eating these in 15-20 minutes. Save this recipe for your next meal, you don’t want to miss out!

I’ve partnered with @kilosamak to produce a few recipes with their quality seafood- I’ve tried several of their items and genuinely loved them all! They deliver seafood straight to your door for you to enjoy and cook at home. Takes all the guesswork out of trying to choose and clean fish yourself, perfect solution for someone like me who loves seafood but isn’t so great at prepping it! Check out their Instagram page on how to order, or head to the link in my bio.

This salmon has a smoky slightly sweet rub, is baked in the oven for ultimate ease, and gets piled on to rice and topped with an easy, addictive, zingy mango and avocado salsa. Adapted from @pinchofyum , I’ll make this again and again!

Ingredients:
For the salmon:
2 fillets, about 250 g each 
Spice Rub:
2 tbsp brown sugar
1.5 tsp paprika 
1 tsp garlic powder
1 tsp onion powder, optional 
1/2 tsp chili powder
1/2 tsp salt 
2 tbsp olive oil 

Mango avocado salsa:
1 diced mangos 
1 diced avocado
1/4 cup finely diced coriander 
1/4 cup finely diced red onion 
1 inch spicy green chili pepper, finely chopped
1 tsp honey
Juice and zest of one lime
Salt to taste

Method:
- Make the salsa by mixing together all the salsa ingredients and placing bowl in fridge while you make the salmon.
- Heat oven to 240C, and line a baking sheet with parchment paper. 
-Mix together all the ingredients for the salmon rub, and rub thoroughly all over the salmon, both sides.
- Bake for 10-12 minutes until salmon is opaque and cooked all the way through.
-Assemble bowls with rice, flaked pieces of salmon,and plenty of mango avocado salsa. Enjoy 😍

Catch the steps in my story!
Have you tried this pasta yet? Save this for your Have you tried this pasta yet? Save this for your next weeknight meal! Saucy macarona iltaybeen, can’t get much more comforting.  Adapted from @jedir3waish , makes for an easy delicious main that’ll make your family including kids very happy! Can find a step by step linked bio, or at https://everylittlecrumb.com/macarona/ , or in my story!

INGREDIENTS:
 
2 tbsp olive oil, divided
big pinch of salt
3 heaped tbsp tomato paste, divided 2 oz or 70 g
1 pack elbow macaroni 14 oz or 400 g
1 onion, very finely diced
1 zucchini, finely diced
1 carrot, finely diced
4-5 garlic cloves, minced
250 g ground beef
1 tsp seven spices
1 tsp turmeric
1/2 tsp paprika powder
1/4 tsp basil
1/4 tsp cinnamon powder
1/4 tsp garlic powder
1/2 tsp black pepper
1 tsp salt
1 can crushed tomatoes 14.5oz (400g)

NSTRUCTIONS
 
Bring a large pot of water to boil, add 1 tbsp olive oil and the salt, one tbsp of tomato paste, then the pack of pasta. Cook until al dente, then drain the pasta, reserving the pasta water. Set cooked pasta aside.

In a large skillet, heat the remaining tbsp of olive oil. Once hot, add the diced onion, and cook for 4-5 minutes until softened. Add the diced zucchini and carrots, and garlic and cook for a further 4-5 minutes until softened slightly.

Add the ground beef, and cook, smushing with a wooden spoon to break up the meat. Keep cooking until the beef is browned and cooked through, then optionally, drain the fat.
Add in the salt, pepper, and all the spices. Cook for another minute or so. Add the remaining 2 tbsp of tomato paste, and stir.

Add the can of crushed tomatoes and stir to combine. Bring to a simmer, then add a big ladleful of the reserved pasta water and simmer for 2-3 minutes on low heat.

Add the pasta to the sauce (I don't always add all the pasta, maybe 3/4 of the cooked amount until the finished dish is as saucy as I like). Stir to coat, cook for another minute or so until the pasta is warmed through, then enjoy!
This gorgeous tiramisu was so kindly sent to me by This gorgeous tiramisu was so kindly sent to me by @cadysweets.sa on my birthday, and we enjoyed every light fluffy bite of it. Their old account got hacked so follow along and support their new account ! They have a bunch of cakes and sweets for every occasion, so make someone or yourself happy and order one for a treat🤩! Send this to the tiramisu lover in your life 🍰.
.
.
.
.
.

#chocolatecake #magnoliabakery #cakestagram #cakephotos #layercake #chocolate #ganache #foodblog #instayum #yummy #bakery #foodporn #foodtographyschool #foodphotography #slice #delish #foodfluffer #damnthatsdelish #tiramisu #birthdaytreat #dessertbae #dessertoftheday #scoop #foodstyling #foodstylingandphotography
Easiest at home crusty bread with a great open cru Easiest at home crusty bread with a great open crumb texture. It’s the no knead bread from @breadin5 and has yet to fail me. Check my story for the step by step, and swipe for a video reveal.

Ingredients for two small loaves:
1.5 cups lukewarm water 
1/2 tbsp any type of yeast
1/2 tbsp salt
3 1/4 cup plain flour (450g)

Method:
In a large bowl, stir together the water with the yeast and salt. Try to dissolve but it’s fine if you have clumps.
2. Add flour all at once and stir, just until no flour patches remain.
3. Cover loosely with a kitchen cloth and leave it to rest for 2 hours in a warm place until risen and bubbly.
After this rest you can:
- Use dough immediately if impatient, but it’s easier to work with if cold, so maybe pop in fridge briefly
- Or, their recommended method and the one I do, leave in the fridge loosely covered for 12 hours or overnight. 
Refrigerated dough lasts up to two weeks, and flavor depends over time!
4. The next day, the dough might look deflated. That’s fine! When ready to bake, divide dough in half (I got two 400g dough balls)- it might be easier to handle if you sprinkle the dough lightly with flour, and take the half you are going to bake out of the fridge. Let it rest on a parchment paper lined baking sheet 40-90 minutes. The longer the more interior bubbles you should have. Preheat oven to 235C (450F), and after rest, make a few deep slashes in the dough with a sharp knife.
5. Place in the middle rack of the oven, and on the bottom rack place a roasting pan that had about a cup of hot water in it. This will create steam which gives a crustier crust!
6. Bake for 30-35 minutes or until deep golden brown.
7. Let it cool completely before enjoying!
.
.

.
.
.

#damnthatsdelish #foodfluffer #thebakefeed #feedfeed #tastingtable #forthemaking #BHGfood #foodblogfeed #bakedfromscratch #bakinglove #f52grams #foodbloggerpro #bakersofinstagram #TOHfoodie #foodphotography #canonphotos #bread #instayummy #kitchn #huffposttaste #food #dough #foodie #nokneadbread #homemadebread #doughter
Good morning! With dine in still closed in Saudi, Good morning! With dine in still closed in Saudi, Friday pancakes are fast becoming a tradition. And honestly, I don’t think I’ve had better pancakes at any restaurant recently! The easiest, fluffiest diner style pancakes are a huge hit in our family, find the recipe below adapted from @allrecipes . I like to barely warm the oven (110C or so) and keep the finished pancakes in a pan in the oven until I’m done with all the batter so they stay warm and perfect 👌🏼.

Ingredients
3/4 cup milk 170g
1 tbsp white vinegar
1 cup flour 125g
2 tbsp sugar 25g
1 tsp baking powder
1/2 tsp baking soda
1/4 tsp salt
1 egg room temperature
1/2 tsp vanilla
2 tbsp butter, melted 28g

Instructions:
-In a large bowl, combine the milk and vinegar, and let aside to stand for 5 minutes until curdled. Whisk to combine.
-In a separate large bowl, mix together the flour, sugar, baking powder, baking soda and salt.
-Add an egg, the vanilla and the melted butter to the buttermilk and whisk to combine.
-Add the dry ingredients all at once to the wet, and whisk until flour patches disappear. A few lumps are fine, but don't over mix.
-Let the batter rest for 5-10 minutes while you heat a pan on the stove.
lightly grease the pan with nonstick spray or butter, and pour about 1/4 cup of batter on the pan. Cook for 2-3 minutes on each side or until golden brown. (Flip the first time once you see bubbles form and the edges of the pancake dry up).
-Enjoy with toppings of your choice!
.
.
.
.
.
#pancakes #pancakerecipe #blueberrypancakes #maplesyrup #breakfast #morningslikethese #fridaymorning #flatlay #foodfluffer #breakfastrecipes #breakfastfood #breakfastofchampions #pancakelover #food #foodtography #foodtographyschool #foodphotography #delish #foodphotos #weekendbreakfast #eatingathome #recipeoftheday #foodporn #foodflatlay #blueberries #trayoftheday
One of my photos from my shoot @tackle.baks . How One of my photos from my shoot @tackle.baks . How insane does this tom yum soup look? For those who haven’t tried this casual seafood spot yet, you really should! The food is great and priced very reasonably, and they have some menu items I’m obsessed with like their crispy fish burger, the salmon poke salad and the creamy truffle shrimp👌🏼. They currently have a delivery offer going for only 5SAR on HungerStation, so no time like the present! Have I tempted you with this photo of the tom yum soup? I’m hungry just writing this caption🤤.
.
.
.
.
.
#soup #tomyum #tomyumsoup #food #foodphotography #canonphotography #canon #seafood #seafoodlover #shrimp #delish #beautifulcuisines #foodtographyschool #foodtography #foodblogger #instayum #lonelyplanetfood #dametravelerfoodie #soupseason #restaurantphotography #khobar #tastemade #tastingtable #foodfluffer
I wanted to take a really pretty photo of the choc I wanted to take a really pretty photo of the chocolate fondants and post it with the recipe but I gave into peer pressure and am posting the recipe with this horribly lit and not at all beautifully set up video🤷🏻‍♀️. At least the video really demonstrates how gooey and perfect the center of these chocolate lava cakes are, and how unbelievably delicious they are. You won’t believe how easy it is to make these! And you may never order this at a restaurant again! You can even use muffin cups instead of ramekins. Save this recipe for when you want to be extra fancy with your dessert 👩‍🍳 I looked at a bunch of recipes online and compiled my favorite steps from each, this is most influenced from @gordongram 

Ingredients:
For greasing the ramekins:
1 tbsp melted butter
1 tbsp cocoa powder

For the fondants:
1 stick butter 115 g
2 eggs
2 egg yolks
170 g chocolate bittersweet chocolate (I used Lindt 70%)
1/2 cup caster sugar or regular sugar
Pinch salt 
3 tbsp flour (41g)
25 g butter melted

Method:
-Spray ramekins with nonstick spray, then dust with cocoa powder and shake until evenly coated, or brush inside of ramekins with melted butter, chill into butter sets, grease again with more melted butter and dust with cocoa powder (Gordon Ramsay’s fancy method)

-Melt together the butter and chocolate over a pan of simmering water (Bain marie ). Set aside melted chocolate to cool for 10 minutes.

-In an electric mixer, whisk the eggs, egg yolks, and sugar until thick and pale about 3-4 min. Sift in the flour and beat again until mixed.

-Pour melted chocolate into the egg mixture in 3 additions, mixing well between each until combined.

-Pour fondant batter evenly into prepared ramekins. If baking immediately, let them chill in the fridge while you preheat the oven to 200C. You can also store in the fridge for up to two days before baking.

- Bake 10-12 minute or until top just looks set. If using muffin pans, they’ll take less time, 8-10 minutes. Remove from oven and cool 1 minute before inverting onto a plate. Enjoy immediately with vanilla ice cream and berries!
Load More... Follow on Instagram

Copyright © 2019 on the Seasoned Pro Theme