• Skip to primary navigation
  • Skip to main content
  • Skip to primary sidebar
  • Skip to footer

 logo

  • Recipes
    • Breakfast
    • Sides
    • Soup
    • Main Meals
    • Healthy
    • Dessert
    • Drinks
  • Eating Out
  • About Me
    • Privacy Policy
  • Resources
    • Must Have Kitchen Tools
  • Nav Social Menu

    • Email
    • Facebook
    • Instagram
    • Pinterest

Philly Cheesesteak Sliders

Sep 15, 2020 · 9 Comments

Jump to Recipe
Skillet of cooked philly cheesesteak with a wooden spoon in it

The best recipe for Philly cheesesteak sliders, an approachable way of making this delicious sandwich at home. Just a few key ingredients on toasted garlic butter buns give you the ultimate sandwich right in the comfort of your own home!

What makes these philly cheesesteak sliders so good?

slider buns stuffed with philly cheesesteak filling

A few key delicious factors!

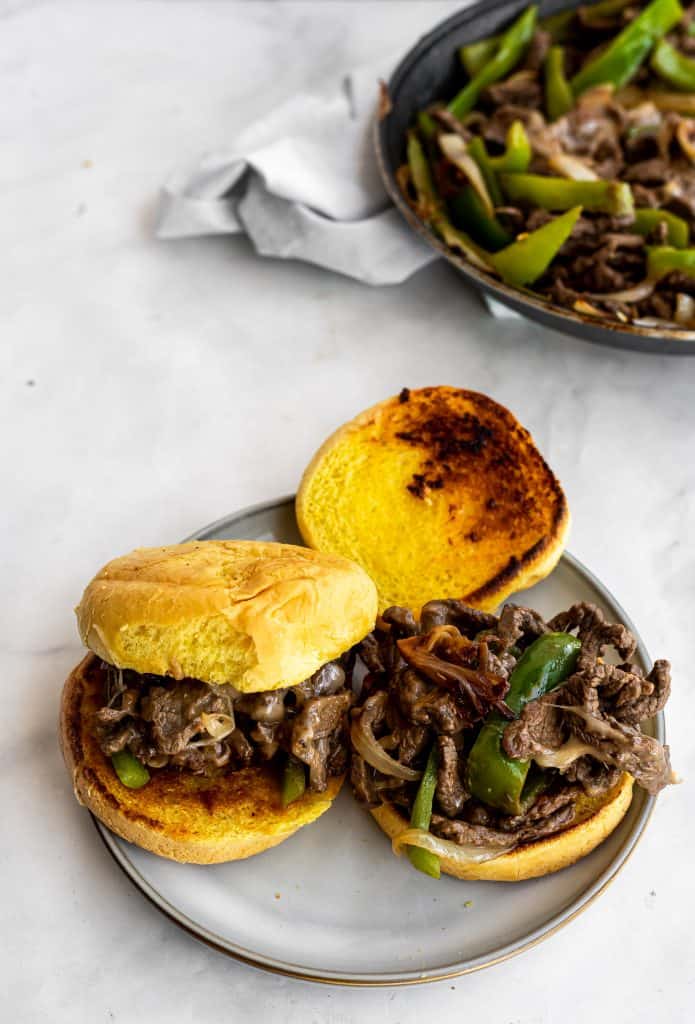
The toasted garlic butter bun for starters. You can use the bun of your choice (I used potato buns and loved how tender they were), but spread a thin layer of softened garlic butter on them and toast them till golden brown and it’ll completely up your Philly game!

How easy it is to make Philly cheeseseteaks. You just need a handful of ingredients and about 10 minutes in a skillet.

The extra flavor from the soy sauce and Worcestershire really elevates the meat. I haven’t seen this done in other recipes but I’ll never make it without!

What kind of meat to use to make Phillys?

stretching cheese in the philly cheese skillet

Ribeye is the best cut of meat to use in this case. It’s traditionally used because it’s tender and delicious. It can be pricey though, so you can try and substitute flank steak or sirloin steak.

You can even sub thinly sliced chicken breasts if you’d like for a chicken version of the dish!

What ingredients do you need for Philly cheesesteaks?

ingredients needed to prep phillys

Steak as discussed above

Butter and Oil to cook the meat and veggies

Sliced onion and green bell peppers

Mushrooms are optional- I left them out because my husband is a mushroom hater (sigh. I know).

Worcestershire and Soy Sauce: These are the perfect way to flavor the meat! The soy sauce gives a salty umami flavor, and the Worcestershire is the best compliment to the meat.

Salt and pepper to taste, after adding the above sauces

Slider buns and garlic butter for the bread. I used potato buns which were soft and fluffy and made these into sliders. You could also use regular burger buns, hoagie rolls, french bread, whatever you like.

The garlic butter is a great trick to adding so much flavor the bread, along with toasting the bread, it’s a great little step that gives big impact.

How to prepare Philly cheesesteaks:

The first step is making sure the meat is prepared by cutting it very thinly with a sharp knife. It’s easiest to do this when you freeze the meat for 30-40 minutes first. Next, slice very thinly until you have shaved meat.Alternately, you can have your butcher do this. Check this video out if you want to see how it’s done visually.

Most recipes call for cooking the veggies in a skillet, setting aside, then cooking the steak.

I flip it here, because I think cooking the vegetables in the same skillet the meat was cooked in gives them great flavor.

We heat butter and oil in a skillet large enough to fit all the meat and veggies, and add the meat on medium high heat, cooking until browned and crispy in bits.

Set meat aside, then in the same skillet add a little more oil and add the onions. Cook until onions start to char and caramelize, then add the green bell peppers and cook for a few minute more. Once veggies have cooked enough, add the beef back in to warm through, and add the slices of provolone cheese till they are melted enough that you can stir them into the steak.

provolone slices on top of the cooked steak

While this is all going on, you can toast the buns by mixing softened butter with the crushed garlic cloves, and spreading generously on both sides of the buns. Toast on a hot skillet or griddle until golden brown. Delicious!

What to serve phillys with:

We had these with oven baked sweet potato fries and loved them. You can also serve with Air fryer sweet potato fries, or just plain old potato chips.

philly cheesesteak sliders on parchment paper with philly skillet in the background

Leftover philly cheesesteak:

Once you fill the sliders to your hearts content, you might end up with some leftover philly cheesesteak filling. This is never a bad thing!

You can toss some with some creamy sauced pasta for a very indulgent meal.

Leftover philly is perfect for topping a pizza (recipe for this coming very soon).

You can even mix some in with some eggs for a cheesy meaty breakfast skillet, or use the mix to stuff some bell peppers or portobello mushrooms.

Slider buns stuffed with philly cheesesteak filling

Philly Cheesesteak Sliders

Easy philly cheese steak served on garlic butter toasted buns. Delicious meal that's guaranteed to hit the spot!
5 from 5 votes
Print Pin
Rate
Course: Main Course
Cuisine: American
Keyword: steak, sandwiches
Prep Time: 15 minutes
Cook Time: 10 minutes
Servings: 8 people
Calories: 472kcal
Author: Farah Abumaizar

Ingredients

  • 1 tbsp butter
  • 1 tbsp oil
  • 1.5 lb ribeye or sirloin or other cut of beef, sliced thinly see post for tips
  • 1 large yellow onion, sliced
  • 2 green bell peppers, sliced
  • 2 tsp Worcestershire sauce
  • 2 tsp soy sauce
  • 6 slices provolone cheese
  • pinch salt and pepper, to taste

For the buns:

  • 2 tbsp butter, softened
  • 1-2 crushed garlic cloves
  • 6-8 buns of choice, slider sized or normal

Instructions

  • Heat a large skillet over medium high heat, and add the butter and oil. Once the butter melts, add the steak and cook until brown and fully cooked through, preferably with some crispy dark brown bits. Once meat cooks, drain the fat, and season with soy sauce and Worcestershire as well as salt and pepper.
  • Remove steak to a plate, and in the same pan that the steak was cooked in, drizzle a little more oil in if needed and add the sliced onions. Cook for a few minutes until onions start to caramelize, then add the green bell peppers and cook for a couple minutes further. I like my bell peppers to still have some crunch to them.
  • Add the steak back in and stir to combine, then add the slices of provolone cheese and stir until melted.
  • Spread the buns with the softened garlic butter and toast in a skillet or a griddle until golden brown, then pile high with the Philly cheesesteak. You can add some mayo to the sandwiches if you like, as well as any other condiments.

Notes

To slice the beef very thinly, it’s easier to freeze the meat then cut it with a sharp knife.
Tried this recipe?Mention @everylittlecrumb or tag #everylittlecrumb!

Nutrition

Calories: 472kcal

If you liked this recipe, you might like:

Sous Vide Brisket

Slow Cooker BBQ Beef Sandwiches

Chicken and Beef Tacos

Did you make this? Tag @everylittlecrumb or hashtag #everylittlecrumb and I’ll share your images!

Main Meals, Recipes

Previous Post: « Instant Pot Oatmeal
Next Post: Pink Sauce Pasta »

Reader Interactions

Comments

  1. Katie says

    September 15, 2020 at 8:46 pm

    5 stars
    Looks so good! Can’t wait to try this one.

    Reply
    • Farah Abumaizar says

      September 15, 2020 at 10:35 pm

      Thanks Katie!

      Reply
  2. Neli Howard says

    September 15, 2020 at 9:07 pm

    5 stars
    Sliders looks incredible. When I was working in Seattle I use to get them from a food truck. Now that I am working from home, I need to give your recipe a try. Great for feeding a crowd!

    Reply
    • Farah Abumaizar says

      September 15, 2020 at 10:35 pm

      Love hearing that! Thanks Neil!

      Reply
  3. Shelley Fulton says

    September 15, 2020 at 9:24 pm

    5 stars
    So fun – a scrumptious slider version of everybody’s favorite Philly Cheesesteak sandwich! These look phenomenal, and I really appreciated all the good tips. Specifically, the recommendation to use ribeye, but also the great suggestion that I can sub chicken instead. Oh – and I love that you used soy sauce and Worcestershire BOTH – so much umami flavor from using them both – great idea!

    Reply
    • Farah Abumaizar says

      September 15, 2020 at 10:36 pm

      So true it really does give such great flavor! Thanks Shelley!

      Reply
  4. veenaazmanov says

    September 15, 2020 at 9:58 pm

    5 stars
    I love that it is cheesy and these Sliders are definitely the best evening snack option or a light Dinner option too. These look yum and delicious and flavorful.

    Reply
    • Farah Abumaizar says

      September 15, 2020 at 10:36 pm

      Thanks very much!! Hope you try and enjoy them

      Reply
  5. Cathleen @ A Taste of Madness says

    September 15, 2020 at 9:59 pm

    5 stars
    Can you believe that I have never tried a philly cheesesteak before?? I have got to try this one, because I am drooling over your photos! Bookmarked for later, thanks for the recipe 🙂

    Reply

Leave a Reply Cancel reply

Your email address will not be published. Required fields are marked *

Recipe Rating


Primary Sidebar

Get more stuff

Subscribe to our mailing list and get interesting stuff and updates to your email inbox.

Thank you for subscribing.

Something went wrong.

we respect your privacy and take protecting it seriously

FeedFeed

Featured Recipes

Nana tea

Halal Guys Chicken and Rice

Aish El Saraya

Instant Pot Enchilada Soup

Death By Chocolate Zucchini Bread

More

Footer

everylittlecrumb

Farah Abu Maizar | Food Lover
Good morning! If there’s one thing we like doing Good morning! If there’s one thing we like doing, it’s experimenting with breakfast dishes 🍳.These beauties are froached eggs- poached eggs that are lightly fried and seasoned with breadcrumbs. Best of both worlds! Creamy poached eggs, runny yolk but a little crisp on the white part of the eggs. So good! Inspired by @sveverything , we used our sous vide machine for this but you can do this with regular poached eggs. Recipe can be found linked in bio or at https://everylittlecrumb.com/froached-eggs/ . Team runny yolk anyone? 
.
.
.
.
.
#eggs #poachedeggs #poachedegg #eggsontoast #beautifulcuisines #tasty #delish #foodphotography #foodstyling #foodstylingandphotography #cheeseontoast #foodblogger #foodie #breakfast #brunch #instayum #yum #brunch #tastingtable #f52community #food52 #yolkporn #friday
How I spend a lot of my weekends😂. Nothing like How I spend a lot of my weekends😂. Nothing like a big bowl of cookie dough to say weekend mode on! Are you like me and end up eating more dough than actual cookies? My foolproof recipe I use and post time and time again 👇🏼(and often double the batch so I can store some in the freezer!)

Ingredients:
1 stick butter, softened 113 g
3/4 cup tightly packed brown sugar (I like using 1/2 cup light brown and 1/4 cup dark brown, but you can use either or) 150 g total
1/4 cup white sugar 50 g
1 egg, room temperature
1 tsp vanilla extract
1 3/4 cup all purpose flour 220 g
3/4 tsp baking soda
1/4 tsp salt
1 cup semi-sweet chocolate chips or chunks
flaky salt for topping, optional

Instructions:
-In the bowl of a stand mixer fitted with a paddle attachment, or a handheld mixer, cream together butter, brown sugar, and white sugar for 5 minutes on medium speed until light and fluffy.
-Once five minutes is over, add in egg and vanilla and mix until combined.
In a separate bowl, mix flour, baking soda, and salt, and mix until combined. Add these dry ingredients to the butter mixture on low speed, and mix until just combined.
-Using a wooden spoon or spatula, mix in chocolate chips or chunks until just combined. Place bowl of dough in fridge for at least 30 minutes to chill.
-While dough is chilling, heat oven to 180 C (350F). Portion dough out into heaped 1 tbsp-2 tbsp sized dough pieces on parchment paper lined baking sheets. 
-Bake for 11-12 minutes or until golden brown on the edges but still soft in the center. Cool until cookies firm up, then enjoy, still warm.
.
.
.
.
.

#chocolatecake #cookiemonster #cakestagram #cakephotos #layercake #chocolate #weekendbaking #foodblog #instayum #yummy #bakery #foodporn #foodtographyschool #foodphotography #chocolatechips #delish #foodfluffer #damnthatsdelish #cookiedough #chocatechipcookies #bakes #bakestagram #doughbowl #chocolatechips #hersheys
Bbq salmon bowls with mango avocado salsa- unbelie Bbq salmon bowls with mango avocado salsa- unbelievable! And start to finish, you can be eating these in 15-20 minutes. Save this recipe for your next meal, you don’t want to miss out!

I’ve partnered with @kilosamak to produce a few recipes with their quality seafood- I’ve tried several of their items and genuinely loved them all! They deliver seafood straight to your door for you to enjoy and cook at home. Takes all the guesswork out of trying to choose and clean fish yourself, perfect solution for someone like me who loves seafood but isn’t so great at prepping it! Check out their Instagram page on how to order, or head to the link in my bio.

This salmon has a smoky slightly sweet rub, is baked in the oven for ultimate ease, and gets piled on to rice and topped with an easy, addictive, zingy mango and avocado salsa. Adapted from @pinchofyum , I’ll make this again and again!

Ingredients:
For the salmon:
2 fillets, about 250 g each 
Spice Rub:
2 tbsp brown sugar
1.5 tsp paprika 
1 tsp garlic powder
1 tsp onion powder, optional 
1/2 tsp chili powder
1/2 tsp salt 
2 tbsp olive oil 

Mango avocado salsa:
1 diced mangos 
1 diced avocado
1/4 cup finely diced coriander 
1/4 cup finely diced red onion 
1 inch spicy green chili pepper, finely chopped
1 tsp honey
Juice and zest of one lime
Salt to taste

Method:
- Make the salsa by mixing together all the salsa ingredients and placing bowl in fridge while you make the salmon.
- Heat oven to 240C, and line a baking sheet with parchment paper. 
-Mix together all the ingredients for the salmon rub, and rub thoroughly all over the salmon, both sides.
- Bake for 10-12 minutes until salmon is opaque and cooked all the way through.
-Assemble bowls with rice, flaked pieces of salmon,and plenty of mango avocado salsa. Enjoy 😍

Catch the steps in my story!
Have you tried this pasta yet? Save this for your Have you tried this pasta yet? Save this for your next weeknight meal! Saucy macarona iltaybeen, can’t get much more comforting.  Adapted from @jedir3waish , makes for an easy delicious main that’ll make your family including kids very happy! Can find a step by step linked bio, or at https://everylittlecrumb.com/macarona/ , or in my story!

INGREDIENTS:
 
2 tbsp olive oil, divided
big pinch of salt
3 heaped tbsp tomato paste, divided 2 oz or 70 g
1 pack elbow macaroni 14 oz or 400 g
1 onion, very finely diced
1 zucchini, finely diced
1 carrot, finely diced
4-5 garlic cloves, minced
250 g ground beef
1 tsp seven spices
1 tsp turmeric
1/2 tsp paprika powder
1/4 tsp basil
1/4 tsp cinnamon powder
1/4 tsp garlic powder
1/2 tsp black pepper
1 tsp salt
1 can crushed tomatoes 14.5oz (400g)

NSTRUCTIONS
 
Bring a large pot of water to boil, add 1 tbsp olive oil and the salt, one tbsp of tomato paste, then the pack of pasta. Cook until al dente, then drain the pasta, reserving the pasta water. Set cooked pasta aside.

In a large skillet, heat the remaining tbsp of olive oil. Once hot, add the diced onion, and cook for 4-5 minutes until softened. Add the diced zucchini and carrots, and garlic and cook for a further 4-5 minutes until softened slightly.

Add the ground beef, and cook, smushing with a wooden spoon to break up the meat. Keep cooking until the beef is browned and cooked through, then optionally, drain the fat.
Add in the salt, pepper, and all the spices. Cook for another minute or so. Add the remaining 2 tbsp of tomato paste, and stir.

Add the can of crushed tomatoes and stir to combine. Bring to a simmer, then add a big ladleful of the reserved pasta water and simmer for 2-3 minutes on low heat.

Add the pasta to the sauce (I don't always add all the pasta, maybe 3/4 of the cooked amount until the finished dish is as saucy as I like). Stir to coat, cook for another minute or so until the pasta is warmed through, then enjoy!
This gorgeous tiramisu was so kindly sent to me by This gorgeous tiramisu was so kindly sent to me by @cadysweets.sa on my birthday, and we enjoyed every light fluffy bite of it. Their old account got hacked so follow along and support their new account ! They have a bunch of cakes and sweets for every occasion, so make someone or yourself happy and order one for a treat🤩! Send this to the tiramisu lover in your life 🍰.
.
.
.
.
.

#chocolatecake #magnoliabakery #cakestagram #cakephotos #layercake #chocolate #ganache #foodblog #instayum #yummy #bakery #foodporn #foodtographyschool #foodphotography #slice #delish #foodfluffer #damnthatsdelish #tiramisu #birthdaytreat #dessertbae #dessertoftheday #scoop #foodstyling #foodstylingandphotography
Easiest at home crusty bread with a great open cru Easiest at home crusty bread with a great open crumb texture. It’s the no knead bread from @breadin5 and has yet to fail me. Check my story for the step by step, and swipe for a video reveal.

Ingredients for two small loaves:
1.5 cups lukewarm water 
1/2 tbsp any type of yeast
1/2 tbsp salt
3 1/4 cup plain flour (450g)

Method:
In a large bowl, stir together the water with the yeast and salt. Try to dissolve but it’s fine if you have clumps.
2. Add flour all at once and stir, just until no flour patches remain.
3. Cover loosely with a kitchen cloth and leave it to rest for 2 hours in a warm place until risen and bubbly.
After this rest you can:
- Use dough immediately if impatient, but it’s easier to work with if cold, so maybe pop in fridge briefly
- Or, their recommended method and the one I do, leave in the fridge loosely covered for 12 hours or overnight. 
Refrigerated dough lasts up to two weeks, and flavor depends over time!
4. The next day, the dough might look deflated. That’s fine! When ready to bake, divide dough in half (I got two 400g dough balls)- it might be easier to handle if you sprinkle the dough lightly with flour, and take the half you are going to bake out of the fridge. Let it rest on a parchment paper lined baking sheet 40-90 minutes. The longer the more interior bubbles you should have. Preheat oven to 235C (450F), and after rest, make a few deep slashes in the dough with a sharp knife.
5. Place in the middle rack of the oven, and on the bottom rack place a roasting pan that had about a cup of hot water in it. This will create steam which gives a crustier crust!
6. Bake for 30-35 minutes or until deep golden brown.
7. Let it cool completely before enjoying!
.
.

.
.
.

#damnthatsdelish #foodfluffer #thebakefeed #feedfeed #tastingtable #forthemaking #BHGfood #foodblogfeed #bakedfromscratch #bakinglove #f52grams #foodbloggerpro #bakersofinstagram #TOHfoodie #foodphotography #canonphotos #bread #instayummy #kitchn #huffposttaste #food #dough #foodie #nokneadbread #homemadebread #doughter
Good morning! With dine in still closed in Saudi, Good morning! With dine in still closed in Saudi, Friday pancakes are fast becoming a tradition. And honestly, I don’t think I’ve had better pancakes at any restaurant recently! The easiest, fluffiest diner style pancakes are a huge hit in our family, find the recipe below adapted from @allrecipes . I like to barely warm the oven (110C or so) and keep the finished pancakes in a pan in the oven until I’m done with all the batter so they stay warm and perfect 👌🏼.

Ingredients
3/4 cup milk 170g
1 tbsp white vinegar
1 cup flour 125g
2 tbsp sugar 25g
1 tsp baking powder
1/2 tsp baking soda
1/4 tsp salt
1 egg room temperature
1/2 tsp vanilla
2 tbsp butter, melted 28g

Instructions:
-In a large bowl, combine the milk and vinegar, and let aside to stand for 5 minutes until curdled. Whisk to combine.
-In a separate large bowl, mix together the flour, sugar, baking powder, baking soda and salt.
-Add an egg, the vanilla and the melted butter to the buttermilk and whisk to combine.
-Add the dry ingredients all at once to the wet, and whisk until flour patches disappear. A few lumps are fine, but don't over mix.
-Let the batter rest for 5-10 minutes while you heat a pan on the stove.
lightly grease the pan with nonstick spray or butter, and pour about 1/4 cup of batter on the pan. Cook for 2-3 minutes on each side or until golden brown. (Flip the first time once you see bubbles form and the edges of the pancake dry up).
-Enjoy with toppings of your choice!
.
.
.
.
.
#pancakes #pancakerecipe #blueberrypancakes #maplesyrup #breakfast #morningslikethese #fridaymorning #flatlay #foodfluffer #breakfastrecipes #breakfastfood #breakfastofchampions #pancakelover #food #foodtography #foodtographyschool #foodphotography #delish #foodphotos #weekendbreakfast #eatingathome #recipeoftheday #foodporn #foodflatlay #blueberries #trayoftheday
One of my photos from my shoot @tackle.baks . How One of my photos from my shoot @tackle.baks . How insane does this tom yum soup look? For those who haven’t tried this casual seafood spot yet, you really should! The food is great and priced very reasonably, and they have some menu items I’m obsessed with like their crispy fish burger, the salmon poke salad and the creamy truffle shrimp👌🏼. They currently have a delivery offer going for only 5SAR on HungerStation, so no time like the present! Have I tempted you with this photo of the tom yum soup? I’m hungry just writing this caption🤤.
.
.
.
.
.
#soup #tomyum #tomyumsoup #food #foodphotography #canonphotography #canon #seafood #seafoodlover #shrimp #delish #beautifulcuisines #foodtographyschool #foodtography #foodblogger #instayum #lonelyplanetfood #dametravelerfoodie #soupseason #restaurantphotography #khobar #tastemade #tastingtable #foodfluffer
Load More... Follow on Instagram

Copyright © 2019 on the Seasoned Pro Theme