• Skip to primary navigation
  • Skip to main content
  • Skip to primary sidebar
  • Skip to footer

 logo

  • Recipes
    • Breakfast
    • Sides
    • Soup
    • Main Meals
    • Healthy
    • Dessert
    • Drinks
  • Eating Out
  • About Me
    • Privacy Policy
  • Resources
    • Must Have Kitchen Tools
  • Nav Social Menu

    • Email
    • Facebook
    • Instagram
    • Pinterest

Instant Pot Enchilada Soup

Feb 18, 2021 · Leave a Comment

Jump to Recipe
 bowl of chicken enchilada soup with limes on the side

This instant pot enchilada soup is a hearty and delicious Mexican themed soup bursting with flavor and texture. It’s so easy to make, and will be such a hit! Filling enough to be a stand alone meal this is definitely one you want to try.

Why should you make this soup?

It’s such an easy recipe. Everything gets thrown into the instant pot, with barely any prep, and cooked.

The mixture of black beans and corn, veggies and chicken breasts make this a filling soup that’s easily enjoyed as an entree.

Kid will love this! The soup itself is family friendly and quite mild, but I’ll include ingredient substitutions to make this even milder.

The recipe is adapted from Six Sister’s Stuff, and they have great recipes. Always easy and approachable!

Ingredients you need:
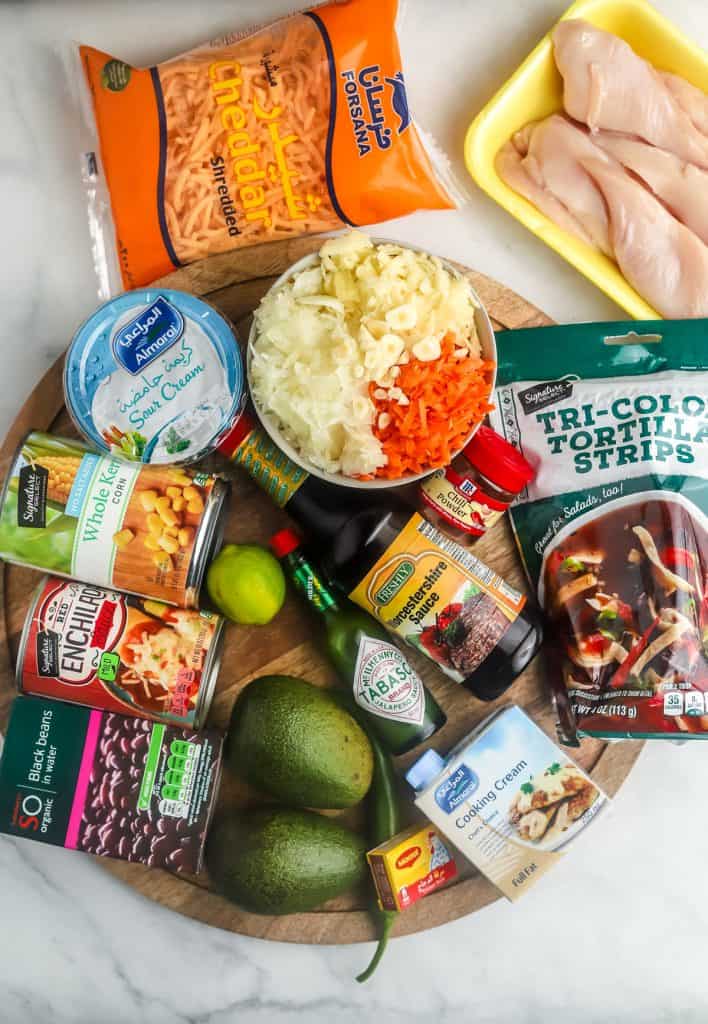
ingredients to make enchilada soup

Chicken breasts

Canned black beans- rinse and drain these

Canned corn- don’t drain this can

Onion and garlic

Carrots: I subbed these instead of the red bell pepper used in the original recipe because I had some on hand and my kids love them!

Chili powder: I halved the amount from the original recipe to make sure it wasn’t too intense for my little ones, and you could reduce it even further to 1/4 tsp, or omit altogether and replace with paprika powder.;

Worcestershire sauce and green Tabasco sauce: You can also use sriracha sauce but I like the little tangy kick that green Tabasco gives. Again, not so much that it’ll make this too spicy.

Canned Enchilada Sauce: I went for mild

Stock cube and water: or sub with 4 cups of chicken stock

Then after cooking, add the ingredients that’ll give this creaminess. Cooking cream or heavy cream, sour cream, and cheddar cheese. I actually added half the amount of cheese that the original recipe called for, because I didn’t want it to be too rich or heavy and I was happy with the amount. You can definitely add more!

How to make instant pot enchilada soup:

all the ingredients for chicken tortilla soup in instant pot

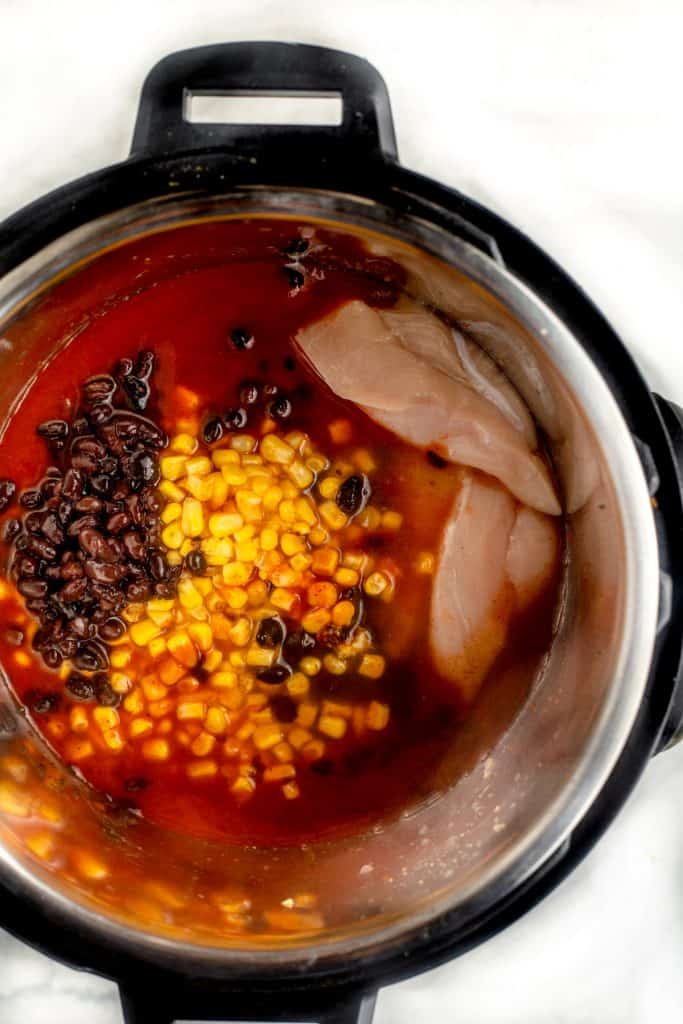
The steps are simple! Basically add all the ingredients to your instant pot.

Make sure that the valve is set to the sealing position, cover with lid and close, and set cooking time to High pressure for 15 minutes.

The pot will take some time to come to pressure, then will begin to count down from 15 minutes of cooking time. Once the cook time is over, wait 5 minutes then force release the remaining pressure.

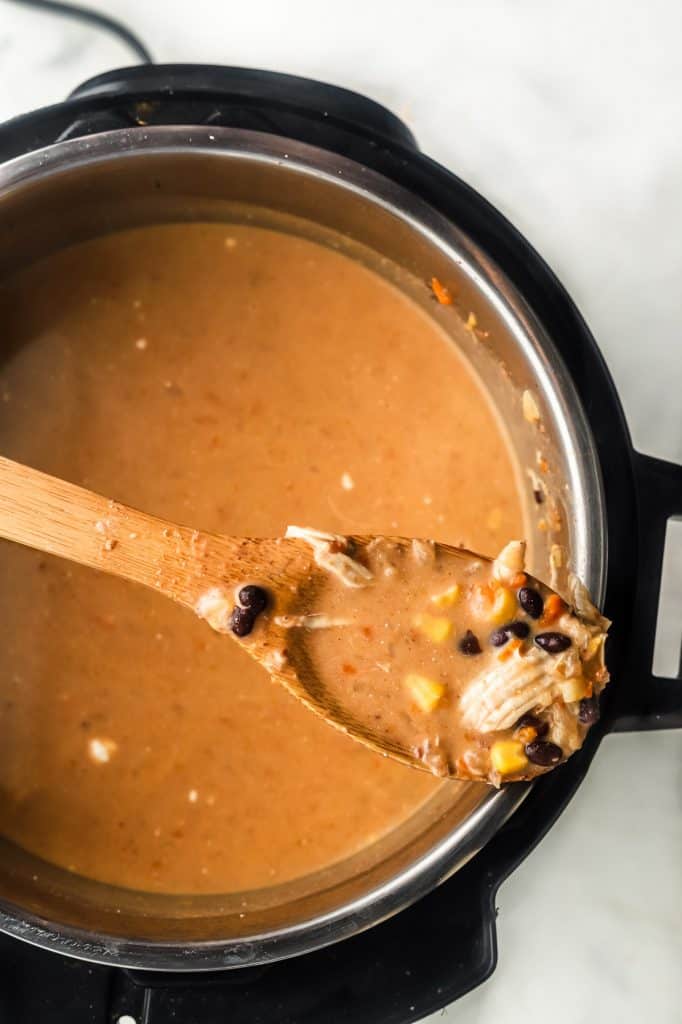
Open the lid of the instant pot and use a fork to shred the chicken breasts. They’ll bes o tender that they’ll shred very easily. Stir in the cream, sour cream, and cheddar cheese. Stir until cheese has melted, this won’t take long at all.

Enjoy immediately!

finished enchilada soup being scooped out of the pan

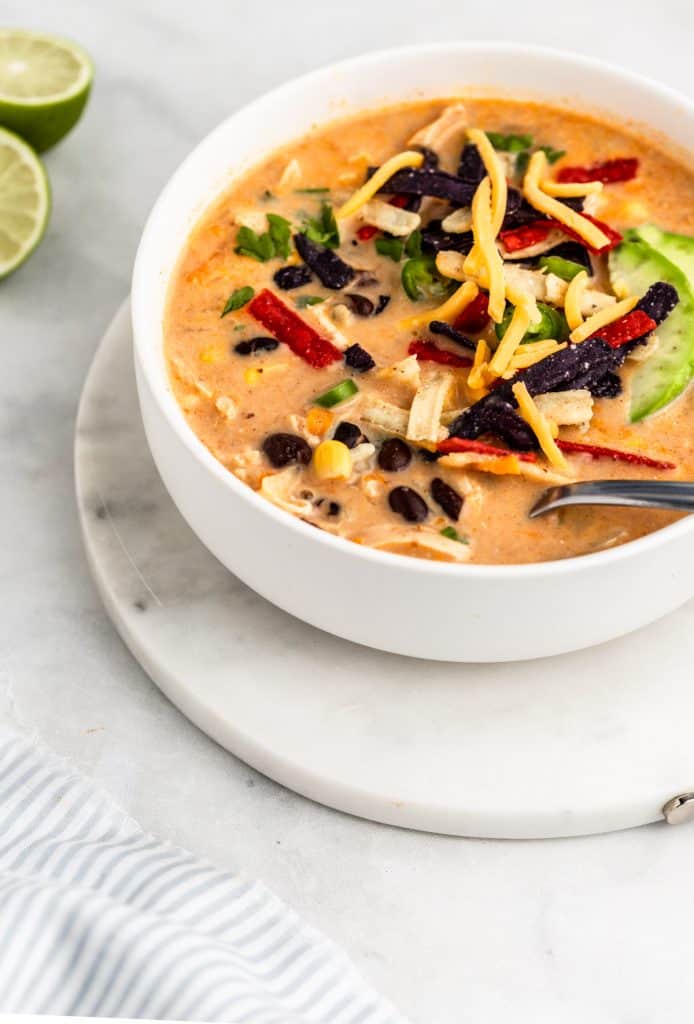
What to garnish the soup with:

big bowl of chicken enchilada soup with a spoon scooping a bite out

I love adding little crispy tortilla strips to the top, but if you can’t find any, add some tortilla chips. They add a big crunch and yum factor.

This would be great with an extra dollop of sour cream, and maybe some sliced avocados on top.

A little chopped coriander gives some color and earthy herby flavor to the soup.

Storing leftover chicken enchilada soup:

white bowl of enchilada soup with limes on the side

Leftover soup will last tightly covered in the fridge for 3 days. This will also freeze very well.

I have heard mixed reviews about freezing soups that have cream in them, as the cream might separate in the freezer, so if making soup to intentionally freeze, it might be best to freeze before adding the sour cream, cream and cheddar cheese. Freeze tightly covered for up to 3 months, then defrost overnight and once heating up the next day add the creams and cheese.

If you liked this recipe, you might like these other soup recipes:

Oat Soup

Middle Eastern Lentil Soup

Creamy Roasted Mushroom Soup

Or these Instant Pot recipes:

Instant Pot Oatmeal

Some curry dishes:

Instant Pot Lentil Curry

Instant Pot Shrimp Curry

some Asian inspired dishes:

Instant Pot Orange Chicken

Beef and Broccoli Instant Pot Noodles

and Middle Eastern!

Instant Pot Mujaddara

 bowl of chicken enchilada soup with limes on the side

Instant Pot Enchilada Soup

Filling and delicious instant pot chicken enchilada soup made easy, and lightened up!
Print Pin
Rate
Course: Soup
Cuisine: Mexican
Keyword: soup, mexican,chicken
Prep Time: 10 minutes
Cook Time: 4 hours 20 minutes
Servings: 6 people
Calories: 451kcal
Author: Farah Abumaizar

Equipment

  • Instant Pot

Ingredients

  • 3-4 chicken breasts 1 lb or 450 g total
  • 1 can black beans, drained 14.5 oz or 400 g
  • 1 can corn kernels, don't drain 14.5 oz or 400 g
  • 1 onion, finely chopped or grated
  • 3 garlic cloves, crushed
  • 1-2 carrots, grated
  • 1/2 tsp chili powder
  • 1 tsp Worcestershire sauce
  • 1-2 tsp green tabasco or sriracha sauce
  • 1 can enchilada sauce 10 oz or 285 g
  • 1 stock cube, chicken or veggie
  • 4 cups water
  • 1/2 cup heavy or cooking cream
  • 1/2 cup sour cream
  • 1 cup shredded cheddar cheese 8 oz or 200 g

Instructions

  • To the instant pot, add the chicken breasts, the drained black beans, can of corn (without draining), onion, garlic, and carrots.
  • Add the enchilada sauce, chilli powder, Worcestershire, the tabasco, the stock cube, and the water. Cover instant pot, making sure the valve is set to seal and turn it on high pressure for 15 minutes.
  • Once cooking time is over, wait 5 minutes, then quickly release the pressure. Open the lid, and use two fork to shred the chicken breasts. They should shred very easily.
  • Stir in the heavy cream, sour cream, and cheese. Keep stirring until the cheese melts.
  • Serve with crispy tortilla strips and coriander if desired and enjoy immediately.

Video

Instant Pot Chicken Enchilada Soup by everylittlecrumb on Jumprope.

Notes

Recipe adapted from Six Sister’s Stuff. 
I made a few changes to the original recipe to suit our tastes.
You can make this vegetarian by omitting the chicken, and using a vegetable stock cube. 
 
Tried this recipe?Mention @everylittlecrumb or tag #everylittlecrumb!

Nutrition

Calories: 451kcal
 

Instant Pot, Recipes, Soup

Previous Post: « Death By Chocolate Zucchini Bread
Next Post: Aish El Saraya »

Reader Interactions

Leave a Reply Cancel reply

Your email address will not be published. Required fields are marked *

Recipe Rating


Primary Sidebar

Get more stuff

Subscribe to our mailing list and get interesting stuff and updates to your email inbox.

Thank you for subscribing.

Something went wrong.

we respect your privacy and take protecting it seriously

FeedFeed

Featured Recipes

Nana tea

Halal Guys Chicken and Rice

Aish El Saraya

Death By Chocolate Zucchini Bread

Makloubeh

More

Footer

everylittlecrumb

Farah Abu Maizar | Food Lover
Very excited that restaurants are opening back up Very excited that restaurants are opening back up for dine in in Saudi! To celebrate, here’s a photo of gorgeous cronuts and pastries from @savorbakery . The blueberry cronut is insanely sweet, a little too much so, but also flaky golden brown and buttery, so that qualifies as a win in my book. Anywhere you’ve been waiting to go to and actually sit in or have you even functioning just fine with delivery? I definitely missed the whole restaurant vibe! 
.
.
.
.
.
#cronut #cronuts #donuts #pastries #zaatar #croissants #coffeeshopsoftheworld #foodfluffer #blueberrycake #carbs #carblife #breadporn #cafe #coffeeshopvibes #breakfast #morningslikethis #morningcoffee #nutella #nutellalovers #tasty #tastingtable #foodphotography #foodstylist #foodphotos
Good morning! If there’s one thing we like doing Good morning! If there’s one thing we like doing, it’s experimenting with breakfast dishes 🍳.These beauties are froached eggs- poached eggs that are lightly fried and seasoned with breadcrumbs. Best of both worlds! Creamy poached eggs, runny yolk but a little crisp on the white part of the eggs. So good! Inspired by @sveverything , we used our sous vide machine for this but you can do this with regular poached eggs. Recipe can be found linked in bio or at https://everylittlecrumb.com/froached-eggs/ . Team runny yolk anyone? 
.
.
.
.
.
#eggs #poachedeggs #poachedegg #eggsontoast #beautifulcuisines #tasty #delish #foodphotography #foodstyling #foodstylingandphotography #cheeseontoast #foodblogger #foodie #breakfast #brunch #instayum #yum #brunch #tastingtable #f52community #food52 #yolkporn #friday
How I spend a lot of my weekends😂. Nothing like How I spend a lot of my weekends😂. Nothing like a big bowl of cookie dough to say weekend mode on! Are you like me and end up eating more dough than actual cookies? My foolproof recipe I use and post time and time again 👇🏼(and often double the batch so I can store some in the freezer!)

Ingredients:
1 stick butter, softened 113 g
3/4 cup tightly packed brown sugar (I like using 1/2 cup light brown and 1/4 cup dark brown, but you can use either or) 150 g total
1/4 cup white sugar 50 g
1 egg, room temperature
1 tsp vanilla extract
1 3/4 cup all purpose flour 220 g
3/4 tsp baking soda
1/4 tsp salt
1 cup semi-sweet chocolate chips or chunks
flaky salt for topping, optional

Instructions:
-In the bowl of a stand mixer fitted with a paddle attachment, or a handheld mixer, cream together butter, brown sugar, and white sugar for 5 minutes on medium speed until light and fluffy.
-Once five minutes is over, add in egg and vanilla and mix until combined.
In a separate bowl, mix flour, baking soda, and salt, and mix until combined. Add these dry ingredients to the butter mixture on low speed, and mix until just combined.
-Using a wooden spoon or spatula, mix in chocolate chips or chunks until just combined. Place bowl of dough in fridge for at least 30 minutes to chill.
-While dough is chilling, heat oven to 180 C (350F). Portion dough out into heaped 1 tbsp-2 tbsp sized dough pieces on parchment paper lined baking sheets. 
-Bake for 11-12 minutes or until golden brown on the edges but still soft in the center. Cool until cookies firm up, then enjoy, still warm.
.
.
.
.
.

#chocolatecake #cookiemonster #cakestagram #cakephotos #layercake #chocolate #weekendbaking #foodblog #instayum #yummy #bakery #foodporn #foodtographyschool #foodphotography #chocolatechips #delish #foodfluffer #damnthatsdelish #cookiedough #chocatechipcookies #bakes #bakestagram #doughbowl #chocolatechips #hersheys
Bbq salmon bowls with mango avocado salsa- unbelie Bbq salmon bowls with mango avocado salsa- unbelievable! And start to finish, you can be eating these in 15-20 minutes. Save this recipe for your next meal, you don’t want to miss out!

I’ve partnered with @kilosamak to produce a few recipes with their quality seafood- I’ve tried several of their items and genuinely loved them all! They deliver seafood straight to your door for you to enjoy and cook at home. Takes all the guesswork out of trying to choose and clean fish yourself, perfect solution for someone like me who loves seafood but isn’t so great at prepping it! Check out their Instagram page on how to order, or head to the link in my bio.

This salmon has a smoky slightly sweet rub, is baked in the oven for ultimate ease, and gets piled on to rice and topped with an easy, addictive, zingy mango and avocado salsa. Adapted from @pinchofyum , I’ll make this again and again!

Ingredients:
For the salmon:
2 fillets, about 250 g each 
Spice Rub:
2 tbsp brown sugar
1.5 tsp paprika 
1 tsp garlic powder
1 tsp onion powder, optional 
1/2 tsp chili powder
1/2 tsp salt 
2 tbsp olive oil 

Mango avocado salsa:
1 diced mangos 
1 diced avocado
1/4 cup finely diced coriander 
1/4 cup finely diced red onion 
1 inch spicy green chili pepper, finely chopped
1 tsp honey
Juice and zest of one lime
Salt to taste

Method:
- Make the salsa by mixing together all the salsa ingredients and placing bowl in fridge while you make the salmon.
- Heat oven to 240C, and line a baking sheet with parchment paper. 
-Mix together all the ingredients for the salmon rub, and rub thoroughly all over the salmon, both sides.
- Bake for 10-12 minutes until salmon is opaque and cooked all the way through.
-Assemble bowls with rice, flaked pieces of salmon,and plenty of mango avocado salsa. Enjoy 😍

Catch the steps in my story!
Have you tried this pasta yet? Save this for your Have you tried this pasta yet? Save this for your next weeknight meal! Saucy macarona iltaybeen, can’t get much more comforting.  Adapted from @jedir3waish , makes for an easy delicious main that’ll make your family including kids very happy! Can find a step by step linked bio, or at https://everylittlecrumb.com/macarona/ , or in my story!

INGREDIENTS:
 
2 tbsp olive oil, divided
big pinch of salt
3 heaped tbsp tomato paste, divided 2 oz or 70 g
1 pack elbow macaroni 14 oz or 400 g
1 onion, very finely diced
1 zucchini, finely diced
1 carrot, finely diced
4-5 garlic cloves, minced
250 g ground beef
1 tsp seven spices
1 tsp turmeric
1/2 tsp paprika powder
1/4 tsp basil
1/4 tsp cinnamon powder
1/4 tsp garlic powder
1/2 tsp black pepper
1 tsp salt
1 can crushed tomatoes 14.5oz (400g)

NSTRUCTIONS
 
Bring a large pot of water to boil, add 1 tbsp olive oil and the salt, one tbsp of tomato paste, then the pack of pasta. Cook until al dente, then drain the pasta, reserving the pasta water. Set cooked pasta aside.

In a large skillet, heat the remaining tbsp of olive oil. Once hot, add the diced onion, and cook for 4-5 minutes until softened. Add the diced zucchini and carrots, and garlic and cook for a further 4-5 minutes until softened slightly.

Add the ground beef, and cook, smushing with a wooden spoon to break up the meat. Keep cooking until the beef is browned and cooked through, then optionally, drain the fat.
Add in the salt, pepper, and all the spices. Cook for another minute or so. Add the remaining 2 tbsp of tomato paste, and stir.

Add the can of crushed tomatoes and stir to combine. Bring to a simmer, then add a big ladleful of the reserved pasta water and simmer for 2-3 minutes on low heat.

Add the pasta to the sauce (I don't always add all the pasta, maybe 3/4 of the cooked amount until the finished dish is as saucy as I like). Stir to coat, cook for another minute or so until the pasta is warmed through, then enjoy!
This gorgeous tiramisu was so kindly sent to me by This gorgeous tiramisu was so kindly sent to me by @cadysweets.sa on my birthday, and we enjoyed every light fluffy bite of it. Their old account got hacked so follow along and support their new account ! They have a bunch of cakes and sweets for every occasion, so make someone or yourself happy and order one for a treat🤩! Send this to the tiramisu lover in your life 🍰.
.
.
.
.
.

#chocolatecake #magnoliabakery #cakestagram #cakephotos #layercake #chocolate #ganache #foodblog #instayum #yummy #bakery #foodporn #foodtographyschool #foodphotography #slice #delish #foodfluffer #damnthatsdelish #tiramisu #birthdaytreat #dessertbae #dessertoftheday #scoop #foodstyling #foodstylingandphotography
Easiest at home crusty bread with a great open cru Easiest at home crusty bread with a great open crumb texture. It’s the no knead bread from @breadin5 and has yet to fail me. Check my story for the step by step, and swipe for a video reveal.

Ingredients for two small loaves:
1.5 cups lukewarm water 
1/2 tbsp any type of yeast
1/2 tbsp salt
3 1/4 cup plain flour (450g)

Method:
In a large bowl, stir together the water with the yeast and salt. Try to dissolve but it’s fine if you have clumps.
2. Add flour all at once and stir, just until no flour patches remain.
3. Cover loosely with a kitchen cloth and leave it to rest for 2 hours in a warm place until risen and bubbly.
After this rest you can:
- Use dough immediately if impatient, but it’s easier to work with if cold, so maybe pop in fridge briefly
- Or, their recommended method and the one I do, leave in the fridge loosely covered for 12 hours or overnight. 
Refrigerated dough lasts up to two weeks, and flavor depends over time!
4. The next day, the dough might look deflated. That’s fine! When ready to bake, divide dough in half (I got two 400g dough balls)- it might be easier to handle if you sprinkle the dough lightly with flour, and take the half you are going to bake out of the fridge. Let it rest on a parchment paper lined baking sheet 40-90 minutes. The longer the more interior bubbles you should have. Preheat oven to 235C (450F), and after rest, make a few deep slashes in the dough with a sharp knife.
5. Place in the middle rack of the oven, and on the bottom rack place a roasting pan that had about a cup of hot water in it. This will create steam which gives a crustier crust!
6. Bake for 30-35 minutes or until deep golden brown.
7. Let it cool completely before enjoying!
.
.

.
.
.

#damnthatsdelish #foodfluffer #thebakefeed #feedfeed #tastingtable #forthemaking #BHGfood #foodblogfeed #bakedfromscratch #bakinglove #f52grams #foodbloggerpro #bakersofinstagram #TOHfoodie #foodphotography #canonphotos #bread #instayummy #kitchn #huffposttaste #food #dough #foodie #nokneadbread #homemadebread #doughter
Good morning! With dine in still closed in Saudi, Good morning! With dine in still closed in Saudi, Friday pancakes are fast becoming a tradition. And honestly, I don’t think I’ve had better pancakes at any restaurant recently! The easiest, fluffiest diner style pancakes are a huge hit in our family, find the recipe below adapted from @allrecipes . I like to barely warm the oven (110C or so) and keep the finished pancakes in a pan in the oven until I’m done with all the batter so they stay warm and perfect 👌🏼.

Ingredients
3/4 cup milk 170g
1 tbsp white vinegar
1 cup flour 125g
2 tbsp sugar 25g
1 tsp baking powder
1/2 tsp baking soda
1/4 tsp salt
1 egg room temperature
1/2 tsp vanilla
2 tbsp butter, melted 28g

Instructions:
-In a large bowl, combine the milk and vinegar, and let aside to stand for 5 minutes until curdled. Whisk to combine.
-In a separate large bowl, mix together the flour, sugar, baking powder, baking soda and salt.
-Add an egg, the vanilla and the melted butter to the buttermilk and whisk to combine.
-Add the dry ingredients all at once to the wet, and whisk until flour patches disappear. A few lumps are fine, but don't over mix.
-Let the batter rest for 5-10 minutes while you heat a pan on the stove.
lightly grease the pan with nonstick spray or butter, and pour about 1/4 cup of batter on the pan. Cook for 2-3 minutes on each side or until golden brown. (Flip the first time once you see bubbles form and the edges of the pancake dry up).
-Enjoy with toppings of your choice!
.
.
.
.
.
#pancakes #pancakerecipe #blueberrypancakes #maplesyrup #breakfast #morningslikethese #fridaymorning #flatlay #foodfluffer #breakfastrecipes #breakfastfood #breakfastofchampions #pancakelover #food #foodtography #foodtographyschool #foodphotography #delish #foodphotos #weekendbreakfast #eatingathome #recipeoftheday #foodporn #foodflatlay #blueberries #trayoftheday
Load More... Follow on Instagram

Copyright © 2019 on the Seasoned Pro Theme