• Skip to primary navigation
  • Skip to main content
  • Skip to primary sidebar
  • Skip to footer

 logo

  • Recipes
    • Breakfast
    • Sides
    • Soup
    • Main Meals
    • Healthy
    • Dessert
    • Drinks
  • Eating Out
  • About Me
    • Privacy Policy
  • Resources
    • Must Have Kitchen Tools
  • Nav Social Menu

    • Email
    • Facebook
    • Instagram
    • Pinterest

Aish El Saraya

Feb 23, 2021 · 2 Comments

Jump to Recipe

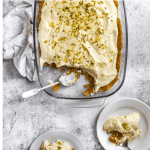
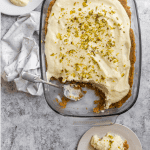
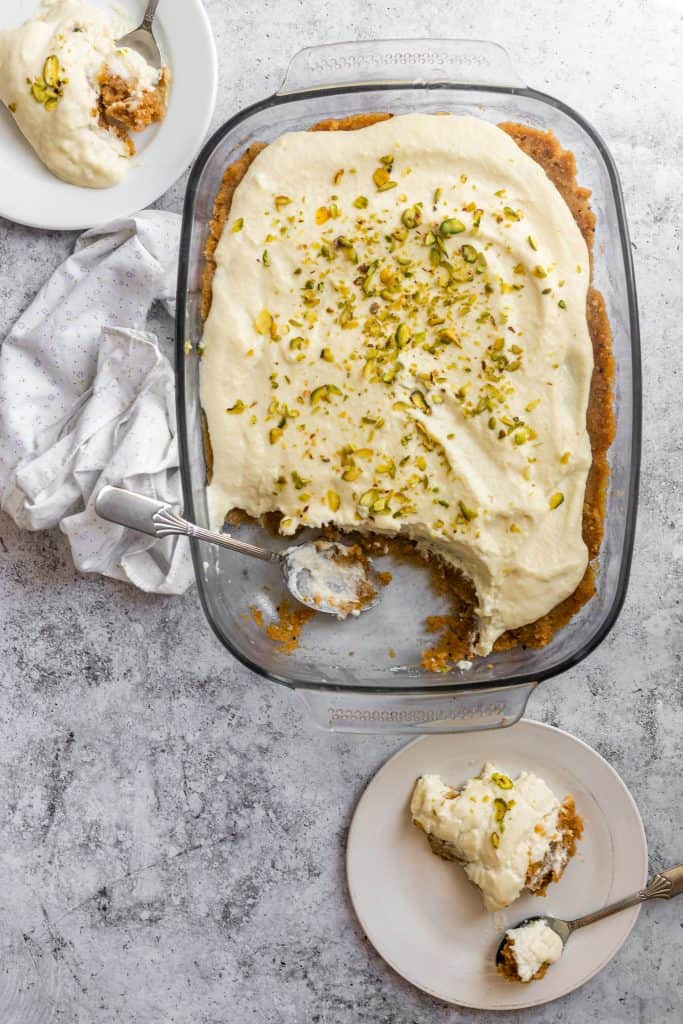
Aish el saraya is a beautiful Middle Eastern dessert consisting of fragrant scented sweetened breadcrumbs, topped with a cream referred to as ashta (Sort of like an Arabic clotted cream) and garnished with pistachios.

It’s absolutely heavenly, and along with kunafa, my favorite Middle Eastern dessert of all time. It’s also much easier to make than you might expect, and my mom’s recipe is HANDS DOWN the best. That’s why I’m so happy to be able to share her version with you today!

Recipe originally published May 2019 but updated February 2020 with new photos and information.

What is aish el saraya?

Aish translates to bread in Arabic, and saraya to palace, so Aish el saraya literally translates to “the bread of the palaces”. That’s because this is a kingly dessert, based on something as innocuous as bread crumbs!

Aish al saraya dessert on a plate garnished iwth pistachio and rose petals, with a linen napkin under the plate on a gray backdrop

It’s very commonly consumed in the Middle East, especially in the Levantine region. It’s phenomenal and I so encourage you to give it a try! Aish el saraya is often associated with Ramadan, just like other desserts made with orange blossom and rose water and traditional Middle Eastern flavors.

Why should I make this?

The combination of the sticky, sweet, almost caramelized breadcrumbs with the fluffy fragrant cream is unbelievable. The breadcrumbs are mixed with a sugar syrup that has rose water and orange blossom in it, and the cream isn’t sweetened so the contrast in sweetness is perfect.

It’s an exotic dessert, that feeds a crowd, and looks beautiful. Something different to try!

This actually comes together quite easily once you have the different components ready, and all the parts can be made in advance. The sugar syrup can be made days in advance and stored in the fridge, and I’ve made the cream up to 2 days in advance and stored in the fridge. I’ve even mixed the breadcrumbs with the syrup and placed those in the fridge the day before assembling.

Leftovers, if you have any, taste amazing!

Ingredients you need:

There are two main components to this dessert, the cream topping and the sugar syrup sweetened breadcrumbs.

For the cream:

Heavy cream and milk: with a higher proportion of cream to milk. I recommend using whole fat milk for ultimate creaminess.

White Bread: This is the hack to get that clotted texture to the cream, you process the soft white bread (crusts removed) into crumbs and add to a saucepan with the other cream ingredients.

Cornstarch: A little cornstarch to help the cream thicken (cornflour)

Rose water and orange blossom water: Hallmarks of Middle Eastern desserts, these add a wonderful fragrant quality to the cream. You’ll find these in Middle Eastern supply stores or online. In a pinch, you can substitute a little orange zest for the blossom water.

For the sweetened breadcrumbs:

We need to make a sugar syrup that we’ll then mix the breadcrumbs into. A sugar syrup is an essential part of many Middle Eastern desserts, like baklava, or kunafa. It’s very easy to make, much easier than caramel, but with a similar process.

Sugar and Water: equal amounts of sugar and water to give us a loose sugar syrup.

Orange blossom and rose water: So not only the cream has these, but the sugar syrup does too. The sugar syrup for this aish el saraya differs just a little bit from some other recipes because it has a lot of orange blossom and rose water. So much, that I was sure my mom had made a mistake given me the recipe. She hadn’t! The flavor is incredible, and not overpowering at all. If you are worried, you can add less to your taste preferences.

Breadcrumbs: I use dry plain rusks, which are twice baked white bread that I find in the bakery section of my supermarket. (you can see them in the photo of all the ingredients above). If using rusks, choose unsweetened ones. You can alternately make your own breadcrumbs by baking white bread in a 400 F (200C) oven for 20 minutes or so until golden brown and dry.

Whichever one you chose, process in a food processor until crumbs form.

How to make aish el saraya:

The cream:

What I love so much about the cream in this recipe is that it tastes like authentic Arabic qishta- which is actually very time consuming to make, and hard to find.

If you know Turkish kaymak, you get the idea. You’ll need to whisk quite a bit, so roll up those sleeves and get to work. Trust me, it’s worth it.

Cut the crusts off of the white bread, then process in a food processor until soft fluffy crumbs form. Add these crumbs along with all the cream ingredients to a large saucepan.

Over medium low heat, whisk the cream ingredients continuously until the cream thickens. It should thicken into a custard like texture, and this will take a while, around 10 minutes. Arm workout for the day! Once the cream is nice and thick, remove from the heat and set aside to cool slightly.

The sweetened breadcrumbs- our base:

This part actually comes together much faster than the cream topping.

Make the sugar syrup. Add the sugar and water to a medium saucepan and bring to a boil, then reduce heat to medium low and let it simmer for 8 minutes or until slightly thickened. It doesn’t need to be too thick.

Take the dry rusks or dry toasts and process them into fine crumbs, then add the breadcrumbs to the sugar syrup, and stir in the rose water and orange blossom water. The consistency will be like wet, thick sand.

Stir in a LOT of rose water and orange blossom water. I was initially scared by the amount and put just half, tasted it, then added the remaining half. Mom was right, I shouldn’t have doubted her recipe.

Some people make this by just layering untoasted bread in a serving platter and topping with syrup and cream, but I prefer the toasted breadcrumbs so much more. They ends up tasting almost like toffee. It’s really hard to describe, but you’ll get it once you taste this.

Assemble:

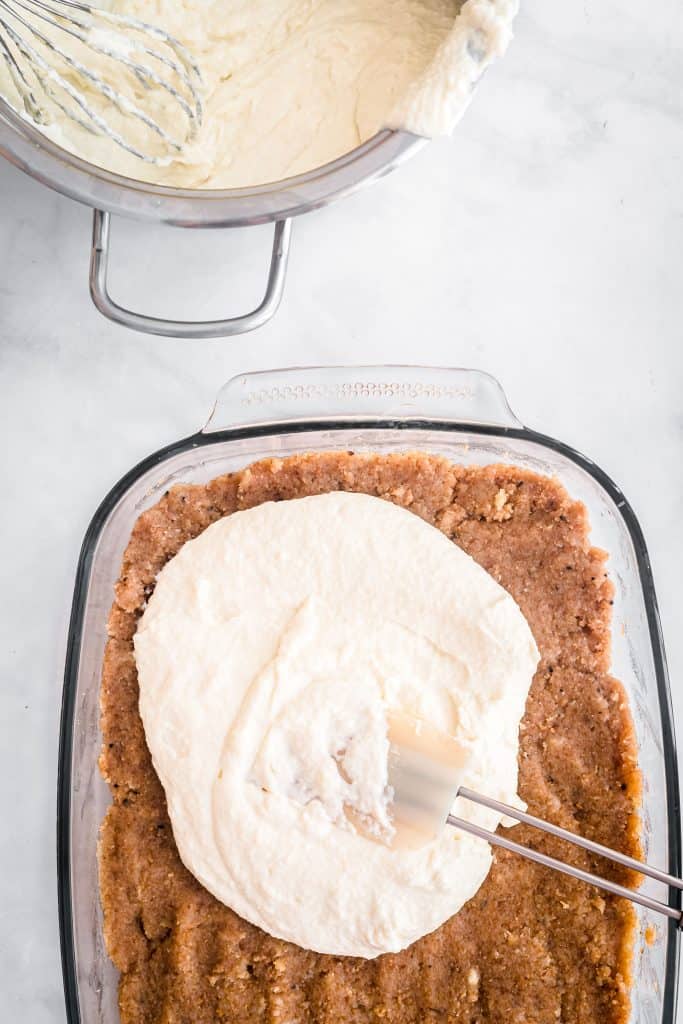
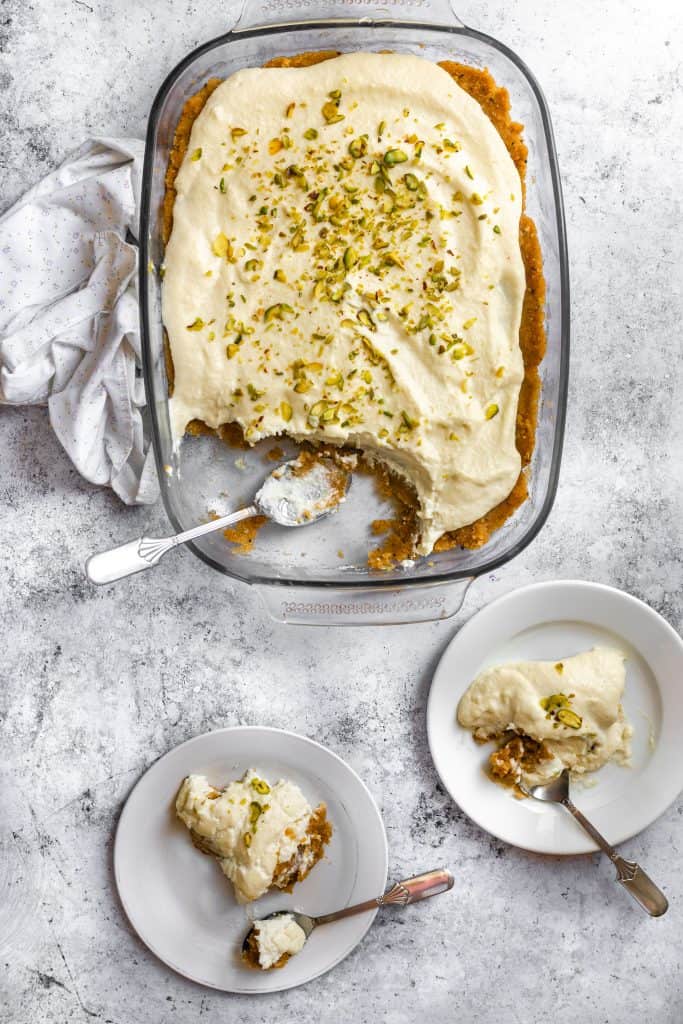
In a large 9×13 inch serving platter, spread the sweetened breadcrumbs into an even layer. Top with the cream and spread evenly. Garnish with chopped pistachios, and dried rose petals if desired.

My mom always tops this with something called zahr el laymoun, which is candied flower petal jam. You can see what it looks like in this photo!

Chill in the fridge for a few hours or overnight, and enjoy. It’s luscious.

Making in advance and storing leftovers:

You can prepare the different parts of the dessert in advance. The sugar syrup can be made a week in advance, and the cream topping 1-2 days in advance. You can even add the breadcrumbs to the syrup and mix them and store in the fridge for a couple days in advance.

Leftovers will last 2-3 days in the fridge, tightly covered.

If you liked this recipe, you might like these other Middle Eastern desserts:

Kunafa

Mini Kunafa

Maamoul

Sahleb

Um Ali

Orange Blossom Cake

and this would go amazingly with this Karak Chai, a wonderful spiced tea.

Aish El Saraya

A classic Middle Eastern dessert of sweetened breadcrumbs topped with easy homemade cream. It's a triumph!
5 from 1 vote
Print Pin
Rate
Course: Dessert
Cuisine: Middle Eastern
Keyword: middle eastern, dessert, cream, bread
Prep Time: 5 minutes
Cook Time: 20 minutes
Servings: 8 people
Calories: 393kcal
Author: Farah Abumaizar

Ingredients

For the qishta (cream):

  • 6 slices white bread, crust removed
  • 3 cups heavy whipping cream
  • 1 cup milk
  • 1 tbsp cornstarch
  • 1 tbsp rose water
  • 1 tbsp orange blossom water

For the sweetened breadcrumbs:

  • 2 bags dry unsweetened rusks (qirshala) 320 g total
  • 2 cups sugar
  • 2 cups water
  • 1/2 cup rose water
  • 1/2 cup orange blossom water

For the garnish:

  • handful roughly chopped pistachios
  • sprinkle of dried rose petals if desired
  • rose petal jam if desired

Instructions

For the cream:

  • Place the soft white bread in food processor and process until it turns into soft crumbs.
  • Combine the breadcrumbs with the heavy cream, the milk, the cornstarch, the rose water and the orange blossom water in a saucepan. Over low heat, whisk constantly until mixture thickens into a cream like texture. This may take 7-10 minutes.
  • Cool the cream until it reaches room temperature, then store in the fridge.

For the sweetened breadcrumbs:

  • Use a food processor to process the dry rusks into crumbs. Set aside.
  • Stir together the sugar and water in a large saucepan over medium heat until sugar is dissolved and mixture comes to a boil. It doesn't need to thicken too much.
  • Add the dry breadcrumbs, stir to combine, then remove from heat and stir in the rose water and the orange blossom water.

To assemble and garnish:

  • Assemble by spreading the breadcrumb mixture into your serving platter, and topping with the chilled cream. Garnish with pistachios and rose petals and clumps of rose petal jam, or however you like!

Video

Your embed Jumprope code:
Aish El Saraya by everylittlecrumb on Jumprope.

Notes

Store the Aish el Saraya in the fridge until ready to serve. You can prepare the breadcrumb and the cream mixture separately in advance, store in fridge, and not assemble until right before serving. Assembled Aish el Saraya will last 2-3 days in the fridge.
Tried this recipe?Mention @everylittlecrumb or tag #everylittlecrumb!

Nutrition

Calories: 393kcal

Dessert, Recipes dessert, middle eastern

Previous Post: « Instant Pot Enchilada Soup
Next Post: Halal Guys Chicken and Rice »

Reader Interactions

Comments

  1. Bushra says

    May 27, 2019 at 12:33 pm

    5 stars
    Tried this recipe, it was PERFECTION. Everything I wanted it to be. So yummy and easy to put together

    Reply
    • Farah Abumaizar says

      May 27, 2019 at 10:56 pm

      I’m so so glad you like it! Especially coming from a fellow Aish al saraya lover

      Reply

Leave a Reply Cancel reply

Your email address will not be published. Required fields are marked *

Recipe Rating


Primary Sidebar

Get more stuff

Subscribe to our mailing list and get interesting stuff and updates to your email inbox.

Thank you for subscribing.

Something went wrong.

we respect your privacy and take protecting it seriously

FeedFeed

Featured Recipes

Tamriyeh

Nescafe Cake

Berries and Cream Sara Lee Cake

Kebab Karaz

Eggplant Fatteh

More

Footer

everylittlecrumb

Farah Abu Maizar | Food Lover
You have to know, if I post a chicken recipe it me You have to know, if I post a chicken recipe it means it’s reaaaaaally good. This copy cat Halal guys chicken and rice is unbelievable dish! I got the turmeric rice recipe from @seriouseats and its buttery and perfectly spiced and fluffy and addictive, topped with juicy grilled spiced chicken cubes and a tangy, creamy dressing, tomatoes and parsley. AMAZING! Recipe below and in the @tamimimarkets catalogue❤️.

INGREDIENTS:

For the chicken marinade:
900 g chicken breasts
1/4 cup olive oil
2 tbsp lemon juice
1 tbsp white vinegar
3 garlic cloves, minced
1 tsp salt
1/2 tsp black pepper
1 tsp oregano powder
1 tsp seven spices
1/2 tsp ginger powder
1/2 tsp cumin powder
1/2 tsp paprika powder

For the white sauce:
3/4 cup Greek yogurt 170g (6oz)
1/2 cup mayonnaise 115 g
1 tbsp white vinegar
1 tbsp water
1 tsp lemon juice
1-2 tsp sugar
1/2 tsp salt
1/4 tsp black pepper

For the rice:
2 tbsp unsalted butter
1/2 tsp turmeric powder
1/4 tsp cumin powder
1 1/2 cups basmati rice, soaked for 20 minutes then rinsed
2 1/2 cups chicken stock or 1 stock cube dissolved in 2.5 cups hot water
salt and pepper to taste, a pinch of each

To assemble:
1 chopped tomato
handful chopped parsley
sriracha sauce

INSTRUCTIONS: 
For the chicken:
In a bowl, mix all the ingredients for chicken marinade. Add chicken breast and toss to coat evenly. Cover and marinade for 1-2 hours.

Heat 1 tbsp oil in a large skillet on medium high heat, and cook chicken for 5-6 min each side, or until golden brown and cooked.
Remove chicken to a cutting board, and rest for 10 minutes, before chopping roughly into 2 inch cubes.

For the white sauce:
Mix all ingredients and store in the fridge until ready to serve.

For the rice:
Add butter to a large saucepan over medium heat. Once melted, add the turmeric and cumin, and stir for 1 minutes.
Add the rice, and toast the rice by stirring for 4 minutes. Add chicken stock, salt and pepper to season. Stir and bring to a boil, then reduce heat to a simmer, cover and cook for 15 min, then set aside 15 min and fluff with a fork.

To assemble:
Place the rice in your serving platter, top with the chicken, the white sauce, and chopped tomatoes and parsley. Sriracha too!
This is my go to baked creamy cheesecake. It’s s This is my go to baked creamy cheesecake. It’s so good and rich and easy, topped with a sweet and tangy simple strawberry sauce (sauce recipe from @sallysbakeblog ). I used my new @kenwood_bahrain stand mixer and it was excellent- gave me silky smooth lump free filling. Another winner for my @digitrolley collab- all my new appliances are from them❤️ Check IGTV for recipe video!

For the strawberry topping:
-1 tbsp cornstarch
-3 tbsp water
-450 g strawberries, halved (big pack)
-zest and juice from 1/2 small lemon 
-1/4 cup (50g) sugar

-Whisk together cornstarch and water, then add to a saucepan along with all other ingredients, over medium heat.
-Bring to a simmer, stirring constantly and breaking up strawberries as they cook, 5 minutes or so until thickened. Set aside to cool, can be stored in fridge up to one week.

For the cheesecake:

Ingredients
For the crust:
* 250 g crushed digestive biscuits 2 cups 
* 135 g melted butter 1 stick and 1 tablespoon
* 1/2 tsp cinnamon

For the cheesecake:
* 900 g cream cheese (3 3/4 cup)
* 1 1/2 cup white sugar 300 g
* 3/4 cup milk, room temp
* 4 eggs, room temp
* 1 cup sour cream 240 g
* 1 tbsp vanilla extract
* 1/4 cup all purpose flour 32g

Instructions:

For the crust:
* In a mixing bowl, combine crushed biscuits, the melted butter, and the cinnamon with a fork until crumbs are moistened evenly throughout. Press along the bottom and sides of a lightly greased 9 inch springform pan. Let the crust chill a little in the fridge while you prepare cheesecake.

For the cheesecake:
-Preheat the oven to 180 C
-In  stand mixer, combine the cream cheese with the sugar in a large bowl and mix on medium speed until well combined and fluffy. Blend in the milk, then add the eggs one at a time, mixing briefly after each addition.

-Mix in sour cream, vanilla and flour until smooth. It may be easier to sift in the flour.

-Pour filling into prepared crust. Bake at 180 C for 1 hour, then turn off the oven and leave cheesecake inside for another 5 hours or so until oven has completely cooled. This is to prevent cracking.

* Store cheesecake in fridge after this time period is over until chilled, then top with the strawberry topping.
This, to me, is the sambosa that best embodies Bah This, to me, is the sambosa that best embodies Bahrain- the first- actually the only-place I have these cheesy corn sambosa ❤️. No fancy cheese goes in this, it’s literally the stuff out of a can and take SO melty and cheesy and good. I mix in a little mashed potatoes and it just makes these 💯 times better, creamy and delicious. Posting the full steps on IGTV, it’s so easy you prob won’t need them! Recipe below and tell me- what’s your go to sambosa cheese?

Ingredients
2 small potatoes, peeled and cut into cubes 8 oz total, 235 g
1/2 cup corn kernels, from a can, drained
12 oz American cheese, like Velveeta or Kraft, grated 340 g (2 170g cans of Kraft processed cheese)
pinch salt
pinch black pepper
1/2 pack samosa wrappers each pack is 500 g

Instructions:
-Cover potato cubes with water, and bring to a boil. Reduce heat and simmer until potatoes are completely cooked through. Drain, and mash.

-Let potatoes cool slightly then combine mashed potatoes with the grated cheese, drained corn, salt and pepper. Mix well until the mixture is evenly combined. Taste for and adjust seasoning.

-Fill each samosa wrapper with a tbsp of mixture on the bottom corner, then fold the corner of the samosa up and over the filling to the other side, to make a triangle. Keep folding this triangle over all the way up the top (check the video at the bottom of this recipe card to see how). Mix together the flour and water to form a thick paste, and seal the ends of the samosa to prevent them from opening up while frying.

-Place vegetable oil in a skillet, about 2 inches deep and heat on medium high heat. Once hot enough, add the sambosa and fry for around 2 minutes a side until golden brown. Remove to a paper towel lined plate to absorb some of the excess oil, then enjoy warm.

.
.
.
.
.

#harira #soup #ramadanrecipes #ramadan2021 #ramadan #ramadankareem #vegetablesoup #soupseason #soupsofinstagram #delishkitchen #friedfood #aprilisforarabfood #f52grams #foodfluffer #foodflatlay #foodphotography #foodphotographer #foodstylist #thefeedfeed #middleeasternfood #vegetarian #tasty #tastingtable #tastemade #samosa #sambosa
This is one of my top 5 recipes from this Ramadan’s recipe prep. One of my features does the @tamimimarkets recipe catalogue! Click the link in their bio to access this gorgeous (free!) catalogue.

This harira soup is unbelievable. Hearty and delicious and beautifully spiced- I’ve never been obsessed with harira soup until this one. It’s a simple one because it’s meat free, so it’s perfect to start your iftar with but also hearty enough to totally serve as a meal alongside some sambosas. Recipe below, and IGTV video coming in a bit!

Ingredients
3 tbsp olive oil
1 large onion, diced
3 celery stalks, diced
2 carrots, diced
1 tsp cinnamon powder
1/2 tsp salt
1/2 tsp black pepper
pinch red chili flakes
1/2 cup chopped parsley
1/2 cup chopped coriander(cilantro)
1 can tomato sauce 15 oz (430g)
7 cups vegetable stock or 2 stock cubes dissolved in 7 cups water
1 can drained chickpeas 15 oz (400 g)
1 cup green lentils
1/2 cup vermicelli noodles 50 g
2 lemons, juiced 1/4 cup juice
2 tbsp flour, dissolved in 1/4 cup water* use cornstarch if gluten free

Instructions:
-Start by adding the lentils to a bowl of water and soaking as you prepare the rest of the ingredients, this helps them cook through faster.
-Heat oil in a large saucepan over medium heat, and add the onions, celery and carrots. Saute for 6-8 minutes, until onions soften and turn golden brown.
-Add all the spices, the chopped parsley and chopped coriander, the tomato sauce, and the vegetable stock. Bring the pot to a boil, then add the drained chickpeas and drained lentils. Reduce heat and simmer for 25 minutes or until chickpeas and lentils are tender.
-Add the vermicelli, and let it boil for 3-4 minutes or until tender. Add the lemon juice, and the flour water mixture. Let it simmer another minute or until it thickens, then taste for seasoning and add salt and pepper if necessary.
.
.
.
.
.
#harira #soup #ramadanrecipes #ramadan2021 #ramadan #ramadankareem #vegetablesoup #soupseason #soupsofinstagram #moroccan #moroccanfood #aprilisforarabfood #f52grams #foodfluffer #foodflatlay #foodphotography #foodphotographer #foodstylist #thefeedfeed #veganrecipes #vegan #tasty #tastingtable #tastemade #lentils
Never ever liked vimto until I had it like this 🍧. Vimto smoothies means that the sweetness of vimto is tempered by that cold crunchy shaved ice. Could not stop eating/drinking these vimto slushees! So easy, you just need water, ice, vimto and a high speed blender- my @ninjakitchenme did so well breaking down huge ice chunks👏🏼. Save this for a little twist on your classic iftar drink🥳

Ingredients:
-3/4 cup water
- 3/4 cup vimto 
- 2 cups ice 

Method:
Add the ingredients to your blender in the order listed, and blend on frozen drink mode until slushy like consistency. Add more ice or water if you need to, and enjoy immediately with a spoon/straw. Yum!
.
.
.
.
.

#ramadan #ramadan2021 #ramadanrecipes #iceddrinks #slush #slushy #slushii #berries #syrup #cordial #drinkphotography #damnthatsdelish #foodfluffer #pour #dripshot #foodphotography #foodphotographyandstyling #foodstylist #foodstyling #thefeedfeed #vimto #foodtographyschool #foodtography #beautifulcuisines
A biscuit base topped with a super easy smooth, cr A biscuit base topped with a super easy smooth, creamy pistachio cheesecake and the crowning touch,  @mayadelices ‘s luscious milk chocolate melted and poured over the top. I mean- heavenly! Recipe below, adapted from @savoryandsweetfood ,, IGTV will be uploaded today. I am absolutely loving @mayadelices couverture, great quality baking chocolate thats so fun experimenting with! They have sugar free and vegan options too, and best of all it’s easily available in their shop in Bahrain 🍫👏🏼

Ingredients:

For the crust:
2 cups digestive biscuit crumbs (250 g)
1/2 cup butter melted, 115g
Pinch cinnamon powder

For the pistachio cheesecake filling:

1 cup pistachio powder (140g)
12 Kiri squares or cream cheese (215g)
250 ml thick cream
1/2 of a 400 g tin of sweetened condensed milk, more if you like it sweeter

To top:
1 cup Maya milk chocolate (160g)
pistachios to garnish

Method:
1. Preheat oven to 180C. Grease and line a 8x8 inch pan with parchment paper with extra paper hanging over the sides so you can easily lift out the bars.

2. Mix digestive crumbs with melted butter and cinnamon. Press this firmly into the base of the pan. Refrigerate for 10 minutes.

3. In a food processor, add the pistachio powder, kiri cheese cubes, thick cream, and condensed milk. Blend until well combined and smooth. Pour this mixture into the crust base and bake for 15-20 minutes until set but center is still a little jiggly. Let cool at room temperature for 1 hour then refrigerate for several hours.

4. Melt the milk chocolate gently in the microwave, in 10 second bursts, stirring after each increment. Once smooth and melted, spread over the top of the cheesecake, and refrigerate until set. Enjoy!
.
.
.
.
.
#ramadan #ramadan2021 #ramadanrecipes #cheesecakebars #cheesecakebites #chocolateporn #pistachio #chocolatelover #chocolaterecipes #cheesecakelovers #cheesecakelove #damnthatsdelish #foodfluffer #pour #chocolatedrip #dripshot #foodphotography #foodphotographyandstyling #foodstylist #foodstyling #thefeedfeed #thebakefeed #foodtographyschool #foodtography #beautifulcuisines
Want a Ramadan dessert that takes minutes to make Want a Ramadan dessert that takes minutes to make and tastes amazing? Yeah we all do - I got you! Try this coffee biscuit cake (barely adapted from the wonderful @littlesunnykitchen). Layers of coffee soaked biscuits and a super easy fluffy cream 👌🏼. I used my new @braun_bahrain handheld electric whisk, one of the attachments in the minipimer set-It whips the cream so fast, much faster than my stand mixer and it’s so convenient to be able to use any bowl to prep the cream in. I’ve partnered with @digitrolley to bring you lots of good recipes with their range of kitchen appliances, so keep following along! Recipe below , and IGTV video coming today in my Ramadan series!

Ingredients
2 tbsp nescafe powder dissolved in 1 cup hot water
1 cup heavy whipping cream 250ml
3 tbsp sweetened condensed milk
splash vanilla extract, optional
1 creme caramel sachet, powder only 49g
1 pack tea biscuits or graham crackers 7 oz or 200 g
2 tbsp cocoa powder for topping

Instructions:
-Add the heavy cream, sweetened condensed milk, vanilla and creme caramel powder to a bowl and beat until soft peaks form. Set this cream mixture aside.
-Dip the tea biscuits into the coffee briefly until they soak up the coffee but before they start to break apart. -Layer in a 7×11 or 9×9 inch clear pyrex dish, then top with half the cream mixture.
-Repeat another layer of coffee soaked biscuits on top of the heavy cream, followed by the remaining half of the cream. Sift the cocoa powder on to the top, then refrigerate for several hours until set. This is even better the next day!

.
.
.
.
.
#nescafe #nescafegold #coffeecake #biscuit #biscuitcake #nobake #nobakedessert #nobakecake #tiramisu #damnthatsdelish #tastingtable #beautifulcuisines #foodphotography #foodphotographyandstyling #tastyfood #easydessert #ramadankareem #ramadan2021 #ramadanrecipes #cream
Ramadan Kareem! And the first recipe is for these Ramadan Kareem! And the first recipe is for these unbelievable (and easy!) chicken musakhan sambosa was developed for @tamimimarkets Ramadan catalogue. One of the coolest projects I’ve ever worked on can’t wait to tell you more about it! In the meantime, enjoy this teaser recipe and check IGTV for full video steps coming up. 

Ingredients:
2 chicken breasts, cooked and finely shredded about 1 heaped cup of shredded chicken See notes
1/4 cup olive oil
2 large onions cut in half, then thinly sliced into wedges
1/4 cup toasted almond slivers or pine nuts
3 tbsp sumac
1/2 tsp salt
1/4 tsp black pepper
1/4 tsp cumin powder
1/4 tsp cinnamon powder
To assemble:
1 pack sambosa wrappers 500 g
1 tbsp flour
1/2 tbsp water
For frying:
vegetable oil, about 1/4 cup

Instructions:
-In a deep skillet over medium heat, add the olive oil until it heats up. Add the onions, and cook, stirring frequently until soft and starting to caramelize, 8-10 minutes.

-Add the shredded chicken, the toasted nuts, and all the spices. Stir to combine, then remove from the heat. Let mixture cool slightly 5 minutes or so.

-Fill each sambosa wrapper with a tbsp of mixture on the bottom corner, then fold the corner of the sambosa up and over the filling to the other side, to make a triangle. Keep folding this triangle over all the way up the top 

-Mix together the flour and water to form a thick paste, and seal the ends of the sambosa to prevent them from opening up while frying.

-Place vegetable oil in a skillet, about 2 inches deep and heat on medium high heat. Once hot enough, add the sambosa and fry for around 2 minutes a side until golden brown. Remove to a paper towel lined plate to absorb some of the excess oil, then enjoy warm, optionally with yogurt to dip in.
.
.
.
.
.
#chickensamosa #musakhan #ramadankareem #ramadan2021 #ramadanrecipes #samosa #friedfood #palestinianfood #middleeasternfood #beautifulcuisines #damnthatsdelish #f52community #thefeedfeed #foodgawker #f52grams #buzzfeedfood #tastingtable #tastemade #chickenrecipes #sumac #caramelizedonions #foodblogfeed #foodphotography #foodphotographyandstyling #foodstyling
Load More... Follow on Instagram

Copyright © 2019 on the Seasoned Pro Theme