• Skip to primary navigation
  • Skip to main content
  • Skip to primary sidebar
  • Skip to footer

 logo

  • Recipes
    • Breakfast
    • Sides
    • Soup
    • Main Meals
    • Healthy
    • Dessert
    • Drinks
  • Eating Out
  • About Me
    • Privacy Policy
  • Resources
    • Must Have Kitchen Tools
  • Nav Social Menu

    • Email
    • Facebook
    • Instagram
    • Pinterest

Um Ali

May 18, 2020 · 10 Comments

Jump to Recipe
um ali with a scoop taken out and nuts on the side

This Um Ali recipe gives you a very traditional Egyptian dessert that is like an extra special bread pudding. It’s delicious- creamy, sweet and comforting, with an assortment of nuts for those so inclined. It’s incredibly easy to put together and a staple dessert for special events in the Middle East.

What is Um Ali?

Um Ali literally translates into “Ali’s Mother”, named after the wife of a ruler in the Ayyubid empire in Egypt who used to make it for her husband. It’s a complete classic that’s been around forever, and makes an appearance on any buffet table you’ll ever frequent in Ramadan.

What is in Um Ali?

It’s a traditional bread pudding with pastry, sugar, milk, nuts, and raisins. Spices are optional (like cinnamon, saffron, cardamom, etc). I made this one without any of the spices and it came out beautifully, but embellish if you like!

What makes this recipe so good?

close up pic of a scoop being taken out of baked um ali

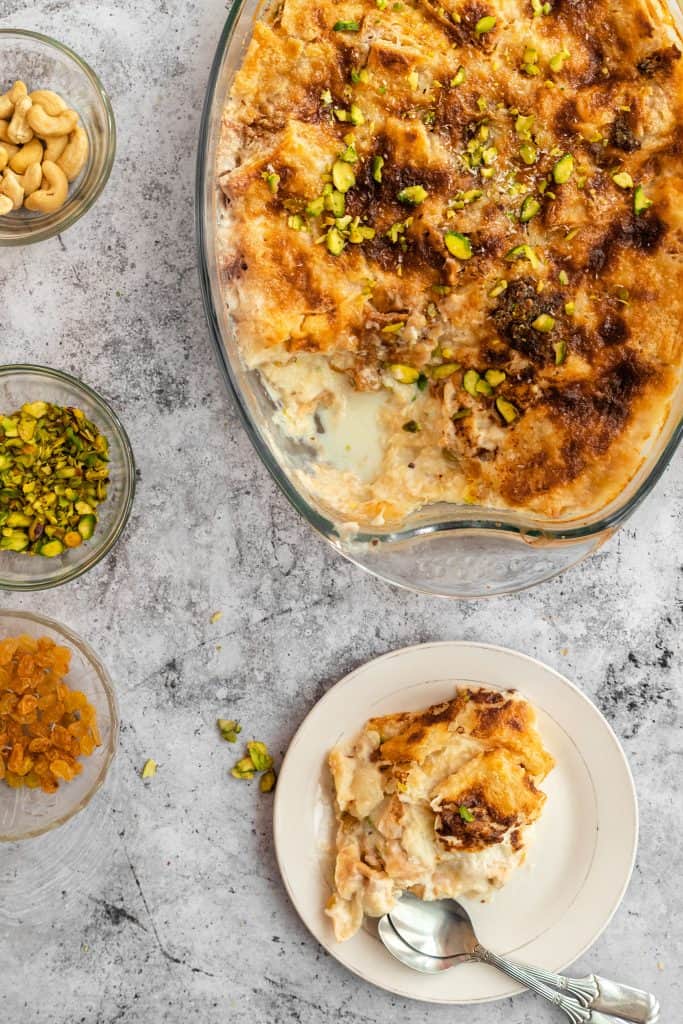
It’s sweet and milky, warm and comforting and has a gorgeous mix of textures. The nuts, the crunchy edges of the puff pastry, the soft middle of the soaked pastry, the broiled cream topping. It smells amazing the second it comes out the oven.

It’s fun to do a more exotic version of bread pudding, and it’ll open up your culinary horizons.

And best of all, it’s so incredibly easy.

Ingredients in Um Ali:

ingredients to make um ali

Puff Pastry: My pastry of choice is the classic for this dessert, baked puff pastry. I like to brush the raw puff pastry with a little butter and sprinkle with some sugar before baking because it gives a wonderful hint of sweetness and richness and the perfect crunch!

Milk: I use whole milk for richness. Some recipes call for heavy cream for the pastry soak, but I found the milk rich enough, especially since the whole bread pudding is topped with cream and broiled.

Sugar: Simple granulated white sugar to sweeten the milk, and not too much. 3/4 cup is the perfect amount to give sweetness that isn’t overpowering.

Heavy Whipping Cream (plus sugar and vanilla): We lightly sweeten the heavy cream and add a little vanilla if you like, then whip it up into soft peaks. This is to top the Um Ali with before broiling which gives an amazing golden brown thick layer on the top.

Assorted Nuts and Raisins: A Um Ali recipe is traditionally layered with mixed nuts. Use whatever you like! I used cashews, pistachios, dried shredded coconut, and raisins. I actually do NOT like raisins in my desserts, but I wanted to keep this authentic. Feel free to leave the raisins out!

How to make Um Ali:

pastry being baked for um ali

First bake the pastry: Brush the puff pastry with some softened butter, sprinkle with a little sugar, and bake (spaced out so they don’t overlap) on a large baking sheet at 390F (200C) until golden brown. This took me around 20-25 min.

Let the pastry cool so you can handle it, because you’ll be tearing this into pieces and layering in a serving dish. The first layer will be about 3/4 of the pastry.

The next layer will be the assorted nuts and raisins

Make the milk soak for the pudding: Heat the milk and sugar until sugar dissolves and milk has just boiled. This hot milk will be poured on to the nut and pastry layer in the dish.

Top with the remaining 1/4 of the puff pastry.

um ali being assembled

Make the whipped cream topping:

Whip the heavy cream, vanilla, and sugar until soft peaks form. Spread this over the top of the puff pastry.

Put the oven function onto broil, same temperature as before (390F/200C), and place the Um Ali in the middle rack of the oven (so it’s not too close to the broiler). Broil for 10 minutes until golden brown and bubbling.

um ali being assembled

How to serve and store:

I highly recommend serving this fresh out the oven. That’s when it’s at its most delicious.

That said, you can reheat leftovers in a moderately hot oven (300F/150C) until warm. Leftovers will last 2-3 days in the fridge.

If you want to assemble in advance, I recommend making the different components without assembling, because the longer the pudding sits, the more milk it’ll soak up and it’ll be less saucy.

I would whip the cream and keep that in the fridge, bake and shred the puff pastry and set that aside at room temperature, and combine the milk and sugar in a saucepan without heating.

When it’s time for you to assemble and bake, you just need to heat the milk, pour it over the puff pastry and spread whipped cream on top and bake.

The good thing is this Um Ali recipe only takes 10 minutes in the oven, so you can do this on the spot!

I’ve also had people report to me that they have assembled the whole thing and baked before serving and still really enjoyed it. I’ve also had people bake it completely and reheat before serving and also enjoy that! It’s all down to what you prefer.

Completed um ali with a scoop being taken out

Um Ali

A classic Middle Eastern bread pudding made with layers of puff pastry that's soaked in a sweet milk mixture and layered with mixed nuts and raisins.
5 from 5 votes
Print Pin
Rate
Course: Dessert
Cuisine: Middle Eastern
Keyword: um ali
Prep Time: 5 minutes
Cook Time: 10 minutes
Servings: 8 people
Calories: 357kcal
Author: Farah Abumaizar

Ingredients

For the pastry:

  • 16 oz puff pastry dough, thawed 16 oz (470g) I used 13 squares
  • 1 tbsp softened butter
  • 1 tbsp sugar for sprinkling

For the milk soak:

  • 4 cups whole milk
  • 3/4 cup sugar 150 g

Mix- Ins:

  • 1/4 cup each cashews, pistachios, dried coconut, and golden raisins

Cream topping:

  • 1 cup heavy whipping cream 250 g
  • 1 tsp vanilla extract
  • 1 tbsp sugar

Instructions

  • Preheat the oven to 390F (200C). Place the puff pastry squares in a single row on a baking sheet. Brush evenly with butter and sprinkle the sugar on top. Bake for 20-25 minutes until golden brown, then set on counter to cool. Leave the oven on.
  • Whip the heavy cream by adding the cold cream to the bowl of a mixer along with the vanilla and sugar, and whipping on medium high speed until soft peaks form. Set aside.
  • Add the milk and sugar to a medium saucepan over medium heat, stir until sugar dissolves then bring to a boil. Once the milk boils, remove from heat.
  • Break 3/4 of the puff pastry into chunks and scatter on the base of a 9×13 inch pan. Add all the nuts and raisins by sprinkling evenly over the pastry surface. Pour all of the hot milk on top.
  • Break up the remaining 1/4 of the puff pastry and scatter it evenly on top of the milk. Spread the whipped cream evenly on the top.
  • Turn the oven to the broil function, at the same temperature (390F, 200C). Place um ali in the middle rack of the oven and broil for around 10 minutes, watching carefully, until golden brown and bubbly. Sprinkle with additional pistachio if desired, and serve warm.
Tried this recipe?Mention @everylittlecrumb or tag #everylittlecrumb!

Nutrition

Calories: 357kcal
 

If you liked this recipe, you might like:

Kunafa

Aish El Saraya

Mango Trifle

Did you make this? Tag @everylittlecrumb or hashtag #everylittlecrumb and I’ll share your images! Don’t forget to pin for later!

Dessert, Recipes

Previous Post: « Shawarma Sauce
Next Post: Date Nut Bars »

Reader Interactions

Comments

  1. Amanda Wren-Grimwood says

    May 18, 2020 at 6:50 pm

    5 stars
    This sounds so comforting with the combination of nuts and soft pastry!

    Reply
    • Farah Abumaizar says

      May 18, 2020 at 8:05 pm

      It truly is!!

      Reply
  2. Jessica Formicola says

    May 18, 2020 at 7:09 pm

    5 stars
    I’ve never had um ali, but after reading this recipe, I can’t wait to try it! Thanks for sharing!

    Reply
    • Farah Abumaizar says

      May 18, 2020 at 8:05 pm

      I hope you love it Jessica!

      Reply
  3. Shadi Hasanzadenemati says

    May 18, 2020 at 7:33 pm

    5 stars
    Love how easy and delicious this recipe is. It’s perfect for a gathering or a party.

    Reply
    • Farah Abumaizar says

      May 20, 2020 at 1:13 pm

      It really is!

      Reply
  4. Stephanie says

    May 18, 2020 at 7:35 pm

    5 stars
    I’ve never heard of this before, but it looks absolutely amazing! I have everything except the puff pastry so I know what I will be grabbing when I head to the store today. I don’t think I can even wait until the weekend for this one.

    Reply
    • Farah Abumaizar says

      May 20, 2020 at 1:13 pm

      I hope you try and love it!

      Reply
  5. Jill says

    May 18, 2020 at 10:29 pm

    5 stars
    I’ve not heard of this dessert, but I know I’d devour it. I always enjoy the American version of bread pudding. Using puff pastry and all the mix-ins just makes it all the more decadent. Yum!

    Reply
    • Farah Abumaizar says

      May 20, 2020 at 1:13 pm

      It’s so decadent and comforting! Thanks Jill

      Reply

Leave a Reply Cancel reply

Your email address will not be published. Required fields are marked *

Recipe Rating


Primary Sidebar

Get more stuff

Subscribe to our mailing list and get interesting stuff and updates to your email inbox.

Thank you for subscribing.

Something went wrong.

we respect your privacy and take protecting it seriously

FeedFeed

Featured Recipes

Nana tea

Halal Guys Chicken and Rice

Aish El Saraya

Instant Pot Enchilada Soup

Death By Chocolate Zucchini Bread

More

Footer

everylittlecrumb

Farah Abu Maizar | Food Lover
Bbq salmon bowls with mango avocado salsa- unbelie Bbq salmon bowls with mango avocado salsa- unbelievable! And start to finish, you can be eating these in 15-20 minutes. Save this recipe for your next meal, you don’t want to miss out!

I’ve partnered with @kilosamak to produce a few recipes with their quality seafood- I’ve tried several of their items and genuinely loved them all! They deliver seafood straight to your door for you to enjoy and cook at home. Takes all the guesswork out of trying to choose and clean fish yourself, perfect solution for someone like me who loves seafood but isn’t so great at prepping it! Check out their Instagram page on how to order, or head to the link in my bio.

This salmon has a smoky slightly sweet rub, is baked in the oven for ultimate ease, and gets piled on to rice and topped with an easy, addictive, zingy mango and avocado salsa. Adapted from @pinchofyum , I’ll make this again and again!

Ingredients:
For the salmon:
2 fillets, about 250 g each 
Spice Rub:
2 tbsp brown sugar
1.5 tsp paprika 
1 tsp garlic powder
1 tsp onion powder, optional 
1/2 tsp chili powder
1/2 tsp salt 
2 tbsp olive oil 

Mango avocado salsa:
1 diced mangos 
1 diced avocado
1/4 cup finely diced coriander 
1/4 cup finely diced red onion 
1 inch spicy green chili pepper, finely chopped
1 tsp honey
Juice and zest of one lime
Salt to taste

Method:
- Make the salsa by mixing together all the salsa ingredients and placing bowl in fridge while you make the salmon.
- Heat oven to 240C, and line a baking sheet with parchment paper. 
-Mix together all the ingredients for the salmon rub, and rub thoroughly all over the salmon, both sides.
- Bake for 10-12 minutes until salmon is opaque and cooked all the way through.
-Assemble bowls with rice, flaked pieces of salmon,and plenty of mango avocado salsa. Enjoy 😍

Catch the steps in my story!
Have you tried this pasta yet? Save this for your Have you tried this pasta yet? Save this for your next weeknight meal! Saucy macarona iltaybeen, can’t get much more comforting.  Adapted from @jedir3waish , makes for an easy delicious main that’ll make your family including kids very happy! Can find a step by step linked bio, or at https://everylittlecrumb.com/macarona/ , or in my story!

INGREDIENTS:
 
2 tbsp olive oil, divided
big pinch of salt
3 heaped tbsp tomato paste, divided 2 oz or 70 g
1 pack elbow macaroni 14 oz or 400 g
1 onion, very finely diced
1 zucchini, finely diced
1 carrot, finely diced
4-5 garlic cloves, minced
250 g ground beef
1 tsp seven spices
1 tsp turmeric
1/2 tsp paprika powder
1/4 tsp basil
1/4 tsp cinnamon powder
1/4 tsp garlic powder
1/2 tsp black pepper
1 tsp salt
1 can crushed tomatoes 14.5oz (400g)

NSTRUCTIONS
 
Bring a large pot of water to boil, add 1 tbsp olive oil and the salt, one tbsp of tomato paste, then the pack of pasta. Cook until al dente, then drain the pasta, reserving the pasta water. Set cooked pasta aside.

In a large skillet, heat the remaining tbsp of olive oil. Once hot, add the diced onion, and cook for 4-5 minutes until softened. Add the diced zucchini and carrots, and garlic and cook for a further 4-5 minutes until softened slightly.

Add the ground beef, and cook, smushing with a wooden spoon to break up the meat. Keep cooking until the beef is browned and cooked through, then optionally, drain the fat.
Add in the salt, pepper, and all the spices. Cook for another minute or so. Add the remaining 2 tbsp of tomato paste, and stir.

Add the can of crushed tomatoes and stir to combine. Bring to a simmer, then add a big ladleful of the reserved pasta water and simmer for 2-3 minutes on low heat.

Add the pasta to the sauce (I don't always add all the pasta, maybe 3/4 of the cooked amount until the finished dish is as saucy as I like). Stir to coat, cook for another minute or so until the pasta is warmed through, then enjoy!
This gorgeous tiramisu was so kindly sent to me by This gorgeous tiramisu was so kindly sent to me by @cadysweets.sa on my birthday, and we enjoyed every light fluffy bite of it. Their old account got hacked so follow along and support their new account ! They have a bunch of cakes and sweets for every occasion, so make someone or yourself happy and order one for a treat🤩! Send this to the tiramisu lover in your life 🍰.
.
.
.
.
.

#chocolatecake #magnoliabakery #cakestagram #cakephotos #layercake #chocolate #ganache #foodblog #instayum #yummy #bakery #foodporn #foodtographyschool #foodphotography #slice #delish #foodfluffer #damnthatsdelish #tiramisu #birthdaytreat #dessertbae #dessertoftheday #scoop #foodstyling #foodstylingandphotography
Easiest at home crusty bread with a great open cru Easiest at home crusty bread with a great open crumb texture. It’s the no knead bread from @breadin5 and has yet to fail me. Check my story for the step by step, and swipe for a video reveal.

Ingredients for two small loaves:
1.5 cups lukewarm water 
1/2 tbsp any type of yeast
1/2 tbsp salt
3 1/4 cup plain flour (450g)

Method:
In a large bowl, stir together the water with the yeast and salt. Try to dissolve but it’s fine if you have clumps.
2. Add flour all at once and stir, just until no flour patches remain.
3. Cover loosely with a kitchen cloth and leave it to rest for 2 hours in a warm place until risen and bubbly.
After this rest you can:
- Use dough immediately if impatient, but it’s easier to work with if cold, so maybe pop in fridge briefly
- Or, their recommended method and the one I do, leave in the fridge loosely covered for 12 hours or overnight. 
Refrigerated dough lasts up to two weeks, and flavor depends over time!
4. The next day, the dough might look deflated. That’s fine! When ready to bake, divide dough in half (I got two 400g dough balls)- it might be easier to handle if you sprinkle the dough lightly with flour, and take the half you are going to bake out of the fridge. Let it rest on a parchment paper lined baking sheet 40-90 minutes. The longer the more interior bubbles you should have. Preheat oven to 235C (450F), and after rest, make a few deep slashes in the dough with a sharp knife.
5. Place in the middle rack of the oven, and on the bottom rack place a roasting pan that had about a cup of hot water in it. This will create steam which gives a crustier crust!
6. Bake for 30-35 minutes or until deep golden brown.
7. Let it cool completely before enjoying!
.
.

.
.
.

#damnthatsdelish #foodfluffer #thebakefeed #feedfeed #tastingtable #forthemaking #BHGfood #foodblogfeed #bakedfromscratch #bakinglove #f52grams #foodbloggerpro #bakersofinstagram #TOHfoodie #foodphotography #canonphotos #bread #instayummy #kitchn #huffposttaste #food #dough #foodie #nokneadbread #homemadebread #doughter
Good morning! With dine in still closed in Saudi, Good morning! With dine in still closed in Saudi, Friday pancakes are fast becoming a tradition. And honestly, I don’t think I’ve had better pancakes at any restaurant recently! The easiest, fluffiest diner style pancakes are a huge hit in our family, find the recipe below adapted from @allrecipes . I like to barely warm the oven (110C or so) and keep the finished pancakes in a pan in the oven until I’m done with all the batter so they stay warm and perfect 👌🏼.

Ingredients
3/4 cup milk 170g
1 tbsp white vinegar
1 cup flour 125g
2 tbsp sugar 25g
1 tsp baking powder
1/2 tsp baking soda
1/4 tsp salt
1 egg room temperature
1/2 tsp vanilla
2 tbsp butter, melted 28g

Instructions:
-In a large bowl, combine the milk and vinegar, and let aside to stand for 5 minutes until curdled. Whisk to combine.
-In a separate large bowl, mix together the flour, sugar, baking powder, baking soda and salt.
-Add an egg, the vanilla and the melted butter to the buttermilk and whisk to combine.
-Add the dry ingredients all at once to the wet, and whisk until flour patches disappear. A few lumps are fine, but don't over mix.
-Let the batter rest for 5-10 minutes while you heat a pan on the stove.
lightly grease the pan with nonstick spray or butter, and pour about 1/4 cup of batter on the pan. Cook for 2-3 minutes on each side or until golden brown. (Flip the first time once you see bubbles form and the edges of the pancake dry up).
-Enjoy with toppings of your choice!
.
.
.
.
.
#pancakes #pancakerecipe #blueberrypancakes #maplesyrup #breakfast #morningslikethese #fridaymorning #flatlay #foodfluffer #breakfastrecipes #breakfastfood #breakfastofchampions #pancakelover #food #foodtography #foodtographyschool #foodphotography #delish #foodphotos #weekendbreakfast #eatingathome #recipeoftheday #foodporn #foodflatlay #blueberries #trayoftheday
One of my photos from my shoot @tackle.baks . How One of my photos from my shoot @tackle.baks . How insane does this tom yum soup look? For those who haven’t tried this casual seafood spot yet, you really should! The food is great and priced very reasonably, and they have some menu items I’m obsessed with like their crispy fish burger, the salmon poke salad and the creamy truffle shrimp👌🏼. They currently have a delivery offer going for only 5SAR on HungerStation, so no time like the present! Have I tempted you with this photo of the tom yum soup? I’m hungry just writing this caption🤤.
.
.
.
.
.
#soup #tomyum #tomyumsoup #food #foodphotography #canonphotography #canon #seafood #seafoodlover #shrimp #delish #beautifulcuisines #foodtographyschool #foodtography #foodblogger #instayum #lonelyplanetfood #dametravelerfoodie #soupseason #restaurantphotography #khobar #tastemade #tastingtable #foodfluffer
I wanted to take a really pretty photo of the choc I wanted to take a really pretty photo of the chocolate fondants and post it with the recipe but I gave into peer pressure and am posting the recipe with this horribly lit and not at all beautifully set up video🤷🏻‍♀️. At least the video really demonstrates how gooey and perfect the center of these chocolate lava cakes are, and how unbelievably delicious they are. You won’t believe how easy it is to make these! And you may never order this at a restaurant again! You can even use muffin cups instead of ramekins. Save this recipe for when you want to be extra fancy with your dessert 👩‍🍳 I looked at a bunch of recipes online and compiled my favorite steps from each, this is most influenced from @gordongram 

Ingredients:
For greasing the ramekins:
1 tbsp melted butter
1 tbsp cocoa powder

For the fondants:
1 stick butter 115 g
2 eggs
2 egg yolks
170 g chocolate bittersweet chocolate (I used Lindt 70%)
1/2 cup caster sugar or regular sugar
Pinch salt 
3 tbsp flour (41g)
25 g butter melted

Method:
-Spray ramekins with nonstick spray, then dust with cocoa powder and shake until evenly coated, or brush inside of ramekins with melted butter, chill into butter sets, grease again with more melted butter and dust with cocoa powder (Gordon Ramsay’s fancy method)

-Melt together the butter and chocolate over a pan of simmering water (Bain marie ). Set aside melted chocolate to cool for 10 minutes.

-In an electric mixer, whisk the eggs, egg yolks, and sugar until thick and pale about 3-4 min. Sift in the flour and beat again until mixed.

-Pour melted chocolate into the egg mixture in 3 additions, mixing well between each until combined.

-Pour fondant batter evenly into prepared ramekins. If baking immediately, let them chill in the fridge while you preheat the oven to 200C. You can also store in the fridge for up to two days before baking.

- Bake 10-12 minute or until top just looks set. If using muffin pans, they’ll take less time, 8-10 minutes. Remove from oven and cool 1 minute before inverting onto a plate. Enjoy immediately with vanilla ice cream and berries!
I can’t stop myself from craving over the top de I can’t stop myself from craving over the top decadent desserts when it’s cloudy and a little chilly. One of my favorites in Bahrain is @joesbahrain ‘s sticky date cake that comes swimming in a pool of caramel sauce. It’s a drool worthy dessert! Their warm chocolate brownie is also unbelievable. I always end up confused on which to order and usually give in to ordering both 😂. Their coffee pairs perfectly with either👌🏼. Definitely miss this spot and wish I could be dining outdoors @theavenuesbh now indulging on this ultimate treat. Do you agree with my review? 
.
.
.
.

#chocolatecake #magnoliabakery #cakestagram #cakephotos #layercake #chocolate #ganache #foodblog #instayum #yummy #bakery #foodporn #foodtographyschool #foodphotography #slice #delish #foodfluffer #damnthatsdelish #datecake #caramel #stickytoffee
Load More... Follow on Instagram

Copyright © 2019 on the Seasoned Pro Theme