• Skip to primary navigation
  • Skip to main content
  • Skip to primary sidebar
  • Skip to footer

 logo

  • Recipes
    • Breakfast
    • Sides
    • Soup
    • Main Meals
    • Healthy
    • Dessert
    • Drinks
  • Eating Out
  • About Me
    • Privacy Policy
  • Resources
    • Must Have Kitchen Tools
  • Nav Social Menu

    • Email
    • Facebook
    • Instagram
    • Pinterest

Shawarma Sauce

May 14, 2020 · Leave a Comment

Jump to Recipe
Shawarma sauce two ways with a little salad on the side

Easy and delicious shawarma sauce two ways! This gives you the option of having a yogurt based sauce or a tahini based sauce, both of which go great with homemade shawarma (and a bunch of other things)

What is shawarma?

A very ubiquitous Middle Eastern street food.  Shawarma is thinly sliced meat that’s cooked by roasting in a turning vertical rotisserie. It’s full of exotic spices, and therefore full of flavor.

It’s reminiscent of Greek gyros, or Turkish doners, down to the fact that it needs a really tasty (but simple) sauce to complete it.

I have a great homemade recipe for chicken shawarma that’s oven baked, easy and delicious! This is the perfect accompaniment to that.

What is shawarma sauce made of?

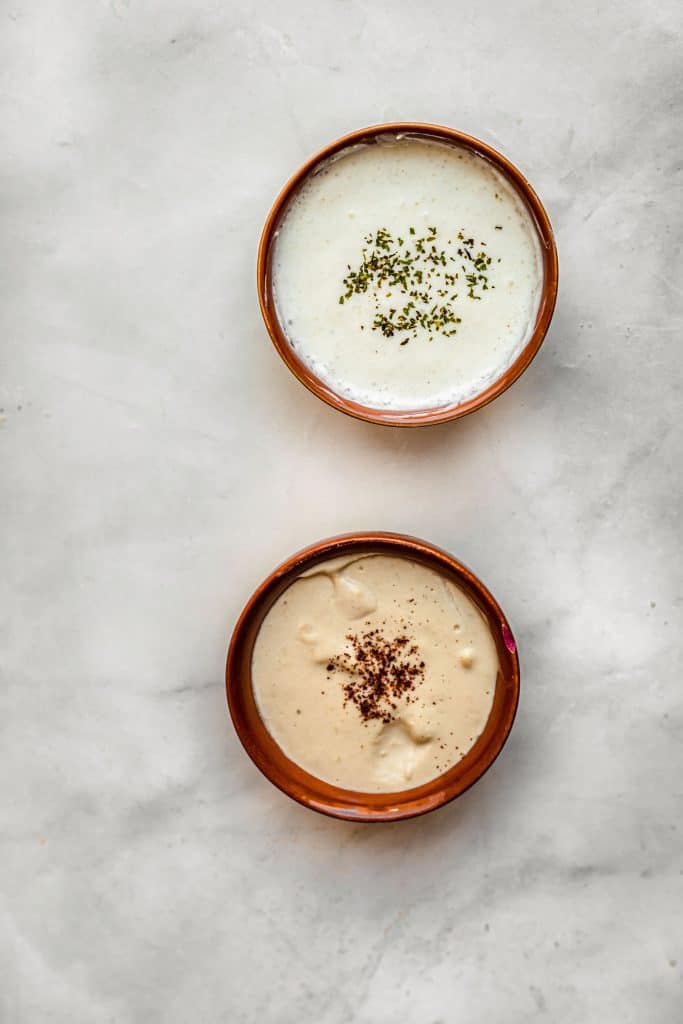
Shawarma is either chicken or meat. Usually chicken shawarma is served with a garlic sauce (toum), and meat shawarma is served with a tahini sauce.

Toum is a delicious emulsified spread made with garlic that’s whipped until fluffy and thick with vegetable oil. It’s really hard to make! I haven’t perfected it yet- I actually just tried making this once at home and it was a complete fail. Therefore, I have the perfect, easier and lighter hack.

How to make homemade shawarma sauce:

ingredients to make yogurt garlic shawarma sauce

For the garlic sauce:

Combining yogurt with garlic gives a tangy creaminess with a hint of heat from the garlic.

I use a mix of plain yogurt and labneh to get a really nice sour edge, but if you can’t find labneh, the perfect substitution is using greek yogurt in place of the plain yogurt and labneh mix. A hint of white vinegar, salt to taste and a good squeeze of lemon juice completes this!

You can whisk the ingredients together vigorously or blend them briefly in a food processor just to get a nice uniform consistency.

ingredients for garlic shawarma sauce in a blender

For the tahini sauce:

This is as easy as mixing together tahini, lemon juice, crushed garlic, and just enough water to thin out as needed. It’s better to use room temperature water so it combines better. You can just whisk the ingredients together with a fork and that’s it!

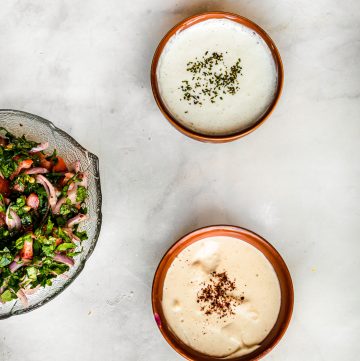
What to serve shawarma sauce with?

Well, obviously, shawarma, like the recipe I’ve mentioned.

You can also serve this drizzled on roasted eggplant, salads, sweet potato fries, so many things really!

two ways shawarma sauce in small bowls, yogurt and tahini

Shawarma Sauce

Easy shawarma sauce, two ways, with a yogurt garlic option and a tahini option.
Print Pin
Rate
Course: Side Dish
Cuisine: Middle Eastern
Prep Time: 5 minutes
Servings: 6 people
Author: Farah Abumaizar

Ingredients

For the yogurt sauce:

  • 1 small container plain yogurt 170g (8 oz)
  • 2 tbsp labneh or, omit labneh and replace plain yogurt with Greek yogurt
  • 2 garlic cloves, crushed
  • 1 tsp white vinegar
  • squeeze lemon juice
  • salt to taste
  • pinch black pepper

For the tahini sauce:

  • 1/2 cup tahini
  • 1/2-1 lemon or lime squeezed
  • 2-3 tbsp room temperature water
  • 1/2 tsp salt, or to taste

Instructions

For the yogurt garlic sauce:

  • Mix together the yogurt and labneh, or just greek yogurt, crushed garlic, lemon juice, vinegar, and salt and pepper to taste. You can whisk, or use a little blender. Refrigerate until ready to use.

For the tahini sauce:

  • Whisk together the tahini, lemon juice, water and salt. Add more water if you need to thin the sauce further. Refrigerate until ready to use.

Notes

For a great oven baked shawarma recipe, click here:
Tried this recipe?Mention @everylittlecrumb or tag #everylittlecrumb!

If you liked this recipe, you might like:

Oven Chicken Shawarma

Pesto Sauce

Middle Eastern Roasted Lamb

Did you make this? Tag @everylittlecrumb or hashtag #everylittlecrumb and I’ll share your images! Don’t forget to pin for later!

Recipes, Sauces

Previous Post: « Oven Chicken Shawarma
Next Post: Um Ali »

Reader Interactions

Leave a Reply Cancel reply

Your email address will not be published. Required fields are marked *

Recipe Rating


Primary Sidebar

Get more stuff

Subscribe to our mailing list and get interesting stuff and updates to your email inbox.

Thank you for subscribing.

Something went wrong.

we respect your privacy and take protecting it seriously

FeedFeed

Featured Recipes

Nana tea

Halal Guys Chicken and Rice

Aish El Saraya

Instant Pot Enchilada Soup

Death By Chocolate Zucchini Bread

More

Footer

everylittlecrumb

Farah Abu Maizar | Food Lover
Bbq salmon bowls with mango avocado salsa- unbelie Bbq salmon bowls with mango avocado salsa- unbelievable! And start to finish, you can be eating these in 15-20 minutes. Save this recipe for your next meal, you don’t want to miss out!

I’ve partnered with @kilosamak to produce a few recipes with their quality seafood- I’ve tried several of their items and genuinely loved them all! They deliver seafood straight to your door for you to enjoy and cook at home. Takes all the guesswork out of trying to choose and clean fish yourself, perfect solution for someone like me who loves seafood but isn’t so great at prepping it! Check out their Instagram page on how to order, or head to the link in my bio.

This salmon has a smoky slightly sweet rub, is baked in the oven for ultimate ease, and gets piled on to rice and topped with an easy, addictive, zingy mango and avocado salsa. Adapted from @pinchofyum , I’ll make this again and again!

Ingredients:
For the salmon:
2 fillets, about 250 g each 
Spice Rub:
2 tbsp brown sugar
1.5 tsp paprika 
1 tsp garlic powder
1 tsp onion powder, optional 
1/2 tsp chili powder
1/2 tsp salt 
2 tbsp olive oil 

Mango avocado salsa:
1 diced mangos 
1 diced avocado
1/4 cup finely diced coriander 
1/4 cup finely diced red onion 
1 inch spicy green chili pepper, finely chopped
1 tsp honey
Juice and zest of one lime
Salt to taste

Method:
- Make the salsa by mixing together all the salsa ingredients and placing bowl in fridge while you make the salmon.
- Heat oven to 240C, and line a baking sheet with parchment paper. 
-Mix together all the ingredients for the salmon rub, and rub thoroughly all over the salmon, both sides.
- Bake for 10-12 minutes until salmon is opaque and cooked all the way through.
-Assemble bowls with rice, flaked pieces of salmon,and plenty of mango avocado salsa. Enjoy 😍

Catch the steps in my story!
Have you tried this pasta yet? Save this for your Have you tried this pasta yet? Save this for your next weeknight meal! Saucy macarona iltaybeen, can’t get much more comforting.  Adapted from @jedir3waish , makes for an easy delicious main that’ll make your family including kids very happy! Can find a step by step linked bio, or at https://everylittlecrumb.com/macarona/ , or in my story!

INGREDIENTS:
 
2 tbsp olive oil, divided
big pinch of salt
3 heaped tbsp tomato paste, divided 2 oz or 70 g
1 pack elbow macaroni 14 oz or 400 g
1 onion, very finely diced
1 zucchini, finely diced
1 carrot, finely diced
4-5 garlic cloves, minced
250 g ground beef
1 tsp seven spices
1 tsp turmeric
1/2 tsp paprika powder
1/4 tsp basil
1/4 tsp cinnamon powder
1/4 tsp garlic powder
1/2 tsp black pepper
1 tsp salt
1 can crushed tomatoes 14.5oz (400g)

NSTRUCTIONS
 
Bring a large pot of water to boil, add 1 tbsp olive oil and the salt, one tbsp of tomato paste, then the pack of pasta. Cook until al dente, then drain the pasta, reserving the pasta water. Set cooked pasta aside.

In a large skillet, heat the remaining tbsp of olive oil. Once hot, add the diced onion, and cook for 4-5 minutes until softened. Add the diced zucchini and carrots, and garlic and cook for a further 4-5 minutes until softened slightly.

Add the ground beef, and cook, smushing with a wooden spoon to break up the meat. Keep cooking until the beef is browned and cooked through, then optionally, drain the fat.
Add in the salt, pepper, and all the spices. Cook for another minute or so. Add the remaining 2 tbsp of tomato paste, and stir.

Add the can of crushed tomatoes and stir to combine. Bring to a simmer, then add a big ladleful of the reserved pasta water and simmer for 2-3 minutes on low heat.

Add the pasta to the sauce (I don't always add all the pasta, maybe 3/4 of the cooked amount until the finished dish is as saucy as I like). Stir to coat, cook for another minute or so until the pasta is warmed through, then enjoy!
This gorgeous tiramisu was so kindly sent to me by This gorgeous tiramisu was so kindly sent to me by @cadysweets.sa on my birthday, and we enjoyed every light fluffy bite of it. Their old account got hacked so follow along and support their new account ! They have a bunch of cakes and sweets for every occasion, so make someone or yourself happy and order one for a treat🤩! Send this to the tiramisu lover in your life 🍰.
.
.
.
.
.

#chocolatecake #magnoliabakery #cakestagram #cakephotos #layercake #chocolate #ganache #foodblog #instayum #yummy #bakery #foodporn #foodtographyschool #foodphotography #slice #delish #foodfluffer #damnthatsdelish #tiramisu #birthdaytreat #dessertbae #dessertoftheday #scoop #foodstyling #foodstylingandphotography
Easiest at home crusty bread with a great open cru Easiest at home crusty bread with a great open crumb texture. It’s the no knead bread from @breadin5 and has yet to fail me. Check my story for the step by step, and swipe for a video reveal.

Ingredients for two small loaves:
1.5 cups lukewarm water 
1/2 tbsp any type of yeast
1/2 tbsp salt
3 1/4 cup plain flour (450g)

Method:
In a large bowl, stir together the water with the yeast and salt. Try to dissolve but it’s fine if you have clumps.
2. Add flour all at once and stir, just until no flour patches remain.
3. Cover loosely with a kitchen cloth and leave it to rest for 2 hours in a warm place until risen and bubbly.
After this rest you can:
- Use dough immediately if impatient, but it’s easier to work with if cold, so maybe pop in fridge briefly
- Or, their recommended method and the one I do, leave in the fridge loosely covered for 12 hours or overnight. 
Refrigerated dough lasts up to two weeks, and flavor depends over time!
4. The next day, the dough might look deflated. That’s fine! When ready to bake, divide dough in half (I got two 400g dough balls)- it might be easier to handle if you sprinkle the dough lightly with flour, and take the half you are going to bake out of the fridge. Let it rest on a parchment paper lined baking sheet 40-90 minutes. The longer the more interior bubbles you should have. Preheat oven to 235C (450F), and after rest, make a few deep slashes in the dough with a sharp knife.
5. Place in the middle rack of the oven, and on the bottom rack place a roasting pan that had about a cup of hot water in it. This will create steam which gives a crustier crust!
6. Bake for 30-35 minutes or until deep golden brown.
7. Let it cool completely before enjoying!
.
.

.
.
.

#damnthatsdelish #foodfluffer #thebakefeed #feedfeed #tastingtable #forthemaking #BHGfood #foodblogfeed #bakedfromscratch #bakinglove #f52grams #foodbloggerpro #bakersofinstagram #TOHfoodie #foodphotography #canonphotos #bread #instayummy #kitchn #huffposttaste #food #dough #foodie #nokneadbread #homemadebread #doughter
Good morning! With dine in still closed in Saudi, Good morning! With dine in still closed in Saudi, Friday pancakes are fast becoming a tradition. And honestly, I don’t think I’ve had better pancakes at any restaurant recently! The easiest, fluffiest diner style pancakes are a huge hit in our family, find the recipe below adapted from @allrecipes . I like to barely warm the oven (110C or so) and keep the finished pancakes in a pan in the oven until I’m done with all the batter so they stay warm and perfect 👌🏼.

Ingredients
3/4 cup milk 170g
1 tbsp white vinegar
1 cup flour 125g
2 tbsp sugar 25g
1 tsp baking powder
1/2 tsp baking soda
1/4 tsp salt
1 egg room temperature
1/2 tsp vanilla
2 tbsp butter, melted 28g

Instructions:
-In a large bowl, combine the milk and vinegar, and let aside to stand for 5 minutes until curdled. Whisk to combine.
-In a separate large bowl, mix together the flour, sugar, baking powder, baking soda and salt.
-Add an egg, the vanilla and the melted butter to the buttermilk and whisk to combine.
-Add the dry ingredients all at once to the wet, and whisk until flour patches disappear. A few lumps are fine, but don't over mix.
-Let the batter rest for 5-10 minutes while you heat a pan on the stove.
lightly grease the pan with nonstick spray or butter, and pour about 1/4 cup of batter on the pan. Cook for 2-3 minutes on each side or until golden brown. (Flip the first time once you see bubbles form and the edges of the pancake dry up).
-Enjoy with toppings of your choice!
.
.
.
.
.
#pancakes #pancakerecipe #blueberrypancakes #maplesyrup #breakfast #morningslikethese #fridaymorning #flatlay #foodfluffer #breakfastrecipes #breakfastfood #breakfastofchampions #pancakelover #food #foodtography #foodtographyschool #foodphotography #delish #foodphotos #weekendbreakfast #eatingathome #recipeoftheday #foodporn #foodflatlay #blueberries #trayoftheday
One of my photos from my shoot @tackle.baks . How One of my photos from my shoot @tackle.baks . How insane does this tom yum soup look? For those who haven’t tried this casual seafood spot yet, you really should! The food is great and priced very reasonably, and they have some menu items I’m obsessed with like their crispy fish burger, the salmon poke salad and the creamy truffle shrimp👌🏼. They currently have a delivery offer going for only 5SAR on HungerStation, so no time like the present! Have I tempted you with this photo of the tom yum soup? I’m hungry just writing this caption🤤.
.
.
.
.
.
#soup #tomyum #tomyumsoup #food #foodphotography #canonphotography #canon #seafood #seafoodlover #shrimp #delish #beautifulcuisines #foodtographyschool #foodtography #foodblogger #instayum #lonelyplanetfood #dametravelerfoodie #soupseason #restaurantphotography #khobar #tastemade #tastingtable #foodfluffer
I wanted to take a really pretty photo of the choc I wanted to take a really pretty photo of the chocolate fondants and post it with the recipe but I gave into peer pressure and am posting the recipe with this horribly lit and not at all beautifully set up video🤷🏻‍♀️. At least the video really demonstrates how gooey and perfect the center of these chocolate lava cakes are, and how unbelievably delicious they are. You won’t believe how easy it is to make these! And you may never order this at a restaurant again! You can even use muffin cups instead of ramekins. Save this recipe for when you want to be extra fancy with your dessert 👩‍🍳 I looked at a bunch of recipes online and compiled my favorite steps from each, this is most influenced from @gordongram 

Ingredients:
For greasing the ramekins:
1 tbsp melted butter
1 tbsp cocoa powder

For the fondants:
1 stick butter 115 g
2 eggs
2 egg yolks
170 g chocolate bittersweet chocolate (I used Lindt 70%)
1/2 cup caster sugar or regular sugar
Pinch salt 
3 tbsp flour (41g)
25 g butter melted

Method:
-Spray ramekins with nonstick spray, then dust with cocoa powder and shake until evenly coated, or brush inside of ramekins with melted butter, chill into butter sets, grease again with more melted butter and dust with cocoa powder (Gordon Ramsay’s fancy method)

-Melt together the butter and chocolate over a pan of simmering water (Bain marie ). Set aside melted chocolate to cool for 10 minutes.

-In an electric mixer, whisk the eggs, egg yolks, and sugar until thick and pale about 3-4 min. Sift in the flour and beat again until mixed.

-Pour melted chocolate into the egg mixture in 3 additions, mixing well between each until combined.

-Pour fondant batter evenly into prepared ramekins. If baking immediately, let them chill in the fridge while you preheat the oven to 200C. You can also store in the fridge for up to two days before baking.

- Bake 10-12 minute or until top just looks set. If using muffin pans, they’ll take less time, 8-10 minutes. Remove from oven and cool 1 minute before inverting onto a plate. Enjoy immediately with vanilla ice cream and berries!
I can’t stop myself from craving over the top de I can’t stop myself from craving over the top decadent desserts when it’s cloudy and a little chilly. One of my favorites in Bahrain is @joesbahrain ‘s sticky date cake that comes swimming in a pool of caramel sauce. It’s a drool worthy dessert! Their warm chocolate brownie is also unbelievable. I always end up confused on which to order and usually give in to ordering both 😂. Their coffee pairs perfectly with either👌🏼. Definitely miss this spot and wish I could be dining outdoors @theavenuesbh now indulging on this ultimate treat. Do you agree with my review? 
.
.
.
.

#chocolatecake #magnoliabakery #cakestagram #cakephotos #layercake #chocolate #ganache #foodblog #instayum #yummy #bakery #foodporn #foodtographyschool #foodphotography #slice #delish #foodfluffer #damnthatsdelish #datecake #caramel #stickytoffee
Load More... Follow on Instagram

Copyright © 2019 on the Seasoned Pro Theme