• Skip to primary navigation
  • Skip to main content
  • Skip to primary sidebar
  • Skip to footer

 logo

  • Recipes
    • Breakfast
    • Sides
    • Soup
    • Main Meals
    • Healthy
    • Dessert
    • Drinks
  • Eating Out
  • About Me
    • Privacy Policy
  • Resources
    • Must Have Kitchen Tools
  • Nav Social Menu

    • Email
    • Facebook
    • Instagram
    • Pinterest

Oven Chicken Shawarma

May 11, 2020 · 10 Comments

Jump to Recipe
Baked chicken shawarma on a tray with assorted dips

Oven Chicken Shawarma is the easiest, no fuss shawarma you could make and it’s just packed with flavor. Juicy and delicious and so adaptable. A Middle Eastern classic made so approachable!

What is shawarma?

A very common dish in the Middle East, shawarma is thinly sliced meat that’s cooked by roasting in a turning vertical rotisserie. Shawarma is full of exotic spices, and therefore full of flavor.

It’s a really popular street food, usually sold in sandwiches that are laden with garlic sauce or tahini sauce, pickles and tomatoes. It’s very affordable, and so common. Everyone has their favorite shawarma sandwich!

What makes this shawarma so good:

It’s easy! Marinate chicken, and bake it!

It’s full of flavor from the spice mix- and on that note, it uses a homemade spice mix instead of storebought stuff.

It’s healthy, made with chicken breast. It can also be made low carb if you serve this on salad instead of with bread.

How to make shawarma at home:

Ingredients to make chicken shawarma at home

Some recipes call for pan frying the meat, some recipes use an outdoor grill. I wanted to make it as easy and convenient as possible, so I decided on oven baked shawarma. No standing over frying pans or a hot grill. This works amazingly well!

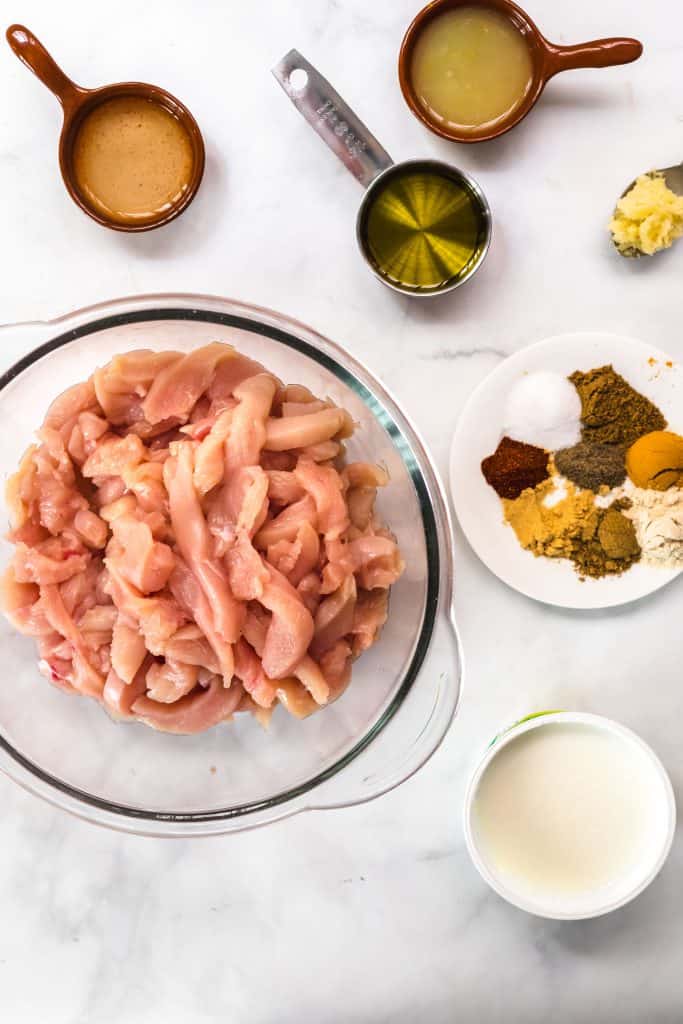
To cut down on cooking time, the chicken is cut into strips before going into the oven. Before cooking, we just need a simple marinade for the chicken.

Why marinate chicken?

It adds so much flavor and juiciness to the chicken. The olive oil in this marinate is the perfect fat to get the chicken to cook through in the oven, and the mix of the spices with the oil coats the chicken to get all the warm flavor of the spices infused into the chicken.

What kind of chicken to use for shawarma:

I’m sure that most recipes online call for chicken thighs. We are a chicken breast family. Just like in these chicken tacos, I went with chicken breasts instead of thighs. Don’t let anyone tell you chicken breast won’t be fabulous in shawarma!

Plus, it’s healthier too. If you really want to, feel free to substitute chicken thigh, but if you prefer breasts but were worried about using breast for shawarma, I’m here to tell you don’t worry!

What goes in a shawarma marinade?

Chicken shawarma with all the marinade ingredients

Spice: In the Middle East, shawarma spices are very commonly sold. You don’t need them. Make your own, probably more superior, spice mix right at home.

Lots of warming spices: cumin powder, mixed spice, turmeric garlic powder, ginger powder, paprika, salt and pepper.

If you can’t find mixed spice, you can make your own here, or just add a little cinnamon and the rest of the spices in the mix.

Garlic: a natural pairing for chicken

Olive Oil: to coat the chicken and make it juicy.

Lemon juice and white vinegar: they help tenderize the chicken and add some acidity.

Yogurt: Adds so much moistness and tang to the chicken

Chicken shawarma being marinated

How to cook oven chicken shawarma at home:

raw chicken shawarma on baking pan

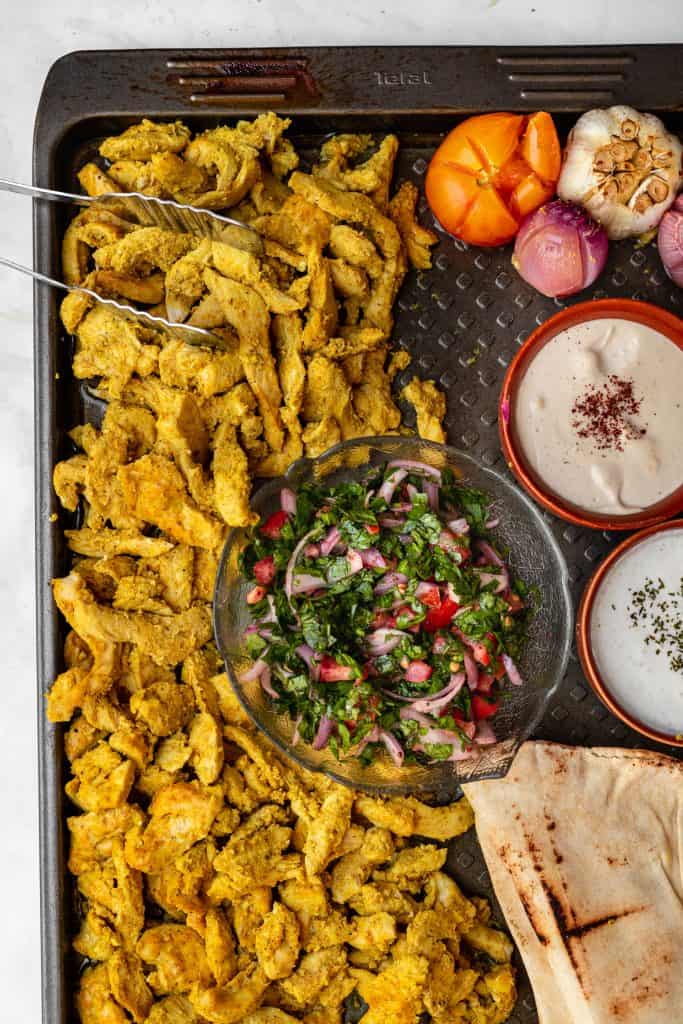
The best thing about this oven chicken shawarma is that it’s baked in the oven instead of messier methods.

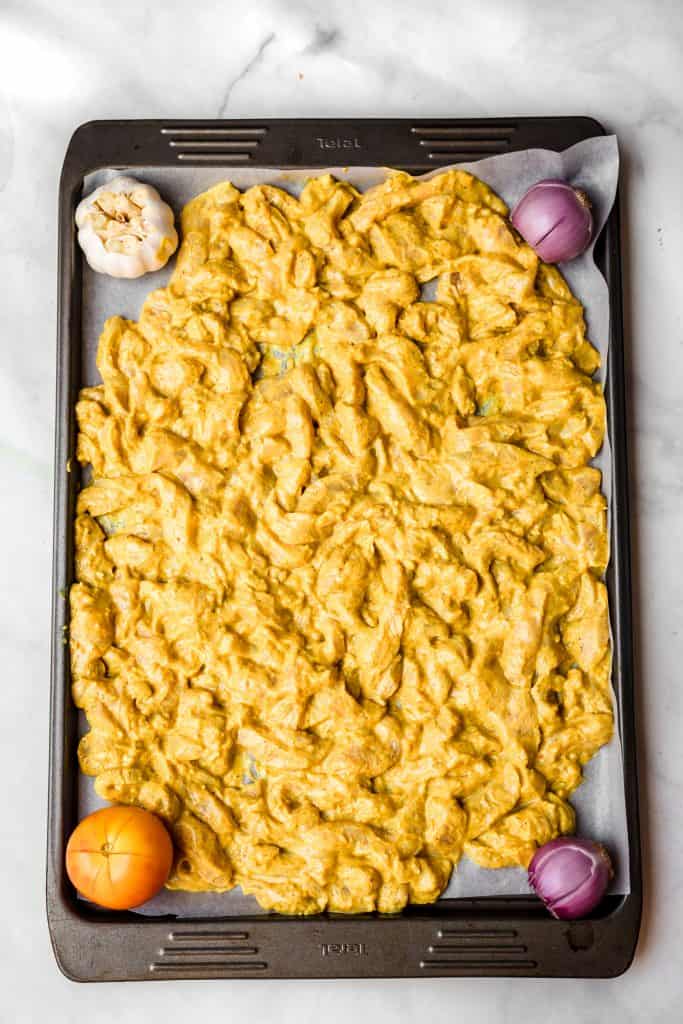
After the chicken marinates, place it in a single layer on a lined baking sheet. You want it to be spread out so that the chicken isn’t on top of each other in the oven, resulting in soggy chicken instead of crisp.

You need to make sure your oven is hot before the chicken goes in. It only needs 20 minutes or so to cook through.

My tip to get that golden brown crispy texture on some bits of shawarma: once chicken cooks through, drizzle with a little olive oil, then put it back in the oven on the broil function for 2- 3 minutes. It’ll get a beautiful color and texture!

My photos were actually taken before the broiling happened, because I prepped the chicken in advance, took photos, and broiled it right before eating to reheat.

What to serve shawarma with?

Easy homemade shawarma sauce, two ways, like in this post!

This shawarma tray is perfect for serving with pita bread and an assortment of toppings.

The idea is to have everyone assemble their own shawarma sandwich the way they like, much like my popular chicken and beef tacos recipe.

We like to mix together tomato, parsley and red onions that we dress with a little olive oil and salt. It makes the perfect salad to top the shawarma with once you put it in bread.

Shawarma is definitely best served with pickles! If you want a great side dish, try these air fryer sweet potato fries.

Cooked chicken shawarma ready to serve

How to make shawarma sauce:

sauces to serve with shawarma

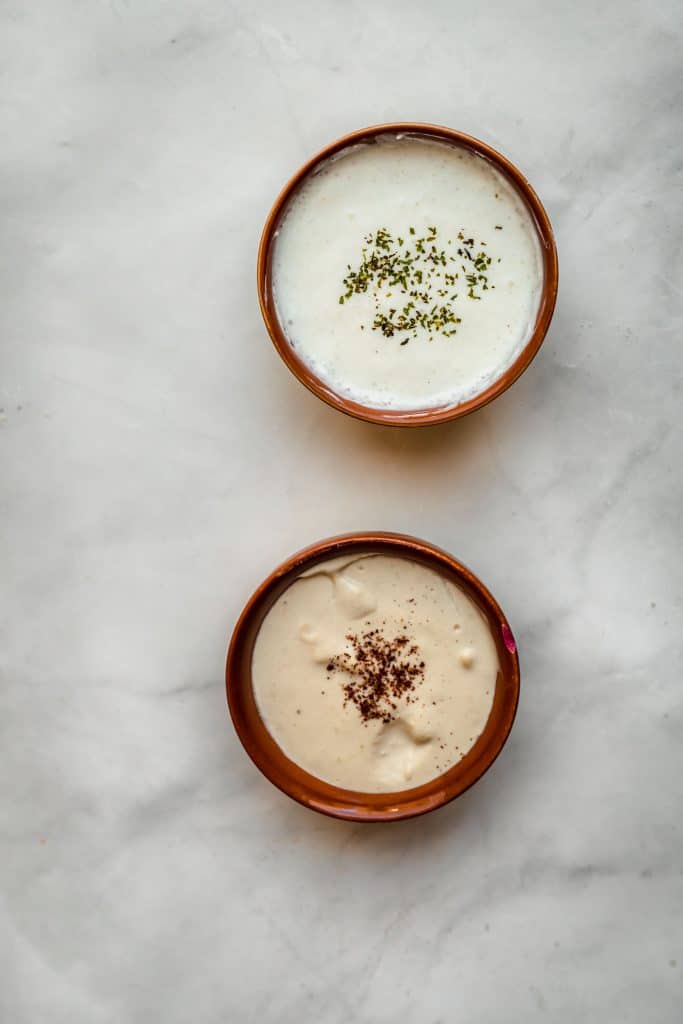
Shawarma is traditionally served with one of two types of sauces, either a garlic sauce (usually for chicken shawarma) or a tahini sauce (usually for beef shawarma).

I actually did a version of both sauces for these, but I included the recipe for the yogurt garlic sauce because that was the perfect pairing.

Making a yogurt garlic shawarma sauce is as easy as mixing together yogurt and labneh (if you can’t find labneh, replace the yogurt and labneh mix with just Greek yogurt). Add a squeeze of lemon juice, crushed garlic to taste, and a tiny bit of white vinegar for some tang.

Oven Chicken Shawarma

Easy baked chicken shawarma that tastes just as good as the street food does. Healthy and packed with flavor, this will be a big hit!
5 from 5 votes
Print Pin
Rate
Course: Main Course
Cuisine: Middle Eastern
Keyword: chicken, shawarma
Prep Time: 5 minutes
Cook Time: 20 minutes
Resting Time: 3 hours
Servings: 6 people
Calories: 333kcal
Author: Farah Abumaizar

Ingredients

  • 1 kg chicken breasts 2.5 pounds, or 6 chicken breasts
  • 1/4 cup olive oil
  • 2 tbsp lemon juice
  • 2 tbsp white vinegar
  • 2 minced garlic cloves
  • 1 tsp cumin powder
  • 1 tsp mixed spices (seven spices)
  • 1 tsp garlic powder
  • 1 tsp salt
  • 1/2 tsp black pepper
  • 1/2 tsp ginger powder
  • 1/2 tsp paprika powder
  • 1 small container yogurt 170g (8 oz)

Yogurt Garlic Sauce for serving:

  • small container plain yogurt 170g (8 oz)
  • 2 tbsp labneh Or, replace plain yogurt with Greek yogurt
  • 2 garlic cloves, crushed
  • 1 tsp white vinegar
  • squeeze lemon juice

Instructions

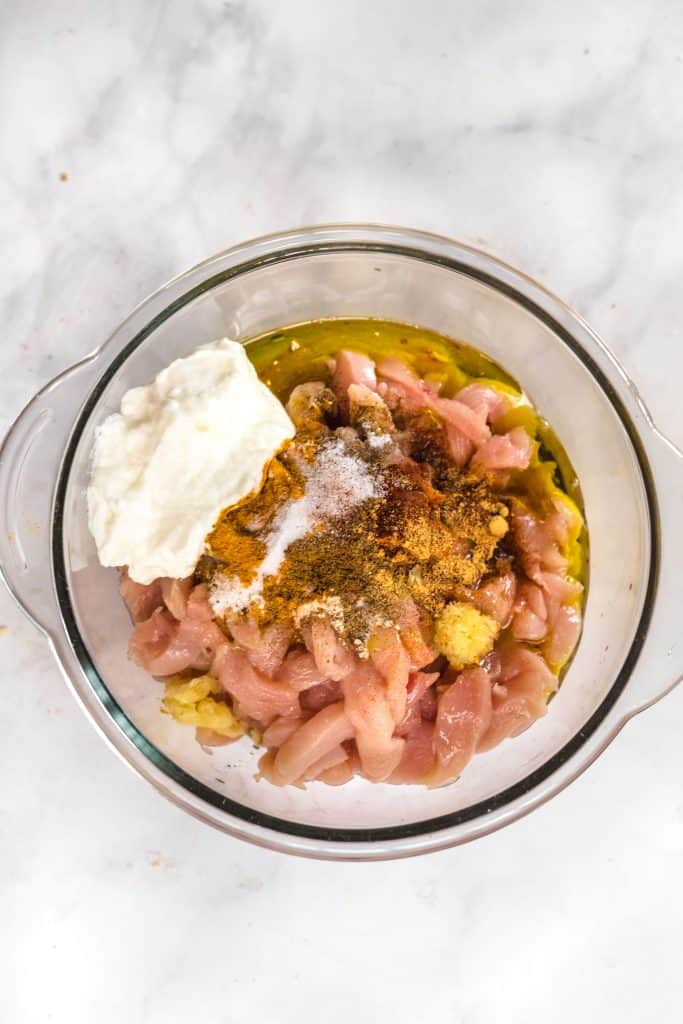
  • Cut chicken into strips, and clean of any fatty bits. Place in a large bowl. (You can also get your butcher to cut it for you)
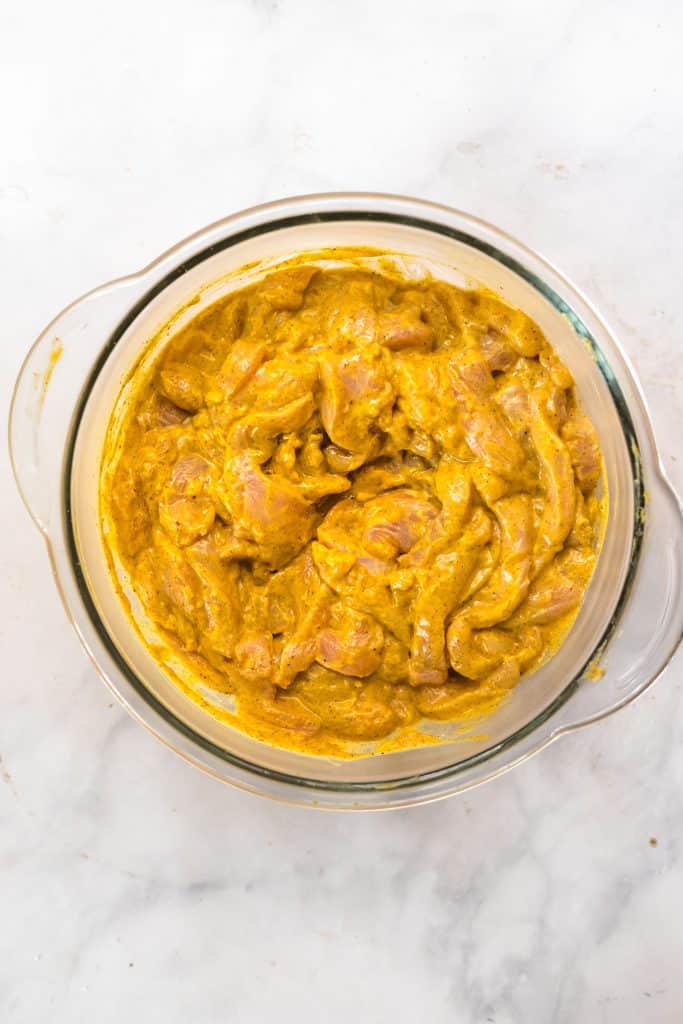
  • Pour olive oil over the chicken, then add all the minced garlic and all the spices. Toss very well to combine, might be easier to do this with a gloved hand. Add the yogurt and toss to combine thoroughly.
  • Place chicken in fridge for 3 hours or overnight to marinate. If you have to cut down on marination time, that's fine, just marinate for however long you can.
  • Once the chicken has finished marinating, heat the oven to 220 C (425F). Place chicken strips on baking sheet (we lined ours with parchment paper)and make sure you spread them out so they are all in a single layer.
  • Bake for 20 minutes, until cooked through. Halfway through, use a metal spatula or tongs to move the strips around and separate any that have clumped together.
  • Optional, but recommended. After the chicken has cooked through, drizzle with some olive oil and put back into the oven, this time on broil function. Broil for 2-3 minutes or until the top is browned in places. I took my photographs before broiling, in case you were wondering about the color of my chicken.

To make the garlic yogurt sauce:

  • Mix together the yogurt and labneh, or just greek yogurt, crushed garlic, lemon juice, vinegar, and salt and pepper to taste. You can whisk, or use a little blender. Refrigerate until ready to use.
Tried this recipe?Mention @everylittlecrumb or tag #everylittlecrumb!

Nutrition

Calories: 333kcal


If you liked this recipe, you might like:

Shawarma Sauce

Chicken and Beef Tacos

Lebanese Chicken and Potatoes

Chicken Madhbi

Did you make this? Tag @everylittlecrumb or hashtag #everylittlecrumb and I’ll share your images! Don’t forget to pin for later!

Healthy, Main Meals, Recipes

Previous Post: « Mango Trifle
Next Post: Shawarma Sauce »

Reader Interactions

Comments

  1. Nart at Cooking with Nart says

    May 16, 2020 at 5:28 pm

    5 stars
    Made this and it was so delicious. Loved all the spices you use!

    Reply
    • Farah Abumaizar says

      May 16, 2020 at 6:22 pm

      Thank you Nart!!

      Reply
  2. Sue says

    May 16, 2020 at 5:49 pm

    5 stars
    This recipe is absolute genius, so colorful and healthy!

    Reply
    • Farah Abumaizar says

      May 16, 2020 at 6:21 pm

      Thanks sue!!!

      Reply
  3. veenaazmanov says

    May 16, 2020 at 6:14 pm

    5 stars
    Nothing like enjoying a Homemade meal and this Chicken Shawarma looks super delicious and a must try one too.

    Reply
    • Farah Abumaizar says

      May 16, 2020 at 6:22 pm

      Thanks so much!!

      Reply
  4. Julia says

    May 16, 2020 at 6:22 pm

    5 stars
    I love chicken shawarma, so when I saw this oven recipe I had to give it a try! And it was so tasty and delicious! Thank you for sharing this fabulous recipe 🙂

    Reply
    • Farah Abumaizar says

      May 16, 2020 at 9:40 pm

      So glad to hear it thanks Julia!

      Reply
  5. Ana F. says

    May 16, 2020 at 7:12 pm

    5 stars
    What an easy recipe Farah! The flavors blend perfectly together and this is one of my husband’s favorite dish. Now I can make it for him all the time! Thanks for the recipe!

    Reply
    • Farah Abumaizar says

      May 16, 2020 at 9:40 pm

      So glad to hear that thanks Ana!

      Reply

Leave a Reply Cancel reply

Your email address will not be published. Required fields are marked *

Recipe Rating


Primary Sidebar

Get more stuff

Subscribe to our mailing list and get interesting stuff and updates to your email inbox.

Thank you for subscribing.

Something went wrong.

we respect your privacy and take protecting it seriously

FeedFeed

Featured Recipes

Nana tea

Halal Guys Chicken and Rice

Aish El Saraya

Instant Pot Enchilada Soup

Death By Chocolate Zucchini Bread

More

Footer

everylittlecrumb

Farah Abu Maizar | Food Lover
Bbq salmon bowls with mango avocado salsa- unbelie Bbq salmon bowls with mango avocado salsa- unbelievable! And start to finish, you can be eating these in 15-20 minutes. Save this recipe for your next meal, you don’t want to miss out!

I’ve partnered with @kilosamak to produce a few recipes with their quality seafood- I’ve tried several of their items and genuinely loved them all! They deliver seafood straight to your door for you to enjoy and cook at home. Takes all the guesswork out of trying to choose and clean fish yourself, perfect solution for someone like me who loves seafood but isn’t so great at prepping it! Check out their Instagram page on how to order, or head to the link in my bio.

This salmon has a smoky slightly sweet rub, is baked in the oven for ultimate ease, and gets piled on to rice and topped with an easy, addictive, zingy mango and avocado salsa. Adapted from @pinchofyum , I’ll make this again and again!

Ingredients:
For the salmon:
2 fillets, about 250 g each 
Spice Rub:
2 tbsp brown sugar
1.5 tsp paprika 
1 tsp garlic powder
1 tsp onion powder, optional 
1/2 tsp chili powder
1/2 tsp salt 
2 tbsp olive oil 

Mango avocado salsa:
1 diced mangos 
1 diced avocado
1/4 cup finely diced coriander 
1/4 cup finely diced red onion 
1 inch spicy green chili pepper, finely chopped
1 tsp honey
Juice and zest of one lime
Salt to taste

Method:
- Make the salsa by mixing together all the salsa ingredients and placing bowl in fridge while you make the salmon.
- Heat oven to 240C, and line a baking sheet with parchment paper. 
-Mix together all the ingredients for the salmon rub, and rub thoroughly all over the salmon, both sides.
- Bake for 10-12 minutes until salmon is opaque and cooked all the way through.
-Assemble bowls with rice, flaked pieces of salmon,and plenty of mango avocado salsa. Enjoy 😍

Catch the steps in my story!
Have you tried this pasta yet? Save this for your Have you tried this pasta yet? Save this for your next weeknight meal! Saucy macarona iltaybeen, can’t get much more comforting.  Adapted from @jedir3waish , makes for an easy delicious main that’ll make your family including kids very happy! Can find a step by step linked bio, or at https://everylittlecrumb.com/macarona/ , or in my story!

INGREDIENTS:
 
2 tbsp olive oil, divided
big pinch of salt
3 heaped tbsp tomato paste, divided 2 oz or 70 g
1 pack elbow macaroni 14 oz or 400 g
1 onion, very finely diced
1 zucchini, finely diced
1 carrot, finely diced
4-5 garlic cloves, minced
250 g ground beef
1 tsp seven spices
1 tsp turmeric
1/2 tsp paprika powder
1/4 tsp basil
1/4 tsp cinnamon powder
1/4 tsp garlic powder
1/2 tsp black pepper
1 tsp salt
1 can crushed tomatoes 14.5oz (400g)

NSTRUCTIONS
 
Bring a large pot of water to boil, add 1 tbsp olive oil and the salt, one tbsp of tomato paste, then the pack of pasta. Cook until al dente, then drain the pasta, reserving the pasta water. Set cooked pasta aside.

In a large skillet, heat the remaining tbsp of olive oil. Once hot, add the diced onion, and cook for 4-5 minutes until softened. Add the diced zucchini and carrots, and garlic and cook for a further 4-5 minutes until softened slightly.

Add the ground beef, and cook, smushing with a wooden spoon to break up the meat. Keep cooking until the beef is browned and cooked through, then optionally, drain the fat.
Add in the salt, pepper, and all the spices. Cook for another minute or so. Add the remaining 2 tbsp of tomato paste, and stir.

Add the can of crushed tomatoes and stir to combine. Bring to a simmer, then add a big ladleful of the reserved pasta water and simmer for 2-3 minutes on low heat.

Add the pasta to the sauce (I don't always add all the pasta, maybe 3/4 of the cooked amount until the finished dish is as saucy as I like). Stir to coat, cook for another minute or so until the pasta is warmed through, then enjoy!
This gorgeous tiramisu was so kindly sent to me by This gorgeous tiramisu was so kindly sent to me by @cadysweets.sa on my birthday, and we enjoyed every light fluffy bite of it. Their old account got hacked so follow along and support their new account ! They have a bunch of cakes and sweets for every occasion, so make someone or yourself happy and order one for a treat🤩! Send this to the tiramisu lover in your life 🍰.
.
.
.
.
.

#chocolatecake #magnoliabakery #cakestagram #cakephotos #layercake #chocolate #ganache #foodblog #instayum #yummy #bakery #foodporn #foodtographyschool #foodphotography #slice #delish #foodfluffer #damnthatsdelish #tiramisu #birthdaytreat #dessertbae #dessertoftheday #scoop #foodstyling #foodstylingandphotography
Easiest at home crusty bread with a great open cru Easiest at home crusty bread with a great open crumb texture. It’s the no knead bread from @breadin5 and has yet to fail me. Check my story for the step by step, and swipe for a video reveal.

Ingredients for two small loaves:
1.5 cups lukewarm water 
1/2 tbsp any type of yeast
1/2 tbsp salt
3 1/4 cup plain flour (450g)

Method:
In a large bowl, stir together the water with the yeast and salt. Try to dissolve but it’s fine if you have clumps.
2. Add flour all at once and stir, just until no flour patches remain.
3. Cover loosely with a kitchen cloth and leave it to rest for 2 hours in a warm place until risen and bubbly.
After this rest you can:
- Use dough immediately if impatient, but it’s easier to work with if cold, so maybe pop in fridge briefly
- Or, their recommended method and the one I do, leave in the fridge loosely covered for 12 hours or overnight. 
Refrigerated dough lasts up to two weeks, and flavor depends over time!
4. The next day, the dough might look deflated. That’s fine! When ready to bake, divide dough in half (I got two 400g dough balls)- it might be easier to handle if you sprinkle the dough lightly with flour, and take the half you are going to bake out of the fridge. Let it rest on a parchment paper lined baking sheet 40-90 minutes. The longer the more interior bubbles you should have. Preheat oven to 235C (450F), and after rest, make a few deep slashes in the dough with a sharp knife.
5. Place in the middle rack of the oven, and on the bottom rack place a roasting pan that had about a cup of hot water in it. This will create steam which gives a crustier crust!
6. Bake for 30-35 minutes or until deep golden brown.
7. Let it cool completely before enjoying!
.
.

.
.
.

#damnthatsdelish #foodfluffer #thebakefeed #feedfeed #tastingtable #forthemaking #BHGfood #foodblogfeed #bakedfromscratch #bakinglove #f52grams #foodbloggerpro #bakersofinstagram #TOHfoodie #foodphotography #canonphotos #bread #instayummy #kitchn #huffposttaste #food #dough #foodie #nokneadbread #homemadebread #doughter
Good morning! With dine in still closed in Saudi, Good morning! With dine in still closed in Saudi, Friday pancakes are fast becoming a tradition. And honestly, I don’t think I’ve had better pancakes at any restaurant recently! The easiest, fluffiest diner style pancakes are a huge hit in our family, find the recipe below adapted from @allrecipes . I like to barely warm the oven (110C or so) and keep the finished pancakes in a pan in the oven until I’m done with all the batter so they stay warm and perfect 👌🏼.

Ingredients
3/4 cup milk 170g
1 tbsp white vinegar
1 cup flour 125g
2 tbsp sugar 25g
1 tsp baking powder
1/2 tsp baking soda
1/4 tsp salt
1 egg room temperature
1/2 tsp vanilla
2 tbsp butter, melted 28g

Instructions:
-In a large bowl, combine the milk and vinegar, and let aside to stand for 5 minutes until curdled. Whisk to combine.
-In a separate large bowl, mix together the flour, sugar, baking powder, baking soda and salt.
-Add an egg, the vanilla and the melted butter to the buttermilk and whisk to combine.
-Add the dry ingredients all at once to the wet, and whisk until flour patches disappear. A few lumps are fine, but don't over mix.
-Let the batter rest for 5-10 minutes while you heat a pan on the stove.
lightly grease the pan with nonstick spray or butter, and pour about 1/4 cup of batter on the pan. Cook for 2-3 minutes on each side or until golden brown. (Flip the first time once you see bubbles form and the edges of the pancake dry up).
-Enjoy with toppings of your choice!
.
.
.
.
.
#pancakes #pancakerecipe #blueberrypancakes #maplesyrup #breakfast #morningslikethese #fridaymorning #flatlay #foodfluffer #breakfastrecipes #breakfastfood #breakfastofchampions #pancakelover #food #foodtography #foodtographyschool #foodphotography #delish #foodphotos #weekendbreakfast #eatingathome #recipeoftheday #foodporn #foodflatlay #blueberries #trayoftheday
One of my photos from my shoot @tackle.baks . How One of my photos from my shoot @tackle.baks . How insane does this tom yum soup look? For those who haven’t tried this casual seafood spot yet, you really should! The food is great and priced very reasonably, and they have some menu items I’m obsessed with like their crispy fish burger, the salmon poke salad and the creamy truffle shrimp👌🏼. They currently have a delivery offer going for only 5SAR on HungerStation, so no time like the present! Have I tempted you with this photo of the tom yum soup? I’m hungry just writing this caption🤤.
.
.
.
.
.
#soup #tomyum #tomyumsoup #food #foodphotography #canonphotography #canon #seafood #seafoodlover #shrimp #delish #beautifulcuisines #foodtographyschool #foodtography #foodblogger #instayum #lonelyplanetfood #dametravelerfoodie #soupseason #restaurantphotography #khobar #tastemade #tastingtable #foodfluffer
I wanted to take a really pretty photo of the choc I wanted to take a really pretty photo of the chocolate fondants and post it with the recipe but I gave into peer pressure and am posting the recipe with this horribly lit and not at all beautifully set up video🤷🏻‍♀️. At least the video really demonstrates how gooey and perfect the center of these chocolate lava cakes are, and how unbelievably delicious they are. You won’t believe how easy it is to make these! And you may never order this at a restaurant again! You can even use muffin cups instead of ramekins. Save this recipe for when you want to be extra fancy with your dessert 👩‍🍳 I looked at a bunch of recipes online and compiled my favorite steps from each, this is most influenced from @gordongram 

Ingredients:
For greasing the ramekins:
1 tbsp melted butter
1 tbsp cocoa powder

For the fondants:
1 stick butter 115 g
2 eggs
2 egg yolks
170 g chocolate bittersweet chocolate (I used Lindt 70%)
1/2 cup caster sugar or regular sugar
Pinch salt 
3 tbsp flour (41g)
25 g butter melted

Method:
-Spray ramekins with nonstick spray, then dust with cocoa powder and shake until evenly coated, or brush inside of ramekins with melted butter, chill into butter sets, grease again with more melted butter and dust with cocoa powder (Gordon Ramsay’s fancy method)

-Melt together the butter and chocolate over a pan of simmering water (Bain marie ). Set aside melted chocolate to cool for 10 minutes.

-In an electric mixer, whisk the eggs, egg yolks, and sugar until thick and pale about 3-4 min. Sift in the flour and beat again until mixed.

-Pour melted chocolate into the egg mixture in 3 additions, mixing well between each until combined.

-Pour fondant batter evenly into prepared ramekins. If baking immediately, let them chill in the fridge while you preheat the oven to 200C. You can also store in the fridge for up to two days before baking.

- Bake 10-12 minute or until top just looks set. If using muffin pans, they’ll take less time, 8-10 minutes. Remove from oven and cool 1 minute before inverting onto a plate. Enjoy immediately with vanilla ice cream and berries!
I can’t stop myself from craving over the top de I can’t stop myself from craving over the top decadent desserts when it’s cloudy and a little chilly. One of my favorites in Bahrain is @joesbahrain ‘s sticky date cake that comes swimming in a pool of caramel sauce. It’s a drool worthy dessert! Their warm chocolate brownie is also unbelievable. I always end up confused on which to order and usually give in to ordering both 😂. Their coffee pairs perfectly with either👌🏼. Definitely miss this spot and wish I could be dining outdoors @theavenuesbh now indulging on this ultimate treat. Do you agree with my review? 
.
.
.
.

#chocolatecake #magnoliabakery #cakestagram #cakephotos #layercake #chocolate #ganache #foodblog #instayum #yummy #bakery #foodporn #foodtographyschool #foodphotography #slice #delish #foodfluffer #damnthatsdelish #datecake #caramel #stickytoffee
Load More... Follow on Instagram

Copyright © 2019 on the Seasoned Pro Theme