• Skip to primary navigation
  • Skip to main content
  • Skip to primary sidebar
  • Skip to footer

 logo

  • Recipes
    • Breakfast
    • Sides
    • Soup
    • Main Meals
    • Healthy
    • Dessert
    • Drinks
  • Eating Out
  • About Me
    • Privacy Policy
  • Resources
    • Must Have Kitchen Tools
  • Nav Social Menu

    • Email
    • Facebook
    • Instagram
    • Pinterest

Mini Chocolate Chip Cookies

Aug 4, 2019 · 10 Comments

Jump to Recipe
Distressed baking sheet with mini chocolate chip cookies cooling on it and a wooden spoon with chocolate chips on it

Itty bitty mini chocolate chip cookies that are soft and pillowy and melt in your mouth. Huge hit with my daughter which was expected, but also with me which wasn’t! (I’m extremely picky with my cookies). No mixer is required for this recipe that comes together in 5 minutes flat from the wonderful Disney Princess Cookbook – so much fun to bake with your kid!

I did not have high hopes for chocolate chip cookies that came out of a cookbook titled the Disney Princess cookbook. I am a chocolate chip cookie snob, well renowned for my obsession with cookies. Heavy research is involved before investing my time and my quality chocolate into a new recipe. I read every comment and review that’s left on any recipe before deciding whether to try it. I have a few favorite recipes I rotate between, and am always on the quest for the ultimate gourmet chocolate chip cookie.

Mini chocolate chip cookies – all the fun in a smaller package!

These mini chocolate chip cookies aren’t it. In a way, they are almost better. Ridiculously easy, no electric mixer required, and a way to bond with your kiddos in the kitchen. The hint of nutmeg in them evokes a bakery fresh feel, and they are so soft and almost light. Mini chocolate chip cookies are fun, they are easy and they are delicious! They got this mama and kiddos stamp of approval!

How to make them:

Doesn’t need much explanation! Mix together your dry ingredients in a bowl. You mix together your butter and sugars in another. Add the egg and vanilla to the butter sugar mix, then the dry ingredients, then your chocolate chips.

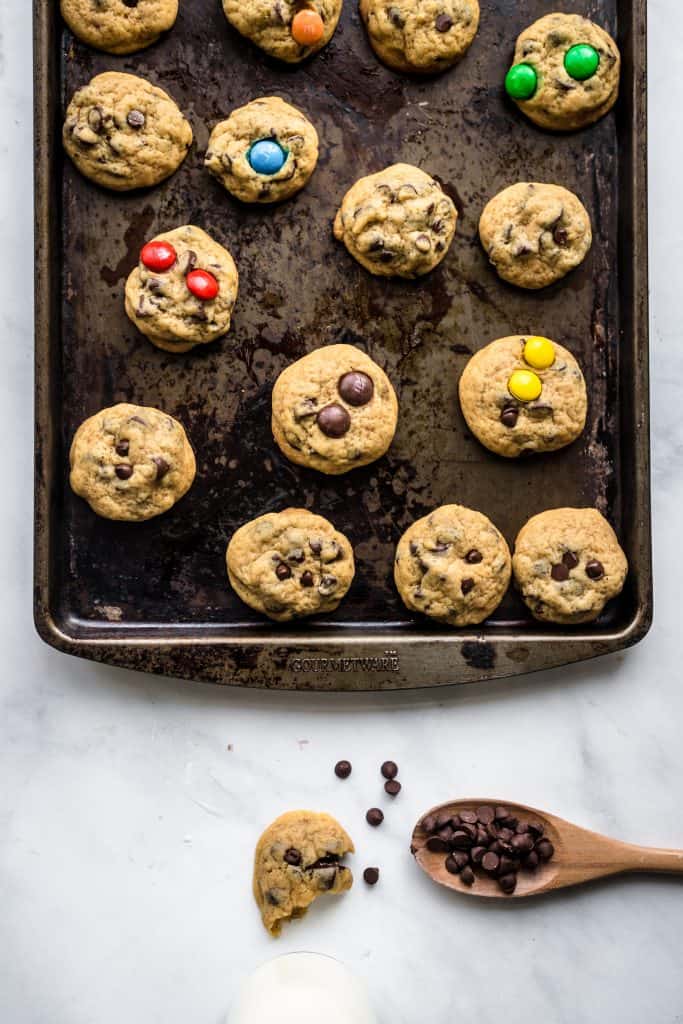
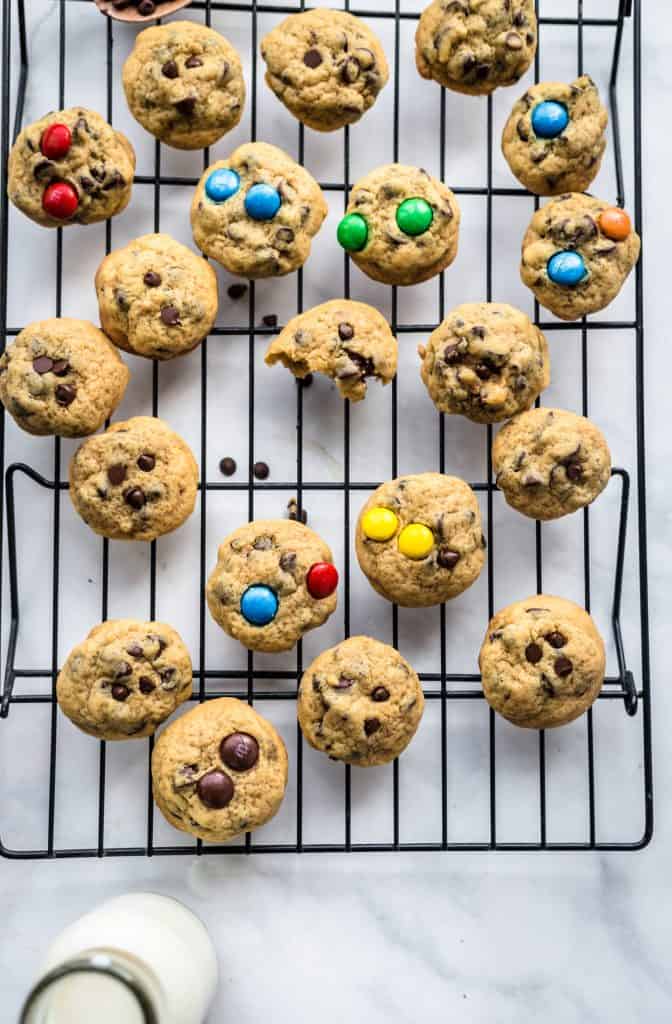
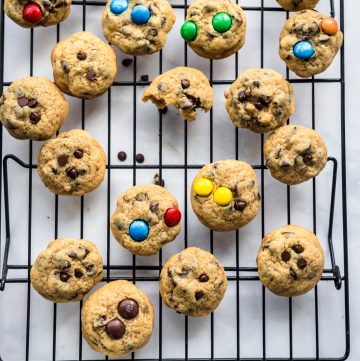
To shape them into mini chocolate chip cookies, you’ll make them about half the size of regular chocolate chip cookies (which run about 2 tbsp big). They don’t spread much, which is why we press down on the top of the raw dough a little before baking. Their size before baking gives you an indication of their size after.

A black wire cooling rack with mini chocolate chip cookies on it, some with m&m's and a glass of milk at the bottom of the photo

Storing your cookie dough/ cookies:

I am always inclined to bake off just a small amount of dough, and refrigerate or freeze the rest so that I always have cookie dough ready to bake off at a moments notice. The advantage? Eating your cookies warm and fresh out the oven! Although, I will say, this is one of the few cookie recipes I’ve still enjoyed a couple days after baking. These babies stay super soft and delicious.

To store baked cookies: Keep them in an airtight container for up to 3 days. I doubt they’ll last you that long!

A child hand grabbing a mini chocolate chip cookie off a plate that's on a pale pink kitchen towel

To store cookie dough: You can keep the cookie dough in a bowl tightly covered in the fridge for 3-5 days. My preferred method is to shape the cookie dough into balls, and freeze in a freezer safe bag for 3-6 months. When baking cookie doughs from frozen, there’s no need to thaw but you might need to add 1-2 minutes to the total baking time.

A black wire cooling rack with mini chocolate chip cookies on it, some with m&m's and a glass of milk at the bottom of the photo

Mini Chocolate Chip Cookies

Delicious soft homemade chocolate chip cookies made mini and extra fun. From the Disney Princess cookbook, make this recipe with a child!
5 from 4 votes
Print Pin
Rate
Course: Dessert
Cuisine: American
Keyword: cookies, chocolate
Prep Time: 5 minutes
Cook Time: 6 minutes
Servings: 8 people
Calories: 131kcal
Author: Farah Abumaizar

Ingredients

  • 2 cups flour (250g)
  • 1/2 tsp baking soda
  • 1/2 tsp salt
  • 1/4 tsp nutmeg
  • 1/2 cup brown sugar 90 g
  • 1/2 cup white sugar 100 g
  • 3/4 cup butter, softened 170g
  • 1 egg
  • 1 tsp vanilla extract
  • 2 cups semi sweet chocolate chips
  • Handful M &M's for topping – optional

Instructions

  • Preheat oven to 180 C (350F). Line baking sheets with parchment paper.
  • In a small bowl, whisk together flour, baking soda, salt and nutmeg.
  • In a large bowl, combine the brown sugar and white sugar. Using a wooden spoon, press the butter into the sugar until mixture is smooth and combined.
  • Add the egg and vanilla extract and stir well, then slowly stir in the flour mixture.
  • Stir in the chocolate chips, and either bake immediately, or allow to chill 30 minutes in the fridge if you have time.
  • Place 12 slightly rounded tablespoons of cookie dough onto each prepared baking sheet. About 1/2 inch apart. Press lightly on each dough circle to flatten the dough slightly. If using M&M's, press a few on top of each dough circle.
  • Bake in the preheated oven for 6-8 minutes or until just golden brown on top. Remove from oven and let cool another 2 minutes on the baking sheet before removing to a wire rack to cool
  • You can either bake any extra dough you have in the same manner, or refrigerate dough tightly covered for 3 days, or form cookie dough balls and freeze for up to 3 months.

Notes

Recipe adapted from the adorable Disney Princess Cookbook. So much fun to make with a child!
Tried this recipe?Mention @everylittlecrumb or tag #everylittlecrumb!

Nutrition

Calories: 131kcal


For more easy dessert recipes try:

Pineapple Pudding Cake

Unbelievably Moist Chocolate Bundt Cake

Brownie Skillet

Did you make this? Tag @everylittlecrumb or hashtag #everylittlecrumb and I’ll share your images!

Dessert, Recipes

Previous Post: « Lotus Biscoff Cheesecake
Next Post: Baked Fish and Chips »

Reader Interactions

Comments

  1. Dannii says

    August 4, 2019 at 10:09 am

    5 stars
    Everything tastes better when it is mini. These are really cute.

    Reply
    • Farah Abumaizar says

      August 4, 2019 at 11:07 am

      I agree ! Mini food is such fun 🙂

      Reply
  2. Cindy @ A Uniquely Edible Magic says

    August 4, 2019 at 10:51 am

    5 stars
    These are so adorable! Love the M&M’s.

    Reply
    • Farah Abumaizar says

      August 4, 2019 at 11:07 am

      Thanks Cindy!

      Reply
  3. Lizzy says

    August 4, 2019 at 2:05 pm

    Adorable! I never think to add candy like m&m’s to cookies – such a cute idea!

    Reply
    • Farah Abumaizar says

      August 4, 2019 at 2:20 pm

      My daughters contribution hehe! She loved them and always claims the cookies with the most m&m’s for herself 😂

      Reply
  4. Alison says

    August 4, 2019 at 2:19 pm

    5 stars
    Great for little ones to have a small treat!

    Reply
    • Farah Abumaizar says

      August 4, 2019 at 2:19 pm

      Yes exactly ❤️❤️😊

      Reply
  5. Eman says

    August 5, 2019 at 7:55 am

    5 stars
    This looks delicious Yum!

    Reply
    • Farah Abumaizar says

      August 6, 2019 at 1:41 pm

      Thank you lovely Eman!

      Reply

Leave a Reply Cancel reply

Your email address will not be published. Required fields are marked *

Recipe Rating


Primary Sidebar

Get more stuff

Subscribe to our mailing list and get interesting stuff and updates to your email inbox.

Thank you for subscribing.

Something went wrong.

we respect your privacy and take protecting it seriously

FeedFeed

Featured Recipes

Nana tea

Halal Guys Chicken and Rice

Aish El Saraya

Instant Pot Enchilada Soup

Death By Chocolate Zucchini Bread

More

Footer

everylittlecrumb

Farah Abu Maizar | Food Lover
Good morning! If there’s one thing we like doing Good morning! If there’s one thing we like doing, it’s experimenting with breakfast dishes 🍳.These beauties are froached eggs- poached eggs that are lightly fried and seasoned with breadcrumbs. Best of both worlds! Creamy poached eggs, runny yolk but a little crisp on the white part of the eggs. So good! Inspired by @sveverything , we used our sous vide machine for this but you can do this with regular poached eggs. Recipe can be found linked in bio or at https://everylittlecrumb.com/froached-eggs/ . Team runny yolk anyone? 
.
.
.
.
.
#eggs #poachedeggs #poachedegg #eggsontoast #beautifulcuisines #tasty #delish #foodphotography #foodstyling #foodstylingandphotography #cheeseontoast #foodblogger #foodie #breakfast #brunch #instayum #yum #brunch #tastingtable #f52community #food52 #yolkporn #friday
How I spend a lot of my weekends😂. Nothing like How I spend a lot of my weekends😂. Nothing like a big bowl of cookie dough to say weekend mode on! Are you like me and end up eating more dough than actual cookies? My foolproof recipe I use and post time and time again 👇🏼(and often double the batch so I can store some in the freezer!)

Ingredients:
1 stick butter, softened 113 g
3/4 cup tightly packed brown sugar (I like using 1/2 cup light brown and 1/4 cup dark brown, but you can use either or) 150 g total
1/4 cup white sugar 50 g
1 egg, room temperature
1 tsp vanilla extract
1 3/4 cup all purpose flour 220 g
3/4 tsp baking soda
1/4 tsp salt
1 cup semi-sweet chocolate chips or chunks
flaky salt for topping, optional

Instructions:
-In the bowl of a stand mixer fitted with a paddle attachment, or a handheld mixer, cream together butter, brown sugar, and white sugar for 5 minutes on medium speed until light and fluffy.
-Once five minutes is over, add in egg and vanilla and mix until combined.
In a separate bowl, mix flour, baking soda, and salt, and mix until combined. Add these dry ingredients to the butter mixture on low speed, and mix until just combined.
-Using a wooden spoon or spatula, mix in chocolate chips or chunks until just combined. Place bowl of dough in fridge for at least 30 minutes to chill.
-While dough is chilling, heat oven to 180 C (350F). Portion dough out into heaped 1 tbsp-2 tbsp sized dough pieces on parchment paper lined baking sheets. 
-Bake for 11-12 minutes or until golden brown on the edges but still soft in the center. Cool until cookies firm up, then enjoy, still warm.
.
.
.
.
.

#chocolatecake #cookiemonster #cakestagram #cakephotos #layercake #chocolate #weekendbaking #foodblog #instayum #yummy #bakery #foodporn #foodtographyschool #foodphotography #chocolatechips #delish #foodfluffer #damnthatsdelish #cookiedough #chocatechipcookies #bakes #bakestagram #doughbowl #chocolatechips #hersheys
Bbq salmon bowls with mango avocado salsa- unbelie Bbq salmon bowls with mango avocado salsa- unbelievable! And start to finish, you can be eating these in 15-20 minutes. Save this recipe for your next meal, you don’t want to miss out!

I’ve partnered with @kilosamak to produce a few recipes with their quality seafood- I’ve tried several of their items and genuinely loved them all! They deliver seafood straight to your door for you to enjoy and cook at home. Takes all the guesswork out of trying to choose and clean fish yourself, perfect solution for someone like me who loves seafood but isn’t so great at prepping it! Check out their Instagram page on how to order, or head to the link in my bio.

This salmon has a smoky slightly sweet rub, is baked in the oven for ultimate ease, and gets piled on to rice and topped with an easy, addictive, zingy mango and avocado salsa. Adapted from @pinchofyum , I’ll make this again and again!

Ingredients:
For the salmon:
2 fillets, about 250 g each 
Spice Rub:
2 tbsp brown sugar
1.5 tsp paprika 
1 tsp garlic powder
1 tsp onion powder, optional 
1/2 tsp chili powder
1/2 tsp salt 
2 tbsp olive oil 

Mango avocado salsa:
1 diced mangos 
1 diced avocado
1/4 cup finely diced coriander 
1/4 cup finely diced red onion 
1 inch spicy green chili pepper, finely chopped
1 tsp honey
Juice and zest of one lime
Salt to taste

Method:
- Make the salsa by mixing together all the salsa ingredients and placing bowl in fridge while you make the salmon.
- Heat oven to 240C, and line a baking sheet with parchment paper. 
-Mix together all the ingredients for the salmon rub, and rub thoroughly all over the salmon, both sides.
- Bake for 10-12 minutes until salmon is opaque and cooked all the way through.
-Assemble bowls with rice, flaked pieces of salmon,and plenty of mango avocado salsa. Enjoy 😍

Catch the steps in my story!
Have you tried this pasta yet? Save this for your Have you tried this pasta yet? Save this for your next weeknight meal! Saucy macarona iltaybeen, can’t get much more comforting.  Adapted from @jedir3waish , makes for an easy delicious main that’ll make your family including kids very happy! Can find a step by step linked bio, or at https://everylittlecrumb.com/macarona/ , or in my story!

INGREDIENTS:
 
2 tbsp olive oil, divided
big pinch of salt
3 heaped tbsp tomato paste, divided 2 oz or 70 g
1 pack elbow macaroni 14 oz or 400 g
1 onion, very finely diced
1 zucchini, finely diced
1 carrot, finely diced
4-5 garlic cloves, minced
250 g ground beef
1 tsp seven spices
1 tsp turmeric
1/2 tsp paprika powder
1/4 tsp basil
1/4 tsp cinnamon powder
1/4 tsp garlic powder
1/2 tsp black pepper
1 tsp salt
1 can crushed tomatoes 14.5oz (400g)

NSTRUCTIONS
 
Bring a large pot of water to boil, add 1 tbsp olive oil and the salt, one tbsp of tomato paste, then the pack of pasta. Cook until al dente, then drain the pasta, reserving the pasta water. Set cooked pasta aside.

In a large skillet, heat the remaining tbsp of olive oil. Once hot, add the diced onion, and cook for 4-5 minutes until softened. Add the diced zucchini and carrots, and garlic and cook for a further 4-5 minutes until softened slightly.

Add the ground beef, and cook, smushing with a wooden spoon to break up the meat. Keep cooking until the beef is browned and cooked through, then optionally, drain the fat.
Add in the salt, pepper, and all the spices. Cook for another minute or so. Add the remaining 2 tbsp of tomato paste, and stir.

Add the can of crushed tomatoes and stir to combine. Bring to a simmer, then add a big ladleful of the reserved pasta water and simmer for 2-3 minutes on low heat.

Add the pasta to the sauce (I don't always add all the pasta, maybe 3/4 of the cooked amount until the finished dish is as saucy as I like). Stir to coat, cook for another minute or so until the pasta is warmed through, then enjoy!
This gorgeous tiramisu was so kindly sent to me by This gorgeous tiramisu was so kindly sent to me by @cadysweets.sa on my birthday, and we enjoyed every light fluffy bite of it. Their old account got hacked so follow along and support their new account ! They have a bunch of cakes and sweets for every occasion, so make someone or yourself happy and order one for a treat🤩! Send this to the tiramisu lover in your life 🍰.
.
.
.
.
.

#chocolatecake #magnoliabakery #cakestagram #cakephotos #layercake #chocolate #ganache #foodblog #instayum #yummy #bakery #foodporn #foodtographyschool #foodphotography #slice #delish #foodfluffer #damnthatsdelish #tiramisu #birthdaytreat #dessertbae #dessertoftheday #scoop #foodstyling #foodstylingandphotography
Easiest at home crusty bread with a great open cru Easiest at home crusty bread with a great open crumb texture. It’s the no knead bread from @breadin5 and has yet to fail me. Check my story for the step by step, and swipe for a video reveal.

Ingredients for two small loaves:
1.5 cups lukewarm water 
1/2 tbsp any type of yeast
1/2 tbsp salt
3 1/4 cup plain flour (450g)

Method:
In a large bowl, stir together the water with the yeast and salt. Try to dissolve but it’s fine if you have clumps.
2. Add flour all at once and stir, just until no flour patches remain.
3. Cover loosely with a kitchen cloth and leave it to rest for 2 hours in a warm place until risen and bubbly.
After this rest you can:
- Use dough immediately if impatient, but it’s easier to work with if cold, so maybe pop in fridge briefly
- Or, their recommended method and the one I do, leave in the fridge loosely covered for 12 hours or overnight. 
Refrigerated dough lasts up to two weeks, and flavor depends over time!
4. The next day, the dough might look deflated. That’s fine! When ready to bake, divide dough in half (I got two 400g dough balls)- it might be easier to handle if you sprinkle the dough lightly with flour, and take the half you are going to bake out of the fridge. Let it rest on a parchment paper lined baking sheet 40-90 minutes. The longer the more interior bubbles you should have. Preheat oven to 235C (450F), and after rest, make a few deep slashes in the dough with a sharp knife.
5. Place in the middle rack of the oven, and on the bottom rack place a roasting pan that had about a cup of hot water in it. This will create steam which gives a crustier crust!
6. Bake for 30-35 minutes or until deep golden brown.
7. Let it cool completely before enjoying!
.
.

.
.
.

#damnthatsdelish #foodfluffer #thebakefeed #feedfeed #tastingtable #forthemaking #BHGfood #foodblogfeed #bakedfromscratch #bakinglove #f52grams #foodbloggerpro #bakersofinstagram #TOHfoodie #foodphotography #canonphotos #bread #instayummy #kitchn #huffposttaste #food #dough #foodie #nokneadbread #homemadebread #doughter
Good morning! With dine in still closed in Saudi, Good morning! With dine in still closed in Saudi, Friday pancakes are fast becoming a tradition. And honestly, I don’t think I’ve had better pancakes at any restaurant recently! The easiest, fluffiest diner style pancakes are a huge hit in our family, find the recipe below adapted from @allrecipes . I like to barely warm the oven (110C or so) and keep the finished pancakes in a pan in the oven until I’m done with all the batter so they stay warm and perfect 👌🏼.

Ingredients
3/4 cup milk 170g
1 tbsp white vinegar
1 cup flour 125g
2 tbsp sugar 25g
1 tsp baking powder
1/2 tsp baking soda
1/4 tsp salt
1 egg room temperature
1/2 tsp vanilla
2 tbsp butter, melted 28g

Instructions:
-In a large bowl, combine the milk and vinegar, and let aside to stand for 5 minutes until curdled. Whisk to combine.
-In a separate large bowl, mix together the flour, sugar, baking powder, baking soda and salt.
-Add an egg, the vanilla and the melted butter to the buttermilk and whisk to combine.
-Add the dry ingredients all at once to the wet, and whisk until flour patches disappear. A few lumps are fine, but don't over mix.
-Let the batter rest for 5-10 minutes while you heat a pan on the stove.
lightly grease the pan with nonstick spray or butter, and pour about 1/4 cup of batter on the pan. Cook for 2-3 minutes on each side or until golden brown. (Flip the first time once you see bubbles form and the edges of the pancake dry up).
-Enjoy with toppings of your choice!
.
.
.
.
.
#pancakes #pancakerecipe #blueberrypancakes #maplesyrup #breakfast #morningslikethese #fridaymorning #flatlay #foodfluffer #breakfastrecipes #breakfastfood #breakfastofchampions #pancakelover #food #foodtography #foodtographyschool #foodphotography #delish #foodphotos #weekendbreakfast #eatingathome #recipeoftheday #foodporn #foodflatlay #blueberries #trayoftheday
One of my photos from my shoot @tackle.baks . How One of my photos from my shoot @tackle.baks . How insane does this tom yum soup look? For those who haven’t tried this casual seafood spot yet, you really should! The food is great and priced very reasonably, and they have some menu items I’m obsessed with like their crispy fish burger, the salmon poke salad and the creamy truffle shrimp👌🏼. They currently have a delivery offer going for only 5SAR on HungerStation, so no time like the present! Have I tempted you with this photo of the tom yum soup? I’m hungry just writing this caption🤤.
.
.
.
.
.
#soup #tomyum #tomyumsoup #food #foodphotography #canonphotography #canon #seafood #seafoodlover #shrimp #delish #beautifulcuisines #foodtographyschool #foodtography #foodblogger #instayum #lonelyplanetfood #dametravelerfoodie #soupseason #restaurantphotography #khobar #tastemade #tastingtable #foodfluffer
Load More... Follow on Instagram

Copyright © 2019 on the Seasoned Pro Theme