• Skip to primary navigation
  • Skip to main content
  • Skip to primary sidebar
  • Skip to footer

 logo

  • Recipes
    • Breakfast
    • Sides
    • Soup
    • Main Meals
    • Healthy
    • Dessert
    • Drinks
  • Eating Out
  • About Me
    • Privacy Policy
  • Resources
    • Must Have Kitchen Tools
  • Nav Social Menu

    • Email
    • Facebook
    • Instagram
    • Pinterest

Lebanese Spinach Stew

Feb 29, 2020 · 11 Comments

A bowl of Lebanese spinach stew with vermicelli rice on a plate with pickles and lemon slices
Jump to Recipe

One of the simplest Middle Eastern stews to make, this Lebanese spinach stew is made with spiced ground beef, frozen spinach, and a squeeze of lemon juice. It’s so easy and healthy, and kids love it too!

What is Lebanese spinach stew?

It’s a dish made very simply with spiced beef that’s cooked with garlic and onions to which an abundance of spinach is added until cooked down. It’s saucy and full of flavor, and finished off with lemon juice. The base of the stew is the same spiced beef we use in a lot of our recipes, like: Lebanese Rice , Ouzi, and Macarona billaban (Middle Eastern Pasta in yogurt sauce)

A saucepan filled with Lebanese spinach stew with a wooden spoon scooping some out

Ingredients in spinach stew:

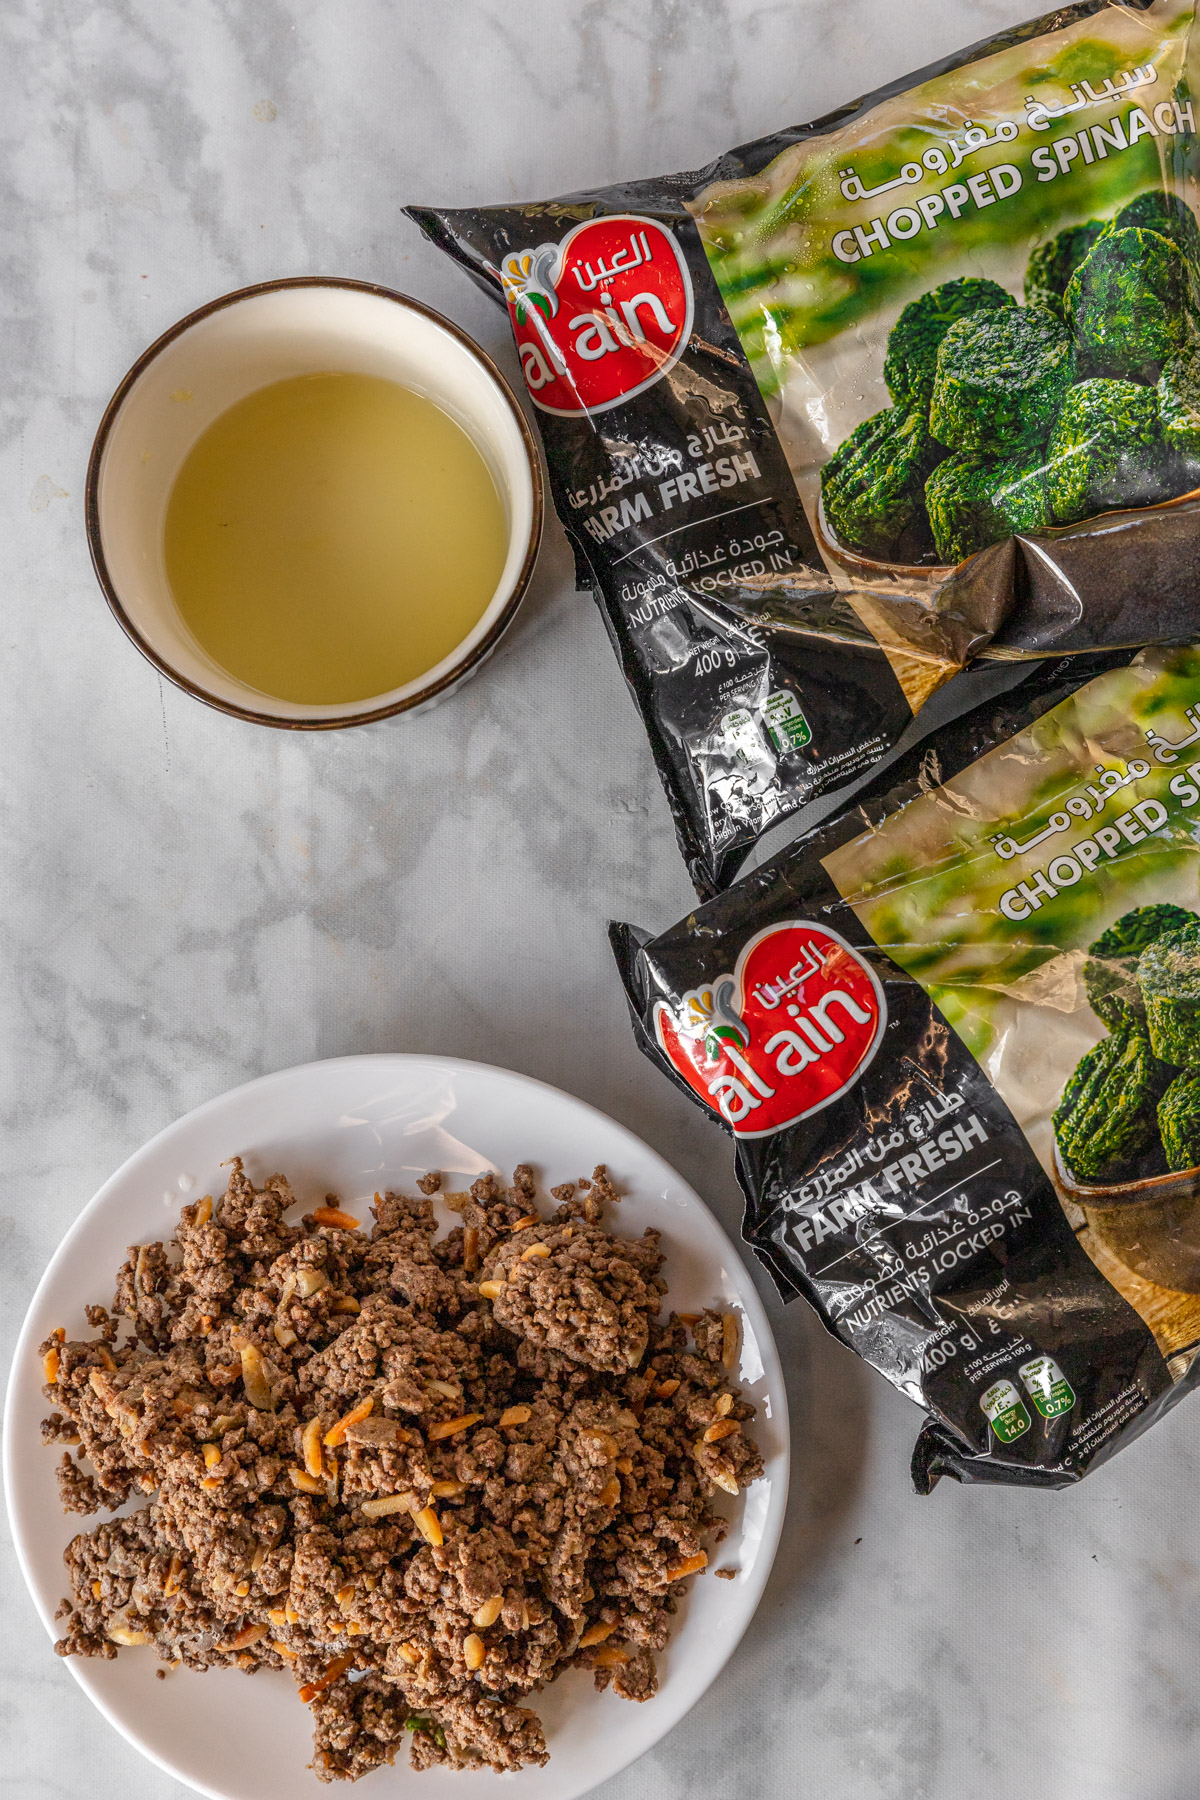
Meat: The beef is made by cooking it with onion and garlic, and is seasoned with seven spices (or all spice), salt and pepper.

I love when I have frozen beef that’s already been cooked and seasoned. This way, I can use it directly in the recipe. For full instructions on cooking and freezing, definitely check out this recipe:

The spinach:

You can use fresh or frozen spinach for this. I’ve done it both ways, they both taste great. For convenience sakes, I usually prefer frozen spinach. It requires a lot less effort, and a lot less spinach! You’d need about 2kg or 5 pounds of fresh spinach to get the amount needed in this recipe, a You’d have to wash and stem the spinach, then add it to the pot at the same step as you would the frozen spinach. Another advantage of frozen spinach is not having to thaw it in advance. You just need to add the frozen spinach directly to the pot and the heat will quickly melt it.

Spiced ground beef and frozen spinach in a saucepan for Lebanese spinach stew

Do I add water to the spinach? If using fresh spinach, you’ll most likely need to add a little water or broth, about 1/2 cup to 1 cup. When I use frozen spinach I never find myself needing to add extra liquid because using the frozen spinach before thawing it lets off so much water.

The extras:

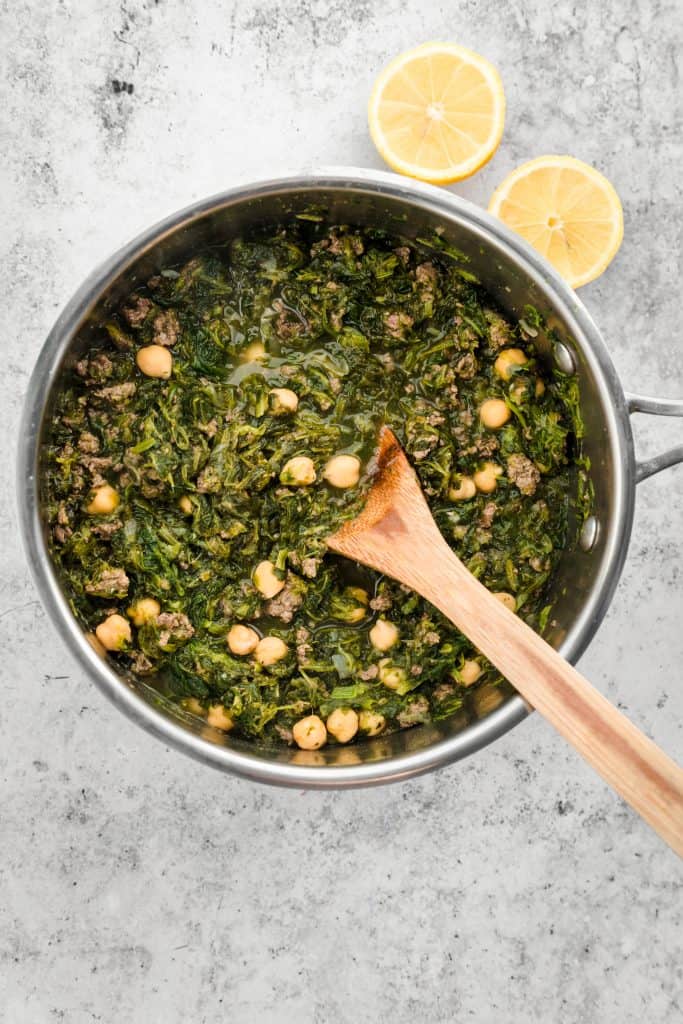
Chickpeas: This is completely optional, but I like to take a can of chickpeas, drain and rinse it thoroughly then add them to the stew. They just need to warm through with the spinach.

Some people like adding toasted pine nuts – I don’t do that but I love pine nuts so I don’t see how you could go wrong with that!

Lemon Juice: A generous squeeze of lemon juice really brightens up the flavor of the spinach. Add as much or as little as you like, tasting as you season. That goes for salt and pepper to, taste and adjust!

A saucepan filled with Lebanese spinach stew with a wooden spoon scooping some out

Why is Lebanese spinach stew so good?

Because it’s tasty, extremely easy to prepare and so good FOR you. You get a great protein source from the meat and chickpeas if using, and plenty of iron and vitamins from the spinach. The thing is, this stew defies all odds and manages to be so kid friendly. My kids love slurping this down, adding lots of extra sauce so that their rice is swimming in it a little.

What to serve with Lebanese Spinach Stew:

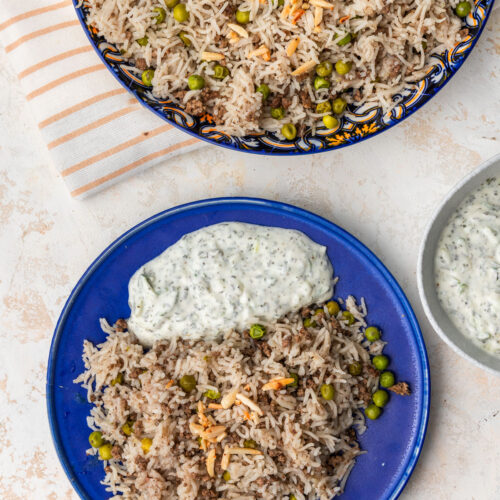
Vermicelli rice is the classic pairing. It’s the perfect vessel to soak up all that lemony goodness. I have an entire step by step post on how to make the perfect vermicelli rice here. You can also go with plain rice, jasmine rice, or brown rice. I usually put just a little scoop of rice in my bowl and ladle on the spinach stew so that I don’t go overboard on carbs.

Lebanese Spinach Stew

An incredibly easy dish made with spiced ground beef, spinach, and a squeeze of lemon juice
5 from 3 votes
Print Pin
Rate
Course: Main Course
Cuisine: Middle Eastern
Keyword: middle eastern, stew
Prep Time: 5 minutes
Cook Time: 15 minutes
Servings: 6 people
Calories: 160kcal
Author: Farah Abumaizar

Ingredients

  • 2 tsp olive oil
  • 1 onion, finely diced
  • 2-3 garlic cloves, crushed
  • 250-350 g ground beef 1/2 pound
  • 1/2 tsp seven spices or allspice
  • 1/4 tsp cinnamon
  • 1/2 tsp salt, more to taste
  • black pepper to taste
  • 2 bags frozen chopped spinach , 400 g each total 28 oz
  • 1 lemon, juiced
  • vermicelli rice, to serve

Instructions

  • Start by cooking the beef. In a large pot over medium high heat, add the olive oil. Once hot, add the diced onions and cook for 3-4 minutes until softened, stirring continuously.
  • Add the crushed garlic, and cook for a further minute or so, then add the ground beef.
  • Cook for a minute, breaking apart any clumps of meat with a wooden spoon, then add all the spices (seven spice or all spice, cinnamon, salt and black pepper). Continue cooking, a good 6-8 minutes until beef is all cooked through and brown with no pink bits remaining.
  • Keep stirring and breaking apart clumps of meat- you can even use a potato masher to break the meat apart a little. If desired, drain any extra fat. Taste the mince and adjust for seasoning.
  • Add the frozen packs of spinach directly into the pan with the cooked beef. Let the spinach soften in the heat, and then keep it on the heat till its completely cooked through. If it isn't saucy enough, add 1/2 cup to 1 cup of water or broth. I always find that the spinach releases plenty of liquid and I don't need to add any extra. Add the drained chickpeas and cook for a couple minutes more.
  • Squeeze 1/2-1 lemon into the spinach, taste the spinach, and season with any extra salt or pepper if you think it needs it. Enjoy hot, over vermicelli or plain rice.

Notes

For full recipe post on Middle Eastern spiced ground meat click here:
For full recipe post on Vermicelli Rice click here:
Tried this recipe?Mention @everylittlecrumb or tag #everylittlecrumb!

Nutrition

Calories: 160kcal

If you liked this recipe, you might like:

Bamia (Okra and Meat Stew)

Fasoolia Baida (Middle Eastern White Bean Stew)

Lebanese Chicken and Potatoes

Did you make this? Tag @everylittlecrumb or hashtag #everylittlecrumb and I’ll share your images!

Main Meals, Recipes

Previous Post: « Fasoolia Baida- Middle Eastern White Bean Stew
Next Post: Cucumber Avocado Salad »

Reader Interactions

Comments

  1. Raida says

    March 2, 2020 at 4:09 pm

    Love the yellow and red accents

    Reply
    • Farah Abumaizar says

      March 2, 2020 at 4:16 pm

      I knew you would!!

      Reply
  2. Dannii says

    March 5, 2020 at 12:17 pm

    5 stars
    I am pretty much obsessed with all Lebanese food and this looks delicious. A great way to eat more greens.

    Reply
    • Farah Abumaizar says

      March 5, 2020 at 12:17 pm

      That’s a great way of putting it!

      Reply
  3. Danielle says

    March 5, 2020 at 2:27 pm

    5 stars
    Now this is a great simple way to make stew and enjoy spinach like never before. Delicious and absolutely inviting!

    Reply
    • Farah Abumaizar says

      March 5, 2020 at 3:34 pm

      Thanks Danielle !

      Reply
  4. Mahy says

    March 5, 2020 at 2:35 pm

    5 stars
    I love exploring Middle Eastern recipes, especially if they are as good as this stew. Delicious and healthy – perfect!

    Reply
    • Farah Abumaizar says

      March 5, 2020 at 2:36 pm

      Thanks so much Mahy!

      Reply
  5. Bintu | Recipes From A Pantry says

    March 5, 2020 at 4:48 pm

    What a tasty sounding stew. It sounds like it has a ton of flavour!

    Reply
    • Farah Abumaizar says

      March 5, 2020 at 6:57 pm

      It’s simple but the flavor shines through!!

      Reply

Leave a Reply Cancel reply

Your email address will not be published. Required fields are marked *

Recipe Rating


Primary Sidebar

Get more stuff

Subscribe to our mailing list and get interesting stuff and updates to your email inbox.

Thank you for subscribing.

Something went wrong.

we respect your privacy and take protecting it seriously

FeedFeed

Featured Recipes

Tamriyeh

Nescafe Cake

Berries and Cream Sara Lee Cake

Kebab Karaz

Eggplant Fatteh

More

Footer

everylittlecrumb

Farah Abu Maizar | Food Lover
You have to know, if I post a chicken recipe it me You have to know, if I post a chicken recipe it means it’s reaaaaaally good. This copy cat Halal guys chicken and rice is unbelievable dish! I got the turmeric rice recipe from @seriouseats and its buttery and perfectly spiced and fluffy and addictive, topped with juicy grilled spiced chicken cubes and a tangy, creamy dressing, tomatoes and parsley. AMAZING! Recipe below and in the @tamimimarkets catalogue❤️.

INGREDIENTS:

For the chicken marinade:
900 g chicken breasts
1/4 cup olive oil
2 tbsp lemon juice
1 tbsp white vinegar
3 garlic cloves, minced
1 tsp salt
1/2 tsp black pepper
1 tsp oregano powder
1 tsp seven spices
1/2 tsp ginger powder
1/2 tsp cumin powder
1/2 tsp paprika powder

For the white sauce:
3/4 cup Greek yogurt 170g (6oz)
1/2 cup mayonnaise 115 g
1 tbsp white vinegar
1 tbsp water
1 tsp lemon juice
1-2 tsp sugar
1/2 tsp salt
1/4 tsp black pepper

For the rice:
2 tbsp unsalted butter
1/2 tsp turmeric powder
1/4 tsp cumin powder
1 1/2 cups basmati rice, soaked for 20 minutes then rinsed
2 1/2 cups chicken stock or 1 stock cube dissolved in 2.5 cups hot water
salt and pepper to taste, a pinch of each

To assemble:
1 chopped tomato
handful chopped parsley
sriracha sauce

INSTRUCTIONS: 
For the chicken:
In a bowl, mix all the ingredients for chicken marinade. Add chicken breast and toss to coat evenly. Cover and marinade for 1-2 hours.

Heat 1 tbsp oil in a large skillet on medium high heat, and cook chicken for 5-6 min each side, or until golden brown and cooked.
Remove chicken to a cutting board, and rest for 10 minutes, before chopping roughly into 2 inch cubes.

For the white sauce:
Mix all ingredients and store in the fridge until ready to serve.

For the rice:
Add butter to a large saucepan over medium heat. Once melted, add the turmeric and cumin, and stir for 1 minutes.
Add the rice, and toast the rice by stirring for 4 minutes. Add chicken stock, salt and pepper to season. Stir and bring to a boil, then reduce heat to a simmer, cover and cook for 15 min, then set aside 15 min and fluff with a fork.

To assemble:
Place the rice in your serving platter, top with the chicken, the white sauce, and chopped tomatoes and parsley. Sriracha too!
This is my go to baked creamy cheesecake. It’s s This is my go to baked creamy cheesecake. It’s so good and rich and easy, topped with a sweet and tangy simple strawberry sauce (sauce recipe from @sallysbakeblog ). I used my new @kenwood_bahrain stand mixer and it was excellent- gave me silky smooth lump free filling. Another winner for my @digitrolley collab- all my new appliances are from them❤️ Check IGTV for recipe video!

For the strawberry topping:
-1 tbsp cornstarch
-3 tbsp water
-450 g strawberries, halved (big pack)
-zest and juice from 1/2 small lemon 
-1/4 cup (50g) sugar

-Whisk together cornstarch and water, then add to a saucepan along with all other ingredients, over medium heat.
-Bring to a simmer, stirring constantly and breaking up strawberries as they cook, 5 minutes or so until thickened. Set aside to cool, can be stored in fridge up to one week.

For the cheesecake:

Ingredients
For the crust:
* 250 g crushed digestive biscuits 2 cups 
* 135 g melted butter 1 stick and 1 tablespoon
* 1/2 tsp cinnamon

For the cheesecake:
* 900 g cream cheese (3 3/4 cup)
* 1 1/2 cup white sugar 300 g
* 3/4 cup milk, room temp
* 4 eggs, room temp
* 1 cup sour cream 240 g
* 1 tbsp vanilla extract
* 1/4 cup all purpose flour 32g

Instructions:

For the crust:
* In a mixing bowl, combine crushed biscuits, the melted butter, and the cinnamon with a fork until crumbs are moistened evenly throughout. Press along the bottom and sides of a lightly greased 9 inch springform pan. Let the crust chill a little in the fridge while you prepare cheesecake.

For the cheesecake:
-Preheat the oven to 180 C
-In  stand mixer, combine the cream cheese with the sugar in a large bowl and mix on medium speed until well combined and fluffy. Blend in the milk, then add the eggs one at a time, mixing briefly after each addition.

-Mix in sour cream, vanilla and flour until smooth. It may be easier to sift in the flour.

-Pour filling into prepared crust. Bake at 180 C for 1 hour, then turn off the oven and leave cheesecake inside for another 5 hours or so until oven has completely cooled. This is to prevent cracking.

* Store cheesecake in fridge after this time period is over until chilled, then top with the strawberry topping.
This, to me, is the sambosa that best embodies Bah This, to me, is the sambosa that best embodies Bahrain- the first- actually the only-place I have these cheesy corn sambosa ❤️. No fancy cheese goes in this, it’s literally the stuff out of a can and take SO melty and cheesy and good. I mix in a little mashed potatoes and it just makes these 💯 times better, creamy and delicious. Posting the full steps on IGTV, it’s so easy you prob won’t need them! Recipe below and tell me- what’s your go to sambosa cheese?

Ingredients
2 small potatoes, peeled and cut into cubes 8 oz total, 235 g
1/2 cup corn kernels, from a can, drained
12 oz American cheese, like Velveeta or Kraft, grated 340 g (2 170g cans of Kraft processed cheese)
pinch salt
pinch black pepper
1/2 pack samosa wrappers each pack is 500 g

Instructions:
-Cover potato cubes with water, and bring to a boil. Reduce heat and simmer until potatoes are completely cooked through. Drain, and mash.

-Let potatoes cool slightly then combine mashed potatoes with the grated cheese, drained corn, salt and pepper. Mix well until the mixture is evenly combined. Taste for and adjust seasoning.

-Fill each samosa wrapper with a tbsp of mixture on the bottom corner, then fold the corner of the samosa up and over the filling to the other side, to make a triangle. Keep folding this triangle over all the way up the top (check the video at the bottom of this recipe card to see how). Mix together the flour and water to form a thick paste, and seal the ends of the samosa to prevent them from opening up while frying.

-Place vegetable oil in a skillet, about 2 inches deep and heat on medium high heat. Once hot enough, add the sambosa and fry for around 2 minutes a side until golden brown. Remove to a paper towel lined plate to absorb some of the excess oil, then enjoy warm.

.
.
.
.
.

#harira #soup #ramadanrecipes #ramadan2021 #ramadan #ramadankareem #vegetablesoup #soupseason #soupsofinstagram #delishkitchen #friedfood #aprilisforarabfood #f52grams #foodfluffer #foodflatlay #foodphotography #foodphotographer #foodstylist #thefeedfeed #middleeasternfood #vegetarian #tasty #tastingtable #tastemade #samosa #sambosa
This is one of my top 5 recipes from this Ramadan’s recipe prep. One of my features does the @tamimimarkets recipe catalogue! Click the link in their bio to access this gorgeous (free!) catalogue.

This harira soup is unbelievable. Hearty and delicious and beautifully spiced- I’ve never been obsessed with harira soup until this one. It’s a simple one because it’s meat free, so it’s perfect to start your iftar with but also hearty enough to totally serve as a meal alongside some sambosas. Recipe below, and IGTV video coming in a bit!

Ingredients
3 tbsp olive oil
1 large onion, diced
3 celery stalks, diced
2 carrots, diced
1 tsp cinnamon powder
1/2 tsp salt
1/2 tsp black pepper
pinch red chili flakes
1/2 cup chopped parsley
1/2 cup chopped coriander(cilantro)
1 can tomato sauce 15 oz (430g)
7 cups vegetable stock or 2 stock cubes dissolved in 7 cups water
1 can drained chickpeas 15 oz (400 g)
1 cup green lentils
1/2 cup vermicelli noodles 50 g
2 lemons, juiced 1/4 cup juice
2 tbsp flour, dissolved in 1/4 cup water* use cornstarch if gluten free

Instructions:
-Start by adding the lentils to a bowl of water and soaking as you prepare the rest of the ingredients, this helps them cook through faster.
-Heat oil in a large saucepan over medium heat, and add the onions, celery and carrots. Saute for 6-8 minutes, until onions soften and turn golden brown.
-Add all the spices, the chopped parsley and chopped coriander, the tomato sauce, and the vegetable stock. Bring the pot to a boil, then add the drained chickpeas and drained lentils. Reduce heat and simmer for 25 minutes or until chickpeas and lentils are tender.
-Add the vermicelli, and let it boil for 3-4 minutes or until tender. Add the lemon juice, and the flour water mixture. Let it simmer another minute or until it thickens, then taste for seasoning and add salt and pepper if necessary.
.
.
.
.
.
#harira #soup #ramadanrecipes #ramadan2021 #ramadan #ramadankareem #vegetablesoup #soupseason #soupsofinstagram #moroccan #moroccanfood #aprilisforarabfood #f52grams #foodfluffer #foodflatlay #foodphotography #foodphotographer #foodstylist #thefeedfeed #veganrecipes #vegan #tasty #tastingtable #tastemade #lentils
Never ever liked vimto until I had it like this 🍧. Vimto smoothies means that the sweetness of vimto is tempered by that cold crunchy shaved ice. Could not stop eating/drinking these vimto slushees! So easy, you just need water, ice, vimto and a high speed blender- my @ninjakitchenme did so well breaking down huge ice chunks👏🏼. Save this for a little twist on your classic iftar drink🥳

Ingredients:
-3/4 cup water
- 3/4 cup vimto 
- 2 cups ice 

Method:
Add the ingredients to your blender in the order listed, and blend on frozen drink mode until slushy like consistency. Add more ice or water if you need to, and enjoy immediately with a spoon/straw. Yum!
.
.
.
.
.

#ramadan #ramadan2021 #ramadanrecipes #iceddrinks #slush #slushy #slushii #berries #syrup #cordial #drinkphotography #damnthatsdelish #foodfluffer #pour #dripshot #foodphotography #foodphotographyandstyling #foodstylist #foodstyling #thefeedfeed #vimto #foodtographyschool #foodtography #beautifulcuisines
A biscuit base topped with a super easy smooth, cr A biscuit base topped with a super easy smooth, creamy pistachio cheesecake and the crowning touch,  @mayadelices ‘s luscious milk chocolate melted and poured over the top. I mean- heavenly! Recipe below, adapted from @savoryandsweetfood ,, IGTV will be uploaded today. I am absolutely loving @mayadelices couverture, great quality baking chocolate thats so fun experimenting with! They have sugar free and vegan options too, and best of all it’s easily available in their shop in Bahrain 🍫👏🏼

Ingredients:

For the crust:
2 cups digestive biscuit crumbs (250 g)
1/2 cup butter melted, 115g
Pinch cinnamon powder

For the pistachio cheesecake filling:

1 cup pistachio powder (140g)
12 Kiri squares or cream cheese (215g)
250 ml thick cream
1/2 of a 400 g tin of sweetened condensed milk, more if you like it sweeter

To top:
1 cup Maya milk chocolate (160g)
pistachios to garnish

Method:
1. Preheat oven to 180C. Grease and line a 8x8 inch pan with parchment paper with extra paper hanging over the sides so you can easily lift out the bars.

2. Mix digestive crumbs with melted butter and cinnamon. Press this firmly into the base of the pan. Refrigerate for 10 minutes.

3. In a food processor, add the pistachio powder, kiri cheese cubes, thick cream, and condensed milk. Blend until well combined and smooth. Pour this mixture into the crust base and bake for 15-20 minutes until set but center is still a little jiggly. Let cool at room temperature for 1 hour then refrigerate for several hours.

4. Melt the milk chocolate gently in the microwave, in 10 second bursts, stirring after each increment. Once smooth and melted, spread over the top of the cheesecake, and refrigerate until set. Enjoy!
.
.
.
.
.
#ramadan #ramadan2021 #ramadanrecipes #cheesecakebars #cheesecakebites #chocolateporn #pistachio #chocolatelover #chocolaterecipes #cheesecakelovers #cheesecakelove #damnthatsdelish #foodfluffer #pour #chocolatedrip #dripshot #foodphotography #foodphotographyandstyling #foodstylist #foodstyling #thefeedfeed #thebakefeed #foodtographyschool #foodtography #beautifulcuisines
Want a Ramadan dessert that takes minutes to make Want a Ramadan dessert that takes minutes to make and tastes amazing? Yeah we all do - I got you! Try this coffee biscuit cake (barely adapted from the wonderful @littlesunnykitchen). Layers of coffee soaked biscuits and a super easy fluffy cream 👌🏼. I used my new @braun_bahrain handheld electric whisk, one of the attachments in the minipimer set-It whips the cream so fast, much faster than my stand mixer and it’s so convenient to be able to use any bowl to prep the cream in. I’ve partnered with @digitrolley to bring you lots of good recipes with their range of kitchen appliances, so keep following along! Recipe below , and IGTV video coming today in my Ramadan series!

Ingredients
2 tbsp nescafe powder dissolved in 1 cup hot water
1 cup heavy whipping cream 250ml
3 tbsp sweetened condensed milk
splash vanilla extract, optional
1 creme caramel sachet, powder only 49g
1 pack tea biscuits or graham crackers 7 oz or 200 g
2 tbsp cocoa powder for topping

Instructions:
-Add the heavy cream, sweetened condensed milk, vanilla and creme caramel powder to a bowl and beat until soft peaks form. Set this cream mixture aside.
-Dip the tea biscuits into the coffee briefly until they soak up the coffee but before they start to break apart. -Layer in a 7×11 or 9×9 inch clear pyrex dish, then top with half the cream mixture.
-Repeat another layer of coffee soaked biscuits on top of the heavy cream, followed by the remaining half of the cream. Sift the cocoa powder on to the top, then refrigerate for several hours until set. This is even better the next day!

.
.
.
.
.
#nescafe #nescafegold #coffeecake #biscuit #biscuitcake #nobake #nobakedessert #nobakecake #tiramisu #damnthatsdelish #tastingtable #beautifulcuisines #foodphotography #foodphotographyandstyling #tastyfood #easydessert #ramadankareem #ramadan2021 #ramadanrecipes #cream
Ramadan Kareem! And the first recipe is for these Ramadan Kareem! And the first recipe is for these unbelievable (and easy!) chicken musakhan sambosa was developed for @tamimimarkets Ramadan catalogue. One of the coolest projects I’ve ever worked on can’t wait to tell you more about it! In the meantime, enjoy this teaser recipe and check IGTV for full video steps coming up. 

Ingredients:
2 chicken breasts, cooked and finely shredded about 1 heaped cup of shredded chicken See notes
1/4 cup olive oil
2 large onions cut in half, then thinly sliced into wedges
1/4 cup toasted almond slivers or pine nuts
3 tbsp sumac
1/2 tsp salt
1/4 tsp black pepper
1/4 tsp cumin powder
1/4 tsp cinnamon powder
To assemble:
1 pack sambosa wrappers 500 g
1 tbsp flour
1/2 tbsp water
For frying:
vegetable oil, about 1/4 cup

Instructions:
-In a deep skillet over medium heat, add the olive oil until it heats up. Add the onions, and cook, stirring frequently until soft and starting to caramelize, 8-10 minutes.

-Add the shredded chicken, the toasted nuts, and all the spices. Stir to combine, then remove from the heat. Let mixture cool slightly 5 minutes or so.

-Fill each sambosa wrapper with a tbsp of mixture on the bottom corner, then fold the corner of the sambosa up and over the filling to the other side, to make a triangle. Keep folding this triangle over all the way up the top 

-Mix together the flour and water to form a thick paste, and seal the ends of the sambosa to prevent them from opening up while frying.

-Place vegetable oil in a skillet, about 2 inches deep and heat on medium high heat. Once hot enough, add the sambosa and fry for around 2 minutes a side until golden brown. Remove to a paper towel lined plate to absorb some of the excess oil, then enjoy warm, optionally with yogurt to dip in.
.
.
.
.
.
#chickensamosa #musakhan #ramadankareem #ramadan2021 #ramadanrecipes #samosa #friedfood #palestinianfood #middleeasternfood #beautifulcuisines #damnthatsdelish #f52community #thefeedfeed #foodgawker #f52grams #buzzfeedfood #tastingtable #tastemade #chickenrecipes #sumac #caramelizedonions #foodblogfeed #foodphotography #foodphotographyandstyling #foodstyling
Load More... Follow on Instagram

Copyright © 2019 on the Seasoned Pro Theme