• Skip to primary navigation
  • Skip to main content
  • Skip to primary sidebar
  • Skip to footer

 logo

  • Recipes
    • Breakfast
    • Sides
    • Soup
    • Main Meals
    • Healthy
    • Dessert
    • Drinks
  • Eating Out
  • About Me
    • Privacy Policy
  • Resources
    • Must Have Kitchen Tools
  • Nav Social Menu

    • Email
    • Facebook
    • Instagram
    • Pinterest

Egyptian Goulash

Jan 14, 2021 · Leave a Comment

Jump to Recipe
pan of finished egyptian goulash with tabasco on the side

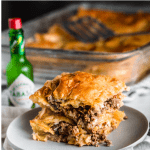
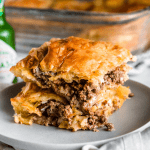
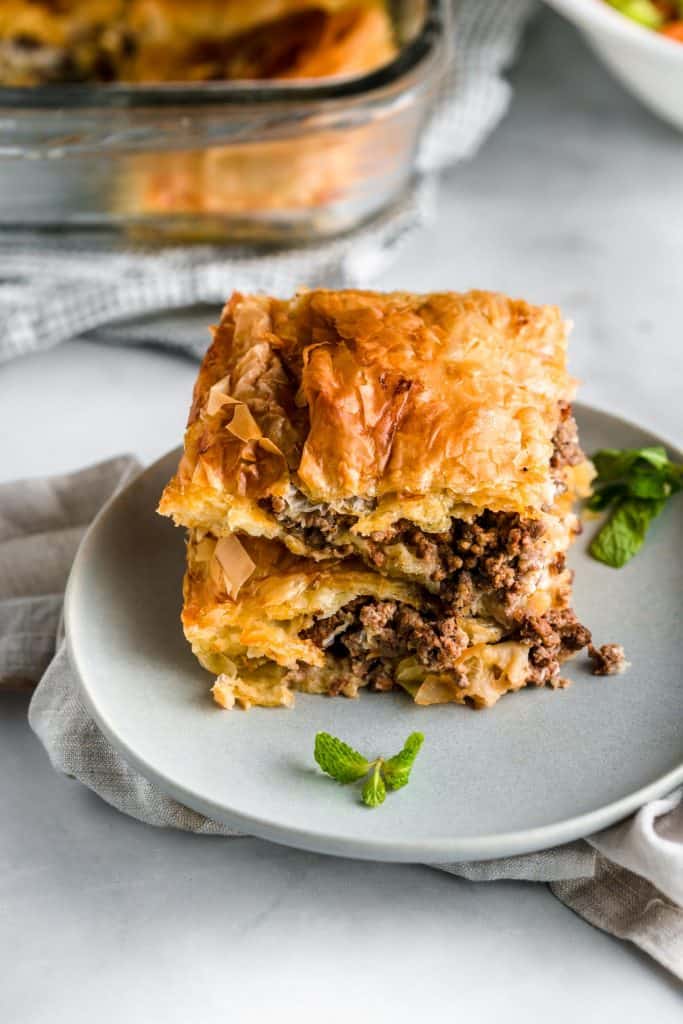
A crispy, crunchy, delicious Egyptian goulash (phyllo meat pie) with a spiced meat interior. So easy and absolutely delicious!

What is Egyptian goulash?

It’s a phyllo meat pie, made with layers of phyllo dough, with a warmly spiced meat interior. The best part is the milk/egg soak that the pie gets before baking which gives it a little gooeyness in the center. So good!

I know that there’s a very famous Hungarian stew called goulash, but this is totally different.

This is similar to Turkish meat borek, also made with phyllo dough!

What’s so good about this phyllo meat pie recipe?

two slices of phyllo meat pie stacked on top of a plate

It’s actually so easy to make, with a handful of ingredients. It comes out looking so impressive though, no one would ever guess how simple it is!

The dough is ready and thaws really easily, so you can get a crispy flaky pie without having to make your own dough.

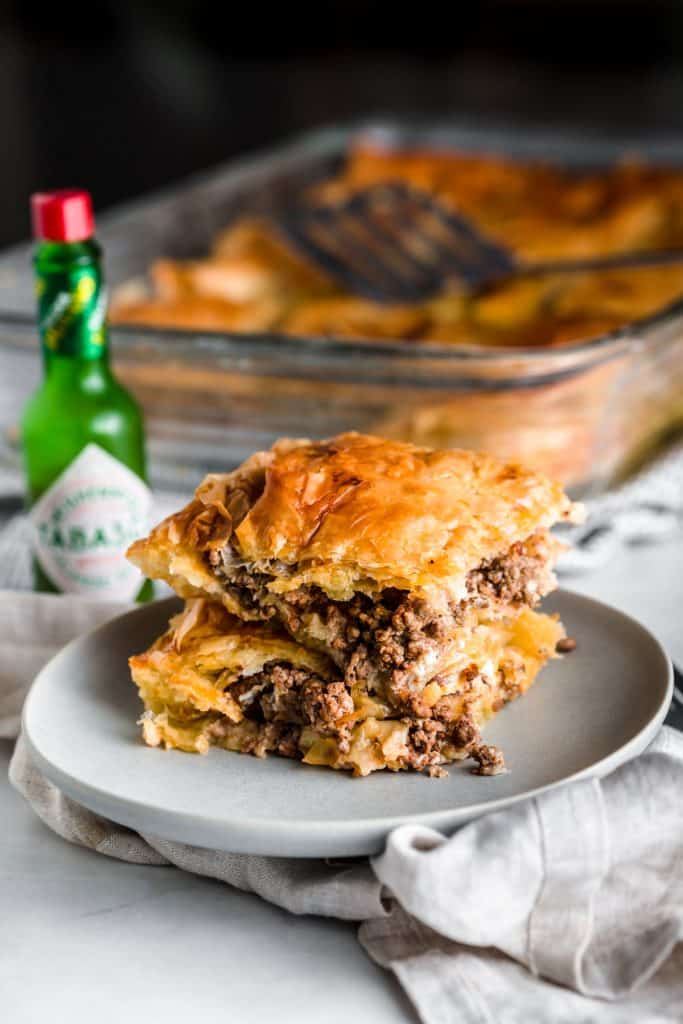
It’s crunchy, crispy and golden brown on the outside, and a little softer and more moist in the middle due to the egg and milk soak that goes through the knife cuts you make.

Goulash is a hearty, filling meal that kid and adult both will enjoy. Leftovers taste great!

This is easy to adapt. Feel free to add some veggies like peas and/or corn. You can add some shredded cheese to the meat layer too, and play around with the seasoning.

What ingredients do I need to make Egyptian goulash?

ingredients needed to make egyptian goulash

Phyllo dough: Using ready made dough is so convenient for this recipe. Thaw the phyllo dough in advance, either in the fridge overnight or for several hours, or on the counter for an hour or so.

Olive oil and an onion: You can’t really have ground beef without the flavor that an onion gives!

Ground beef: I like to use lean ground beef while making this. You can use whichever type of ground beef you prefer.

Spices: Salt, pepper, all spices or seven spice, cinnamon powder and garlic powder for seasoning.

Tomato paste: This gives a nice hint of flavor to the meat.

Olive oil and melted butter: I like using a higher proportion of olive oil to butter to brush the phyllo sheets with. I’ve had a good experience of using olive oil to coat phyllo dough, like in this Easy Greek spanokopita. I recommend using the whole amount of the oil/butter wash for maximum flavor and so that the pie cooks to a beautiful golden brown. If you want, you can brush with a little more moderation to make this healthier.

Egg + Milk : These are whisked together until well blended and poured on the top of the pie.

How do I make Egyptian Goulash?

unbaked phyllo meat pie with squares cut into it and milk wash on the side
  1. The first step is pre-heating the oven so it’s ready to go when your pie is assembled.
  2. Make the meat filling by sautéing an onion in olive oil for a few minutes until soft, then adding the ground beef and cooking thoroughly until browned. Drain the fat if you like, before adding all the spices and tomato paste and cooking for a few minutes more.
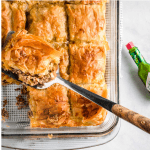
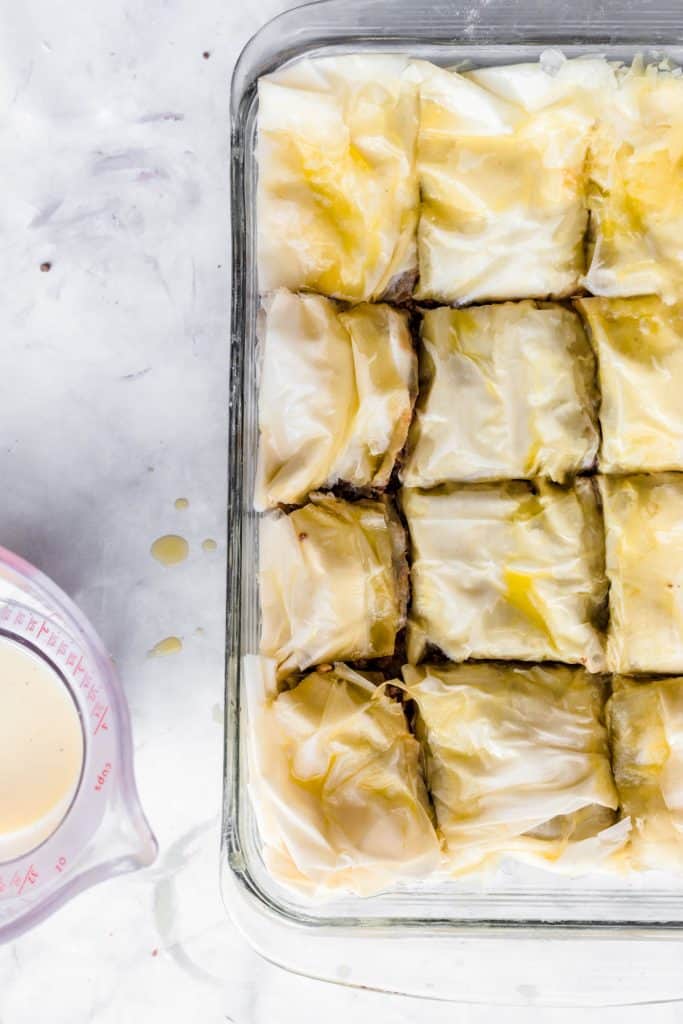
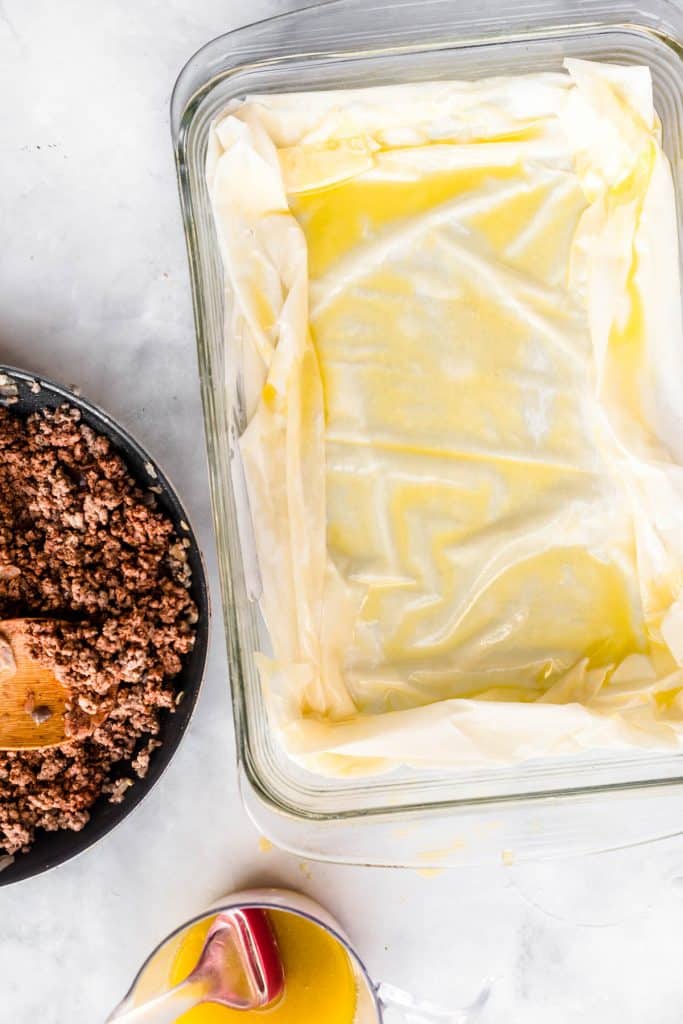
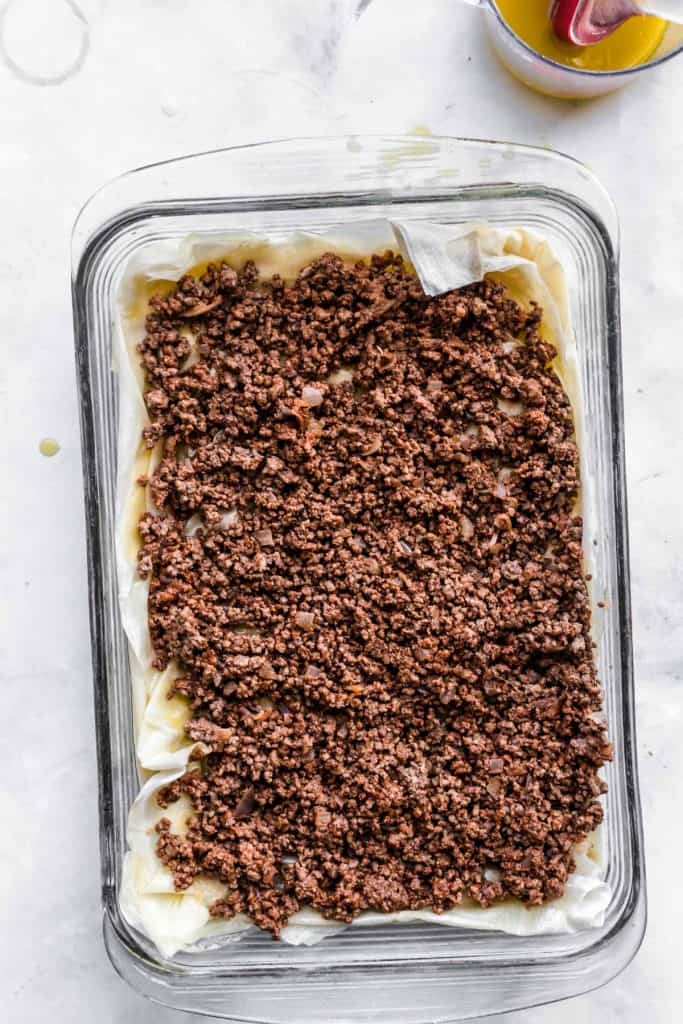
  3. Assemble the pie. You’ll layer 2-3 sheets of thawed phyllo dough in a 9×13 inch pan at a time, brush thoroughly with the olive oil/butter mixture and repeat. You’ll use up half the sheets in the package on the bottom, then place all the meat filling on that bottom half. Continue to layer with 2-3 sheets of phyllo dough at a time, brushing in between until you use up all the phyllo sheets. Slice the pan all the way to the bottom into evenly sized squares.
  4. Pour the egg/milk mixture on top evenly, then bake for around 45 minutes until golden brown and bubbly.
unbaked phyllo sheets in a pan with pan of cooked beef on the side

How do I work with phyllo dough?

Phyllo dough dries out very quickly, so while assembling, lay a damp kitchen towel over the opened pack of dough.

layered meat onto unbaked phyllo pie

Don’t panic if your dough tears. You can still layer the torn sheet as best as you can, it won’t matter at all once all the layers are assembled.

Brush the olive oil/butter mixture gently on top using a pastry brush.

Cut the pie all the way through to the bottom layer of phyllo dough, because it’ll be much easier than cutting it after baking (it’ll be too crispy).

two slices of egyptian goulash on plate with salad in the background

What to serve with Goulash:

This is excellent with a simple salad with a zingy lemony dressing. Try it with fattoush, tabboule, or an arugula salad. This would also be great with a roasted eggplant salad! Yum.

You could try it with beetroot hummus as a dipping side.

You can serve this with yogurt too, which is often what I do.

top down shot of baked phyllo meat pie on kitchen towel

Storing leftover goulash:

Leftovers will store well in the fridge for 3-4 days, tightly covered. Reheat in the oven or microwave. (Oven will work best to keep this crispy).

slices of egyptian goulash with tabasco sauce on background

If you liked this recipe, you might like:

Lasagna Bolognese with Bechamel

Easy Spanokopita

Arayes- Lebanese Meat Pitas

Cream Cheese Puff Pastry Bites

Egyptian Goulash (Phyllo Meat Pie)

This crispy flaky golden pastry is filled with a spiced ground beef mixture. It's a meat pie that looks and tastes so impressive but comes together so easily. Delicious!
Print Pin
Rate
Course: Main Course
Cuisine: Middle Eastern
Keyword: meat, pie
Prep Time: 20 minutes
Cook Time: 45 minutes
Servings: 6 people
Calories: 398kcal
Author: Farah Abumaizar

Ingredients

For the meat mix:

  • 1 tbsp olive oil
  • 1 small onion, finely diced
  • 1.5 lb lean ground beef 650-700g
  • 1 tsp salt
  • 1/4 tsp black pepper
  • 1/2 tsp garlic powder
  • 1 tsp seven spices or all spice
  • 2 heaped tbsp tomato paste

For assembling:

  • 1/2 cup olive oil
  • 1/4 cup butter, melted 56 g
  • 16 oz package phyllo dough, thawed 450g
  • 1 cup milk
  • 1 egg
  • salt and pepper for seasoning

Instructions

For the meat mix:

  • Preheat the oven to 350 F (180C).
  • Heat the olive oil in a large skillet over medium high heat. Add the diced onion and sauté for 3-4 minutes until softened. Add the ground beef and cook, separating any clumps that form until browned and cooked through. Drain any fat over the sink before returning pan to the stove.
  • Add all the spices and the tomato paste, and stir to combine well. The meat filling is ready, set aside while you assemble your pan.

To assemble:

  • Mix together the olive oil and melted butter. Lightly brush the bottom of a 9×13 inch pan. Start layering. Add 2-3 sheets of phyllo dough and place on the bottom of the pan. Brush generously with the butter oil mixture, then repeat by adding another 2-3 sheets of phyllo dough on top, and brushing generously with the butter oil. Keep repeating until you are done with about 1/2 the sheets of phyllo dough in the package.
  • Add the ground beef mixture to the pan and spread evenly. Continue to layer by placing 2-3 sheets on top of the ground beef, brushing generously with the butter/oil mix, repeating with another 2-3 sheets phyllo, and etc. Continue until you've used up all the phyllo sheets.
  • With a sharp knife, cut the phyllo pie into even squares or diagonals. Cut all the way through to the bottom of the pan, this will make it much easier to lift out slices once baked.
  • Whisk together the egg and the milk, and add a pinch of salt and pepper to season. Pour this mix evenly over the phyllo pie.
  • Bake in the middle rack of the oven for about 45 minutes or until golden brown and crispy. Serve warm, preferably with a side salad or yogurt. Enjoy!

Notes

For tips on how to work with phyllo dough, check the post above.
Tried this recipe?Mention @everylittlecrumb or tag #everylittlecrumb!

Nutrition

Calories: 398kcal

Phyllo Meat Pie by everylittlecrumb on Jumprope.

Main Meals, Recipes

Previous Post: « Pink Hummus
Next Post: Heaven Bars »

Reader Interactions

Leave a Reply Cancel reply

Your email address will not be published. Required fields are marked *

Recipe Rating


Primary Sidebar

Get more stuff

Subscribe to our mailing list and get interesting stuff and updates to your email inbox.

Thank you for subscribing.

Something went wrong.

we respect your privacy and take protecting it seriously

FeedFeed

Featured Recipes

Tamriyeh

Nescafe Cake

Berries and Cream Sara Lee Cake

Kebab Karaz

Eggplant Fatteh

More

Footer

everylittlecrumb

Farah Abu Maizar | Food Lover
Another recipe from @tamimimarkets ‘s catalogue, Another recipe from @tamimimarkets ‘s catalogue, this easy berry trifle has such a Ramadan vibe, this easy berry uses all the ingredients I associate with quick and easy no-bake Ramadan desserts. Thick cream ✅ Dream whip ✅ Condensed milk ✅ . All the things you need for creamy, light goodness. Layer this with buttery Sara Lee pound cake and lots of fresh berries and this will be a dessert you won’t to be able to stop eating😍 Send this to a someone who’d appreciate a quick and easy dessert and look out for the IGTV coming today!

Ingredients
2 containers thick cream  250 g each
1 sachet dream whip powder  28 g
1 sachet creme caramel, powder only (not syrup)  50 g
1/2 cup heavy whipping cream 120 ml
3 tbsp milk
Sweetened condensed milk 200 g, 1/2 large can
For assembling:
1 pack strawberries, halved 227 g,
1 pack raspberries 170 g
1 pack blueberries 170 g
1 pack blackberries 170 g
1 Sara Lee vanilla pound cake, thawed 300 g)

Instructions
-In an electric mixer, add the thick cream, dream whip, creme caramel, whipping cream, and condensed milk. -Beat until thick and fluffy, with soft peaks, about 3 minutes or so.
-Gently rinse the berries and pat dry, and cut the pound cake into large cubes.
-Cut the pound cake into cubes, and layer a trifle dish like so: 1 layer of pound cake cubes, half the cream, 1/2 the cream, and half the berries (a mix of all the berries). 
-Repeat with the second half of pound cake cubes, the second half of the cream and top with the remaining berries. Add whole strawberries and mint leaves to garnish, optional.
-Let the trifle set for a few hours or overnight before enjoying!
.
.
.
.
.
#berries #trifle #triflecake #poundcake #saralee #layercake #creamy #nobake #nobakedessert  #aprilisforarabfood #f52grams #foodfluffer #foodflatlay #foodphotography #foodphotographer #foodstylist #thefeedfeed #ramadan #ramadanrecipes #ramadan2021 #strawberry #strawberrycake #dessert #cakestagram #dessertpic #dessertphotography
You have to know, if I post a chicken recipe it me You have to know, if I post a chicken recipe it means it’s reaaaaaally good. This copy cat Halal guys chicken and rice is unbelievable dish! I got the turmeric rice recipe from @seriouseats and its buttery and perfectly spiced and fluffy and addictive, topped with juicy grilled spiced chicken cubes and a tangy, creamy dressing, tomatoes and parsley. AMAZING! Recipe below and in the @tamimimarkets catalogue❤️.

INGREDIENTS:

For the chicken marinade:
900 g chicken breasts
1/4 cup olive oil
2 tbsp lemon juice
1 tbsp white vinegar
3 garlic cloves, minced
1 tsp salt
1/2 tsp black pepper
1 tsp oregano powder
1 tsp seven spices
1/2 tsp ginger powder
1/2 tsp cumin powder
1/2 tsp paprika powder

For the white sauce:
3/4 cup Greek yogurt 170g (6oz)
1/2 cup mayonnaise 115 g
1 tbsp white vinegar
1 tbsp water
1 tsp lemon juice
1-2 tsp sugar
1/2 tsp salt
1/4 tsp black pepper

For the rice:
2 tbsp unsalted butter
1/2 tsp turmeric powder
1/4 tsp cumin powder
1 1/2 cups basmati rice, soaked for 20 minutes then rinsed
2 1/2 cups chicken stock or 1 stock cube dissolved in 2.5 cups hot water
salt and pepper to taste, a pinch of each

To assemble:
1 chopped tomato
handful chopped parsley
sriracha sauce

INSTRUCTIONS: 
For the chicken:
In a bowl, mix all the ingredients for chicken marinade. Add chicken breast and toss to coat evenly. Cover and marinade for 1-2 hours.

Heat 1 tbsp oil in a large skillet on medium high heat, and cook chicken for 5-6 min each side, or until golden brown and cooked.
Remove chicken to a cutting board, and rest for 10 minutes, before chopping roughly into 2 inch cubes.

For the white sauce:
Mix all ingredients and store in the fridge until ready to serve.

For the rice:
Add butter to a large saucepan over medium heat. Once melted, add the turmeric and cumin, and stir for 1 minutes.
Add the rice, and toast the rice by stirring for 4 minutes. Add chicken stock, salt and pepper to season. Stir and bring to a boil, then reduce heat to a simmer, cover and cook for 15 min, then set aside 15 min and fluff with a fork.

To assemble:
Place the rice in your serving platter, top with the chicken, the white sauce, and chopped tomatoes and parsley. Sriracha too!
This is my go to baked creamy cheesecake. It’s s This is my go to baked creamy cheesecake. It’s so good and rich and easy, topped with a sweet and tangy simple strawberry sauce (sauce recipe from @sallysbakeblog ). I used my new @kenwood_bahrain stand mixer and it was excellent- gave me silky smooth lump free filling. Another winner for my @digitrolley collab- all my new appliances are from them❤️ Check IGTV for recipe video!

For the strawberry topping:
-1 tbsp cornstarch
-3 tbsp water
-450 g strawberries, halved (big pack)
-zest and juice from 1/2 small lemon 
-1/4 cup (50g) sugar

-Whisk together cornstarch and water, then add to a saucepan along with all other ingredients, over medium heat.
-Bring to a simmer, stirring constantly and breaking up strawberries as they cook, 5 minutes or so until thickened. Set aside to cool, can be stored in fridge up to one week.

For the cheesecake:

Ingredients
For the crust:
* 250 g crushed digestive biscuits 2 cups 
* 135 g melted butter 1 stick and 1 tablespoon
* 1/2 tsp cinnamon

For the cheesecake:
* 900 g cream cheese (3 3/4 cup)
* 1 1/2 cup white sugar 300 g
* 3/4 cup milk, room temp
* 4 eggs, room temp
* 1 cup sour cream 240 g
* 1 tbsp vanilla extract
* 1/4 cup all purpose flour 32g

Instructions:

For the crust:
* In a mixing bowl, combine crushed biscuits, the melted butter, and the cinnamon with a fork until crumbs are moistened evenly throughout. Press along the bottom and sides of a lightly greased 9 inch springform pan. Let the crust chill a little in the fridge while you prepare cheesecake.

For the cheesecake:
-Preheat the oven to 180 C
-In  stand mixer, combine the cream cheese with the sugar in a large bowl and mix on medium speed until well combined and fluffy. Blend in the milk, then add the eggs one at a time, mixing briefly after each addition.

-Mix in sour cream, vanilla and flour until smooth. It may be easier to sift in the flour.

-Pour filling into prepared crust. Bake at 180 C for 1 hour, then turn off the oven and leave cheesecake inside for another 5 hours or so until oven has completely cooled. This is to prevent cracking.

* Store cheesecake in fridge after this time period is over until chilled, then top with the strawberry topping.
This, to me, is the sambosa that best embodies Bah This, to me, is the sambosa that best embodies Bahrain- the first- actually the only-place I have these cheesy corn sambosa ❤️. No fancy cheese goes in this, it’s literally the stuff out of a can and take SO melty and cheesy and good. I mix in a little mashed potatoes and it just makes these 💯 times better, creamy and delicious. Posting the full steps on IGTV, it’s so easy you prob won’t need them! Recipe below and tell me- what’s your go to sambosa cheese?

Ingredients
2 small potatoes, peeled and cut into cubes 8 oz total, 235 g
1/2 cup corn kernels, from a can, drained
12 oz American cheese, like Velveeta or Kraft, grated 340 g (2 170g cans of Kraft processed cheese)
pinch salt
pinch black pepper
1/2 pack samosa wrappers each pack is 500 g

Instructions:
-Cover potato cubes with water, and bring to a boil. Reduce heat and simmer until potatoes are completely cooked through. Drain, and mash.

-Let potatoes cool slightly then combine mashed potatoes with the grated cheese, drained corn, salt and pepper. Mix well until the mixture is evenly combined. Taste for and adjust seasoning.

-Fill each samosa wrapper with a tbsp of mixture on the bottom corner, then fold the corner of the samosa up and over the filling to the other side, to make a triangle. Keep folding this triangle over all the way up the top (check the video at the bottom of this recipe card to see how). Mix together the flour and water to form a thick paste, and seal the ends of the samosa to prevent them from opening up while frying.

-Place vegetable oil in a skillet, about 2 inches deep and heat on medium high heat. Once hot enough, add the sambosa and fry for around 2 minutes a side until golden brown. Remove to a paper towel lined plate to absorb some of the excess oil, then enjoy warm.

.
.
.
.
.

#harira #soup #ramadanrecipes #ramadan2021 #ramadan #ramadankareem #vegetablesoup #soupseason #soupsofinstagram #delishkitchen #friedfood #aprilisforarabfood #f52grams #foodfluffer #foodflatlay #foodphotography #foodphotographer #foodstylist #thefeedfeed #middleeasternfood #vegetarian #tasty #tastingtable #tastemade #samosa #sambosa
This is one of my top 5 recipes from this Ramadan’s recipe prep. One of my features does the @tamimimarkets recipe catalogue! Click the link in their bio to access this gorgeous (free!) catalogue.

This harira soup is unbelievable. Hearty and delicious and beautifully spiced- I’ve never been obsessed with harira soup until this one. It’s a simple one because it’s meat free, so it’s perfect to start your iftar with but also hearty enough to totally serve as a meal alongside some sambosas. Recipe below, and IGTV video coming in a bit!

Ingredients
3 tbsp olive oil
1 large onion, diced
3 celery stalks, diced
2 carrots, diced
1 tsp cinnamon powder
1/2 tsp salt
1/2 tsp black pepper
pinch red chili flakes
1/2 cup chopped parsley
1/2 cup chopped coriander(cilantro)
1 can tomato sauce 15 oz (430g)
7 cups vegetable stock or 2 stock cubes dissolved in 7 cups water
1 can drained chickpeas 15 oz (400 g)
1 cup green lentils
1/2 cup vermicelli noodles 50 g
2 lemons, juiced 1/4 cup juice
2 tbsp flour, dissolved in 1/4 cup water* use cornstarch if gluten free

Instructions:
-Start by adding the lentils to a bowl of water and soaking as you prepare the rest of the ingredients, this helps them cook through faster.
-Heat oil in a large saucepan over medium heat, and add the onions, celery and carrots. Saute for 6-8 minutes, until onions soften and turn golden brown.
-Add all the spices, the chopped parsley and chopped coriander, the tomato sauce, and the vegetable stock. Bring the pot to a boil, then add the drained chickpeas and drained lentils. Reduce heat and simmer for 25 minutes or until chickpeas and lentils are tender.
-Add the vermicelli, and let it boil for 3-4 minutes or until tender. Add the lemon juice, and the flour water mixture. Let it simmer another minute or until it thickens, then taste for seasoning and add salt and pepper if necessary.
.
.
.
.
.
#harira #soup #ramadanrecipes #ramadan2021 #ramadan #ramadankareem #vegetablesoup #soupseason #soupsofinstagram #moroccan #moroccanfood #aprilisforarabfood #f52grams #foodfluffer #foodflatlay #foodphotography #foodphotographer #foodstylist #thefeedfeed #veganrecipes #vegan #tasty #tastingtable #tastemade #lentils
Never ever liked vimto until I had it like this 🍧. Vimto smoothies means that the sweetness of vimto is tempered by that cold crunchy shaved ice. Could not stop eating/drinking these vimto slushees! So easy, you just need water, ice, vimto and a high speed blender- my @ninjakitchenme did so well breaking down huge ice chunks👏🏼. Save this for a little twist on your classic iftar drink🥳

Ingredients:
-3/4 cup water
- 3/4 cup vimto 
- 2 cups ice 

Method:
Add the ingredients to your blender in the order listed, and blend on frozen drink mode until slushy like consistency. Add more ice or water if you need to, and enjoy immediately with a spoon/straw. Yum!
.
.
.
.
.

#ramadan #ramadan2021 #ramadanrecipes #iceddrinks #slush #slushy #slushii #berries #syrup #cordial #drinkphotography #damnthatsdelish #foodfluffer #pour #dripshot #foodphotography #foodphotographyandstyling #foodstylist #foodstyling #thefeedfeed #vimto #foodtographyschool #foodtography #beautifulcuisines
A biscuit base topped with a super easy smooth, cr A biscuit base topped with a super easy smooth, creamy pistachio cheesecake and the crowning touch,  @mayadelices ‘s luscious milk chocolate melted and poured over the top. I mean- heavenly! Recipe below, adapted from @savoryandsweetfood ,, IGTV will be uploaded today. I am absolutely loving @mayadelices couverture, great quality baking chocolate thats so fun experimenting with! They have sugar free and vegan options too, and best of all it’s easily available in their shop in Bahrain 🍫👏🏼

Ingredients:

For the crust:
2 cups digestive biscuit crumbs (250 g)
1/2 cup butter melted, 115g
Pinch cinnamon powder

For the pistachio cheesecake filling:

1 cup pistachio powder (140g)
12 Kiri squares or cream cheese (215g)
250 ml thick cream
1/2 of a 400 g tin of sweetened condensed milk, more if you like it sweeter

To top:
1 cup Maya milk chocolate (160g)
pistachios to garnish

Method:
1. Preheat oven to 180C. Grease and line a 8x8 inch pan with parchment paper with extra paper hanging over the sides so you can easily lift out the bars.

2. Mix digestive crumbs with melted butter and cinnamon. Press this firmly into the base of the pan. Refrigerate for 10 minutes.

3. In a food processor, add the pistachio powder, kiri cheese cubes, thick cream, and condensed milk. Blend until well combined and smooth. Pour this mixture into the crust base and bake for 15-20 minutes until set but center is still a little jiggly. Let cool at room temperature for 1 hour then refrigerate for several hours.

4. Melt the milk chocolate gently in the microwave, in 10 second bursts, stirring after each increment. Once smooth and melted, spread over the top of the cheesecake, and refrigerate until set. Enjoy!
.
.
.
.
.
#ramadan #ramadan2021 #ramadanrecipes #cheesecakebars #cheesecakebites #chocolateporn #pistachio #chocolatelover #chocolaterecipes #cheesecakelovers #cheesecakelove #damnthatsdelish #foodfluffer #pour #chocolatedrip #dripshot #foodphotography #foodphotographyandstyling #foodstylist #foodstyling #thefeedfeed #thebakefeed #foodtographyschool #foodtography #beautifulcuisines
Want a Ramadan dessert that takes minutes to make Want a Ramadan dessert that takes minutes to make and tastes amazing? Yeah we all do - I got you! Try this coffee biscuit cake (barely adapted from the wonderful @littlesunnykitchen). Layers of coffee soaked biscuits and a super easy fluffy cream 👌🏼. I used my new @braun_bahrain handheld electric whisk, one of the attachments in the minipimer set-It whips the cream so fast, much faster than my stand mixer and it’s so convenient to be able to use any bowl to prep the cream in. I’ve partnered with @digitrolley to bring you lots of good recipes with their range of kitchen appliances, so keep following along! Recipe below , and IGTV video coming today in my Ramadan series!

Ingredients
2 tbsp nescafe powder dissolved in 1 cup hot water
1 cup heavy whipping cream 250ml
3 tbsp sweetened condensed milk
splash vanilla extract, optional
1 creme caramel sachet, powder only 49g
1 pack tea biscuits or graham crackers 7 oz or 200 g
2 tbsp cocoa powder for topping

Instructions:
-Add the heavy cream, sweetened condensed milk, vanilla and creme caramel powder to a bowl and beat until soft peaks form. Set this cream mixture aside.
-Dip the tea biscuits into the coffee briefly until they soak up the coffee but before they start to break apart. -Layer in a 7×11 or 9×9 inch clear pyrex dish, then top with half the cream mixture.
-Repeat another layer of coffee soaked biscuits on top of the heavy cream, followed by the remaining half of the cream. Sift the cocoa powder on to the top, then refrigerate for several hours until set. This is even better the next day!

.
.
.
.
.
#nescafe #nescafegold #coffeecake #biscuit #biscuitcake #nobake #nobakedessert #nobakecake #tiramisu #damnthatsdelish #tastingtable #beautifulcuisines #foodphotography #foodphotographyandstyling #tastyfood #easydessert #ramadankareem #ramadan2021 #ramadanrecipes #cream
Load More... Follow on Instagram

Copyright © 2019 on the Seasoned Pro Theme