• Skip to primary navigation
  • Skip to main content
  • Skip to primary sidebar
  • Skip to footer

 logo

  • Recipes
    • Breakfast
    • Sides
    • Soup
    • Main Meals
    • Healthy
    • Dessert
    • Drinks
  • Eating Out
  • About Me
    • Privacy Policy
  • Resources
    • Must Have Kitchen Tools
  • Nav Social Menu

    • Email
    • Facebook
    • Instagram
    • Pinterest

Cream Cheese Puff Pastry Bites

Mar 23, 2020 · 12 Comments

Jump to Recipe
Puff pastry filled with cheese on glass plate

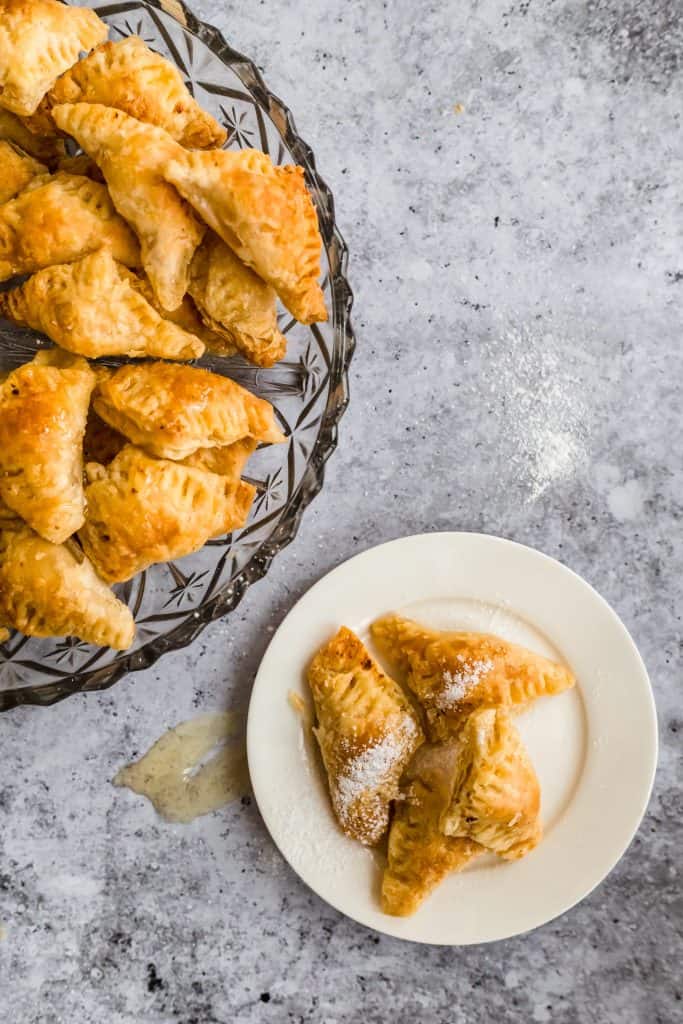
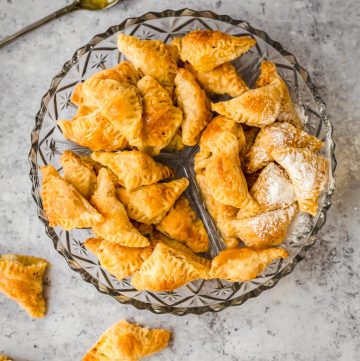
These 3 ingredient easy cream cheese puff pastry bites are ADDICTIVE. They are golden brown and flaky and stuffed with cream cheese that melts in your mouth. Ideally served sprinkled with icing sugar or drizzled in honey.

These are the my mother in laws signature thing. She makes them every Ramadan and serves them right before our dinner. We gobble them up like popcorn! The idea is genius- little triangles of kiri cheese wrapped in puff pastry squares, brushed with an egg wash and baked till golden brown and crispy. The interior softens in the oven, so you bite into a crisp shell of pastry into a soft, yielding, creamy interior.

Ingredients:

You basically need three. That’s all!

The dough: Puff pastry squares that you’ve thawed in the fridge until soft and pliable.

The filling: We use kiri cream cheese squares. They are similar in flavour to Philadelphia cream cheese, but firmer, so it makes it easier to wrap the dough around them. They come in squares, and are packaged like this:

There is a spreadable tub form, but you want the square version as pictured above.

Substitutes: You can use Philadelphia cream cheese, but not the tub, the individually wrapped bars. Make sure it’s cold and firm before cutting it up to make it easier to handle. You can also use laughing cow cheese triangles!

The butter: Melted butter brushed on the outside of the puff pastry dough before baking will give it a beautiful golden brown color. An egg wash can also be used, but butter will give you a slightly richer color.

How to make the cream cheese bites:

Take a sheet of puff pastry dough and cut it into four squares. Take each kiri cheese square, and cut that into quarters too. Place each cheese cube into a puff pastry square, and fold the puff pastry over diagonally, so you get a little triangle. Crimp the edges of the pastry with a fork to seal it shut, and place on a parchment lined baking paper. Keep going, till you’ve assembled all your bites.

Process shots of puff pastry bites

Once all puff pastry bites are assembled and ready, you brush them with the melted butter so that when they bake they get a nice deep golden brown color.

Bake and enjoy warm!

How to serve Cream Cheese Puff Pastry Bites:

We like the contrast of the savory cream cheese with a hint of sweetness. We always drizzle them with honey, or dust with icing sugar, or even better, do both! They pair perfectly with a hot cup of coffee or tea, and make such a good snack.

Alternately, you can drizzle them with maple syrup, sweetened condensed milk, or golden syrup. These would be gorgeous dusted with pistachio powder!

You can keep these plain, or sprinkle some Zaatar over the cheese cubes before assembling for a great savory rendition.

Puff Pastry cheese bites on a glass plate with some honey

Cream Cheese Puff Pastry Bites

Farah Abumaizar
Easy 3 ingredient golden brown puff pastry triangles filled with cream cheese
5 from 5 votes
Print Recipe Pin Recipe
Prep Time 5 mins
Cook Time 20 mins
Course Appetizer
Cuisine Middle Eastern
Servings 8 people
Calories 213 kcal

Ingredients
  

  • 12 puff pastry square sheets, thawed
  • 12 kiri cream cheese squares
  • 3 tbsp butter, melted
  • honey and/or icing sugar to serve

Instructions
 

  • Preheat oven to 200 C (400 F).
  • Cut the puff pastry squares into 4 equal sized squares (See blog post for process shots) Cut each kiri cream cheese squares into 4 small squares.
  • Place one cut cream cheese square into a cut puff pastry square. Fold one corner to an opposite corner, making a little mini triangle. Use a fork, and crimp the edges to seal.
  • Continue until you've filled all the dough squares. Assemble onto a parchment paper lined or non stick baking sheet, and brush with melted butter. Bake for 15-20 minutes or until pastry is deep golden brown.
  • Enjoy warm, drizzled with honey or sprinkled with icing sugar, or ideally both!
Keyword pastry, cheese

If you liked this recipe, you might like:

Easy Spanokopita

Coffee Cardamom Date Truffles

Ouzi- Filo wrapped Rice

Did you make this? Tag @everylittlecrumb or hashtag #everylittlecrumb and I’ll share your images!

Dessert, Recipes, Sides

Reader Interactions

Comments

  1. Danielle Wolter says

    March 23, 2020 at 1:53 pm

    5 stars
    I could eat all of these! They were so good and nice and easy to make.

    Reply
    • Farah Abumaizar says

      March 23, 2020 at 1:54 pm

      Completely addictive am I right!

      Reply
  2. Bry says

    March 23, 2020 at 1:55 pm

    This was such an easy recipe to prep – got the kids invovled to stem their boredom and they loved it! They’re the perfect bite sized treats – thank you!

    Reply
    • Farah Abumaizar says

      March 23, 2020 at 2:11 pm

      So glad to hear that! Thanks for the feedback!

      Reply
  3. Deanne says

    March 23, 2020 at 3:35 pm

    5 stars
    So light and flaky, we loved these! We’re making them as an appetizer again.

    Reply
    • Farah Abumaizar says

      March 23, 2020 at 3:37 pm

      So happy to hear it Deanne!

      Reply
  4. Jen says

    March 23, 2020 at 4:14 pm

    5 stars
    My kids and I had the best time making these! So easy and absolutely delicious!

    Reply
    • Farah Abumaizar says

      March 23, 2020 at 4:15 pm

      Aw! So happy to her it Jen thanks for the feedback!

      Reply
  5. Jessica says

    March 23, 2020 at 9:48 pm

    5 stars
    These are beautiful! I can’t believe they are only 3-ingredients! What a great recipe 🙂

    Reply
    • Farah Abumaizar says

      March 23, 2020 at 9:48 pm

      Thanks so much Jessica!

      Reply
  6. Anne says

    September 19, 2020 at 4:44 pm

    5 stars
    Divine. Addictive. Simply yummy. What more can I say. Bathroom scale has been pushed under the bed😋😜

    Reply
    • Farah Abumaizar says

      September 21, 2020 at 7:57 pm

      Best comment ever!! Thanks Anne! Totally agree that these are addictive and dangerous hehehe

      Reply

Leave a Reply Cancel reply

Your email address will not be published. Required fields are marked *

Recipe Rating


Primary Sidebar

Get more stuff

Subscribe to our mailing list and get interesting stuff and updates to your email inbox.

Thank you for subscribing.

Something went wrong.

we respect your privacy and take protecting it seriously

FeedFeed

Featured Recipes

Arabic Grills

Heaven Bars

Egyptian Goulash

Pink Hummus

Orange Blossom Cake

More

Footer

everylittlecrumb

Farah Abu Maizar | Food Lover
Just posted the recipe for the chicken and lamb sk Just posted the recipe for the chicken and lamb skewers on the blog! You’ll also find a recipe for Kafta skewers there- save this post or head to https://everylittlecrumb.com/arabic-grills/ linked in bio for all the recipes. Nothing like good old fashioned juicy skewers with a little bit of char to set the weekend mood 😍 And I know you’ll love this recipe!
.
.
.
.
.

#delish #shishtaouk #shishtaouk #skewers #bbqporn #chocolate #chickenrecipes #foodblog #instayum #yummy #winter #foodporn #foodtographyschool #foodphotography #grill #delish #foodfluffer #damnthatsdelish #kafta #kebab #hummus #grills #bbq #lebanesefood #middleeasternfood #lamb #redmeat #pitabread
Fluffy, soft and moist, this old fashioned orange Fluffy, soft and moist, this old fashioned orange cake is another @mrsclueless recipe that exceeded all my expectations. So yum! The only thing I did differently was work the orange zest into the sugar and add a tiny splash of orange blossom because I had a bottle just begging to be used. If you are living under a rock and not following @mrsclueless already, go now! Reposted her recipe below:

INGREDIENTS:
 
4 eggs, room temperature and separated (yolk from white)
1 1/2 cups sugar 300 g
1.5 tsp vanilla extract
1-2 tsp orange blossom water
zest of 2 oranges
1/2 cup vegetable or canola oil
1/2 cup room temperature butter 113 g
2.5 cups all purpose flour 312 g
2 tsp baking powder
1 cup fresh orange juice

INSTRUCTIONS:
 
Preheat oven to 350 F (180C) and prepare your cake pan by lightly greasing and lining with parchment paper or flouring. I used a 9 inch springform pan, you can also use a bundt cake.
Using your fingertips, work the orange zest into the sugar until the sugar has moistened and turned fragrant and changed into a pale yellow/orange color.
In the bowl of a mixer fitted with paddle or whisk attachment, mix the egg yolks, orange zest scented sugar, vanilla, and orange blossom water on medium high speed for 2-3 minutes or until pale yellow and fluffy.
Add the oil and the butter and mix until well combined.
Add the flour and baking powder and mix until just combined, then add the juice and mix until combined.

In a separate bowl (either with a handheld mixer, or transfer the cake batter to another bowl and thoroughly wash and dry the mixer bowl) use an electric whisk to whisk the egg whites on medium high speed for 2-4 minutes until they form peaks that hold their shape.
Fold the egg whites into the cake batter with a rubber spatula, I like to do this in three additions. Take care not to deflate the egg whites.
Pour batter into prepared cake pan and bake for 50-60 minutes or until skewer inserted in the center comes out clean. If the outside of the cake is browning too rapidly and the inside still isn't cook, cover loosely with foil for the remainder of the baking time. Start checking at 40 minutes, every oven is different.
Taco Tuesday 🌮! We drove a good 30 minutes to v Taco Tuesday 🌮! We drove a good 30 minutes to visit this tiny little Mexican joint in seihat called @cancun.sa . The best priced Mexican food I’ve ever encountered- nearly ever dish is under 20 riyals and it was all delicious! Small portions, which is good so you can try a bunch of stuff. Fave was the shrimp burrito and also loved the simple beef tacos, and cheesy quesadillas. Totally exceeded my expectations , I just wish it was closer to Khobar! Would you drive 30+ minutes to fulfill a 🌮 craving?
.
.
.
.
.

#foodblog #instayum #yummy #bakery #foodporn #foodtographyschool #foodphotography #slice #delish #foodfluffer #damnthatsdelish #nachos #tortilla #tortillachips #partyfood #chipsandsalsa #mexicanfood #gamenight #sheetpan #tacos #tacotuesday #shrimp
Magic bars. Addictive! And so easy to make- a dige Magic bars. Addictive! And so easy to make- a digestive biscuit crust topped with chocolate chips and butterscotch chips, walnuts or pecans, sweetened coconut and condensed milk and baked until golden brown and bubbly. I dare you to stop at one! This weeks recipe for @tamimimarkets is a keeper- they have the best range of chocolate chips!

Ingredients:

2 cups digestive biscuit crumbs (200g)
1/2 cup butter, melted (113g)
1 cup semi sweet chocolate chips (150g)
1 cup butterscotch chips (150g)
3/4 cup chopped walnuts or pecans (100g)
1 cup sweetened shredded coconut (signature select)
1/2-2/3 container sweetened condensed milk (400g container)

Method:
1. Preheat oven to 180C. Mix the biscuit crumbs and melted butter until well combined, then press into a parchment paper lined 9x13 inch pan.
2. Layer by scattering the chocolate chips on top of the biscuits, followed by the butterscotch chips, the walnuts, then the shredded coconut. Evenly drizzle the condensed milk on top.
3. Bake for 25-38 minutes or until edges are golden brown and the condensed milk is bubbling. Cool completely before slicing.
I know that the weekend is over, but you can keep I know that the weekend is over, but you can keep the party going with easy sheet pan nachos. For a recent game night, we actually made our nacho chips from scratch and it was so easy (and yum!), I’ll probably never buy store bought tortilla chips again. To make homemade tortilla chips:

Ingredients:
As many corn tortillas as you want, we used 12 small corn tortillas 
Some salt for sprinkling.

Method: 
-Heat the oven to 190C (375F). Cut the tortillas into wedges, each tortilla will give you six wedges. 
- Lay in a single layer on a baking sheet. Bake for 6-7 minutes until starting to turn golden brown, then sprinkle with salt and turn over for another 6-7 minutes until golden brown and crunchy.
- Make nachos by sprinkling the tortilla chips with shredded cheddar cheese, and adding optionally refried beans and cooked ground beef. Bake until cheese is melted then remove from oven and top with anything you like:
- We used diced tomatoes, diced avocados, jalapeños, sliced black olives and chopped coriander. Serve with sour cream and salsa on the side 😍🥳 
.
.
.
.
.

#cakephotos #layercake #chocolate #ganache #foodblog #instayum #yummy #bakery #foodporn #foodtographyschool #foodphotography #slice #delish #foodfluffer #damnthatsdelish #nachos #tortilla #tortillachips #partyfood #chipsandsalsa #mexicanfood #gamenight #sheetpan
We celebrated my husbands birthday with lots of tr We celebrated my husbands birthday with lots of treats, but this cake from home business @littlecakecompanyy really stood out! The talented young woman behind this home business made him a gorgeously decorated cake we devoured. Moist and fluffy chocolate cake layered with Oreo cheesecake filling. Dreamy! I loved the alternative to a regular buttercream filling and the cake itself is so soft and moist. Definitely check out her page fir her flavors and range- like the Nutella cake pops that my kids fought over lol. Swipe to see the inside, would definitely order a cake from her again! Save this to remind you for your next occasion 🎂🥳.
.
.
.
.
.

#chocolatecake #magnoliabakery #cakestagram #cakephotos #layercake #chocolate #ganache #foodblog #instayum #yummy #bakery #foodporn #foodtographyschool #foodphotography #slice #delish #foodfluffer #damnthatsdelish
I’m totally living the bbq life here. It’s bec I’m totally living the bbq life here. It’s become my mission to grill as many times as possible until it gets too hot to be outdoors. Lots of places in Khobar make it easy! We got these mini slider patties, potato buns, burger sauce and all the prepped and ready cut up veggies from @redmarblesa a newly opened premium butchery. Making hamburgers at home has never been this simple and convenient. I really like that it’s a one stop shot for your complete burger. Their burger sauce is really good too! Save this post for next time a burger craving hits!
.
.
.
.
.

#delish #shishtaouk #cakestagram #skewers #bbqporn #chocolate #bbqseason #foodblog #instayum #yummy #winter #foodporn #foodtographyschool #foodphotography #grill #delish #foodfluffer #damnthatsdelish #coleslaw #kebab #fries #grills #bbq #lebanesefood #middleeasternfood #lamb #sliders #burgers
Definitely one of my favorite ways to start the da Definitely one of my favorite ways to start the day. A cup of black coffee and a slice of cake 😍. Thank you @espresso_bh for always spoiling me with goodies and testing out your baked goods on me. I also have to shout out @azulmarblewll for their gorgeous marble trays. Wishing you all a happy Wednesday!
.
.
.
.
.

#chocolatecake #magnoliabakery #cakestagram #cakephotos #layercake #chocolate #ganache #foodblog #instayum #yummy #bakery #foodporn #foodtographyschool #foodphotography #slice #delish #foodfluffer #damnthatsdelish #espresso #blackcoffee
Load More... Follow on Instagram

Copyright © 2019 on the Seasoned Pro Theme