• Skip to primary navigation
  • Skip to main content
  • Skip to primary sidebar
  • Skip to footer

 logo

  • Recipes
    • Breakfast
    • Sides
    • Soup
    • Main Meals
    • Healthy
    • Dessert
    • Drinks
  • Eating Out
  • About Me
    • Privacy Policy
  • Resources
    • Must Have Kitchen Tools
  • Nav Social Menu

    • Email
    • Facebook
    • Instagram
    • Pinterest

Baby Marrow Fritters

Mar 26, 2020 · 10 Comments

Jump to Recipe
A platter full of fritters with parsley on top, yogurt on the side

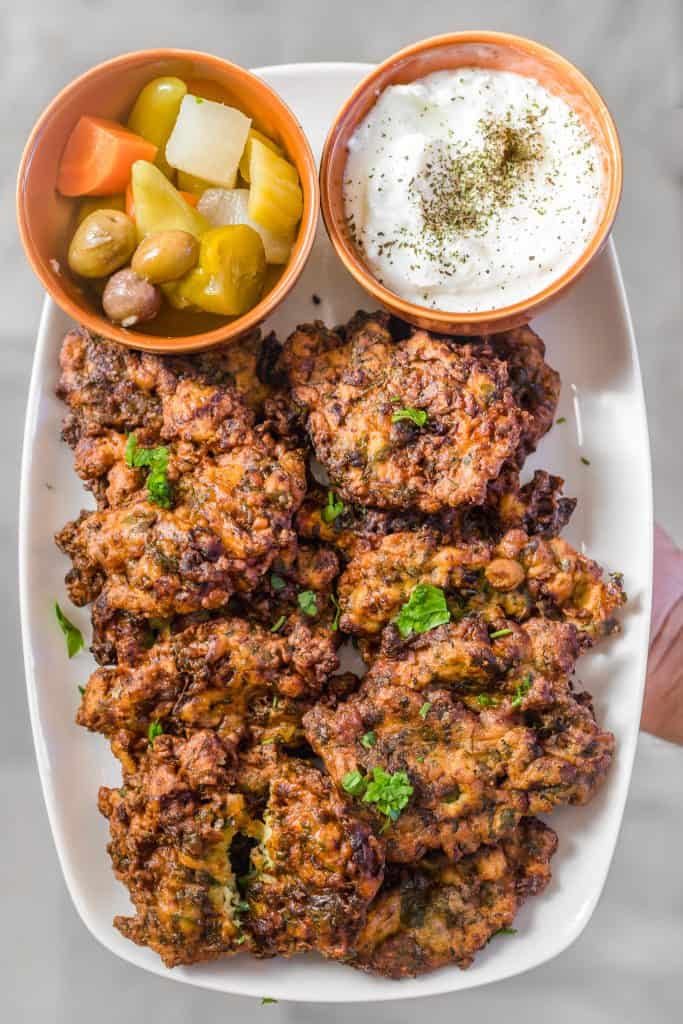
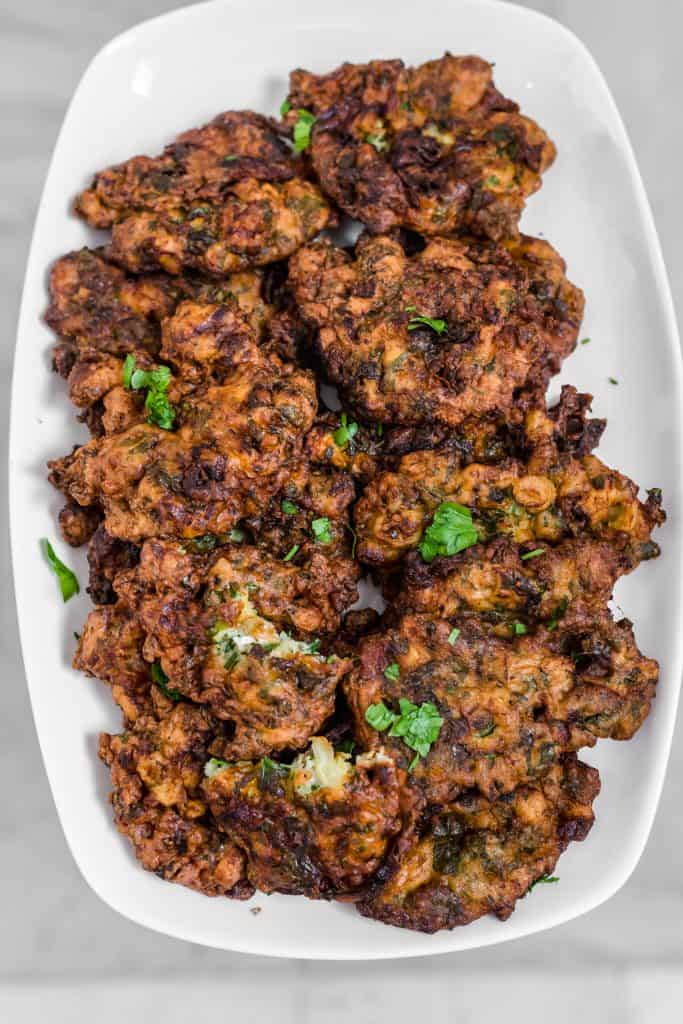
These baby marrow fritters are golden brown, crispy on the outside, tender on the inside delights. Made very simply in one bowl, they are the perfect way to use up baby marrow.

This recipe is another gem from my mother in law (have you seen her 3 ingredient cream cheese puff pastry bites?) these fritters are always what she serves alongside any stuffed baby marrow dish she makes. That’s her way of using up the inside of the vegetables that you core out before stuffing them with rice. In addition to my mother in law, this is a very commonly used application in the Arab world!

Baby marrow is mixed with fresh parsley, flours, eggs and some salt and pepper to create these simple and delicious fritters that are fried in olive oil and in my opinion, best eaten with yogurt.

What are baby marrow?

Baby marrow, or koosa is the main star of this show. Middle Eastern koosa is like a cross between Western zucchini and squash. This is what it looks like for anyone not familiar. We usually stuff it, as I did in these delicious recipes:

Middle Eastern Stuffed Zucchini

and

Warak Enab- Stuffed Grape Leaves

Therefore, this is the perfect recipe to use up that leftover inside core of the vegetable that you removed after stuffing. I do have to mention another great recipe for zucchini cores:

Zucchini Brownies

Keep in mind, even if you haven’t made any stuffed vegetable dishes and you want to try these fritters, you can absolutely use whole baby marrow, or even zucchini. This is a very flexible recipe! At the end of the day, you want around 3 cups of marrow insides/ shredded marrow/shredded zucchini.

How to make baby marrow fritters:

You need to prepare the actual baby marrow. This means that if you are using the inside cores of the baby marrow, you need to dice them well. If using whole marrows, you can shred them using a box grater or the shredder attachment of a food processor.

After the baby marrow is the size we need, remove the majority of the water by placing the shredded marrow over a colander, sprinkling with salt and letting it sit for 10 minutes. Therefore, a lot of the water will be released after 10-15 minutes pass, especially when we squeeze the baby marrow with our hands to further get rid of any liquid.

Why do you need to get rid of the liquid in the first place? Because we want to ensure that the fritters fry up crispy, not soggy!

Next, the rest is easy. You simply place the shredded marrow in a large bowl, add eggs, chopped parsley, flour, crushed garlic, salt and pepper. After that, you have your fritter batter!

You drop in heaped tablespoons (more like 2 tbsp sized) in the hot oil, and fry!

fritters being fried in hot oil

The oil should be over medium high for a few minutes a side until golden brown and delicious. You don’t need to use quite as much oil as the photo and video show, that’s totally up to preference.

What to serve with the fritters:

I really like yogurt sprinkled with dried mint, or even plain yogurt. It makes the perfect dipping sauce. Another thing you can do is make little pita bread fritter wraps, which is something my father in law always does!

How to store fritters:

Storage time for the fritters is up to two days in the fridge tightly covered. They can also be frozen for up to 3 months. Reheat them in a hot oven or in the microwave.

A platter full of fritters with parsley on top

Baby Marrow Fritters

These easy dump and fry them fritters are made with the cored inside of baby marrrows, making it the perfect usage after stuffing them!
5 from 5 votes
Print Pin
Rate
Course: Main Course
Cuisine: Middle Eastern
Prep Time: 5 minutes
Cook Time: 5 minutes
Servings: 6 people
Calories: 152kcal
Author: Farah Abumaizar

Ingredients

  • 3 cups shedded baby marrow or zucchini. Either the inside core of the baby marrow chopped, or whole baby marow or zucchini grated
  • 1 tsp salt for draining the water of the baby marow
  • 4 eggs
  • 1/2 bunch parsley, chopped
  • 4 tbsp flour
  • 2-3 cloves crushed garlic
  • 1 tsp black pepper
  • 1-1.5 tsp salt
  • 2-3 tbsp olive oil

Instructions

  • Chop up the insides of the baby marrow. It'll be tender, so it'll chop easily. Place all the chopped marrow in a colander over the sink, and sprinkle with a teaspoon of salt. Let it sit 10-15 minutes or until some water has been released, then futher squeeze out as much liquid as you can.
  • Add the eggs, the parsley, the flour, crushed garlic, the black pepper and salt, and combine until well mixed. It will form a thick batter. Set it aside while you heat the stove.
  • In a large deep skillet, add enough olive oil to coat the bottom. Heat on medium high heat until olive oil is hot. Scoop 2 tbsp sized dollops of the fritter batter into the hot oil. Don't add too many fritters at once, they shouldn't touch each other. You'll fry in batches!
  • Sautee for for 2-3 minutes a side until deep golden brown, then flip and cook on the other side for 2 minutes or so. Remove the fritters and place them on paper towel lined plate to absorb some of the oil.
  • Keep sauteeing until the batter is all finished, and enjoy warm or room temperature!

Notes

This is the perfect way to use up the inside of the baby marrow in this recipe:
 
https://everylittlecrumb.com/stuffed-grape-leaves-warak-enab/
 
and
https://everylittlecrumb.com/middle-eastern-stuffed-zucchini-vegetarian-koosa-mahshi/
 
Tried this recipe?Mention @everylittlecrumb or tag #everylittlecrumb!

Nutrition

Calories: 152kcal

If you liked this recipe, you might like:

Middle Eastern Stuffed Zucchini

Warak Enab- Stuffed Grape Leaves

Zucchini Brownies

Did you make this? Tag @everylittlecrumb or hashtag #everylittlecrumb and I’ll share your images!

Main Meals, Recipes, Sides

Previous Post: « Cream Cheese Puff Pastry Bites
Next Post: Whipped Dalgona Coffee »

Reader Interactions

Comments

  1. kim says

    March 26, 2020 at 2:33 pm

    5 stars
    Love this recipe! It was so easy, yet had so much flavor! I will definitely be making again!

    Reply
    • Farah Abumaizar says

      March 26, 2020 at 2:39 pm

      Yay thanks Kim! So glad to hear it

      Reply
  2. Bintu | Recipes From A Pantry says

    March 26, 2020 at 3:20 pm

    5 stars
    I have not had marrow in far too long! I will definitely be giving this delicious sounding fritters a try!

    Reply
    • Farah Abumaizar says

      March 26, 2020 at 3:20 pm

      I hope you do and like it!!

      Reply
  3. Danielle says

    March 26, 2020 at 3:24 pm

    5 stars
    This is the perfect idea for when my friendscomeover. Easy to make, easy to eat and just a great recipe to keep handy!

    Reply
    • Farah Abumaizar says

      March 26, 2020 at 3:45 pm

      That’s the truth Danielle! Thank you!

      Reply
  4. Katherine says

    March 26, 2020 at 3:53 pm

    5 stars
    I love how super-quick this recipe is! Sooo good.

    Reply
    • Farah Abumaizar says

      March 26, 2020 at 4:10 pm

      Thanks Katherine!

      Reply
  5. jen says

    March 26, 2020 at 3:56 pm

    5 stars
    Great with zucchini and summer squash combo!

    Reply
    • Farah Abumaizar says

      March 26, 2020 at 4:10 pm

      Nice!! Glad to hear it Jen!

      Reply

Leave a Reply Cancel reply

Your email address will not be published. Required fields are marked *

Recipe Rating


Primary Sidebar

Get more stuff

Subscribe to our mailing list and get interesting stuff and updates to your email inbox.

Thank you for subscribing.

Something went wrong.

we respect your privacy and take protecting it seriously

FeedFeed

Featured Recipes

Tamriyeh

Nescafe Cake

Berries and Cream Sara Lee Cake

Kebab Karaz

Eggplant Fatteh

More

Footer

everylittlecrumb

Farah Abu Maizar | Food Lover
You have to know, if I post a chicken recipe it me You have to know, if I post a chicken recipe it means it’s reaaaaaally good. This copy cat Halal guys chicken and rice is unbelievable dish! I got the turmeric rice recipe from @seriouseats and its buttery and perfectly spiced and fluffy and addictive, topped with juicy grilled spiced chicken cubes and a tangy, creamy dressing, tomatoes and parsley. AMAZING! Recipe below and in the @tamimimarkets catalogue❤️.

INGREDIENTS:

For the chicken marinade:
900 g chicken breasts
1/4 cup olive oil
2 tbsp lemon juice
1 tbsp white vinegar
3 garlic cloves, minced
1 tsp salt
1/2 tsp black pepper
1 tsp oregano powder
1 tsp seven spices
1/2 tsp ginger powder
1/2 tsp cumin powder
1/2 tsp paprika powder

For the white sauce:
3/4 cup Greek yogurt 170g (6oz)
1/2 cup mayonnaise 115 g
1 tbsp white vinegar
1 tbsp water
1 tsp lemon juice
1-2 tsp sugar
1/2 tsp salt
1/4 tsp black pepper

For the rice:
2 tbsp unsalted butter
1/2 tsp turmeric powder
1/4 tsp cumin powder
1 1/2 cups basmati rice, soaked for 20 minutes then rinsed
2 1/2 cups chicken stock or 1 stock cube dissolved in 2.5 cups hot water
salt and pepper to taste, a pinch of each

To assemble:
1 chopped tomato
handful chopped parsley
sriracha sauce

INSTRUCTIONS: 
For the chicken:
In a bowl, mix all the ingredients for chicken marinade. Add chicken breast and toss to coat evenly. Cover and marinade for 1-2 hours.

Heat 1 tbsp oil in a large skillet on medium high heat, and cook chicken for 5-6 min each side, or until golden brown and cooked.
Remove chicken to a cutting board, and rest for 10 minutes, before chopping roughly into 2 inch cubes.

For the white sauce:
Mix all ingredients and store in the fridge until ready to serve.

For the rice:
Add butter to a large saucepan over medium heat. Once melted, add the turmeric and cumin, and stir for 1 minutes.
Add the rice, and toast the rice by stirring for 4 minutes. Add chicken stock, salt and pepper to season. Stir and bring to a boil, then reduce heat to a simmer, cover and cook for 15 min, then set aside 15 min and fluff with a fork.

To assemble:
Place the rice in your serving platter, top with the chicken, the white sauce, and chopped tomatoes and parsley. Sriracha too!
This is my go to baked creamy cheesecake. It’s s This is my go to baked creamy cheesecake. It’s so good and rich and easy, topped with a sweet and tangy simple strawberry sauce (sauce recipe from @sallysbakeblog ). I used my new @kenwood_bahrain stand mixer and it was excellent- gave me silky smooth lump free filling. Another winner for my @digitrolley collab- all my new appliances are from them❤️ Check IGTV for recipe video!

For the strawberry topping:
-1 tbsp cornstarch
-3 tbsp water
-450 g strawberries, halved (big pack)
-zest and juice from 1/2 small lemon 
-1/4 cup (50g) sugar

-Whisk together cornstarch and water, then add to a saucepan along with all other ingredients, over medium heat.
-Bring to a simmer, stirring constantly and breaking up strawberries as they cook, 5 minutes or so until thickened. Set aside to cool, can be stored in fridge up to one week.

For the cheesecake:

Ingredients
For the crust:
* 250 g crushed digestive biscuits 2 cups 
* 135 g melted butter 1 stick and 1 tablespoon
* 1/2 tsp cinnamon

For the cheesecake:
* 900 g cream cheese (3 3/4 cup)
* 1 1/2 cup white sugar 300 g
* 3/4 cup milk, room temp
* 4 eggs, room temp
* 1 cup sour cream 240 g
* 1 tbsp vanilla extract
* 1/4 cup all purpose flour 32g

Instructions:

For the crust:
* In a mixing bowl, combine crushed biscuits, the melted butter, and the cinnamon with a fork until crumbs are moistened evenly throughout. Press along the bottom and sides of a lightly greased 9 inch springform pan. Let the crust chill a little in the fridge while you prepare cheesecake.

For the cheesecake:
-Preheat the oven to 180 C
-In  stand mixer, combine the cream cheese with the sugar in a large bowl and mix on medium speed until well combined and fluffy. Blend in the milk, then add the eggs one at a time, mixing briefly after each addition.

-Mix in sour cream, vanilla and flour until smooth. It may be easier to sift in the flour.

-Pour filling into prepared crust. Bake at 180 C for 1 hour, then turn off the oven and leave cheesecake inside for another 5 hours or so until oven has completely cooled. This is to prevent cracking.

* Store cheesecake in fridge after this time period is over until chilled, then top with the strawberry topping.
This, to me, is the sambosa that best embodies Bah This, to me, is the sambosa that best embodies Bahrain- the first- actually the only-place I have these cheesy corn sambosa ❤️. No fancy cheese goes in this, it’s literally the stuff out of a can and take SO melty and cheesy and good. I mix in a little mashed potatoes and it just makes these 💯 times better, creamy and delicious. Posting the full steps on IGTV, it’s so easy you prob won’t need them! Recipe below and tell me- what’s your go to sambosa cheese?

Ingredients
2 small potatoes, peeled and cut into cubes 8 oz total, 235 g
1/2 cup corn kernels, from a can, drained
12 oz American cheese, like Velveeta or Kraft, grated 340 g (2 170g cans of Kraft processed cheese)
pinch salt
pinch black pepper
1/2 pack samosa wrappers each pack is 500 g

Instructions:
-Cover potato cubes with water, and bring to a boil. Reduce heat and simmer until potatoes are completely cooked through. Drain, and mash.

-Let potatoes cool slightly then combine mashed potatoes with the grated cheese, drained corn, salt and pepper. Mix well until the mixture is evenly combined. Taste for and adjust seasoning.

-Fill each samosa wrapper with a tbsp of mixture on the bottom corner, then fold the corner of the samosa up and over the filling to the other side, to make a triangle. Keep folding this triangle over all the way up the top (check the video at the bottom of this recipe card to see how). Mix together the flour and water to form a thick paste, and seal the ends of the samosa to prevent them from opening up while frying.

-Place vegetable oil in a skillet, about 2 inches deep and heat on medium high heat. Once hot enough, add the sambosa and fry for around 2 minutes a side until golden brown. Remove to a paper towel lined plate to absorb some of the excess oil, then enjoy warm.

.
.
.
.
.

#harira #soup #ramadanrecipes #ramadan2021 #ramadan #ramadankareem #vegetablesoup #soupseason #soupsofinstagram #delishkitchen #friedfood #aprilisforarabfood #f52grams #foodfluffer #foodflatlay #foodphotography #foodphotographer #foodstylist #thefeedfeed #middleeasternfood #vegetarian #tasty #tastingtable #tastemade #samosa #sambosa
This is one of my top 5 recipes from this Ramadan’s recipe prep. One of my features does the @tamimimarkets recipe catalogue! Click the link in their bio to access this gorgeous (free!) catalogue.

This harira soup is unbelievable. Hearty and delicious and beautifully spiced- I’ve never been obsessed with harira soup until this one. It’s a simple one because it’s meat free, so it’s perfect to start your iftar with but also hearty enough to totally serve as a meal alongside some sambosas. Recipe below, and IGTV video coming in a bit!

Ingredients
3 tbsp olive oil
1 large onion, diced
3 celery stalks, diced
2 carrots, diced
1 tsp cinnamon powder
1/2 tsp salt
1/2 tsp black pepper
pinch red chili flakes
1/2 cup chopped parsley
1/2 cup chopped coriander(cilantro)
1 can tomato sauce 15 oz (430g)
7 cups vegetable stock or 2 stock cubes dissolved in 7 cups water
1 can drained chickpeas 15 oz (400 g)
1 cup green lentils
1/2 cup vermicelli noodles 50 g
2 lemons, juiced 1/4 cup juice
2 tbsp flour, dissolved in 1/4 cup water* use cornstarch if gluten free

Instructions:
-Start by adding the lentils to a bowl of water and soaking as you prepare the rest of the ingredients, this helps them cook through faster.
-Heat oil in a large saucepan over medium heat, and add the onions, celery and carrots. Saute for 6-8 minutes, until onions soften and turn golden brown.
-Add all the spices, the chopped parsley and chopped coriander, the tomato sauce, and the vegetable stock. Bring the pot to a boil, then add the drained chickpeas and drained lentils. Reduce heat and simmer for 25 minutes or until chickpeas and lentils are tender.
-Add the vermicelli, and let it boil for 3-4 minutes or until tender. Add the lemon juice, and the flour water mixture. Let it simmer another minute or until it thickens, then taste for seasoning and add salt and pepper if necessary.
.
.
.
.
.
#harira #soup #ramadanrecipes #ramadan2021 #ramadan #ramadankareem #vegetablesoup #soupseason #soupsofinstagram #moroccan #moroccanfood #aprilisforarabfood #f52grams #foodfluffer #foodflatlay #foodphotography #foodphotographer #foodstylist #thefeedfeed #veganrecipes #vegan #tasty #tastingtable #tastemade #lentils
Never ever liked vimto until I had it like this 🍧. Vimto smoothies means that the sweetness of vimto is tempered by that cold crunchy shaved ice. Could not stop eating/drinking these vimto slushees! So easy, you just need water, ice, vimto and a high speed blender- my @ninjakitchenme did so well breaking down huge ice chunks👏🏼. Save this for a little twist on your classic iftar drink🥳

Ingredients:
-3/4 cup water
- 3/4 cup vimto 
- 2 cups ice 

Method:
Add the ingredients to your blender in the order listed, and blend on frozen drink mode until slushy like consistency. Add more ice or water if you need to, and enjoy immediately with a spoon/straw. Yum!
.
.
.
.
.

#ramadan #ramadan2021 #ramadanrecipes #iceddrinks #slush #slushy #slushii #berries #syrup #cordial #drinkphotography #damnthatsdelish #foodfluffer #pour #dripshot #foodphotography #foodphotographyandstyling #foodstylist #foodstyling #thefeedfeed #vimto #foodtographyschool #foodtography #beautifulcuisines
A biscuit base topped with a super easy smooth, cr A biscuit base topped with a super easy smooth, creamy pistachio cheesecake and the crowning touch,  @mayadelices ‘s luscious milk chocolate melted and poured over the top. I mean- heavenly! Recipe below, adapted from @savoryandsweetfood ,, IGTV will be uploaded today. I am absolutely loving @mayadelices couverture, great quality baking chocolate thats so fun experimenting with! They have sugar free and vegan options too, and best of all it’s easily available in their shop in Bahrain 🍫👏🏼

Ingredients:

For the crust:
2 cups digestive biscuit crumbs (250 g)
1/2 cup butter melted, 115g
Pinch cinnamon powder

For the pistachio cheesecake filling:

1 cup pistachio powder (140g)
12 Kiri squares or cream cheese (215g)
250 ml thick cream
1/2 of a 400 g tin of sweetened condensed milk, more if you like it sweeter

To top:
1 cup Maya milk chocolate (160g)
pistachios to garnish

Method:
1. Preheat oven to 180C. Grease and line a 8x8 inch pan with parchment paper with extra paper hanging over the sides so you can easily lift out the bars.

2. Mix digestive crumbs with melted butter and cinnamon. Press this firmly into the base of the pan. Refrigerate for 10 minutes.

3. In a food processor, add the pistachio powder, kiri cheese cubes, thick cream, and condensed milk. Blend until well combined and smooth. Pour this mixture into the crust base and bake for 15-20 minutes until set but center is still a little jiggly. Let cool at room temperature for 1 hour then refrigerate for several hours.

4. Melt the milk chocolate gently in the microwave, in 10 second bursts, stirring after each increment. Once smooth and melted, spread over the top of the cheesecake, and refrigerate until set. Enjoy!
.
.
.
.
.
#ramadan #ramadan2021 #ramadanrecipes #cheesecakebars #cheesecakebites #chocolateporn #pistachio #chocolatelover #chocolaterecipes #cheesecakelovers #cheesecakelove #damnthatsdelish #foodfluffer #pour #chocolatedrip #dripshot #foodphotography #foodphotographyandstyling #foodstylist #foodstyling #thefeedfeed #thebakefeed #foodtographyschool #foodtography #beautifulcuisines
Want a Ramadan dessert that takes minutes to make Want a Ramadan dessert that takes minutes to make and tastes amazing? Yeah we all do - I got you! Try this coffee biscuit cake (barely adapted from the wonderful @littlesunnykitchen). Layers of coffee soaked biscuits and a super easy fluffy cream 👌🏼. I used my new @braun_bahrain handheld electric whisk, one of the attachments in the minipimer set-It whips the cream so fast, much faster than my stand mixer and it’s so convenient to be able to use any bowl to prep the cream in. I’ve partnered with @digitrolley to bring you lots of good recipes with their range of kitchen appliances, so keep following along! Recipe below , and IGTV video coming today in my Ramadan series!

Ingredients
2 tbsp nescafe powder dissolved in 1 cup hot water
1 cup heavy whipping cream 250ml
3 tbsp sweetened condensed milk
splash vanilla extract, optional
1 creme caramel sachet, powder only 49g
1 pack tea biscuits or graham crackers 7 oz or 200 g
2 tbsp cocoa powder for topping

Instructions:
-Add the heavy cream, sweetened condensed milk, vanilla and creme caramel powder to a bowl and beat until soft peaks form. Set this cream mixture aside.
-Dip the tea biscuits into the coffee briefly until they soak up the coffee but before they start to break apart. -Layer in a 7×11 or 9×9 inch clear pyrex dish, then top with half the cream mixture.
-Repeat another layer of coffee soaked biscuits on top of the heavy cream, followed by the remaining half of the cream. Sift the cocoa powder on to the top, then refrigerate for several hours until set. This is even better the next day!

.
.
.
.
.
#nescafe #nescafegold #coffeecake #biscuit #biscuitcake #nobake #nobakedessert #nobakecake #tiramisu #damnthatsdelish #tastingtable #beautifulcuisines #foodphotography #foodphotographyandstyling #tastyfood #easydessert #ramadankareem #ramadan2021 #ramadanrecipes #cream
Ramadan Kareem! And the first recipe is for these Ramadan Kareem! And the first recipe is for these unbelievable (and easy!) chicken musakhan sambosa was developed for @tamimimarkets Ramadan catalogue. One of the coolest projects I’ve ever worked on can’t wait to tell you more about it! In the meantime, enjoy this teaser recipe and check IGTV for full video steps coming up. 

Ingredients:
2 chicken breasts, cooked and finely shredded about 1 heaped cup of shredded chicken See notes
1/4 cup olive oil
2 large onions cut in half, then thinly sliced into wedges
1/4 cup toasted almond slivers or pine nuts
3 tbsp sumac
1/2 tsp salt
1/4 tsp black pepper
1/4 tsp cumin powder
1/4 tsp cinnamon powder
To assemble:
1 pack sambosa wrappers 500 g
1 tbsp flour
1/2 tbsp water
For frying:
vegetable oil, about 1/4 cup

Instructions:
-In a deep skillet over medium heat, add the olive oil until it heats up. Add the onions, and cook, stirring frequently until soft and starting to caramelize, 8-10 minutes.

-Add the shredded chicken, the toasted nuts, and all the spices. Stir to combine, then remove from the heat. Let mixture cool slightly 5 minutes or so.

-Fill each sambosa wrapper with a tbsp of mixture on the bottom corner, then fold the corner of the sambosa up and over the filling to the other side, to make a triangle. Keep folding this triangle over all the way up the top 

-Mix together the flour and water to form a thick paste, and seal the ends of the sambosa to prevent them from opening up while frying.

-Place vegetable oil in a skillet, about 2 inches deep and heat on medium high heat. Once hot enough, add the sambosa and fry for around 2 minutes a side until golden brown. Remove to a paper towel lined plate to absorb some of the excess oil, then enjoy warm, optionally with yogurt to dip in.
.
.
.
.
.
#chickensamosa #musakhan #ramadankareem #ramadan2021 #ramadanrecipes #samosa #friedfood #palestinianfood #middleeasternfood #beautifulcuisines #damnthatsdelish #f52community #thefeedfeed #foodgawker #f52grams #buzzfeedfood #tastingtable #tastemade #chickenrecipes #sumac #caramelizedonions #foodblogfeed #foodphotography #foodphotographyandstyling #foodstyling
Load More... Follow on Instagram

Copyright © 2019 on the Seasoned Pro Theme