

These coffee cardamom date truffles are an iteration of my previous favorite date truffles , with the game changing addition of coffee and cardamom, and roasted almonds instead of raw. Absolutely packed with flavor, all in a little unassuming and guilt free 47 calorie package. For extra happiness, pair these with a cup of coffee and enjoy the interplay of flavors.
I love the formula of this truffle recipe, adapted from Donna Hay. The dates provide sweetness without any need to add maple syrup or sugar. Cocoa powder mixed into the actual truffles gives them a lovely mocha flavor and really enhances the whole truffle feel. The combination of peanut butter and almonds gives a wonderful nuttiness, and keeps you full. If you have time, go the extra mile and roast the almonds for an even more elevated flavor! You can also substitute the peanut butter for almond butter if desired.
How to roast almonds:
Simply place the whole, skinless almonds in a single layer on a baking sheet and bake at 180 C (350F) for 5- 10 minutes, shaking pan halfway through, until golden brown. As soon as you take them out of the oven, transfer them to a bowl to cool so they don’t continue cooking, and wait till fully cooled to use in the recipe.
How to make the truffles:
It’s as simple as placing all your ingredients into a food processor, and processing until smooth. If little bits of almond remain in chunks, that’s fine and it’ll give some extra texture. Once you have a date paste, wet your hands very slightly to prevent sticking, and roll spoonfuls of the date mix into balls- the size you like. You’ll then roll these date balls into extra cocoa powder to coat. Place on a parchment paper lined baking sheet until you are done with all the truffles, then dig in!
Storing your date truffles:
I like to keep them in an airtight container in the fridge to maintain freshness, and just let my little truffles come to room temperature for a few minutes before eating.
They make for the perfect on the go snack, and give a great energy boost!

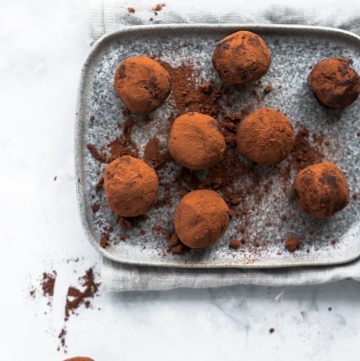
Coffee Cardamom Date Truffles
Ingredients
- 1 1/2 cups fresh dates, pitted
- 1/4 cup roasted almonds
- 1/3 cup peanut butter
- 1 tablespoon dutch processed cocoa powder (plus extra for dusting)
- 1 teaspoon instant coffee powder
- 1/4 teaspoon cardamom
Instructions
- Combine the dates, almonds, peanut butter, 1 tablespoon cocoa powder, coffee powder, and cardamom in a food processor and puree until finely chopped and combined well.
- Using slightly damp hands, take small pieces of the date mix and roll into your hands until you get a circle. Dip this circle into a bowl of cocoa powder and set aside onto a parchment lined baking sheet. Repeat with all the date mixture.
- Store in fridge in an airtight container until ready to serve.
Notes
Nutrition
Did you make this? Tag @everylittlecrumb or hashtag #everylittlecrumb and I’ll share your images!
Reem says
can you make it without the almond?
Farah Abumaizar says
You can substitute another nut or coconut powder instead, just to avoid the truffles being too sticky!
Shannel says
Quick question. Can I freeze them too? If so, then for how long ?
Farah Abumaizar says
Hello! yes you can, in a tight freezer safe bag for 2 months 🙂
Traci says
Date truffles are my jam and these could never disappoint! The coffee powder is EVERYTHING…yummm!
Farah Abumaizar says
Thank you so much Traci!
Alina | Cooking Journey Blog says
It is something magical about adding coffee to desserts. These truffles are the treats I’d love to enjoy, especially sugar-free. Thanks for sharing the recipe!
Farah Abumaizar says
The coffee gives the perfect little kick! Thanks Alina!
Dannii says
I love coffee and dates together, so these sound perfect to me.
Farah Abumaizar says
❤️❤️
Jeannette says
These truffles may be easy to make, but I bet they pack a punch with each bite! They look incredible! Thanks for sharing!
Farah Abumaizar says
They really do! Thanks so much Jeannette
Shashi at SavorySpin says
Now this is my kinda snacking with ALL that flavor and only 48 calories!
Farah Abumaizar says
Yes! Guilt free in every sense 😍
Sylvie says
Such a clever idea to use dates to make truffles! They are the great healthy snacks that still taste delicious – perfect guilt-free treats 🙂
Farah Abumaizar says
Exactly right! thanks Sylvie!
Tisha says
These are so simple and absolutely perfect for a snack!
Farah Abumaizar says
Agree! They really hit the spot