• Skip to primary navigation
  • Skip to main content
  • Skip to primary sidebar
  • Skip to footer

 logo

  • Recipes
    • Breakfast
    • Sides
    • Soup
    • Main Meals
    • Healthy
    • Dessert
    • Drinks
  • Eating Out
  • About Me
    • Privacy Policy
  • Resources
    • Must Have Kitchen Tools
  • Nav Social Menu

    • Email
    • Facebook
    • Instagram
    • Pinterest

Sweet Potato and Beetroot Salad

Feb 4, 2021 · Leave a Comment

Jump to Recipe

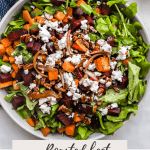
This sweet potato and beetroot salad is the ultimate salad. Full of flavor, textures and nutrients, this’ll keep you full AND happy! Drizzled with my favorite homemade balsamic vinegar dressing, you’ll fall in love with the first bite.

Why should I make this sweet potato and beetroot salad?

The vegetables roast at the same temperature, so it’s actually really easy to prepare them at the same time.

You can roast the sweet potato and beetroot in advance, making prep work even simpler!

The flavors are spot on. The potato and beet add so much more dimension to a simple arugula salad, and make this very filling.

The salad is full of nutritional value, and is a great way of adding some health to your day.

This is a crowd pleaser! It’s my most requested salad ever.

Ingredients you need for the salad:

The greens: I really like using arugula. The pepperiness of the leaves work so well with the caramelized sweet potatoes and beetroot. You can use rocket leaves, baby spinach, a mix of greens, even lettuce if you prefer.

The cheese: My favorite cheese to use in this salad is feta cheese. The saltiness is a great offset to the dressing and the caramelized vegetables.

The nuts: You can leave out the nuts if you aren’t a fan, but toasted pecans or walnuts add such a great crunch and texture to the salad. You can add raw nuts too, but toasting them a little in the oven definitely amps up their flavor. Try adding roasted pistachios for a change and for some beautiful color!

The dressing: My go to salad dressing. It’s an olive oil based balsamic vinaigrette, with honey for sweetness and a pinch of salt and pepper. Tip: for a totally game-changing dressing, prepare it in advance, and add a thinly sliced red onion. The onion will pickle in the vinegar if kept for a couple hours. SO yummy!

Sweet potatoes: I used 2 medium sweet potatoes, the orange ones. It seems like a lot before roasting, but they’ll shrink in the oven.

Beetroot: One large beetroot gives beautiful color and flavor to the salad. So good for you too!

How to roast the beetroot and sweet potato:

The good thing is they both can cook at the same temperature in the oven, so you can put them in at the same time. Preheat the oven to 425 F (220C) before starting.

For the sweet potatoes: Wash, peel and cut the sweet potato into 1 inch sized cubes. Drizzle the sweet potato cubes with olive oil, and optionally add a pinch of cinnamon.

Toss to coat and scatter the cubes out onto a parchment paper lined baking sheet. Make sure they aren’t on top of each other, give them enough space to be in a single layer so they don’t steam and turn soggy. Roast for around 30 minutes, tossing halfway through, or until crisp on the edges and cooked through in the center.

For the beetroot: You don’t need oil or any seasoning. Just wash the beetroot well, don’t peel it, and wrap it in foil. Pop it in the oven at 425F, and roast for 45 minutes-1 hour until a fork or knife inserted into the beetroot easily slides through. You can also wrap the beetroot with parchment paper if you don’t prefer to use foil.

After the beetroot is cooked, allow it to cool until you are comfortable handling it, and peel and chop it into cubes. It should peel very easily, with the skin coming off in strips.

Assembling the sweet potato and beetroot salad:

The arugula or greens will serve as the base for the salad, so spread the leaves out in a layer on the base of your serving dish. I prefer using a more shallow dish for this as opposed to a deep salad bowl so that I get a better ratio of greens to toppings.

On top of the arugula leaves, add the roasted cubed sweet potatoes and beetroot, once they’ve cooled so they don’t wilt the leaves. Scatter on the nuts and the crumbled feta cheese evenly.

Shake or stir the dressing well before pouring it evenly on the top of the salad. Give a quick toss to combine the salad with the dressing, without mixing too vigorously so you maintain the way it looks, and enjoy immediately!

Preparing the salad in advance:

Several components of this recipe can be made in advance. You can prepare the salad dressing and store in a jar in the fridge for a week.

You can also roast the sweet potato and beetroot ahead of time, cut them into cubes and store them in air tight containers in the fridge. They’ll last 3-4 days in the fridge.

If you want to assemble the whole salad early in the day for later on, I’d recommend adding the dressing right before serving.

If you liked this recipe, you might like:

Strawberry Salad with Grilled Halloumi

Eggplant Pomegranate Salad

Beetroot Hummus

Cucumber Avocado Salad

Tuna Rice Salad

Sweet Potato and Beetroot Salad

Roasted sweet potato and beetroot cubes add so much flavor and deliciousness to a simple arugula salad.
Print Pin
Rate
Course: Salad
Cuisine: American
Keyword: salad
Prep Time: 10 minutes
Cook Time: 45 minutes
Servings: 4 people
Calories: 256kcal
Author: Farah Abumaizar

Ingredients

For the dressing:

  • 1/2 cup olive oil
  • 1/4 cup balsamic vinegar
  • 2-3 tsp honey or maple syrup taste and adjust sweetness
  • 1 tsp dijon mustard
  • 1/2 tsp salt
  • pinch black pepper
  • 1 small red onion, thinly sliced

For the sweet potatoes:

  • 2 medium sweet potatoes, peeled, cut into small cubes
  • 1 tbsp olive oil
  • pinch cinnamon powder, optional
  • 1 beetroot

To assemble the salad:

  • 2 boxes arugula leaves, washed each box is around 5 oz, 145 g
  • 1/2 cup roughly chopped toasted pecans or walnuts, or untoasted or omit. toast by placing whole pecans on a baking sheet and baking at 180 C (350 F) for 5-7 min until fragrant, Remove from baking sheet immediately, cool then chop.
  • 1/2 cup feta cheese, crumbled 100 g

Instructions

Make the dressing:

  • Make dressing by whisking together all the dressing ingredients, the olive oil, vinegar, honey, mustard, salt and pepper until well combined. Add the sliced red onion and toss to coat. Store in fridge until ready to use.

Roast the beetroot and sweet potatoes:

  • Arrange washed and dried arugula leaves in serving bowl. Top with chunks of roasted beetroot, dates, feta cheese you crumble in your hands, pecans, and pomegranate seeds (if using). 
  • Immediately before serving, add dressing and toss to combine.
  • Preheat oven to 425 F (220C). Place the sweet potato cubes on a parchment lined baking sheet, drizzle with the olive oil, sprinkle cinnamon if using, and toss to coat evenly. Make sure the sweet potato cubes are in a single layer on the baking sheet.
  • Wash the beetroot, then wrap in foil and place in the oven alongside the sweet potatoes.
  • Roast the sweet potatoes for about 30-35 minutes total, tossing halfway into coooking time until crisp on the outside and cooked through. Set aside until cooled.
  • Roast the beetroot for 45 minutes to 1 hour until a knife inserted easily pierces through to the center. Let the beetroot cool until you can comfortably handling it before peeling it. The peel will easily fall off in strips. Cut into cubes and set aside.

To assemble the salad:

  • Layer the washed and dried arugula leaves onto the base of your serving plate. Top with roasted sweet potatoes, roasted beetroot cubes, chopped nuts, and crumbled feta cheese.
  • Drizzle the dressing evenly on top of the salad, toss lightly to combine and enjoy immediately.
Tried this recipe?Mention @everylittlecrumb or tag #everylittlecrumb!

Nutrition

Calories: 256kcal
 

Healthy, Recipes, Sides

Previous Post: « Crepe Party
Next Post: Baked Feta Pasta »

Reader Interactions

Leave a Reply Cancel reply

Your email address will not be published. Required fields are marked *

Recipe Rating


Primary Sidebar

Get more stuff

Subscribe to our mailing list and get interesting stuff and updates to your email inbox.

Thank you for subscribing.

Something went wrong.

we respect your privacy and take protecting it seriously

FeedFeed

Featured Recipes

Tamriyeh

Nescafe Cake

Berries and Cream Sara Lee Cake

Kebab Karaz

Eggplant Fatteh

More

Footer

everylittlecrumb

Farah Abu Maizar | Food Lover
Another recipe from @tamimimarkets ‘s catalogue, Another recipe from @tamimimarkets ‘s catalogue, this easy berry trifle has such a Ramadan vibe, this easy berry uses all the ingredients I associate with quick and easy no-bake Ramadan desserts. Thick cream ✅ Dream whip ✅ Condensed milk ✅ . All the things you need for creamy, light goodness. Layer this with buttery Sara Lee pound cake and lots of fresh berries and this will be a dessert you won’t to be able to stop eating😍 Send this to a someone who’d appreciate a quick and easy dessert and look out for the IGTV coming today!

Ingredients
2 containers thick cream  250 g each
1 sachet dream whip powder  28 g
1 sachet creme caramel, powder only (not syrup)  50 g
1/2 cup heavy whipping cream 120 ml
3 tbsp milk
Sweetened condensed milk 200 g, 1/2 large can
For assembling:
1 pack strawberries, halved 227 g,
1 pack raspberries 170 g
1 pack blueberries 170 g
1 pack blackberries 170 g
1 Sara Lee vanilla pound cake, thawed 300 g)

Instructions
-In an electric mixer, add the thick cream, dream whip, creme caramel, whipping cream, and condensed milk. -Beat until thick and fluffy, with soft peaks, about 3 minutes or so.
-Gently rinse the berries and pat dry, and cut the pound cake into large cubes.
-Cut the pound cake into cubes, and layer a trifle dish like so: 1 layer of pound cake cubes, half the cream, 1/2 the cream, and half the berries (a mix of all the berries). 
-Repeat with the second half of pound cake cubes, the second half of the cream and top with the remaining berries. Add whole strawberries and mint leaves to garnish, optional.
-Let the trifle set for a few hours or overnight before enjoying!
.
.
.
.
.
#berries #trifle #triflecake #poundcake #saralee #layercake #creamy #nobake #nobakedessert  #aprilisforarabfood #f52grams #foodfluffer #foodflatlay #foodphotography #foodphotographer #foodstylist #thefeedfeed #ramadan #ramadanrecipes #ramadan2021 #strawberry #strawberrycake #dessert #cakestagram #dessertpic #dessertphotography
You have to know, if I post a chicken recipe it me You have to know, if I post a chicken recipe it means it’s reaaaaaally good. This copy cat Halal guys chicken and rice is unbelievable dish! I got the turmeric rice recipe from @seriouseats and its buttery and perfectly spiced and fluffy and addictive, topped with juicy grilled spiced chicken cubes and a tangy, creamy dressing, tomatoes and parsley. AMAZING! Recipe below and in the @tamimimarkets catalogue❤️.

INGREDIENTS:

For the chicken marinade:
900 g chicken breasts
1/4 cup olive oil
2 tbsp lemon juice
1 tbsp white vinegar
3 garlic cloves, minced
1 tsp salt
1/2 tsp black pepper
1 tsp oregano powder
1 tsp seven spices
1/2 tsp ginger powder
1/2 tsp cumin powder
1/2 tsp paprika powder

For the white sauce:
3/4 cup Greek yogurt 170g (6oz)
1/2 cup mayonnaise 115 g
1 tbsp white vinegar
1 tbsp water
1 tsp lemon juice
1-2 tsp sugar
1/2 tsp salt
1/4 tsp black pepper

For the rice:
2 tbsp unsalted butter
1/2 tsp turmeric powder
1/4 tsp cumin powder
1 1/2 cups basmati rice, soaked for 20 minutes then rinsed
2 1/2 cups chicken stock or 1 stock cube dissolved in 2.5 cups hot water
salt and pepper to taste, a pinch of each

To assemble:
1 chopped tomato
handful chopped parsley
sriracha sauce

INSTRUCTIONS: 
For the chicken:
In a bowl, mix all the ingredients for chicken marinade. Add chicken breast and toss to coat evenly. Cover and marinade for 1-2 hours.

Heat 1 tbsp oil in a large skillet on medium high heat, and cook chicken for 5-6 min each side, or until golden brown and cooked.
Remove chicken to a cutting board, and rest for 10 minutes, before chopping roughly into 2 inch cubes.

For the white sauce:
Mix all ingredients and store in the fridge until ready to serve.

For the rice:
Add butter to a large saucepan over medium heat. Once melted, add the turmeric and cumin, and stir for 1 minutes.
Add the rice, and toast the rice by stirring for 4 minutes. Add chicken stock, salt and pepper to season. Stir and bring to a boil, then reduce heat to a simmer, cover and cook for 15 min, then set aside 15 min and fluff with a fork.

To assemble:
Place the rice in your serving platter, top with the chicken, the white sauce, and chopped tomatoes and parsley. Sriracha too!
This is my go to baked creamy cheesecake. It’s s This is my go to baked creamy cheesecake. It’s so good and rich and easy, topped with a sweet and tangy simple strawberry sauce (sauce recipe from @sallysbakeblog ). I used my new @kenwood_bahrain stand mixer and it was excellent- gave me silky smooth lump free filling. Another winner for my @digitrolley collab- all my new appliances are from them❤️ Check IGTV for recipe video!

For the strawberry topping:
-1 tbsp cornstarch
-3 tbsp water
-450 g strawberries, halved (big pack)
-zest and juice from 1/2 small lemon 
-1/4 cup (50g) sugar

-Whisk together cornstarch and water, then add to a saucepan along with all other ingredients, over medium heat.
-Bring to a simmer, stirring constantly and breaking up strawberries as they cook, 5 minutes or so until thickened. Set aside to cool, can be stored in fridge up to one week.

For the cheesecake:

Ingredients
For the crust:
* 250 g crushed digestive biscuits 2 cups 
* 135 g melted butter 1 stick and 1 tablespoon
* 1/2 tsp cinnamon

For the cheesecake:
* 900 g cream cheese (3 3/4 cup)
* 1 1/2 cup white sugar 300 g
* 3/4 cup milk, room temp
* 4 eggs, room temp
* 1 cup sour cream 240 g
* 1 tbsp vanilla extract
* 1/4 cup all purpose flour 32g

Instructions:

For the crust:
* In a mixing bowl, combine crushed biscuits, the melted butter, and the cinnamon with a fork until crumbs are moistened evenly throughout. Press along the bottom and sides of a lightly greased 9 inch springform pan. Let the crust chill a little in the fridge while you prepare cheesecake.

For the cheesecake:
-Preheat the oven to 180 C
-In  stand mixer, combine the cream cheese with the sugar in a large bowl and mix on medium speed until well combined and fluffy. Blend in the milk, then add the eggs one at a time, mixing briefly after each addition.

-Mix in sour cream, vanilla and flour until smooth. It may be easier to sift in the flour.

-Pour filling into prepared crust. Bake at 180 C for 1 hour, then turn off the oven and leave cheesecake inside for another 5 hours or so until oven has completely cooled. This is to prevent cracking.

* Store cheesecake in fridge after this time period is over until chilled, then top with the strawberry topping.
This, to me, is the sambosa that best embodies Bah This, to me, is the sambosa that best embodies Bahrain- the first- actually the only-place I have these cheesy corn sambosa ❤️. No fancy cheese goes in this, it’s literally the stuff out of a can and take SO melty and cheesy and good. I mix in a little mashed potatoes and it just makes these 💯 times better, creamy and delicious. Posting the full steps on IGTV, it’s so easy you prob won’t need them! Recipe below and tell me- what’s your go to sambosa cheese?

Ingredients
2 small potatoes, peeled and cut into cubes 8 oz total, 235 g
1/2 cup corn kernels, from a can, drained
12 oz American cheese, like Velveeta or Kraft, grated 340 g (2 170g cans of Kraft processed cheese)
pinch salt
pinch black pepper
1/2 pack samosa wrappers each pack is 500 g

Instructions:
-Cover potato cubes with water, and bring to a boil. Reduce heat and simmer until potatoes are completely cooked through. Drain, and mash.

-Let potatoes cool slightly then combine mashed potatoes with the grated cheese, drained corn, salt and pepper. Mix well until the mixture is evenly combined. Taste for and adjust seasoning.

-Fill each samosa wrapper with a tbsp of mixture on the bottom corner, then fold the corner of the samosa up and over the filling to the other side, to make a triangle. Keep folding this triangle over all the way up the top (check the video at the bottom of this recipe card to see how). Mix together the flour and water to form a thick paste, and seal the ends of the samosa to prevent them from opening up while frying.

-Place vegetable oil in a skillet, about 2 inches deep and heat on medium high heat. Once hot enough, add the sambosa and fry for around 2 minutes a side until golden brown. Remove to a paper towel lined plate to absorb some of the excess oil, then enjoy warm.

.
.
.
.
.

#harira #soup #ramadanrecipes #ramadan2021 #ramadan #ramadankareem #vegetablesoup #soupseason #soupsofinstagram #delishkitchen #friedfood #aprilisforarabfood #f52grams #foodfluffer #foodflatlay #foodphotography #foodphotographer #foodstylist #thefeedfeed #middleeasternfood #vegetarian #tasty #tastingtable #tastemade #samosa #sambosa
This is one of my top 5 recipes from this Ramadan’s recipe prep. One of my features does the @tamimimarkets recipe catalogue! Click the link in their bio to access this gorgeous (free!) catalogue.

This harira soup is unbelievable. Hearty and delicious and beautifully spiced- I’ve never been obsessed with harira soup until this one. It’s a simple one because it’s meat free, so it’s perfect to start your iftar with but also hearty enough to totally serve as a meal alongside some sambosas. Recipe below, and IGTV video coming in a bit!

Ingredients
3 tbsp olive oil
1 large onion, diced
3 celery stalks, diced
2 carrots, diced
1 tsp cinnamon powder
1/2 tsp salt
1/2 tsp black pepper
pinch red chili flakes
1/2 cup chopped parsley
1/2 cup chopped coriander(cilantro)
1 can tomato sauce 15 oz (430g)
7 cups vegetable stock or 2 stock cubes dissolved in 7 cups water
1 can drained chickpeas 15 oz (400 g)
1 cup green lentils
1/2 cup vermicelli noodles 50 g
2 lemons, juiced 1/4 cup juice
2 tbsp flour, dissolved in 1/4 cup water* use cornstarch if gluten free

Instructions:
-Start by adding the lentils to a bowl of water and soaking as you prepare the rest of the ingredients, this helps them cook through faster.
-Heat oil in a large saucepan over medium heat, and add the onions, celery and carrots. Saute for 6-8 minutes, until onions soften and turn golden brown.
-Add all the spices, the chopped parsley and chopped coriander, the tomato sauce, and the vegetable stock. Bring the pot to a boil, then add the drained chickpeas and drained lentils. Reduce heat and simmer for 25 minutes or until chickpeas and lentils are tender.
-Add the vermicelli, and let it boil for 3-4 minutes or until tender. Add the lemon juice, and the flour water mixture. Let it simmer another minute or until it thickens, then taste for seasoning and add salt and pepper if necessary.
.
.
.
.
.
#harira #soup #ramadanrecipes #ramadan2021 #ramadan #ramadankareem #vegetablesoup #soupseason #soupsofinstagram #moroccan #moroccanfood #aprilisforarabfood #f52grams #foodfluffer #foodflatlay #foodphotography #foodphotographer #foodstylist #thefeedfeed #veganrecipes #vegan #tasty #tastingtable #tastemade #lentils
Never ever liked vimto until I had it like this 🍧. Vimto smoothies means that the sweetness of vimto is tempered by that cold crunchy shaved ice. Could not stop eating/drinking these vimto slushees! So easy, you just need water, ice, vimto and a high speed blender- my @ninjakitchenme did so well breaking down huge ice chunks👏🏼. Save this for a little twist on your classic iftar drink🥳

Ingredients:
-3/4 cup water
- 3/4 cup vimto 
- 2 cups ice 

Method:
Add the ingredients to your blender in the order listed, and blend on frozen drink mode until slushy like consistency. Add more ice or water if you need to, and enjoy immediately with a spoon/straw. Yum!
.
.
.
.
.

#ramadan #ramadan2021 #ramadanrecipes #iceddrinks #slush #slushy #slushii #berries #syrup #cordial #drinkphotography #damnthatsdelish #foodfluffer #pour #dripshot #foodphotography #foodphotographyandstyling #foodstylist #foodstyling #thefeedfeed #vimto #foodtographyschool #foodtography #beautifulcuisines
A biscuit base topped with a super easy smooth, cr A biscuit base topped with a super easy smooth, creamy pistachio cheesecake and the crowning touch,  @mayadelices ‘s luscious milk chocolate melted and poured over the top. I mean- heavenly! Recipe below, adapted from @savoryandsweetfood ,, IGTV will be uploaded today. I am absolutely loving @mayadelices couverture, great quality baking chocolate thats so fun experimenting with! They have sugar free and vegan options too, and best of all it’s easily available in their shop in Bahrain 🍫👏🏼

Ingredients:

For the crust:
2 cups digestive biscuit crumbs (250 g)
1/2 cup butter melted, 115g
Pinch cinnamon powder

For the pistachio cheesecake filling:

1 cup pistachio powder (140g)
12 Kiri squares or cream cheese (215g)
250 ml thick cream
1/2 of a 400 g tin of sweetened condensed milk, more if you like it sweeter

To top:
1 cup Maya milk chocolate (160g)
pistachios to garnish

Method:
1. Preheat oven to 180C. Grease and line a 8x8 inch pan with parchment paper with extra paper hanging over the sides so you can easily lift out the bars.

2. Mix digestive crumbs with melted butter and cinnamon. Press this firmly into the base of the pan. Refrigerate for 10 minutes.

3. In a food processor, add the pistachio powder, kiri cheese cubes, thick cream, and condensed milk. Blend until well combined and smooth. Pour this mixture into the crust base and bake for 15-20 minutes until set but center is still a little jiggly. Let cool at room temperature for 1 hour then refrigerate for several hours.

4. Melt the milk chocolate gently in the microwave, in 10 second bursts, stirring after each increment. Once smooth and melted, spread over the top of the cheesecake, and refrigerate until set. Enjoy!
.
.
.
.
.
#ramadan #ramadan2021 #ramadanrecipes #cheesecakebars #cheesecakebites #chocolateporn #pistachio #chocolatelover #chocolaterecipes #cheesecakelovers #cheesecakelove #damnthatsdelish #foodfluffer #pour #chocolatedrip #dripshot #foodphotography #foodphotographyandstyling #foodstylist #foodstyling #thefeedfeed #thebakefeed #foodtographyschool #foodtography #beautifulcuisines
Want a Ramadan dessert that takes minutes to make Want a Ramadan dessert that takes minutes to make and tastes amazing? Yeah we all do - I got you! Try this coffee biscuit cake (barely adapted from the wonderful @littlesunnykitchen). Layers of coffee soaked biscuits and a super easy fluffy cream 👌🏼. I used my new @braun_bahrain handheld electric whisk, one of the attachments in the minipimer set-It whips the cream so fast, much faster than my stand mixer and it’s so convenient to be able to use any bowl to prep the cream in. I’ve partnered with @digitrolley to bring you lots of good recipes with their range of kitchen appliances, so keep following along! Recipe below , and IGTV video coming today in my Ramadan series!

Ingredients
2 tbsp nescafe powder dissolved in 1 cup hot water
1 cup heavy whipping cream 250ml
3 tbsp sweetened condensed milk
splash vanilla extract, optional
1 creme caramel sachet, powder only 49g
1 pack tea biscuits or graham crackers 7 oz or 200 g
2 tbsp cocoa powder for topping

Instructions:
-Add the heavy cream, sweetened condensed milk, vanilla and creme caramel powder to a bowl and beat until soft peaks form. Set this cream mixture aside.
-Dip the tea biscuits into the coffee briefly until they soak up the coffee but before they start to break apart. -Layer in a 7×11 or 9×9 inch clear pyrex dish, then top with half the cream mixture.
-Repeat another layer of coffee soaked biscuits on top of the heavy cream, followed by the remaining half of the cream. Sift the cocoa powder on to the top, then refrigerate for several hours until set. This is even better the next day!

.
.
.
.
.
#nescafe #nescafegold #coffeecake #biscuit #biscuitcake #nobake #nobakedessert #nobakecake #tiramisu #damnthatsdelish #tastingtable #beautifulcuisines #foodphotography #foodphotographyandstyling #tastyfood #easydessert #ramadankareem #ramadan2021 #ramadanrecipes #cream
Load More... Follow on Instagram

Copyright © 2019 on the Seasoned Pro Theme