• Skip to primary navigation
  • Skip to main content
  • Skip to primary sidebar
  • Skip to footer

 logo

  • Recipes
    • Breakfast
    • Sides
    • Soup
    • Main Meals
    • Healthy
    • Dessert
    • Drinks
  • Eating Out
  • About Me
    • Privacy Policy
  • Resources
    • Must Have Kitchen Tools
  • Nav Social Menu

    • Email
    • Facebook
    • Instagram
    • Pinterest

Tuna Rice Salad

Apr 6, 2020 · 10 Comments

Jump to Recipe
Tuna salad piled onto a platter

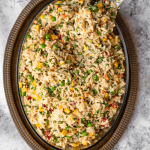
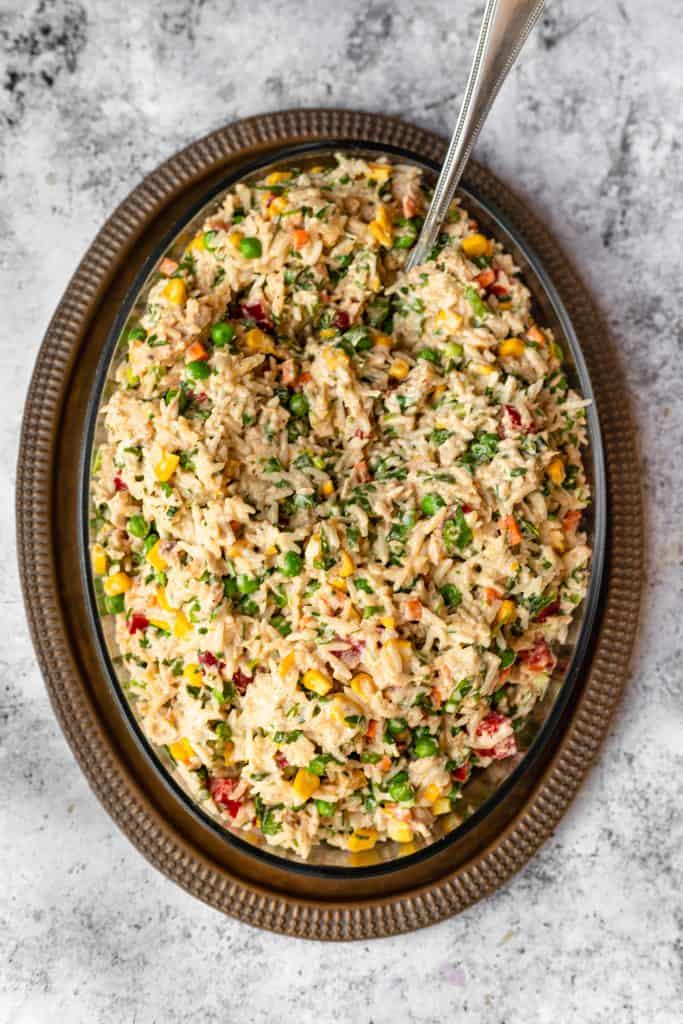
An easy and delicious throw together rice salad with tuna, corn, bell pepper and peas. Makes a great potluck dish or light lunch, holds up very well in the fridge, and is full of flavor. This is a family favorite!

What is tuna rice salad?

It’s a salad my mother in law makes all the time. It’s cold and creamy and packed with crunchy peas and corn kernels, green onions, red bell pepper and zestiness from the lemon. She got the recipe off a decades old recipe card that came with a bottle of oil she purchased. We get excited every time we see this on the table because it really is such a flavor bomb. And so easy to make!

How do you make this?

Very simply! You just need to mix together cooked rice, some veggies, drained tuna, then toss them with a combined dressing.

Ingredients in tuna rice salad:

The base of this is the rice. We used white basmati but I can’t see why this wouldn’t be delicious with brown rice or another form of white rice. Even quinoa would be great! The rice should be cool, so you can prepare it the day ahead if you like. It needs to get broken up so it isn’t clumpy, and mixed with the rest of the ingredients.

The classic recipe calls for corn kernels and peas. I prefer both of these being frozen and thawed- no need to cook or dunk in boiling water or anything. Just thawing them will keep their vibrant color and keeps them nice and crispy in the salad.

We also add diced red bell peppers and green onions- very finely diced so that they don’t become too much of a mouthful.

The dressing is made by mixing together yogurt, mayonnaise, lemon juice and lemon zest, olive oil, and a little milk if the dressing is too thick and needs to be thinned out.

Feel free to experiment and modify this with whatever you have on hand! If not making this ahead of time, I think this would be delicious topped with avocado. You can add cucumber, cherry tomatoes, other types of bell pepper, really anything you like!

How long can leftovers be stored?

Tuna rice salad can be stored for 2-3 days in the fridge, and the beauty of this is it tastes just as great the next day! There’s no lettuce or other greens to become wilted and soggy, so everything stays crips and fresh.

What to serve this with?

This can stand alone as a light lunch, or be served along other items in a spread. This makes the perfect potluck dish!

A scoop of tuna salad being taken out of platter

Tuna Rice Salad

A delicious hearty salad of cold rice, veggies and tuna. Perfect for a pot luck or a lighter lunch!
5 from 5 votes
Print Pin
Rate
Course: Main Course, Salad
Cuisine: American
Keyword: tuna, salad
Prep Time: 10 minutes
Servings: 4 people
Calories: 358kcal
Author: Farah Abumaizar

Ingredients

  • 2 cups of cooked long grain basmati rice, cold
  • 2 tbsp olive oil
  • 1 lemon juice and zest
  • 3 green onions, finely chopped
  • 1 red bell pepper, finely diced
  • 1/2 cup corn, canned or thawed
  • 1 cup peas, canned or thawed
  • 2 cans tuna, drained
  • 6 tbsp mayonnaise
  • 4 tbsp yogurt
  • 2 tbsp milk
  • salt and pepper to taste

Instructions

  • Break apart any clumps of the rice, then add in green onions, red bell pepper, corn, and peas.
  • Add the drained flaked tuna to the mix. I like to break apart the tuna with a fork before dumping it in to make sure its not clumpy.
  • Seperately, mix together the lemon juice and zest, olive oil, mayonnaise, yogurt, milk and salt and pepper to form your dressing.

Notes

Adapted off of an old Mazola recipe card my mother in law keeps in her kitchen drawer
Tried this recipe?Mention @everylittlecrumb or tag #everylittlecrumb!

Nutrition

Calories: 358kcal

If you liked this recipe, you might like:

Cucumber Avocado Salad

Strawberry Halloumi Salad

Chicken Cobb Salad

Did you make this? Tag @everylittlecrumb or hashtag #everylittlecrumb and I’ll share your images!

Main Meals, Recipes, Sides

Previous Post: « Brown Butter Cinnamon Rolls
Next Post: One Layer Carrot Cake »

Reader Interactions

Comments

  1. Carrie Robinson says

    April 7, 2020 at 8:02 pm

    5 stars
    This would make the perfect lunch! Looks delicious. 🙂

    Reply
    • Farah Abumaizar says

      April 7, 2020 at 8:30 pm

      So light and tasty!

      Reply
  2. Marlynn says

    April 7, 2020 at 8:03 pm

    5 stars
    This dish is amazing! So vibrant with color and so much flavor in each bite.

    Reply
    • Farah Abumaizar says

      April 7, 2020 at 8:30 pm

      Thanks Marylnn!

      Reply
  3. Anita says

    April 7, 2020 at 8:07 pm

    5 stars
    This tuna rice salad is delicious and totally works as a filling meal on its own. Perfect for lunch. 🙂

    Reply
    • Farah Abumaizar says

      April 7, 2020 at 8:30 pm

      That’s what I think!!

      Reply
  4. Sara Welch says

    April 7, 2020 at 8:25 pm

    5 stars
    What a great recipe! I happen to have all these ingredients so I am excited to give this a try with dinner tonight! Looks delicious!

    Reply
    • Farah Abumaizar says

      April 7, 2020 at 8:31 pm

      I really hope you like it!

      Reply
  5. Toni says

    April 7, 2020 at 8:46 pm

    5 stars
    This is absolutely amazing! So easy and delicious!

    Reply
    • Farah Abumaizar says

      April 7, 2020 at 9:07 pm

      Thanks Toni!!

      Reply

Leave a Reply Cancel reply

Your email address will not be published. Required fields are marked *

Recipe Rating


Primary Sidebar

Get more stuff

Subscribe to our mailing list and get interesting stuff and updates to your email inbox.

Thank you for subscribing.

Something went wrong.

we respect your privacy and take protecting it seriously

FeedFeed

Featured Recipes

Tamriyeh

Nescafe Cake

Berries and Cream Sara Lee Cake

Kebab Karaz

Eggplant Fatteh

More

Footer

everylittlecrumb

Farah Abu Maizar | Food Lover
You have to know, if I post a chicken recipe it me You have to know, if I post a chicken recipe it means it’s reaaaaaally good. This copy cat Halal guys chicken and rice is unbelievable dish! I got the turmeric rice recipe from @seriouseats and its buttery and perfectly spiced and fluffy and addictive, topped with juicy grilled spiced chicken cubes and a tangy, creamy dressing, tomatoes and parsley. AMAZING! Recipe below and in the @tamimimarkets catalogue❤️.

INGREDIENTS:

For the chicken marinade:
900 g chicken breasts
1/4 cup olive oil
2 tbsp lemon juice
1 tbsp white vinegar
3 garlic cloves, minced
1 tsp salt
1/2 tsp black pepper
1 tsp oregano powder
1 tsp seven spices
1/2 tsp ginger powder
1/2 tsp cumin powder
1/2 tsp paprika powder

For the white sauce:
3/4 cup Greek yogurt 170g (6oz)
1/2 cup mayonnaise 115 g
1 tbsp white vinegar
1 tbsp water
1 tsp lemon juice
1-2 tsp sugar
1/2 tsp salt
1/4 tsp black pepper

For the rice:
2 tbsp unsalted butter
1/2 tsp turmeric powder
1/4 tsp cumin powder
1 1/2 cups basmati rice, soaked for 20 minutes then rinsed
2 1/2 cups chicken stock or 1 stock cube dissolved in 2.5 cups hot water
salt and pepper to taste, a pinch of each

To assemble:
1 chopped tomato
handful chopped parsley
sriracha sauce

INSTRUCTIONS: 
For the chicken:
In a bowl, mix all the ingredients for chicken marinade. Add chicken breast and toss to coat evenly. Cover and marinade for 1-2 hours.

Heat 1 tbsp oil in a large skillet on medium high heat, and cook chicken for 5-6 min each side, or until golden brown and cooked.
Remove chicken to a cutting board, and rest for 10 minutes, before chopping roughly into 2 inch cubes.

For the white sauce:
Mix all ingredients and store in the fridge until ready to serve.

For the rice:
Add butter to a large saucepan over medium heat. Once melted, add the turmeric and cumin, and stir for 1 minutes.
Add the rice, and toast the rice by stirring for 4 minutes. Add chicken stock, salt and pepper to season. Stir and bring to a boil, then reduce heat to a simmer, cover and cook for 15 min, then set aside 15 min and fluff with a fork.

To assemble:
Place the rice in your serving platter, top with the chicken, the white sauce, and chopped tomatoes and parsley. Sriracha too!
This is my go to baked creamy cheesecake. It’s s This is my go to baked creamy cheesecake. It’s so good and rich and easy, topped with a sweet and tangy simple strawberry sauce (sauce recipe from @sallysbakeblog ). I used my new @kenwood_bahrain stand mixer and it was excellent- gave me silky smooth lump free filling. Another winner for my @digitrolley collab- all my new appliances are from them❤️ Check IGTV for recipe video!

For the strawberry topping:
-1 tbsp cornstarch
-3 tbsp water
-450 g strawberries, halved (big pack)
-zest and juice from 1/2 small lemon 
-1/4 cup (50g) sugar

-Whisk together cornstarch and water, then add to a saucepan along with all other ingredients, over medium heat.
-Bring to a simmer, stirring constantly and breaking up strawberries as they cook, 5 minutes or so until thickened. Set aside to cool, can be stored in fridge up to one week.

For the cheesecake:

Ingredients
For the crust:
* 250 g crushed digestive biscuits 2 cups 
* 135 g melted butter 1 stick and 1 tablespoon
* 1/2 tsp cinnamon

For the cheesecake:
* 900 g cream cheese (3 3/4 cup)
* 1 1/2 cup white sugar 300 g
* 3/4 cup milk, room temp
* 4 eggs, room temp
* 1 cup sour cream 240 g
* 1 tbsp vanilla extract
* 1/4 cup all purpose flour 32g

Instructions:

For the crust:
* In a mixing bowl, combine crushed biscuits, the melted butter, and the cinnamon with a fork until crumbs are moistened evenly throughout. Press along the bottom and sides of a lightly greased 9 inch springform pan. Let the crust chill a little in the fridge while you prepare cheesecake.

For the cheesecake:
-Preheat the oven to 180 C
-In  stand mixer, combine the cream cheese with the sugar in a large bowl and mix on medium speed until well combined and fluffy. Blend in the milk, then add the eggs one at a time, mixing briefly after each addition.

-Mix in sour cream, vanilla and flour until smooth. It may be easier to sift in the flour.

-Pour filling into prepared crust. Bake at 180 C for 1 hour, then turn off the oven and leave cheesecake inside for another 5 hours or so until oven has completely cooled. This is to prevent cracking.

* Store cheesecake in fridge after this time period is over until chilled, then top with the strawberry topping.
This, to me, is the sambosa that best embodies Bah This, to me, is the sambosa that best embodies Bahrain- the first- actually the only-place I have these cheesy corn sambosa ❤️. No fancy cheese goes in this, it’s literally the stuff out of a can and take SO melty and cheesy and good. I mix in a little mashed potatoes and it just makes these 💯 times better, creamy and delicious. Posting the full steps on IGTV, it’s so easy you prob won’t need them! Recipe below and tell me- what’s your go to sambosa cheese?

Ingredients
2 small potatoes, peeled and cut into cubes 8 oz total, 235 g
1/2 cup corn kernels, from a can, drained
12 oz American cheese, like Velveeta or Kraft, grated 340 g (2 170g cans of Kraft processed cheese)
pinch salt
pinch black pepper
1/2 pack samosa wrappers each pack is 500 g

Instructions:
-Cover potato cubes with water, and bring to a boil. Reduce heat and simmer until potatoes are completely cooked through. Drain, and mash.

-Let potatoes cool slightly then combine mashed potatoes with the grated cheese, drained corn, salt and pepper. Mix well until the mixture is evenly combined. Taste for and adjust seasoning.

-Fill each samosa wrapper with a tbsp of mixture on the bottom corner, then fold the corner of the samosa up and over the filling to the other side, to make a triangle. Keep folding this triangle over all the way up the top (check the video at the bottom of this recipe card to see how). Mix together the flour and water to form a thick paste, and seal the ends of the samosa to prevent them from opening up while frying.

-Place vegetable oil in a skillet, about 2 inches deep and heat on medium high heat. Once hot enough, add the sambosa and fry for around 2 minutes a side until golden brown. Remove to a paper towel lined plate to absorb some of the excess oil, then enjoy warm.

.
.
.
.
.

#harira #soup #ramadanrecipes #ramadan2021 #ramadan #ramadankareem #vegetablesoup #soupseason #soupsofinstagram #delishkitchen #friedfood #aprilisforarabfood #f52grams #foodfluffer #foodflatlay #foodphotography #foodphotographer #foodstylist #thefeedfeed #middleeasternfood #vegetarian #tasty #tastingtable #tastemade #samosa #sambosa
This is one of my top 5 recipes from this Ramadan’s recipe prep. One of my features does the @tamimimarkets recipe catalogue! Click the link in their bio to access this gorgeous (free!) catalogue.

This harira soup is unbelievable. Hearty and delicious and beautifully spiced- I’ve never been obsessed with harira soup until this one. It’s a simple one because it’s meat free, so it’s perfect to start your iftar with but also hearty enough to totally serve as a meal alongside some sambosas. Recipe below, and IGTV video coming in a bit!

Ingredients
3 tbsp olive oil
1 large onion, diced
3 celery stalks, diced
2 carrots, diced
1 tsp cinnamon powder
1/2 tsp salt
1/2 tsp black pepper
pinch red chili flakes
1/2 cup chopped parsley
1/2 cup chopped coriander(cilantro)
1 can tomato sauce 15 oz (430g)
7 cups vegetable stock or 2 stock cubes dissolved in 7 cups water
1 can drained chickpeas 15 oz (400 g)
1 cup green lentils
1/2 cup vermicelli noodles 50 g
2 lemons, juiced 1/4 cup juice
2 tbsp flour, dissolved in 1/4 cup water* use cornstarch if gluten free

Instructions:
-Start by adding the lentils to a bowl of water and soaking as you prepare the rest of the ingredients, this helps them cook through faster.
-Heat oil in a large saucepan over medium heat, and add the onions, celery and carrots. Saute for 6-8 minutes, until onions soften and turn golden brown.
-Add all the spices, the chopped parsley and chopped coriander, the tomato sauce, and the vegetable stock. Bring the pot to a boil, then add the drained chickpeas and drained lentils. Reduce heat and simmer for 25 minutes or until chickpeas and lentils are tender.
-Add the vermicelli, and let it boil for 3-4 minutes or until tender. Add the lemon juice, and the flour water mixture. Let it simmer another minute or until it thickens, then taste for seasoning and add salt and pepper if necessary.
.
.
.
.
.
#harira #soup #ramadanrecipes #ramadan2021 #ramadan #ramadankareem #vegetablesoup #soupseason #soupsofinstagram #moroccan #moroccanfood #aprilisforarabfood #f52grams #foodfluffer #foodflatlay #foodphotography #foodphotographer #foodstylist #thefeedfeed #veganrecipes #vegan #tasty #tastingtable #tastemade #lentils
Never ever liked vimto until I had it like this 🍧. Vimto smoothies means that the sweetness of vimto is tempered by that cold crunchy shaved ice. Could not stop eating/drinking these vimto slushees! So easy, you just need water, ice, vimto and a high speed blender- my @ninjakitchenme did so well breaking down huge ice chunks👏🏼. Save this for a little twist on your classic iftar drink🥳

Ingredients:
-3/4 cup water
- 3/4 cup vimto 
- 2 cups ice 

Method:
Add the ingredients to your blender in the order listed, and blend on frozen drink mode until slushy like consistency. Add more ice or water if you need to, and enjoy immediately with a spoon/straw. Yum!
.
.
.
.
.

#ramadan #ramadan2021 #ramadanrecipes #iceddrinks #slush #slushy #slushii #berries #syrup #cordial #drinkphotography #damnthatsdelish #foodfluffer #pour #dripshot #foodphotography #foodphotographyandstyling #foodstylist #foodstyling #thefeedfeed #vimto #foodtographyschool #foodtography #beautifulcuisines
A biscuit base topped with a super easy smooth, cr A biscuit base topped with a super easy smooth, creamy pistachio cheesecake and the crowning touch,  @mayadelices ‘s luscious milk chocolate melted and poured over the top. I mean- heavenly! Recipe below, adapted from @savoryandsweetfood ,, IGTV will be uploaded today. I am absolutely loving @mayadelices couverture, great quality baking chocolate thats so fun experimenting with! They have sugar free and vegan options too, and best of all it’s easily available in their shop in Bahrain 🍫👏🏼

Ingredients:

For the crust:
2 cups digestive biscuit crumbs (250 g)
1/2 cup butter melted, 115g
Pinch cinnamon powder

For the pistachio cheesecake filling:

1 cup pistachio powder (140g)
12 Kiri squares or cream cheese (215g)
250 ml thick cream
1/2 of a 400 g tin of sweetened condensed milk, more if you like it sweeter

To top:
1 cup Maya milk chocolate (160g)
pistachios to garnish

Method:
1. Preheat oven to 180C. Grease and line a 8x8 inch pan with parchment paper with extra paper hanging over the sides so you can easily lift out the bars.

2. Mix digestive crumbs with melted butter and cinnamon. Press this firmly into the base of the pan. Refrigerate for 10 minutes.

3. In a food processor, add the pistachio powder, kiri cheese cubes, thick cream, and condensed milk. Blend until well combined and smooth. Pour this mixture into the crust base and bake for 15-20 minutes until set but center is still a little jiggly. Let cool at room temperature for 1 hour then refrigerate for several hours.

4. Melt the milk chocolate gently in the microwave, in 10 second bursts, stirring after each increment. Once smooth and melted, spread over the top of the cheesecake, and refrigerate until set. Enjoy!
.
.
.
.
.
#ramadan #ramadan2021 #ramadanrecipes #cheesecakebars #cheesecakebites #chocolateporn #pistachio #chocolatelover #chocolaterecipes #cheesecakelovers #cheesecakelove #damnthatsdelish #foodfluffer #pour #chocolatedrip #dripshot #foodphotography #foodphotographyandstyling #foodstylist #foodstyling #thefeedfeed #thebakefeed #foodtographyschool #foodtography #beautifulcuisines
Want a Ramadan dessert that takes minutes to make Want a Ramadan dessert that takes minutes to make and tastes amazing? Yeah we all do - I got you! Try this coffee biscuit cake (barely adapted from the wonderful @littlesunnykitchen). Layers of coffee soaked biscuits and a super easy fluffy cream 👌🏼. I used my new @braun_bahrain handheld electric whisk, one of the attachments in the minipimer set-It whips the cream so fast, much faster than my stand mixer and it’s so convenient to be able to use any bowl to prep the cream in. I’ve partnered with @digitrolley to bring you lots of good recipes with their range of kitchen appliances, so keep following along! Recipe below , and IGTV video coming today in my Ramadan series!

Ingredients
2 tbsp nescafe powder dissolved in 1 cup hot water
1 cup heavy whipping cream 250ml
3 tbsp sweetened condensed milk
splash vanilla extract, optional
1 creme caramel sachet, powder only 49g
1 pack tea biscuits or graham crackers 7 oz or 200 g
2 tbsp cocoa powder for topping

Instructions:
-Add the heavy cream, sweetened condensed milk, vanilla and creme caramel powder to a bowl and beat until soft peaks form. Set this cream mixture aside.
-Dip the tea biscuits into the coffee briefly until they soak up the coffee but before they start to break apart. -Layer in a 7×11 or 9×9 inch clear pyrex dish, then top with half the cream mixture.
-Repeat another layer of coffee soaked biscuits on top of the heavy cream, followed by the remaining half of the cream. Sift the cocoa powder on to the top, then refrigerate for several hours until set. This is even better the next day!

.
.
.
.
.
#nescafe #nescafegold #coffeecake #biscuit #biscuitcake #nobake #nobakedessert #nobakecake #tiramisu #damnthatsdelish #tastingtable #beautifulcuisines #foodphotography #foodphotographyandstyling #tastyfood #easydessert #ramadankareem #ramadan2021 #ramadanrecipes #cream
Ramadan Kareem! And the first recipe is for these Ramadan Kareem! And the first recipe is for these unbelievable (and easy!) chicken musakhan sambosa was developed for @tamimimarkets Ramadan catalogue. One of the coolest projects I’ve ever worked on can’t wait to tell you more about it! In the meantime, enjoy this teaser recipe and check IGTV for full video steps coming up. 

Ingredients:
2 chicken breasts, cooked and finely shredded about 1 heaped cup of shredded chicken See notes
1/4 cup olive oil
2 large onions cut in half, then thinly sliced into wedges
1/4 cup toasted almond slivers or pine nuts
3 tbsp sumac
1/2 tsp salt
1/4 tsp black pepper
1/4 tsp cumin powder
1/4 tsp cinnamon powder
To assemble:
1 pack sambosa wrappers 500 g
1 tbsp flour
1/2 tbsp water
For frying:
vegetable oil, about 1/4 cup

Instructions:
-In a deep skillet over medium heat, add the olive oil until it heats up. Add the onions, and cook, stirring frequently until soft and starting to caramelize, 8-10 minutes.

-Add the shredded chicken, the toasted nuts, and all the spices. Stir to combine, then remove from the heat. Let mixture cool slightly 5 minutes or so.

-Fill each sambosa wrapper with a tbsp of mixture on the bottom corner, then fold the corner of the sambosa up and over the filling to the other side, to make a triangle. Keep folding this triangle over all the way up the top 

-Mix together the flour and water to form a thick paste, and seal the ends of the sambosa to prevent them from opening up while frying.

-Place vegetable oil in a skillet, about 2 inches deep and heat on medium high heat. Once hot enough, add the sambosa and fry for around 2 minutes a side until golden brown. Remove to a paper towel lined plate to absorb some of the excess oil, then enjoy warm, optionally with yogurt to dip in.
.
.
.
.
.
#chickensamosa #musakhan #ramadankareem #ramadan2021 #ramadanrecipes #samosa #friedfood #palestinianfood #middleeasternfood #beautifulcuisines #damnthatsdelish #f52community #thefeedfeed #foodgawker #f52grams #buzzfeedfood #tastingtable #tastemade #chickenrecipes #sumac #caramelizedonions #foodblogfeed #foodphotography #foodphotographyandstyling #foodstyling
Load More... Follow on Instagram

Copyright © 2019 on the Seasoned Pro Theme