• Skip to primary navigation
  • Skip to main content
  • Skip to primary sidebar
  • Skip to footer

 logo

  • Recipes
    • Breakfast
    • Sides
    • Soup
    • Main Meals
    • Healthy
    • Dessert
    • Drinks
  • Eating Out
  • About Me
    • Privacy Policy
  • Resources
    • Must Have Kitchen Tools
  • Nav Social Menu

    • Email
    • Facebook
    • Instagram
    • Pinterest

No Knead Brioche

Jun 22, 2020 · 6 Comments

Jump to Recipe
Baked no knead brioche loaf cut into slices with jam in the background

The easiest way to make brioche, and it’ll give you perfect results! No knead brioche requires no stand mixer or vigorous kneading. Just a few ingredients and a wooden spoon and you’ll get the most delicious bread!

What is brioche bread?

Brioche is an enriched bread (meaning it contains a high amount of fat, in brioche’s case from the egg and butter), that is slightly sweet, extremely rich and fluffy.

Brioche has a beautiful deep golden brown crust on the outside, with a the softest most pillowy interior. Absolutely delicious, and something you’ve probably tried at high end bakeries and patisseries.

What makes this no knead brioche recipe so good?

Brioche just became so much more accessible because this recipe will give you the EASIEST brioche you could possibly make. It’s so low maintenance. Easy ingredients, just a few mixing steps, and no need to knead (get it) or for a stand mixer. This recipe is thanks to one of my favorite baking books, Artisan Bread in 5 minutes a Day.

Ingredients in this recipe:

Ingredients needed to make brioche

All purpose flour: you don’t need any fancy pastry or bread flour

Water: this should be slightly warm, not so hot that it would scald your hand if you put a finger in, but warmer than room temperature. Like comfy bath water!

Instant yeast

Salt

Honey: This recipe uses honey as a sweetener and to add moistness. I’ve had people tell me they’ve substituted sugar with good results.

Eggs: Use room temperature eggs so they combine more easily, and whisk them a little before using in the recipe for the same reason.

Melted Butter

How to make an easy no knead brioche loaf:

The different steps to mixing together the dough

Mix the dough: Use a large bowl, because this is the bowl you’ll end up adding all the ingredients to. Mix together the water, yeast, salt and honey. Add the eggs and melted butter and mix until combined, then add the flour and mix until combined.

You don’t need to mix too much, no kneading is required, you don’t even need a stand mixer, you just need to combine the ingredients which will happen very quickly since the butter is in a melted state.

You’ll see a lot of brioche recipes that add a little softened butter at a time while kneading for minutes on end. This isn’t that!

Rest the dough: The dough needs to rest for two hours at which point it’ll get all nice and puffy. I like resting my dough in a warm place to encourage this, like the laundry room or in an oven thats turned off.

Chill the dough: After the two hour rest, dough goes in the fridge for at least a few hours before use (it’ll be too sticky to use straight away). I usually prepare it the day before using, because dough will last up to 5 days in the fridge.

Store the dough: If you make the recipe into a brioche loaf, you’ll have a little dough left over. You can shape the extra dough into brioche buns, or do what I did and make a freeform smaller brioche loaf (no loaf pan required, see the picture below).

dividing the dough for brioche and shaping it into the loaf before baking

I made an amazing brioche bread pudding with the smaller brioche loaf made from the extra dough from this recipe that I baked a couple days after.

How to serve brioche:

This is a beautiful bread, that is delicious with a little jam or honey. It makes for a truly decadent breakfast!

This also makes the best french toast. Absolutely buttery and wonderful. For my favorite french toast batter, head to this recipe.

Not to mention, the best bread pudding you’ll ever have will probably be made with brioche. It’s the perfect vessel to bread pudding custard- fluffy enough to soak in all the liquid but firm enough that it doesn’t turn into mush.

You can also use make little brioche buns and use some for sandwiches or burgers, or to make a perfect egg sandwich. The possibilities are endless!

top down shot of baked brioche with butter and jam on the side

Storing leftover brioche:

As mentioned above, leftover dough can be stored for up to 5 days in the fridge, and frozen tightly wrapped for up to one month (thaw overnight before using)

Baked brioche freezes well too, for up to two months. I often use frozen brioche slices to make french toast.

Fresh baked brioche with slices cut out with jam and butter in the background

No Knead Brioche Loaf

Easiest brioche recipe from the Artisan Bread in 5 cookbook that gives you perfectly fluffy soft brioche with barely any effort!
5 from 2 votes
Print Pin
Rate
Course: Breakfast
Cuisine: European
Keyword: brioche, bread
Prep Time: 5 minutes
Cook Time: 45 minutes
Resting Time: 2 hours
Servings: 6 people
Calories: 223kcal
Author: Farah Abumaizar

Ingredients

  • 3/4 cup water, lukewarm 170g
  • 1/2 tbsp instant yeast
  • 1/2 tbsp salt
  • 1/4 cup honey 85g
  • 4 eggs, lightly beaten room temperature
  • 3/4 cup unsalted butter, melted 170g
  • 4 cups all purpose flour 530g

Egg wash:

  • 1 egg yolk beaten with 1 tbsp of water

Instructions

  • Combine lukewarm water, yeast, salt and honey in a large bowl and stir until combined.
  • Add the eggs and melted butter, and mix until combined.
  • Gradually mix in the flour with a wooden spoon, spatula or dough hook until just combined. You'll want to mix until no flour streaks remain but you don't need to be too vigorous. It'll be a sticky dough.
  • Cover bowl loosely with plastic wrap or a kitchen towel and leave to rest at room temperature for 3 hours. After this rest, store in the fridge for at least 3 hours before using, and up to 5 days.
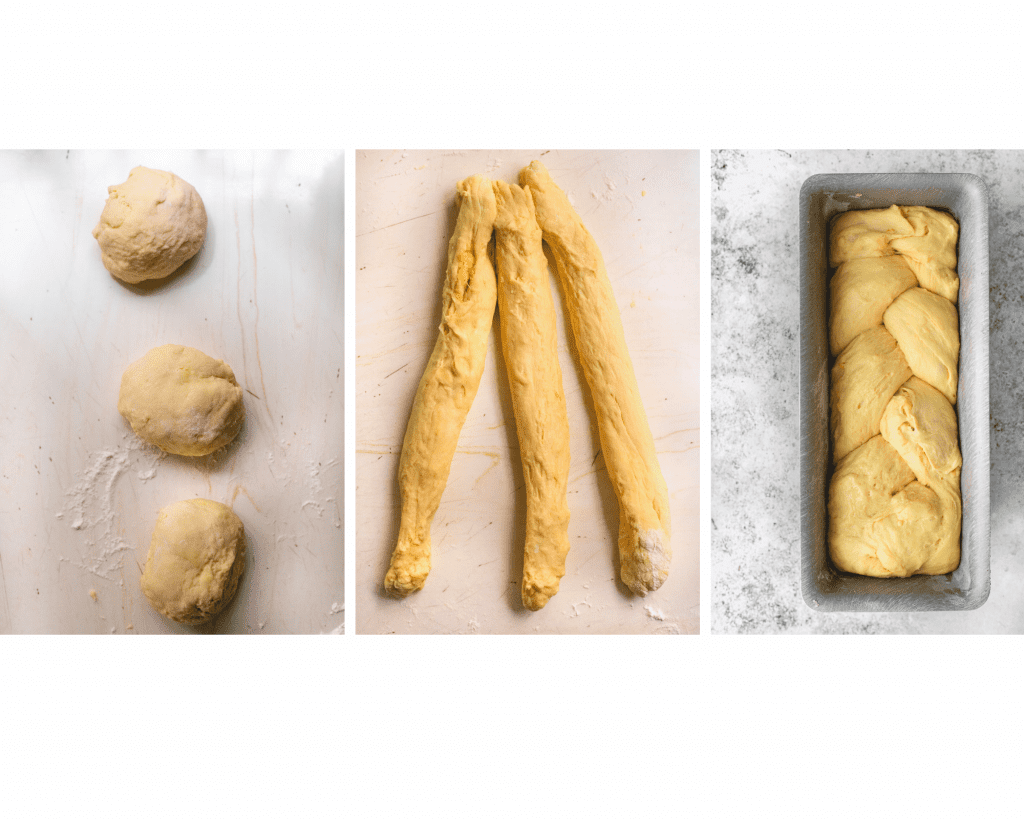
  • When ready to bake, lightly grease a loaf pan. Flour an area of your kitchen counter generously. Scoop out a 1.5 lb piece of dough (680g) or about 2/3 of the total dough you made onto the floured surface (Save the extra dough in the fridge, and see post info above for ideas on what to do with it.) Form the 1.5lb piece of dough into a ball by scooping the surface of the dough around and under.
  • Divide this dough ball into three balls and roll each out into a 12 inch rope. Stick the three ropes together at one end and braid. Pinch edge of braid together to seal.
  • Place braided bread into prepared pan, and rest for 90 minutes. When rest is nearly over, preheat oven to 350F (180C).
  • After rest, brush the loaf with the egg wash. Bake for 40-45 minutes until deep golden brown, but if browning too fast, tent loosely with foil.

Notes

Recipe adapted from the wonderful cookbook, Artisan Bread in 5 Minutes a Day
Tried this recipe?Mention @everylittlecrumb or tag #everylittlecrumb!

Nutrition

Calories: 223kcal
 

Your embed Jumprope code:

Easiest No Knead Fluffy Brioche by everylittlecrumb on Jumprope.

If you liked this recipe, you might like:

Brown Butter Cinnamon Rolls

Cinnamon Sugar Pull Apart Bread

Fluffy Homemade Dinner Rolls

Breads, Breakfast, Recipes

Previous Post: « Oat Soup
Next Post: Creme Brulee Bread Pudding »

Reader Interactions

Comments

  1. Mimi says

    June 25, 2020 at 9:27 pm

    Can you substitute maple syrup for honey?

    Reply
    • Farah Abumaizar says

      June 25, 2020 at 9:38 pm

      I’m sure that would be just fine!

      Reply
  2. Vpk says

    July 29, 2020 at 6:21 pm

    5 stars
    I made this bread today, simply amazing. Very easy to cook with minimal work. Thank you for sharing!

    Reply
    • Farah Abumaizar says

      July 30, 2020 at 4:28 pm

      Yay so glad to hear that!!!

      Reply
  3. Alexandra says

    August 14, 2020 at 1:22 am

    5 stars
    I have never had confidence in my bread baking abilities, but have always wanted to learn how. Brioche is the quintessential breakfast bread… When I found this recipe, I decided to give it a try. It turned out beautifully and tasted delicious! Thank you!

    Reply
    • Farah Abumaizar says

      August 14, 2020 at 11:01 am

      I am so happy this worked out for you! It’s surprising how easily it comes together. Thanks for your wonderful comment!

      Reply

Leave a Reply Cancel reply

Your email address will not be published. Required fields are marked *

Recipe Rating


Primary Sidebar

Get more stuff

Subscribe to our mailing list and get interesting stuff and updates to your email inbox.

Thank you for subscribing.

Something went wrong.

we respect your privacy and take protecting it seriously

FeedFeed

Featured Recipes

Nana tea

Halal Guys Chicken and Rice

Aish El Saraya

Instant Pot Enchilada Soup

Death By Chocolate Zucchini Bread

More

Footer

everylittlecrumb

Farah Abu Maizar | Food Lover
Good morning! If there’s one thing we like doing Good morning! If there’s one thing we like doing, it’s experimenting with breakfast dishes 🍳.These beauties are froached eggs- poached eggs that are lightly fried and seasoned with breadcrumbs. Best of both worlds! Creamy poached eggs, runny yolk but a little crisp on the white part of the eggs. So good! Inspired by @sveverything , we used our sous vide machine for this but you can do this with regular poached eggs. Recipe can be found linked in bio or at https://everylittlecrumb.com/froached-eggs/ . Team runny yolk anyone? 
.
.
.
.
.
#eggs #poachedeggs #poachedegg #eggsontoast #beautifulcuisines #tasty #delish #foodphotography #foodstyling #foodstylingandphotography #cheeseontoast #foodblogger #foodie #breakfast #brunch #instayum #yum #brunch #tastingtable #f52community #food52 #yolkporn #friday
How I spend a lot of my weekends😂. Nothing like How I spend a lot of my weekends😂. Nothing like a big bowl of cookie dough to say weekend mode on! Are you like me and end up eating more dough than actual cookies? My foolproof recipe I use and post time and time again 👇🏼(and often double the batch so I can store some in the freezer!)

Ingredients:
1 stick butter, softened 113 g
3/4 cup tightly packed brown sugar (I like using 1/2 cup light brown and 1/4 cup dark brown, but you can use either or) 150 g total
1/4 cup white sugar 50 g
1 egg, room temperature
1 tsp vanilla extract
1 3/4 cup all purpose flour 220 g
3/4 tsp baking soda
1/4 tsp salt
1 cup semi-sweet chocolate chips or chunks
flaky salt for topping, optional

Instructions:
-In the bowl of a stand mixer fitted with a paddle attachment, or a handheld mixer, cream together butter, brown sugar, and white sugar for 5 minutes on medium speed until light and fluffy.
-Once five minutes is over, add in egg and vanilla and mix until combined.
In a separate bowl, mix flour, baking soda, and salt, and mix until combined. Add these dry ingredients to the butter mixture on low speed, and mix until just combined.
-Using a wooden spoon or spatula, mix in chocolate chips or chunks until just combined. Place bowl of dough in fridge for at least 30 minutes to chill.
-While dough is chilling, heat oven to 180 C (350F). Portion dough out into heaped 1 tbsp-2 tbsp sized dough pieces on parchment paper lined baking sheets. 
-Bake for 11-12 minutes or until golden brown on the edges but still soft in the center. Cool until cookies firm up, then enjoy, still warm.
.
.
.
.
.

#chocolatecake #cookiemonster #cakestagram #cakephotos #layercake #chocolate #weekendbaking #foodblog #instayum #yummy #bakery #foodporn #foodtographyschool #foodphotography #chocolatechips #delish #foodfluffer #damnthatsdelish #cookiedough #chocatechipcookies #bakes #bakestagram #doughbowl #chocolatechips #hersheys
Bbq salmon bowls with mango avocado salsa- unbelie Bbq salmon bowls with mango avocado salsa- unbelievable! And start to finish, you can be eating these in 15-20 minutes. Save this recipe for your next meal, you don’t want to miss out!

I’ve partnered with @kilosamak to produce a few recipes with their quality seafood- I’ve tried several of their items and genuinely loved them all! They deliver seafood straight to your door for you to enjoy and cook at home. Takes all the guesswork out of trying to choose and clean fish yourself, perfect solution for someone like me who loves seafood but isn’t so great at prepping it! Check out their Instagram page on how to order, or head to the link in my bio.

This salmon has a smoky slightly sweet rub, is baked in the oven for ultimate ease, and gets piled on to rice and topped with an easy, addictive, zingy mango and avocado salsa. Adapted from @pinchofyum , I’ll make this again and again!

Ingredients:
For the salmon:
2 fillets, about 250 g each 
Spice Rub:
2 tbsp brown sugar
1.5 tsp paprika 
1 tsp garlic powder
1 tsp onion powder, optional 
1/2 tsp chili powder
1/2 tsp salt 
2 tbsp olive oil 

Mango avocado salsa:
1 diced mangos 
1 diced avocado
1/4 cup finely diced coriander 
1/4 cup finely diced red onion 
1 inch spicy green chili pepper, finely chopped
1 tsp honey
Juice and zest of one lime
Salt to taste

Method:
- Make the salsa by mixing together all the salsa ingredients and placing bowl in fridge while you make the salmon.
- Heat oven to 240C, and line a baking sheet with parchment paper. 
-Mix together all the ingredients for the salmon rub, and rub thoroughly all over the salmon, both sides.
- Bake for 10-12 minutes until salmon is opaque and cooked all the way through.
-Assemble bowls with rice, flaked pieces of salmon,and plenty of mango avocado salsa. Enjoy 😍

Catch the steps in my story!
Have you tried this pasta yet? Save this for your Have you tried this pasta yet? Save this for your next weeknight meal! Saucy macarona iltaybeen, can’t get much more comforting.  Adapted from @jedir3waish , makes for an easy delicious main that’ll make your family including kids very happy! Can find a step by step linked bio, or at https://everylittlecrumb.com/macarona/ , or in my story!

INGREDIENTS:
 
2 tbsp olive oil, divided
big pinch of salt
3 heaped tbsp tomato paste, divided 2 oz or 70 g
1 pack elbow macaroni 14 oz or 400 g
1 onion, very finely diced
1 zucchini, finely diced
1 carrot, finely diced
4-5 garlic cloves, minced
250 g ground beef
1 tsp seven spices
1 tsp turmeric
1/2 tsp paprika powder
1/4 tsp basil
1/4 tsp cinnamon powder
1/4 tsp garlic powder
1/2 tsp black pepper
1 tsp salt
1 can crushed tomatoes 14.5oz (400g)

NSTRUCTIONS
 
Bring a large pot of water to boil, add 1 tbsp olive oil and the salt, one tbsp of tomato paste, then the pack of pasta. Cook until al dente, then drain the pasta, reserving the pasta water. Set cooked pasta aside.

In a large skillet, heat the remaining tbsp of olive oil. Once hot, add the diced onion, and cook for 4-5 minutes until softened. Add the diced zucchini and carrots, and garlic and cook for a further 4-5 minutes until softened slightly.

Add the ground beef, and cook, smushing with a wooden spoon to break up the meat. Keep cooking until the beef is browned and cooked through, then optionally, drain the fat.
Add in the salt, pepper, and all the spices. Cook for another minute or so. Add the remaining 2 tbsp of tomato paste, and stir.

Add the can of crushed tomatoes and stir to combine. Bring to a simmer, then add a big ladleful of the reserved pasta water and simmer for 2-3 minutes on low heat.

Add the pasta to the sauce (I don't always add all the pasta, maybe 3/4 of the cooked amount until the finished dish is as saucy as I like). Stir to coat, cook for another minute or so until the pasta is warmed through, then enjoy!
This gorgeous tiramisu was so kindly sent to me by This gorgeous tiramisu was so kindly sent to me by @cadysweets.sa on my birthday, and we enjoyed every light fluffy bite of it. Their old account got hacked so follow along and support their new account ! They have a bunch of cakes and sweets for every occasion, so make someone or yourself happy and order one for a treat🤩! Send this to the tiramisu lover in your life 🍰.
.
.
.
.
.

#chocolatecake #magnoliabakery #cakestagram #cakephotos #layercake #chocolate #ganache #foodblog #instayum #yummy #bakery #foodporn #foodtographyschool #foodphotography #slice #delish #foodfluffer #damnthatsdelish #tiramisu #birthdaytreat #dessertbae #dessertoftheday #scoop #foodstyling #foodstylingandphotography
Easiest at home crusty bread with a great open cru Easiest at home crusty bread with a great open crumb texture. It’s the no knead bread from @breadin5 and has yet to fail me. Check my story for the step by step, and swipe for a video reveal.

Ingredients for two small loaves:
1.5 cups lukewarm water 
1/2 tbsp any type of yeast
1/2 tbsp salt
3 1/4 cup plain flour (450g)

Method:
In a large bowl, stir together the water with the yeast and salt. Try to dissolve but it’s fine if you have clumps.
2. Add flour all at once and stir, just until no flour patches remain.
3. Cover loosely with a kitchen cloth and leave it to rest for 2 hours in a warm place until risen and bubbly.
After this rest you can:
- Use dough immediately if impatient, but it’s easier to work with if cold, so maybe pop in fridge briefly
- Or, their recommended method and the one I do, leave in the fridge loosely covered for 12 hours or overnight. 
Refrigerated dough lasts up to two weeks, and flavor depends over time!
4. The next day, the dough might look deflated. That’s fine! When ready to bake, divide dough in half (I got two 400g dough balls)- it might be easier to handle if you sprinkle the dough lightly with flour, and take the half you are going to bake out of the fridge. Let it rest on a parchment paper lined baking sheet 40-90 minutes. The longer the more interior bubbles you should have. Preheat oven to 235C (450F), and after rest, make a few deep slashes in the dough with a sharp knife.
5. Place in the middle rack of the oven, and on the bottom rack place a roasting pan that had about a cup of hot water in it. This will create steam which gives a crustier crust!
6. Bake for 30-35 minutes or until deep golden brown.
7. Let it cool completely before enjoying!
.
.

.
.
.

#damnthatsdelish #foodfluffer #thebakefeed #feedfeed #tastingtable #forthemaking #BHGfood #foodblogfeed #bakedfromscratch #bakinglove #f52grams #foodbloggerpro #bakersofinstagram #TOHfoodie #foodphotography #canonphotos #bread #instayummy #kitchn #huffposttaste #food #dough #foodie #nokneadbread #homemadebread #doughter
Good morning! With dine in still closed in Saudi, Good morning! With dine in still closed in Saudi, Friday pancakes are fast becoming a tradition. And honestly, I don’t think I’ve had better pancakes at any restaurant recently! The easiest, fluffiest diner style pancakes are a huge hit in our family, find the recipe below adapted from @allrecipes . I like to barely warm the oven (110C or so) and keep the finished pancakes in a pan in the oven until I’m done with all the batter so they stay warm and perfect 👌🏼.

Ingredients
3/4 cup milk 170g
1 tbsp white vinegar
1 cup flour 125g
2 tbsp sugar 25g
1 tsp baking powder
1/2 tsp baking soda
1/4 tsp salt
1 egg room temperature
1/2 tsp vanilla
2 tbsp butter, melted 28g

Instructions:
-In a large bowl, combine the milk and vinegar, and let aside to stand for 5 minutes until curdled. Whisk to combine.
-In a separate large bowl, mix together the flour, sugar, baking powder, baking soda and salt.
-Add an egg, the vanilla and the melted butter to the buttermilk and whisk to combine.
-Add the dry ingredients all at once to the wet, and whisk until flour patches disappear. A few lumps are fine, but don't over mix.
-Let the batter rest for 5-10 minutes while you heat a pan on the stove.
lightly grease the pan with nonstick spray or butter, and pour about 1/4 cup of batter on the pan. Cook for 2-3 minutes on each side or until golden brown. (Flip the first time once you see bubbles form and the edges of the pancake dry up).
-Enjoy with toppings of your choice!
.
.
.
.
.
#pancakes #pancakerecipe #blueberrypancakes #maplesyrup #breakfast #morningslikethese #fridaymorning #flatlay #foodfluffer #breakfastrecipes #breakfastfood #breakfastofchampions #pancakelover #food #foodtography #foodtographyschool #foodphotography #delish #foodphotos #weekendbreakfast #eatingathome #recipeoftheday #foodporn #foodflatlay #blueberries #trayoftheday
One of my photos from my shoot @tackle.baks . How One of my photos from my shoot @tackle.baks . How insane does this tom yum soup look? For those who haven’t tried this casual seafood spot yet, you really should! The food is great and priced very reasonably, and they have some menu items I’m obsessed with like their crispy fish burger, the salmon poke salad and the creamy truffle shrimp👌🏼. They currently have a delivery offer going for only 5SAR on HungerStation, so no time like the present! Have I tempted you with this photo of the tom yum soup? I’m hungry just writing this caption🤤.
.
.
.
.
.
#soup #tomyum #tomyumsoup #food #foodphotography #canonphotography #canon #seafood #seafoodlover #shrimp #delish #beautifulcuisines #foodtographyschool #foodtography #foodblogger #instayum #lonelyplanetfood #dametravelerfoodie #soupseason #restaurantphotography #khobar #tastemade #tastingtable #foodfluffer
Load More... Follow on Instagram

Copyright © 2019 on the Seasoned Pro Theme