• Skip to primary navigation
  • Skip to main content
  • Skip to primary sidebar
  • Skip to footer

 logo

  • Recipes
    • Breakfast
    • Sides
    • Soup
    • Main Meals
    • Healthy
    • Dessert
    • Drinks
  • Eating Out
  • About Me
    • Privacy Policy
  • Resources
    • Must Have Kitchen Tools
  • Nav Social Menu

    • Email
    • Facebook
    • Instagram
    • Pinterest

Cinnamon Sugar Pull Apart Bread

Dec 30, 2019 · 17 Comments

Jump to Recipe
Pull apart cinnamon bread in loaf pan over kitchen towel

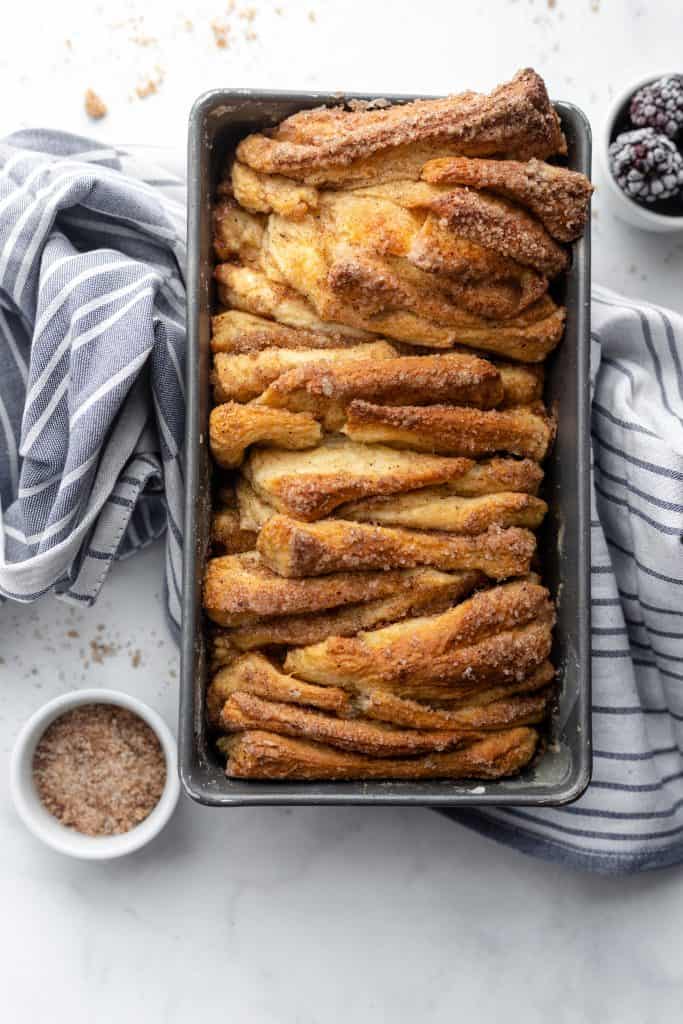
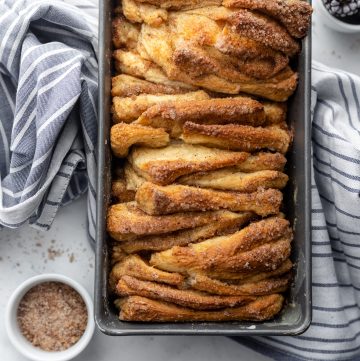
This cinnamon sugar pull apart bread is a showstopping recipe. Just follow the simple steps to get this beautiful loaf of yeasted cinnamon bread out of your oven. Make ahead instructions included!

This bread looks like it was terrifying to make, but is actually so simple. All that’s required is patience, waiting for the dough to rise. Yeast rewards us all for our effort though! It rewards us by leading us to the fluffiest, softest bread, warm from the oven. Also, whenever you bake a yeasted dough and it comes out really good, you can’t help but feel a great sense of accomplishment. Just follow the steps, and you too can conquer dough!

My source for this recipe was Joy the Baker (I posted her Chocolate Loaf Cake earlier). This recipe came out with a bang years ago, leading to endless riffs on pull apart bread. Apple pie pull apart bread, jalapeno cheddar pull apart bread. I’ll have to try both some day, but I can never tear myself away from the classic. It’s just tooooo good. Layers of sweet yeasted dough are filled with a browned butter cinnamon sugar mixture and baked in a way that you can pull one square of dough off at a time to eat. It’s like an ultimate cinnamon roll but in loaf form- and you don’t even need a glaze. This is probably my husbands favorite thing ever that I make and I can’t fault his judgement at all.

The Dough

The dough is a simple affair, slightly sweetened with sugar and enriched with melted butter and eggs. You can mix by hand, or you can use a stand mixer fitted with a dough hook like I did. The original recipe calls for mixing by hand so don’t worry if you don’t have a mixer. It’ll end up be slightly sticky, so resist the urge to load it with extra flour.

Make ahead instructions:

What you can do, and what I prefer to do, is to refrigerate the dough overnight after the first rise, so you can continue with the remaining steps and have a fresh baked loaf without too much delay the next morning. Just take the dough out of the fridge, let it come to room temperature for around 30 minutes, then continue with the below instructions of rolling it out and the second rise.

The Filling

You brown some butter, (easy! remember this recipe?) , and set it aside. You mix together cinnamon, sugar and nutmeg and set that mixture aside. You’ll proceed to brush the dough with the melted browned butter that’s cooled, then sprinkle the sugar cinnamon mix on top. Sound tempting yet?

Making Dough Squares

After the dough has rested, you knead in a couple tablespoons of flour. and this will make it less sticky. You then roll it out into a 12×20 inch rectangle on a lightly floured surface (or as big a rectangle as you can get without the dough splitting apart). You then brush the browned butter on top, and sprinkle with the cinnamon sugar mixture. It seems like a lot of sugar, but that’s ok, you’re going for it.

You use a pizza cutter to slice the dough into six equal strips (top to bottom). Stack the strips on top of each other, then cut into six equal pieces again. You’ll end up with six stacks of six squares. You’re well on your way to cinnamon sugar pull apart bread!

In a greased pan, you’ll place the dough squares sideways. You might have to squeeze to get them to all fit in the pan. It’ll look like a dough accordion! Cover with a damp kitchen towel, and let it rest for 45 minutes in a warm place or until almost doubled in size.

The Bake

Bake at 180 C (350F) for 30-35 minutes until dark golden brown in color. Remove from oven, let it rest 10 minutes, then dig in while it’s still warm and heavenly.

zoomed in shot ofPull apart cinnamon bread in pan

Cinnamon Sugar Pull Apart Bread

Farah Abumaizar
Pull apart squares of yeasted dough baked until golden brown, with a gooey cinnamon sugar filling in between each layer.
4.8 from 5 votes
Print Recipe
Prep Time 20 mins
Cook Time 30 mins
Resting time 2 hrs
Total Time 50 mins
Course Breakfast
Cuisine American
Servings 6 people
Calories 282 kcal

Ingredients
  

For the dough:

  • 3 cups all purpose flour 375 g
  • 1/4 cup granulated sugar
  • 2 1/4 tsp active dry yeast
  • 1/2 tsp salt
  • 56 g butter (1/2 stick or 2 oz)
  • 1/3 cup whole milk
  • 1/4 cup water
  • 2 large eggs, room temperature
  • 1 tsp vanilla extract

For the filling:

  • 1 cup granulated sugar
  • 2 tsp ground cinnamon
  • 1/2 tsp ground nutmeg
  • 56 g butter, browned (1/2 stick or 2 oz)

Instructions
 

  • In a large bowl) whisk together 2 cups of the flour (250g), sugar, yeast, and salt. Set aside.
  • Whisk together the eggs and set aside.
  • In a small saucepan, melt together milk and butter until butter has just melted. Remove from the heat and add water and vanilla extract. Let mixture stand for a minute or two, or until the mixture is room temperature or registers 46-50 C (115 to 125 degrees F) on a thermometer.
  • Pour the milk mixture into the dry ingredients and mix with a spatula or with the dough hook on your stand mixer. Add the eggs and stir the mixture until the eggs are incorporated into the batter. It might take some time to come together but that’s fine. Keep stirring! 
  • Add 3/4 cup of flour (94g) and continue mixing (either with spatula or dough hook in mixer) for about 2 minutes. The dough will come together and feel sticky which is the correct texture.
  • Place the dough is a large bowl that has been lightly greased with oil. Cover with plastic wrap or a damp kitchen towel. Place in a warm space and allow to rest until doubled in size, about 1 hour.* Follow note for make ahead instructions.
  • While the dough rises, whisk together the sugar, cinnamon and nutmeg for the filling. Set aside. 
  • Brown the butter by heating in a saucepan over medium heat and whisking while the butter changes color to a golden brown, and little brown flecks begin to form.** Set butter aside.
  • Grease a 9×5 inch loaf pan, and dust with flour. Set this aside.
  • Once dough has risen for about 1 hour, deflate the risen dough, and knead in an additional 2 tablespoons of flour. This will make it less sticky. Cover again and let it rest 5 minutes.
  •  On a lightly floured work surface, use a rolling pin to roll the dough out. The dough should be 12-inches tall and about 20-inches long. It’ll form a long thick rectangle. Roll it out as big as you can get. 
  • Use a pastry brush to spread the cooled brown butter all over the dough rectangle, leaving just a 1-2 inch of dough border around the sides.
  • Sprinkle the top of the browned butter with the whole cinnamon sugar mix, even though it seems like a lot go for it!
  • Using a very sharp knife or a pizza cutter, slice the dough vertically into 6 equal sized strips from top to bottom. Stack these six slices on top of each other, and cut again into six squares.
  • Place these squares accordion like into the prepared loaf pan (So they are all on their sides). Place the damp kitchen towel over the loaf pan, and allow to rise again in a warm place for 30-45 minutes. Heat the oven to 180 C (350 F) while the dough rises.
  • Once resting period is over, bake the dough for 30-35 minutes or until a deep golden brown. Don’t under bake or bread will be cooked on top but doughy in the middle.
  • Remove from the oven, allow to rest for 15-20 minutes, then run a knife around the edges of the pan and flip the loaf out onto a serving platter. Enjoy immediately while warm! (Although leftovers can be kept for 2 days at room temperature and reheated).

Notes

Recipe from Joy the Baker
*To make this ahead for the next day, refrigerate the dough, covering in plastic wrap, after the first rise. The next day take it out of the fridge and let it come to room temperature for about 30 minutes before proceeding with the recipe.
 
** See this recipe for more detailed butter browning instructions
Keyword bread, cinnamon, dough, sugar

If you liked this recipe, you might like:

Simple Healthy Banana Bread

Sourdough French Toast

Buckwheat Banana Bread

Breads, Breakfast, Recipes

Reader Interactions

Comments

  1. Maike says

    January 5, 2020 at 10:06 am

    5 stars
    This bread looks insanely delicious. Brown butter an cinnamon sugar? Yes, please! It seems like the perfect recipe for a Sunday brunch with friends.

    Reply
    • Farah Abumaizar says

      January 5, 2020 at 10:28 am

      It really is! The way your house smells when making it will start the day off perfectly 🥳

      Reply
  2. Irina says

    January 5, 2020 at 10:54 am

    5 stars
    I have never made a pull apart bread, but have been always impressed with pictures. Your photos are so stunning and delicious that I must try it! I hope that the beauty and the taste of the bread will resemble yours:)

    Reply
    • Farah Abumaizar says

      January 5, 2020 at 12:24 pm

      Thank you!! It’s so much easier than I thought it would be before trying it out and so worth any effort

      Reply
  3. Tonje says

    January 5, 2020 at 11:13 am

    5 stars
    Oh my gosh, this bread looks so delicious. That’s Sunday brunch sorted, can’t wait to try it!

    Reply
    • Farah Abumaizar says

      January 5, 2020 at 12:24 pm

      Thanks Tonje hope you love it!

      Reply
  4. Dannii says

    January 5, 2020 at 12:23 pm

    Oh that looks epic. I love anything with cinnamon.

    Reply
    • Farah Abumaizar says

      January 5, 2020 at 12:25 pm

      Yes me too and the smell when it bakes!!

      Reply
    • Farah Abumaizar says

      January 5, 2020 at 6:40 pm

      Me too!!

      Reply
  5. Jill says

    January 5, 2020 at 5:59 pm

    5 stars
    What a decadent looking loaf of bread. I have to try it!

    Reply
    • Farah Abumaizar says

      January 5, 2020 at 6:41 pm

      Hope you do and love it 😍

      Reply
  6. Marie says

    January 7, 2020 at 3:26 pm

    4 stars
    Hello Farah. The recipe sounds and the pihoto of the finished bread looks amazing. I can hardlly want to try it. I have a question about the second rise. Do you think it would work to take the recipe through placing the dough squares into the pan, covering with plastic wrap sprayed with non-stick cooking spray and placing in the refrigerator overnight then, in the morning, taking the pan out of the refrigerator to complete the second rise?

    Reply
    • Farah Abumaizar says

      January 7, 2020 at 3:39 pm

      Hi Marie! Thanks for the comment and question! I think that will be just fine, just make sure dough comes to room temperature and rises again while oven heats, I’d say around 30-45 minutes. It would be best to let it rise in a warm place! Do let me know if you try this how it works out!

      Reply
  7. Karen says

    March 9, 2020 at 7:59 am

    Hello!
    This looks so homey, comforting and delicious. My daughter is coming home from college for a week on Friday night and I want to have this for her on Saturday morning.
    I’m getting stuck on how to cut it correctly to get enough squares. I understand ( or at least I think I do!) that the rectangle is 12” on the left and right sides and 20” along the top and bottom.
    So when I make the first cuts am I left with 6 strips that are 12” on each side and 3 1/3” wide across the top and bottom?
    After that, stack them on top of each other and cut into 6 square stacks that are 3 1/3” X 2” and a total of 36 squares?
    I hope I’m not making it not confusing:(
    Any help would be totally appreciated!
    Thank you so much!

    Reply
    • Farah Abumaizar says

      March 9, 2020 at 12:04 pm

      Karen, thanks for the comment! I think your daughter will LOVE this. What a great mom! So I’ve never actually measured the width of the strips once cut, but your math makes total sense to me. I will say, don’t worry so much about getting the strips completely equal in size, just eyeball it. Part of the appeal is the rustic look where some strips peek out further than others out of the loaf pan. But yes, the premise is a rectangle, that is cut into six strips, strips get stacked onto each other then six squares get cut out of the stacked strips. I do encourage you to head over to Joy the baker’s website where she does step by step photos that will probably help, linked below, – and I’ll definitely get around to doing that here! Please let me know how it comes out!
      https://joythebaker.com/2011/03/cinnamon-sugar-pull-apart-bread/

      Reply
      • Karen says

        March 11, 2020 at 3:43 am

        Thank you so much Farah!
        I LOVE the rustic look, so I’m glad you told me to concentrate on that!
        Thank you so much for responding!

        Reply
        • Farah Abumaizar says

          March 11, 2020 at 8:35 am

          I hope it turns out amazing!!!

          Reply

Leave a Reply Cancel reply

Your email address will not be published. Required fields are marked *

Recipe Rating


Primary Sidebar

Get more stuff

Subscribe to our mailing list and get interesting stuff and updates to your email inbox.

Thank you for subscribing.

Something went wrong.

we respect your privacy and take protecting it seriously

FeedFeed

Featured Recipes

Arabic Grills

Heaven Bars

Egyptian Goulash

Pink Hummus

Orange Blossom Cake

More

Footer

everylittlecrumb

Farah Abu Maizar | Food Lover
Just posted the recipe for the chicken and lamb sk Just posted the recipe for the chicken and lamb skewers on the blog! You’ll also find a recipe for Kafta skewers there- save this post or head to https://everylittlecrumb.com/arabic-grills/ linked in bio for all the recipes. Nothing like good old fashioned juicy skewers with a little bit of char to set the weekend mood 😍 And I know you’ll love this recipe!
.
.
.
.
.

#delish #shishtaouk #shishtaouk #skewers #bbqporn #chocolate #chickenrecipes #foodblog #instayum #yummy #winter #foodporn #foodtographyschool #foodphotography #grill #delish #foodfluffer #damnthatsdelish #kafta #kebab #hummus #grills #bbq #lebanesefood #middleeasternfood #lamb #redmeat #pitabread
Fluffy, soft and moist, this old fashioned orange Fluffy, soft and moist, this old fashioned orange cake is another @mrsclueless recipe that exceeded all my expectations. So yum! The only thing I did differently was work the orange zest into the sugar and add a tiny splash of orange blossom because I had a bottle just begging to be used. If you are living under a rock and not following @mrsclueless already, go now! Reposted her recipe below:

INGREDIENTS:
 
4 eggs, room temperature and separated (yolk from white)
1 1/2 cups sugar 300 g
1.5 tsp vanilla extract
1-2 tsp orange blossom water
zest of 2 oranges
1/2 cup vegetable or canola oil
1/2 cup room temperature butter 113 g
2.5 cups all purpose flour 312 g
2 tsp baking powder
1 cup fresh orange juice

INSTRUCTIONS:
 
Preheat oven to 350 F (180C) and prepare your cake pan by lightly greasing and lining with parchment paper or flouring. I used a 9 inch springform pan, you can also use a bundt cake.
Using your fingertips, work the orange zest into the sugar until the sugar has moistened and turned fragrant and changed into a pale yellow/orange color.
In the bowl of a mixer fitted with paddle or whisk attachment, mix the egg yolks, orange zest scented sugar, vanilla, and orange blossom water on medium high speed for 2-3 minutes or until pale yellow and fluffy.
Add the oil and the butter and mix until well combined.
Add the flour and baking powder and mix until just combined, then add the juice and mix until combined.

In a separate bowl (either with a handheld mixer, or transfer the cake batter to another bowl and thoroughly wash and dry the mixer bowl) use an electric whisk to whisk the egg whites on medium high speed for 2-4 minutes until they form peaks that hold their shape.
Fold the egg whites into the cake batter with a rubber spatula, I like to do this in three additions. Take care not to deflate the egg whites.
Pour batter into prepared cake pan and bake for 50-60 minutes or until skewer inserted in the center comes out clean. If the outside of the cake is browning too rapidly and the inside still isn't cook, cover loosely with foil for the remainder of the baking time. Start checking at 40 minutes, every oven is different.
Taco Tuesday 🌮! We drove a good 30 minutes to v Taco Tuesday 🌮! We drove a good 30 minutes to visit this tiny little Mexican joint in seihat called @cancun.sa . The best priced Mexican food I’ve ever encountered- nearly ever dish is under 20 riyals and it was all delicious! Small portions, which is good so you can try a bunch of stuff. Fave was the shrimp burrito and also loved the simple beef tacos, and cheesy quesadillas. Totally exceeded my expectations , I just wish it was closer to Khobar! Would you drive 30+ minutes to fulfill a 🌮 craving?
.
.
.
.
.

#foodblog #instayum #yummy #bakery #foodporn #foodtographyschool #foodphotography #slice #delish #foodfluffer #damnthatsdelish #nachos #tortilla #tortillachips #partyfood #chipsandsalsa #mexicanfood #gamenight #sheetpan #tacos #tacotuesday #shrimp
Magic bars. Addictive! And so easy to make- a dige Magic bars. Addictive! And so easy to make- a digestive biscuit crust topped with chocolate chips and butterscotch chips, walnuts or pecans, sweetened coconut and condensed milk and baked until golden brown and bubbly. I dare you to stop at one! This weeks recipe for @tamimimarkets is a keeper- they have the best range of chocolate chips!

Ingredients:

2 cups digestive biscuit crumbs (200g)
1/2 cup butter, melted (113g)
1 cup semi sweet chocolate chips (150g)
1 cup butterscotch chips (150g)
3/4 cup chopped walnuts or pecans (100g)
1 cup sweetened shredded coconut (signature select)
1/2-2/3 container sweetened condensed milk (400g container)

Method:
1. Preheat oven to 180C. Mix the biscuit crumbs and melted butter until well combined, then press into a parchment paper lined 9x13 inch pan.
2. Layer by scattering the chocolate chips on top of the biscuits, followed by the butterscotch chips, the walnuts, then the shredded coconut. Evenly drizzle the condensed milk on top.
3. Bake for 25-38 minutes or until edges are golden brown and the condensed milk is bubbling. Cool completely before slicing.
I know that the weekend is over, but you can keep I know that the weekend is over, but you can keep the party going with easy sheet pan nachos. For a recent game night, we actually made our nacho chips from scratch and it was so easy (and yum!), I’ll probably never buy store bought tortilla chips again. To make homemade tortilla chips:

Ingredients:
As many corn tortillas as you want, we used 12 small corn tortillas 
Some salt for sprinkling.

Method: 
-Heat the oven to 190C (375F). Cut the tortillas into wedges, each tortilla will give you six wedges. 
- Lay in a single layer on a baking sheet. Bake for 6-7 minutes until starting to turn golden brown, then sprinkle with salt and turn over for another 6-7 minutes until golden brown and crunchy.
- Make nachos by sprinkling the tortilla chips with shredded cheddar cheese, and adding optionally refried beans and cooked ground beef. Bake until cheese is melted then remove from oven and top with anything you like:
- We used diced tomatoes, diced avocados, jalapeños, sliced black olives and chopped coriander. Serve with sour cream and salsa on the side 😍🥳 
.
.
.
.
.

#cakephotos #layercake #chocolate #ganache #foodblog #instayum #yummy #bakery #foodporn #foodtographyschool #foodphotography #slice #delish #foodfluffer #damnthatsdelish #nachos #tortilla #tortillachips #partyfood #chipsandsalsa #mexicanfood #gamenight #sheetpan
We celebrated my husbands birthday with lots of tr We celebrated my husbands birthday with lots of treats, but this cake from home business @littlecakecompanyy really stood out! The talented young woman behind this home business made him a gorgeously decorated cake we devoured. Moist and fluffy chocolate cake layered with Oreo cheesecake filling. Dreamy! I loved the alternative to a regular buttercream filling and the cake itself is so soft and moist. Definitely check out her page fir her flavors and range- like the Nutella cake pops that my kids fought over lol. Swipe to see the inside, would definitely order a cake from her again! Save this to remind you for your next occasion 🎂🥳.
.
.
.
.
.

#chocolatecake #magnoliabakery #cakestagram #cakephotos #layercake #chocolate #ganache #foodblog #instayum #yummy #bakery #foodporn #foodtographyschool #foodphotography #slice #delish #foodfluffer #damnthatsdelish
I’m totally living the bbq life here. It’s bec I’m totally living the bbq life here. It’s become my mission to grill as many times as possible until it gets too hot to be outdoors. Lots of places in Khobar make it easy! We got these mini slider patties, potato buns, burger sauce and all the prepped and ready cut up veggies from @redmarblesa a newly opened premium butchery. Making hamburgers at home has never been this simple and convenient. I really like that it’s a one stop shot for your complete burger. Their burger sauce is really good too! Save this post for next time a burger craving hits!
.
.
.
.
.

#delish #shishtaouk #cakestagram #skewers #bbqporn #chocolate #bbqseason #foodblog #instayum #yummy #winter #foodporn #foodtographyschool #foodphotography #grill #delish #foodfluffer #damnthatsdelish #coleslaw #kebab #fries #grills #bbq #lebanesefood #middleeasternfood #lamb #sliders #burgers
Definitely one of my favorite ways to start the da Definitely one of my favorite ways to start the day. A cup of black coffee and a slice of cake 😍. Thank you @espresso_bh for always spoiling me with goodies and testing out your baked goods on me. I also have to shout out @azulmarblewll for their gorgeous marble trays. Wishing you all a happy Wednesday!
.
.
.
.
.

#chocolatecake #magnoliabakery #cakestagram #cakephotos #layercake #chocolate #ganache #foodblog #instayum #yummy #bakery #foodporn #foodtographyschool #foodphotography #slice #delish #foodfluffer #damnthatsdelish #espresso #blackcoffee
Load More... Follow on Instagram

Copyright © 2019 on the Seasoned Pro Theme