• Skip to primary navigation
  • Skip to main content
  • Skip to primary sidebar
  • Skip to footer

 logo

  • Recipes
    • Breakfast
    • Sides
    • Soup
    • Main Meals
    • Healthy
    • Dessert
    • Drinks
  • Eating Out
  • About Me
    • Privacy Policy
  • Resources
    • Must Have Kitchen Tools
  • Nav Social Menu

    • Email
    • Facebook
    • Instagram
    • Pinterest

Buckwheat Banana Bread

Oct 30, 2019 · 24 Comments

Jump to Recipe
Loaf of buckwheat banana bread on parchment paper with a knife

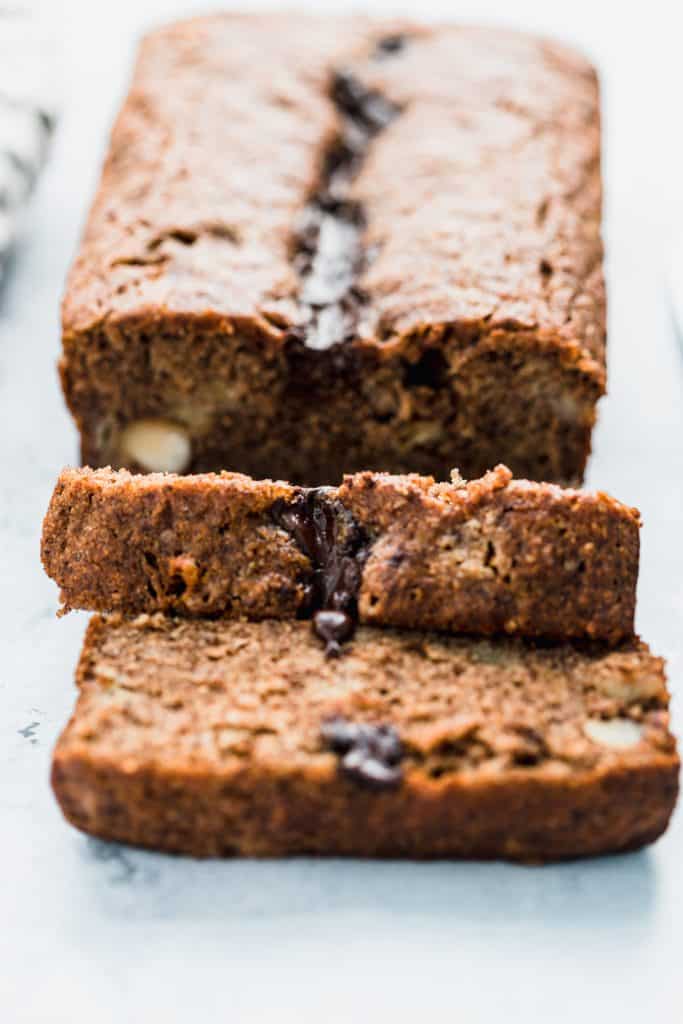
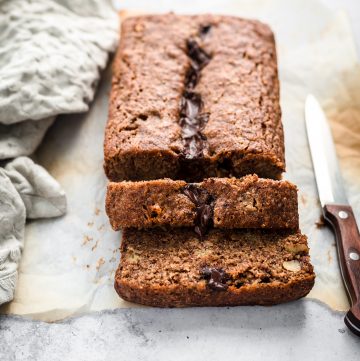
This hearty, healthy, tasty banana bread is made with buckwheat flour, is egg free, sweetened only with honey, and 100% kid approved! I was surprised by how much my two little ones liked this healthier take on banana bread, but since it was such a hit I knew I had to share it with you!

Why buckwheat banana bread?

Buckwheat flour is actually not in the wheat family at all, so it’s gluten free. It’s a superfood in many ways. It has a low glycemic index (raises blood sugar much less than normal white flour). It has antioxidants, and is rich in vegetarian protein and fiber. It’s so good for you, and has this earthy, hearty flavor that lends itself so well to things like banana bread. I have another healthy banana bread recipe that’s a go to, but this time I had some buckwheat flour in my pantry, and I just knew it would pair well with the ripe bananas on my counter, so I did a little research and came across this recipe by Lazy Cat Kitchen.

Buckwheat banana bread ingredients:

For the wet ingredients you need:

Mashed OVERRIPE bananas (the riper, the sweeter!) I like using a potato masher to give them a good mashing.

Coconut oil or olive oil: I had melted coconut oil ready, so that’s what I used but would definitely try it out with a mild olive oil for a change.

Almond milk or regular if not keeping things dairy free. I had regular milk on hand so that’s what I used.

Lemon juice (just a couple teaspoons)

Honey to sweeten. Can sub same amount in coconut or brown sugar.

For the dry ingredients you need:

Buckwheat flour

Baking powder

Baking Soda

Cinnamon

Try these for sprinkling on top or mixing in:

Chocolate chips (personal favorite), toasted nuts like walnuts or pecans, pumpkin seeds, dried cranberries.

This bread would be great spread with almond butter or peanut butter after baking!

loaf of buckwheat banana bread sliceed

How to make this:

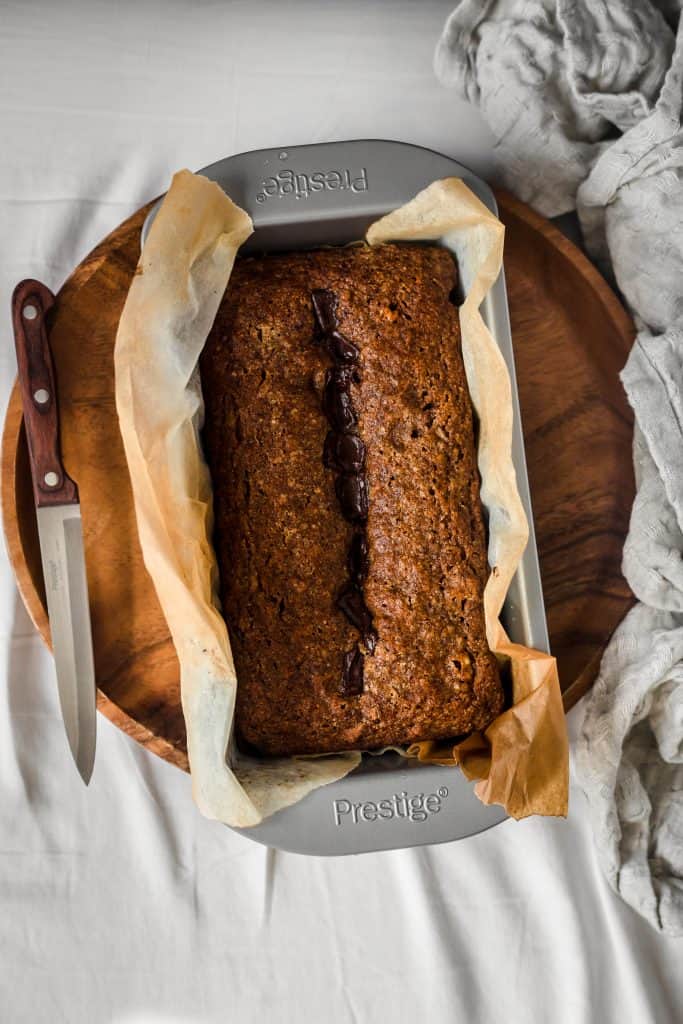
No mixer required, and only two bowls. It’s as simple as stirring together the wet ingredients in a bowl. Stir the dry ingredients in another bowl. The dry ingredients are added in three batches to the wet, combining well after each batch. This batter gets poured into the parchment paper lined loaf pan and baked until toothpick comes out clean or mostly clean.

Storing leftover banana bread:

Banana bread will last a couple days well wrapped at cool room temperature, or up to one week in the fridge. It freezes beautifully. Just wrap the loaf or slices tightly, and freeze for 2-3 months. Slices will thaw quickly, a whole loaf needs a few hours to thaw. Then just reheat in toaster, oven or microwave before eating.

loaf of buckwheat banana bread in loaf pan with knife
Loaf of buckwheat banana bread on parchment paper with a knife

Buckwheat Banana Bread

Hearty and healthy and plenty delicious, this banana bread is GF, refined sugar free, and completely kid friendly!
4.78 from 9 votes
Print Pin
Rate
Course: Breakfast
Cuisine: American
Keyword: banana, bread, healthy,
Prep Time: 20 minutes
Cook Time: 50 minutes
Servings: 6
Calories: 146kcal
Author: Farah Abumaizar

Ingredients

  • 1.5 cups buckwheat flour 180g
  • 1 tsp baking powder
  • 3/4 tsp baking soda
  • 1 tsp cinnamon
  • 1.5 cups mashed overripe banana (about 3 medium, or 550g)
  • 1/4 cup coconut oil or olive oil 60 ml
  • 1/3 cup almond milk or milk of choice 80 ml
  • 2 tsp lemon juice
  • 125 g honey
  • handful chocolate chips or nuts if desired

Instructions

  • Preheat the oven to 180 C (350 F). Grease and line a 9×5 inch loaf pan with parchment paper. Place oven rack slightly lower than the middle of the oven.
  • In a large bowl, combine the mashed bananas, oil, milk, lemon juice and honey. Stir well.
  • In a smaller bowl, combine all the dry ingredients.
  • Add the dry ingredients to the banana in three batches, mixing well after each addition. Mix until well combined.
  • Transfer the banana bread batter to the prepared pan. If desired, sprinkle the top with chocolate chips and or nuts. Bake for around 50-55 minutes or until the bread has turned golden brown, the top springs back when you prod it, and a toothpick inserted in the center comes out pretty clean. It's a moist bread so there may be a few crumbs.

Notes

Recipe adapted from Lazy Cat Kitchen
Tried this recipe?Mention @everylittlecrumb or tag #everylittlecrumb!

Nutrition

Calories: 146kcal

If you liked this recipe, you might like:

Simple Healthy Banana Bread

Super Healthy Banana Muffins

Healthy Pumpkin Bars

Did you make this? Tag @everylittlecrumb or hashtag #everylittlecrumb and I’ll share your images!

Breads, Breakfast, Dessert, Healthy, Recipes banana, healthy

Previous Post: « Pumpkin Curry Soup
Next Post: Lasagna Bolognese with Béchamel »

Reader Interactions

Comments

  1. Veena Azmanov says

    October 30, 2019 at 1:00 pm

    5 stars
    This Buckwheat Banana Bread is made with amazing combinations and flavors. I would grab a slice with my cup of Tea. Look moist and delicious.

    Reply
    • Farah Abumaizar says

      October 31, 2019 at 11:33 am

      Thanks Veena! It really is!

      Reply
  2. kim says

    October 30, 2019 at 2:03 pm

    5 stars
    Love that this uses buckwheat! One of the best banana breads I’ve made. Thanks for the great recipe!

    Reply
    • Farah Abumaizar says

      October 31, 2019 at 11:33 am

      Thanks Kim!!

      Reply
  3. Lisa Huff says

    October 30, 2019 at 2:34 pm

    5 stars
    Love the idea of using buckwheet flour. Great twist on traditional banana bread! And that chocolate on top, yum!

    Reply
    • Farah Abumaizar says

      October 31, 2019 at 11:33 am

      Healthy and yummy! Thanks Lisa!

      Reply
  4. Amanda says

    October 30, 2019 at 3:01 pm

    5 stars
    I’ve only used buckwheet in savoury dishes so this sounds really interesting. I love its nuttiness so I think this is a perfect combination in a loaf cake.

    Reply
    • Farah Abumaizar says

      October 31, 2019 at 11:33 am

      It works very well! Thanks Amanda!

      Reply
  5. Danielle says

    October 30, 2019 at 3:16 pm

    5 stars
    I have a weakness for banana bread. I ‘ve never cooked with buckwheat before – this looks incredible!

    Reply
    • Farah Abumaizar says

      October 31, 2019 at 11:34 am

      I like trying so many different banana bread recipes, and the buckwheat worked so well! Thanks Danielle!

      Reply
  6. Katerina says

    November 8, 2019 at 2:08 pm

    You can’t ever have enough of good banana bread! Your photos are absolutely mouthwatering and I so love that this recipe features buckwheat flour (my favourite) and is refined sugar free. Thanks so much for sharing!

    Reply
    • Farah Abumaizar says

      November 12, 2019 at 8:53 am

      Thank you so much Katerina! I’m so glad that you like the recipe and hope you try it and love it!

      Reply
  7. julienne says

    April 27, 2020 at 7:43 pm

    4 stars
    Hi! i just made this bread today but tweeked it using butter instead of oil and i put a whole envelope of baking powder instead of the one teaspoon which often does not work for the breads i have tried to make before…it came out delicious and i will be making it again! I must say though that i consider this more a cake because of its texture and crumbliness..But i am happy i found the recipe and tried it out. Thanks so much.

    Reply
    • Farah Abumaizar says

      April 28, 2020 at 9:40 pm

      So glad that you let me know!! I love knowing when substitutions work out – buckwheat banana cake I’m down for that! Really happy you liked it Julienne

      Reply
  8. Carina says

    May 2, 2020 at 5:29 pm

    4 stars
    The flavor is amazing (I love buckwheat)! That said, I wasn’t able to get it to cook all the way through. After about an hour and 15 minutes in the oven, I covered it, baked for another 10, and gave up. The consistency was still sort of wet overall. Would love to know what I might be able to do to rectify that situation, since it came together easily, and it really is delicious (just not quite bread lol)!

    Reply
    • Farah Abumaizar says

      May 2, 2020 at 6:05 pm

      Hi Carina! So the only culprits I know of banana bread not baking though are:
      Too much banana was used (so it seems like it’s raw but that’s just dense mushy banana)
      Not enough flour was used or too much liquid added
      Oven temp isn’t correct (do you have an oven temperature perhaps?) if it’s too hot then the outside will cook through and inside stays kinda raw, and if it’s too low, well it just won’t cook through properly
      Honestly this want my experience making this so I’m very curious why this happened with you! Do let me know if you try again and hope it works out perfectly next time

      Reply
  9. Sophia says

    June 5, 2020 at 10:24 pm

    5 stars
    This recipe turned out amazing despite having to use apple sauce in place of banana for a 1/2 cup. I also used almond flour instead of buckwheat flour. I also subbed agave for honey because I am vegan. Despite all of my substitutions, it looks and tastes amazing! Thank you!

    Reply
    • Farah Abumaizar says

      June 6, 2020 at 2:47 pm

      Love hearing about people’s substitutions! Thanks so much Sophia for getting back to me and so glad you enjoyed it!

      Reply
  10. Hala says

    September 6, 2020 at 11:39 am

    I ve just discovered this recipe and tried it. I put 0.5 cups of rice protein powder and 1 cup of buckwheat flower to have a protein rich snack. Delicious 👌

    Reply
    • Farah Abumaizar says

      September 6, 2020 at 12:17 pm

      Thanks for the great tip Hala!! I’ll try that one day!

      Reply
  11. Pepper says

    October 31, 2020 at 3:27 pm

    Wondering if you have ever doubled this recipe and baked the banana bread in a 9 X 13 pan. If so, what is the baking time and how did it come out? Also, I’d love to see more of your Middle Eastern recipes. Yummy!

    Reply
    • Farah Abumaizar says

      October 31, 2020 at 4:49 pm

      You know I haven’t, but I imagine it would come out really well. If you try it please do let me know Pepper! I would bake for probably about the same time but start checking earlier just in case .

      I recommend subscribing because I have a lot of Middle Eastern recipes coming, and you can find a lot under the main meal and dessert section- you’ve inspired me to create a Middle Eastern category though which I’ll work on and which will be under the main Recipe page! Thank you !

      Reply
  12. April says

    February 21, 2021 at 5:32 pm

    5 stars
    This was amazing. Great blend of flavors and a wonderful crumble texture of a quick bread. I’m so glad I found your blog and am really looking forward to trying some new things. Thanks for a fantastic recipe!

    Reply
    • Farah Abumaizar says

      February 21, 2021 at 7:23 pm

      April thanks so much for such a kind comment! Brought a smile to my face. So glad you liked the recipe and hope you try and love many more!

      Reply

Leave a Reply Cancel reply

Your email address will not be published. Required fields are marked *

Recipe Rating


Primary Sidebar

Get more stuff

Subscribe to our mailing list and get interesting stuff and updates to your email inbox.

Thank you for subscribing.

Something went wrong.

we respect your privacy and take protecting it seriously

FeedFeed

Featured Recipes

Tamriyeh

Nescafe Cake

Berries and Cream Sara Lee Cake

Kebab Karaz

Eggplant Fatteh

More

Footer

everylittlecrumb

Farah Abu Maizar | Food Lover
You have to know, if I post a chicken recipe it me You have to know, if I post a chicken recipe it means it’s reaaaaaally good. This copy cat Halal guys chicken and rice is unbelievable dish! I got the turmeric rice recipe from @seriouseats and its buttery and perfectly spiced and fluffy and addictive, topped with juicy grilled spiced chicken cubes and a tangy, creamy dressing, tomatoes and parsley. AMAZING! Recipe below and in the @tamimimarkets catalogue❤️.

INGREDIENTS:

For the chicken marinade:
900 g chicken breasts
1/4 cup olive oil
2 tbsp lemon juice
1 tbsp white vinegar
3 garlic cloves, minced
1 tsp salt
1/2 tsp black pepper
1 tsp oregano powder
1 tsp seven spices
1/2 tsp ginger powder
1/2 tsp cumin powder
1/2 tsp paprika powder

For the white sauce:
3/4 cup Greek yogurt 170g (6oz)
1/2 cup mayonnaise 115 g
1 tbsp white vinegar
1 tbsp water
1 tsp lemon juice
1-2 tsp sugar
1/2 tsp salt
1/4 tsp black pepper

For the rice:
2 tbsp unsalted butter
1/2 tsp turmeric powder
1/4 tsp cumin powder
1 1/2 cups basmati rice, soaked for 20 minutes then rinsed
2 1/2 cups chicken stock or 1 stock cube dissolved in 2.5 cups hot water
salt and pepper to taste, a pinch of each

To assemble:
1 chopped tomato
handful chopped parsley
sriracha sauce

INSTRUCTIONS: 
For the chicken:
In a bowl, mix all the ingredients for chicken marinade. Add chicken breast and toss to coat evenly. Cover and marinade for 1-2 hours.

Heat 1 tbsp oil in a large skillet on medium high heat, and cook chicken for 5-6 min each side, or until golden brown and cooked.
Remove chicken to a cutting board, and rest for 10 minutes, before chopping roughly into 2 inch cubes.

For the white sauce:
Mix all ingredients and store in the fridge until ready to serve.

For the rice:
Add butter to a large saucepan over medium heat. Once melted, add the turmeric and cumin, and stir for 1 minutes.
Add the rice, and toast the rice by stirring for 4 minutes. Add chicken stock, salt and pepper to season. Stir and bring to a boil, then reduce heat to a simmer, cover and cook for 15 min, then set aside 15 min and fluff with a fork.

To assemble:
Place the rice in your serving platter, top with the chicken, the white sauce, and chopped tomatoes and parsley. Sriracha too!
This is my go to baked creamy cheesecake. It’s s This is my go to baked creamy cheesecake. It’s so good and rich and easy, topped with a sweet and tangy simple strawberry sauce (sauce recipe from @sallysbakeblog ). I used my new @kenwood_bahrain stand mixer and it was excellent- gave me silky smooth lump free filling. Another winner for my @digitrolley collab- all my new appliances are from them❤️ Check IGTV for recipe video!

For the strawberry topping:
-1 tbsp cornstarch
-3 tbsp water
-450 g strawberries, halved (big pack)
-zest and juice from 1/2 small lemon 
-1/4 cup (50g) sugar

-Whisk together cornstarch and water, then add to a saucepan along with all other ingredients, over medium heat.
-Bring to a simmer, stirring constantly and breaking up strawberries as they cook, 5 minutes or so until thickened. Set aside to cool, can be stored in fridge up to one week.

For the cheesecake:

Ingredients
For the crust:
* 250 g crushed digestive biscuits 2 cups 
* 135 g melted butter 1 stick and 1 tablespoon
* 1/2 tsp cinnamon

For the cheesecake:
* 900 g cream cheese (3 3/4 cup)
* 1 1/2 cup white sugar 300 g
* 3/4 cup milk, room temp
* 4 eggs, room temp
* 1 cup sour cream 240 g
* 1 tbsp vanilla extract
* 1/4 cup all purpose flour 32g

Instructions:

For the crust:
* In a mixing bowl, combine crushed biscuits, the melted butter, and the cinnamon with a fork until crumbs are moistened evenly throughout. Press along the bottom and sides of a lightly greased 9 inch springform pan. Let the crust chill a little in the fridge while you prepare cheesecake.

For the cheesecake:
-Preheat the oven to 180 C
-In  stand mixer, combine the cream cheese with the sugar in a large bowl and mix on medium speed until well combined and fluffy. Blend in the milk, then add the eggs one at a time, mixing briefly after each addition.

-Mix in sour cream, vanilla and flour until smooth. It may be easier to sift in the flour.

-Pour filling into prepared crust. Bake at 180 C for 1 hour, then turn off the oven and leave cheesecake inside for another 5 hours or so until oven has completely cooled. This is to prevent cracking.

* Store cheesecake in fridge after this time period is over until chilled, then top with the strawberry topping.
This, to me, is the sambosa that best embodies Bah This, to me, is the sambosa that best embodies Bahrain- the first- actually the only-place I have these cheesy corn sambosa ❤️. No fancy cheese goes in this, it’s literally the stuff out of a can and take SO melty and cheesy and good. I mix in a little mashed potatoes and it just makes these 💯 times better, creamy and delicious. Posting the full steps on IGTV, it’s so easy you prob won’t need them! Recipe below and tell me- what’s your go to sambosa cheese?

Ingredients
2 small potatoes, peeled and cut into cubes 8 oz total, 235 g
1/2 cup corn kernels, from a can, drained
12 oz American cheese, like Velveeta or Kraft, grated 340 g (2 170g cans of Kraft processed cheese)
pinch salt
pinch black pepper
1/2 pack samosa wrappers each pack is 500 g

Instructions:
-Cover potato cubes with water, and bring to a boil. Reduce heat and simmer until potatoes are completely cooked through. Drain, and mash.

-Let potatoes cool slightly then combine mashed potatoes with the grated cheese, drained corn, salt and pepper. Mix well until the mixture is evenly combined. Taste for and adjust seasoning.

-Fill each samosa wrapper with a tbsp of mixture on the bottom corner, then fold the corner of the samosa up and over the filling to the other side, to make a triangle. Keep folding this triangle over all the way up the top (check the video at the bottom of this recipe card to see how). Mix together the flour and water to form a thick paste, and seal the ends of the samosa to prevent them from opening up while frying.

-Place vegetable oil in a skillet, about 2 inches deep and heat on medium high heat. Once hot enough, add the sambosa and fry for around 2 minutes a side until golden brown. Remove to a paper towel lined plate to absorb some of the excess oil, then enjoy warm.

.
.
.
.
.

#harira #soup #ramadanrecipes #ramadan2021 #ramadan #ramadankareem #vegetablesoup #soupseason #soupsofinstagram #delishkitchen #friedfood #aprilisforarabfood #f52grams #foodfluffer #foodflatlay #foodphotography #foodphotographer #foodstylist #thefeedfeed #middleeasternfood #vegetarian #tasty #tastingtable #tastemade #samosa #sambosa
This is one of my top 5 recipes from this Ramadan’s recipe prep. One of my features does the @tamimimarkets recipe catalogue! Click the link in their bio to access this gorgeous (free!) catalogue.

This harira soup is unbelievable. Hearty and delicious and beautifully spiced- I’ve never been obsessed with harira soup until this one. It’s a simple one because it’s meat free, so it’s perfect to start your iftar with but also hearty enough to totally serve as a meal alongside some sambosas. Recipe below, and IGTV video coming in a bit!

Ingredients
3 tbsp olive oil
1 large onion, diced
3 celery stalks, diced
2 carrots, diced
1 tsp cinnamon powder
1/2 tsp salt
1/2 tsp black pepper
pinch red chili flakes
1/2 cup chopped parsley
1/2 cup chopped coriander(cilantro)
1 can tomato sauce 15 oz (430g)
7 cups vegetable stock or 2 stock cubes dissolved in 7 cups water
1 can drained chickpeas 15 oz (400 g)
1 cup green lentils
1/2 cup vermicelli noodles 50 g
2 lemons, juiced 1/4 cup juice
2 tbsp flour, dissolved in 1/4 cup water* use cornstarch if gluten free

Instructions:
-Start by adding the lentils to a bowl of water and soaking as you prepare the rest of the ingredients, this helps them cook through faster.
-Heat oil in a large saucepan over medium heat, and add the onions, celery and carrots. Saute for 6-8 minutes, until onions soften and turn golden brown.
-Add all the spices, the chopped parsley and chopped coriander, the tomato sauce, and the vegetable stock. Bring the pot to a boil, then add the drained chickpeas and drained lentils. Reduce heat and simmer for 25 minutes or until chickpeas and lentils are tender.
-Add the vermicelli, and let it boil for 3-4 minutes or until tender. Add the lemon juice, and the flour water mixture. Let it simmer another minute or until it thickens, then taste for seasoning and add salt and pepper if necessary.
.
.
.
.
.
#harira #soup #ramadanrecipes #ramadan2021 #ramadan #ramadankareem #vegetablesoup #soupseason #soupsofinstagram #moroccan #moroccanfood #aprilisforarabfood #f52grams #foodfluffer #foodflatlay #foodphotography #foodphotographer #foodstylist #thefeedfeed #veganrecipes #vegan #tasty #tastingtable #tastemade #lentils
Never ever liked vimto until I had it like this 🍧. Vimto smoothies means that the sweetness of vimto is tempered by that cold crunchy shaved ice. Could not stop eating/drinking these vimto slushees! So easy, you just need water, ice, vimto and a high speed blender- my @ninjakitchenme did so well breaking down huge ice chunks👏🏼. Save this for a little twist on your classic iftar drink🥳

Ingredients:
-3/4 cup water
- 3/4 cup vimto 
- 2 cups ice 

Method:
Add the ingredients to your blender in the order listed, and blend on frozen drink mode until slushy like consistency. Add more ice or water if you need to, and enjoy immediately with a spoon/straw. Yum!
.
.
.
.
.

#ramadan #ramadan2021 #ramadanrecipes #iceddrinks #slush #slushy #slushii #berries #syrup #cordial #drinkphotography #damnthatsdelish #foodfluffer #pour #dripshot #foodphotography #foodphotographyandstyling #foodstylist #foodstyling #thefeedfeed #vimto #foodtographyschool #foodtography #beautifulcuisines
A biscuit base topped with a super easy smooth, cr A biscuit base topped with a super easy smooth, creamy pistachio cheesecake and the crowning touch,  @mayadelices ‘s luscious milk chocolate melted and poured over the top. I mean- heavenly! Recipe below, adapted from @savoryandsweetfood ,, IGTV will be uploaded today. I am absolutely loving @mayadelices couverture, great quality baking chocolate thats so fun experimenting with! They have sugar free and vegan options too, and best of all it’s easily available in their shop in Bahrain 🍫👏🏼

Ingredients:

For the crust:
2 cups digestive biscuit crumbs (250 g)
1/2 cup butter melted, 115g
Pinch cinnamon powder

For the pistachio cheesecake filling:

1 cup pistachio powder (140g)
12 Kiri squares or cream cheese (215g)
250 ml thick cream
1/2 of a 400 g tin of sweetened condensed milk, more if you like it sweeter

To top:
1 cup Maya milk chocolate (160g)
pistachios to garnish

Method:
1. Preheat oven to 180C. Grease and line a 8x8 inch pan with parchment paper with extra paper hanging over the sides so you can easily lift out the bars.

2. Mix digestive crumbs with melted butter and cinnamon. Press this firmly into the base of the pan. Refrigerate for 10 minutes.

3. In a food processor, add the pistachio powder, kiri cheese cubes, thick cream, and condensed milk. Blend until well combined and smooth. Pour this mixture into the crust base and bake for 15-20 minutes until set but center is still a little jiggly. Let cool at room temperature for 1 hour then refrigerate for several hours.

4. Melt the milk chocolate gently in the microwave, in 10 second bursts, stirring after each increment. Once smooth and melted, spread over the top of the cheesecake, and refrigerate until set. Enjoy!
.
.
.
.
.
#ramadan #ramadan2021 #ramadanrecipes #cheesecakebars #cheesecakebites #chocolateporn #pistachio #chocolatelover #chocolaterecipes #cheesecakelovers #cheesecakelove #damnthatsdelish #foodfluffer #pour #chocolatedrip #dripshot #foodphotography #foodphotographyandstyling #foodstylist #foodstyling #thefeedfeed #thebakefeed #foodtographyschool #foodtography #beautifulcuisines
Want a Ramadan dessert that takes minutes to make Want a Ramadan dessert that takes minutes to make and tastes amazing? Yeah we all do - I got you! Try this coffee biscuit cake (barely adapted from the wonderful @littlesunnykitchen). Layers of coffee soaked biscuits and a super easy fluffy cream 👌🏼. I used my new @braun_bahrain handheld electric whisk, one of the attachments in the minipimer set-It whips the cream so fast, much faster than my stand mixer and it’s so convenient to be able to use any bowl to prep the cream in. I’ve partnered with @digitrolley to bring you lots of good recipes with their range of kitchen appliances, so keep following along! Recipe below , and IGTV video coming today in my Ramadan series!

Ingredients
2 tbsp nescafe powder dissolved in 1 cup hot water
1 cup heavy whipping cream 250ml
3 tbsp sweetened condensed milk
splash vanilla extract, optional
1 creme caramel sachet, powder only 49g
1 pack tea biscuits or graham crackers 7 oz or 200 g
2 tbsp cocoa powder for topping

Instructions:
-Add the heavy cream, sweetened condensed milk, vanilla and creme caramel powder to a bowl and beat until soft peaks form. Set this cream mixture aside.
-Dip the tea biscuits into the coffee briefly until they soak up the coffee but before they start to break apart. -Layer in a 7×11 or 9×9 inch clear pyrex dish, then top with half the cream mixture.
-Repeat another layer of coffee soaked biscuits on top of the heavy cream, followed by the remaining half of the cream. Sift the cocoa powder on to the top, then refrigerate for several hours until set. This is even better the next day!

.
.
.
.
.
#nescafe #nescafegold #coffeecake #biscuit #biscuitcake #nobake #nobakedessert #nobakecake #tiramisu #damnthatsdelish #tastingtable #beautifulcuisines #foodphotography #foodphotographyandstyling #tastyfood #easydessert #ramadankareem #ramadan2021 #ramadanrecipes #cream
Ramadan Kareem! And the first recipe is for these Ramadan Kareem! And the first recipe is for these unbelievable (and easy!) chicken musakhan sambosa was developed for @tamimimarkets Ramadan catalogue. One of the coolest projects I’ve ever worked on can’t wait to tell you more about it! In the meantime, enjoy this teaser recipe and check IGTV for full video steps coming up. 

Ingredients:
2 chicken breasts, cooked and finely shredded about 1 heaped cup of shredded chicken See notes
1/4 cup olive oil
2 large onions cut in half, then thinly sliced into wedges
1/4 cup toasted almond slivers or pine nuts
3 tbsp sumac
1/2 tsp salt
1/4 tsp black pepper
1/4 tsp cumin powder
1/4 tsp cinnamon powder
To assemble:
1 pack sambosa wrappers 500 g
1 tbsp flour
1/2 tbsp water
For frying:
vegetable oil, about 1/4 cup

Instructions:
-In a deep skillet over medium heat, add the olive oil until it heats up. Add the onions, and cook, stirring frequently until soft and starting to caramelize, 8-10 minutes.

-Add the shredded chicken, the toasted nuts, and all the spices. Stir to combine, then remove from the heat. Let mixture cool slightly 5 minutes or so.

-Fill each sambosa wrapper with a tbsp of mixture on the bottom corner, then fold the corner of the sambosa up and over the filling to the other side, to make a triangle. Keep folding this triangle over all the way up the top 

-Mix together the flour and water to form a thick paste, and seal the ends of the sambosa to prevent them from opening up while frying.

-Place vegetable oil in a skillet, about 2 inches deep and heat on medium high heat. Once hot enough, add the sambosa and fry for around 2 minutes a side until golden brown. Remove to a paper towel lined plate to absorb some of the excess oil, then enjoy warm, optionally with yogurt to dip in.
.
.
.
.
.
#chickensamosa #musakhan #ramadankareem #ramadan2021 #ramadanrecipes #samosa #friedfood #palestinianfood #middleeasternfood #beautifulcuisines #damnthatsdelish #f52community #thefeedfeed #foodgawker #f52grams #buzzfeedfood #tastingtable #tastemade #chickenrecipes #sumac #caramelizedonions #foodblogfeed #foodphotography #foodphotographyandstyling #foodstyling
Load More... Follow on Instagram

Copyright © 2019 on the Seasoned Pro Theme