• Skip to primary navigation
  • Skip to main content
  • Skip to primary sidebar
  • Skip to footer

 logo

  • Recipes
    • Breakfast
    • Sides
    • Soup
    • Main Meals
    • Healthy
    • Dessert
    • Drinks
  • Eating Out
  • About Me
    • Privacy Policy
  • Resources
    • Must Have Kitchen Tools
  • Nav Social Menu

    • Email
    • Facebook
    • Instagram
    • Pinterest

Fluffy Homemade Dinner Rolls

Jul 4, 2019 · 10 Comments

Jump to Recipe
Golden brown dinner rolls on a bakign sheet over a white kitchen towel with a sprig of rosemary and some garlic herb butter

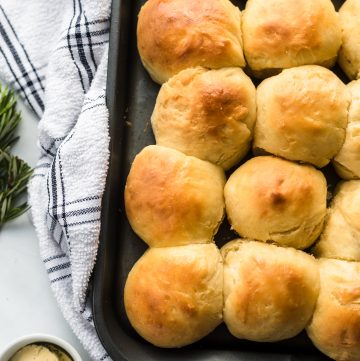
A simple no fuss recipe for fluffy, soft and completely homey dinner rolls. Easy to perfect and the hardest part will be just waiting for the dough to rise! These freeze and reheat very well.

Besides never really nailing mashed potatoes until this perfect recipe, I had the same problem with dinner rolls. They were usually too dense and heavy, and I wanted that perfect fluffines of restaurant rolls, you know the type that come in a basket with butter before your main is served.

I did my research, and tried out this great recipe by the Stay at Home Chef. They turned out great, so I’m sharing them with you today!

Homemade fluffy dinner rolls: The cast of ingredients

Very simple every day things. You’ll need:

Milk: (I used fresh and full fat). The milk needs to be warm to activate the yeast. Not so hot that you’d burn a finger if you stuck it in the milk, but noticeably warm. I usually just microwave mine.

Flour: Regular all purpose flour. I always prefer measuring flour with a kitchen scale as it is much more accurate, but feel free to use measuring cups. Spoon the flour into the cups- it’s more accurate than scooping the measuring flour directly into the flour bag.

Instant dry yeast, sugar (which feeds the yeast), eggs to enrich the dough, salt and butter.

The mixing:

You can knead the dough by hand, until the texture is as described in the recipe. A stand mixer just makes it easier. You’ll add all your ingredients except the flour to the bowl of the stand mixer, mix, then add your flour until the dough forms.

The resting:

The dough rises best in a warm place, so if you have a very cold air conditioned environment, you might want to try one of these hacks. Either turn on your oven for just 2 minutes until it just warms, then have the dough rise in the turned OFF warm oven, or do the same with your washing machine! As usual with yeast dough, there are two resting stages, one with the ball of dough, and one after the dough is shaped into balls.

The bake:

You bake in a hot 190 C (375 F) oven until the tops are lightly browned, then immediately brush with the melted butter- it’ll soak right in.

Storing the rolls:

They’ll last a few days well wrapped in the fridge or at cool room temperature, or can be frozen in a freezer safe bag for 1-2 months.

Serve with:

I went a little extra and made the garlic herb compound butter in the recipe below, but these would be great with just normal butter, or dipped in olive oil and balsamic vinegar.

Fluffy Homemade Dinner Rolls

Farah Abumaizar
A no fuss recipe yielding soft and fluffy homey dinner rolls. Basic ingredients and super easy!
5 from 5 votes
Print Recipe Pin Recipe
Prep Time 5 mins
Cook Time 12 mins
Resting Time 3 hrs
Course Side Dish
Cuisine American
Servings 12 people
Calories 388 kcal

Ingredients
  

For the rolls:

  • 2 cups warm milk
  • 2 tbsp instant dry yeast
  • 1/4 cup white sugar
  • 2 tsp salt
  • 6 tbsp unsalted butter, softened
  • 2 large eggs
  • 6 cups all purpose flour 750 g
  • 1 tbsp melted butter

For the herb butter:

  • 1 stick butter, softened 100 g
  • 4 cloves garlic, crushed
  • 1/4 cup fresh herbs, finely chopped I used chives, rosemary and parsley.

Instructions
 

  • In the bowl of as stand mixer, add the warm milk, the yeast, sugar, salt, butter and eggs. Mix briefly to combine.
  • Add 5 1/2 cups of flour and using either a dough hook or paddle attachment, mix on low speed until flour starts to incorporate into the dough. Increase speed to medium. Add the remaining 1/2 cup flour slowly until dough pulls away from side of the bowl.
  • The dough should be soft and a little bit sticky. If it is too sticky to handle, add a little more flour at at time until you reach the desired consistency.
  • Transfer dough to a lightly oiled bowl, cover with a kitchen towel and allow to rise in a warm place for 90 minutes. It should double in size.
  • Lightly grease a baking sheet and form the rested dough into 24 even sized balls. Place on the baking sheet in 6 rows of 4. It's ok if they touch a little. Cover with a towel and allow to rise for another 1 hour.
  • Preheat the oven to 190 C (375 F), and bake the bread after it's second resting time for 12-14 minutes until golden brown.
  • As soon as it's out of the oven, brush the bread with the melted butter.

To make the herb butter:

  • Make sure the butter is very soft- if necessary, put some plastic gloves on and smush the butter between your fingers a little. Add the crushed garlic and minced herbs and stir to distribute evenly.
  • Transfer the herb butter onto a sheet of plastic wrap then cover with plastic wrap and roll it into a cylinder shape. Twist either end of plastic wrap up tight (like a candy wrapper) and place butter in fridge for at least 1 hour to chill properly. You serve by slicing thin slices directly off this butter log.

Notes

Recipe adapted from The Stay at Home Chef
Keyword bread, rolls

Breads, Recipes baking, bread

Reader Interactions

Comments

  1. Ivana says

    July 5, 2019 at 2:52 pm

    5 stars
    Made these last night for dinner. This is now my favorite dinner roll recipe, thank you!

    Reply
    • Farah Abumaizar says

      July 5, 2019 at 4:08 pm

      So glad you liked them!!

      Reply
  2. Demeter says

    July 5, 2019 at 3:51 pm

    5 stars
    That garlic herb butter sounds divine! Such a perfect compliment to these rolls. Well done!

    Reply
    • Farah Abumaizar says

      July 5, 2019 at 3:52 pm

      Thanks so much Demeter! It really adds a lot of flavor

      Reply
  3. Toni says

    July 5, 2019 at 4:33 pm

    5 stars
    These dinner rolls were really amazing! My kids loved it!

    Reply
    • Farah Abumaizar says

      July 5, 2019 at 9:07 pm

      So glad to hear that Toni!! Thanks for letting me know

      Reply
  4. Annissa says

    July 5, 2019 at 4:54 pm

    5 stars
    Those rolls definitely looks so soft and fluffy! Perfect pairing with the garlic butter!

    Reply
    • Farah Abumaizar says

      July 5, 2019 at 9:08 pm

      Thanks Annissa! Doesn’t get much better than warm rolls and butter

      Reply
  5. Emmeline says

    July 5, 2019 at 5:58 pm

    5 stars
    OK that first pic?! Made my stomach growl and my mouth start salivating! And I just ate! Love how fluffy and delicious these look – saving to try asap!

    Reply
    • Farah Abumaizar says

      July 5, 2019 at 9:09 pm

      Thanks Emmeline! Let me say that I love your website name! Very fitting

      Reply

Leave a Reply Cancel reply

Your email address will not be published. Required fields are marked *

Recipe Rating


Primary Sidebar

Get more stuff

Subscribe to our mailing list and get interesting stuff and updates to your email inbox.

Thank you for subscribing.

Something went wrong.

we respect your privacy and take protecting it seriously

FeedFeed

Featured Recipes

Sayadieh

Arabic Grills

Heaven Bars

Egyptian Goulash

Pink Hummus

More

Footer

everylittlecrumb

Farah Abu Maizar | Food Lover
It’s #nationalchocolatecakeday ! And nothing cel It’s #nationalchocolatecakeday ! And nothing celebrates it like this ginormous slice of chocolate cake from @parkers , aptly named the Matilda cake. It’s insanely decadent and sweet, too much for many people but I loved this- in really small bites! I love these obscure food holidays lol, any excuse right?
.
.
.
.
.

#chocolatecake #magnoliabakery #cakestagram #cakephotos #layercake #chocolate #ganache #foodblog #instayum #yummy #bakery #foodporn #foodtographyschool #foodphotography #slice #delish #foodfluffer #damnthatsdelish
Had so much fun shooting @trio_rest_cafe_ last wee Had so much fun shooting @trio_rest_cafe_ last week for their upcoming limited edition collection in honor of national croissant day! This weekend you can get a variety of ice cream stuffed croissants and trust me when I say you don’t want to miss out. Layla says the berry and vanilla ice cream croissant is one of the best treats she’s ever had, while I was happy to claim the kunafa croissant with homemade rosewater ice cream. I said I’d have just a bite but finished the entire thing in a matter of seconds🤐. Swipe to see all the flavors and tell me which you would most like to try!
.
.
.
.
.

#chocolatecake #magnoliabakery #cakestagram #cakephotos #layercake #chocolate #ganache #foodblog #instayum #yummy #bakery #foodporn #foodtographyschool #foodphotography #slice #delish #foodfluffer #damnthatsdelish #croissant #dripshot #nationalcroissantday #kunafa
I always thought sayadieh would be the most diffic I always thought sayadieh would be the most difficult dish ever, but I found a way to make it easy and still just as incredible. This Lebanese style rice and fish is delicious- fragrant rice, seasoned flaky fish, plenty of warm spices and caramelized onions. This weeks recipe for @tamimimarkets - they have plenty of rice and oil deals on! Must save and must make 😍👌🏼 check their story later today for step by step 

Ingredients:
For the rice:
1/4 cup vegetable or canola oil
3-4 onions thinly sliced
1 tsp cumin powder
1/2 tsp turmeric powder
1/2 tsp cinnamon powder
1.5 tsp salt
1/4 tsp black pepper
1 cup water
1 heaped tbsp tomato paste
Additional 3 cups water
2 cups of basmati rice, soaked and rinsed

For the fish:
2 tbsp vegetable oil
800g white fish fillet, like hammour cut into 4-6 pieces
1 tsp cumin powder
1/2 tsp paprika powder
big pinch salt and pepper

To garnish:
Toasted almond slivers
Chopped parsley

Method:
For the rice:
-Heat the oil for the rice in a large pot over medium high heat, then add the sliced onions. Cook, stirring occasionally until onions have caramelized into a deep golden brown.
-Remove the onions from the pot, and reserve a big handful for garnishing the rice. Place the remaining caramelized onions in a blender, add 1 cup of water, the spices for rice, and the tomato paste and blend until a thick sauce forms.
-Add this sauce to the same saucepan you used to cook the onions, along with 3 additional cups of water, and the basmati rice. The liquid should cover the rice by about 1/2 inch or so. Bring to a boil, then cover with a tightly fitting lid and cook for 15-20 minutes on low heat until all the water has been absorbed. Set rice aside for 10-15 minutes without removing the lid to steam, and meanwhile, cook the fish.
For the fish:
-Heat the oil for the fish in a large skillet. Mix together the spices for the fish fillets and sprinkle both sides evenly with the spice mixture. When oil is hot, add the fish to the skillet and cook for a few minutes a side or until white and flaky and cooked through.
Assemble:
Place all the rice in a serving platter and top with the fish, the reserved caramelized onions, toasted nuts and parsley! Enjoy!!
It’s national peanut butter day! And peanut butt It’s national peanut butter day! And peanut butter stars in what has got to be my favorite energy ball yet. A handful of ingredients and all you need to do is stir them together and you have chewy peanut butter oat bites stuffed with chocolate chips. All the deliciousness, none of the guilt! Swipe to see what the final product looks like. I love the way the ground flaxseed adds a cake like texture to these, makes them really feel like a dessert! Step by step in story, send this to someone on a diet that would appreciate this😂💪🏼

Ingredients :
-2/3 cup creamy peanut butter
-1 cup old fashioned oats
-1/2 cup ground flax seeds (1/4 cup flaxseeds ground up in a small food processor or spice blender)
-2-3 tbsp sweetened shredded coconut (optional)
2-3 tablespoons honey
Handful semi sweet chocolate chips

Method:
Combine all 5 ingredients in a medium bowl. Stir to combine. Place in the refrigerator for 15-30 minutes so they are easier to roll.

Roll into 12-14 balls and store in fridge for up to one week. Enjoy!

#chocolatecake #magnoliabakery #cakestagram #cakephotos #layercake #chocolate #ganache #foodblog #instayum #yummy #bakery #foodporn #foodtographyschool #foodphotography #slice #delish #foodfluffer #damnthatsdelish #nationalpeanutbutterday #peanutbutter #oats #energyballs #chocolatechip #healthysnack
So my weekend was pretty good, how about yours? 😍 Mansaf courtesy of my mother in law. Can’t get enough of this dish! I always put as many toasted nuts as I can. I know jameed can be quite decisive- how about you, love or hate?
.
.
.
.
.
 #middleeasternfood #weekend #platter #rice #beautifulcuisines #lebanese #ganache #foodblog #instayum #yummy #bakery #foodporn #foodtographyschool #foodphotography #slice #delish #foodfluffer #damnthatsdelish #foodforthought #mansaf #jordanian #palestinian #lebanese
Loved @tosto.ksa ! Great outdoor kiosk concept wit Loved @tosto.ksa ! Great outdoor kiosk concept with plenty of seating that offers simple sandwiches and French toast options given to you in a convenient take away sliding box. Portions are relatively small but prices are fair and the actual taste is great! The truffled eggs brioche is delicious. Buttery fluffy bread, soft creamy scrambled eggs and truffle sauce with just enough truffle flavor to enhance without overpowering. The Nutella French toast is also a winner! Cinnamon scented with some biscuit crumbs on top. The ice cream was completely melted though, could have done without it. I want to try their caramel French toast but of course Layla overruled me and went with Nutella. She approved too!
.
.
.
.
.

#chocolatecake #magnoliabakery #cakestagram #cakephotos #layercake #chocolate #ganache #foodblog #instayum #yummy #bakery #foodporn #foodtographyschool #foodphotography #slice #delish #foodfluffer #damnthatsdelish #croissant #croissants #cafe #pastry #almonds #frenchtoast #berries #nutella #truffle #brioche #scrambledeggs
Just posted the recipe for the chicken and lamb sk Just posted the recipe for the chicken and lamb skewers on the blog! You’ll also find a recipe for Kafta skewers there- save this post or head to https://everylittlecrumb.com/arabic-grills/ linked in bio for all the recipes. Nothing like good old fashioned juicy skewers with a little bit of char to set the weekend mood 😍 And I know you’ll love this recipe!
.
.
.
.
.

#delish #shishtaouk #shishtaouk #skewers #bbqporn #chocolate #chickenrecipes #foodblog #instayum #yummy #winter #foodporn #foodtographyschool #foodphotography #grill #delish #foodfluffer #damnthatsdelish #kafta #kebab #hummus #grills #bbq #lebanesefood #middleeasternfood #lamb #redmeat #pitabread
Fluffy, soft and moist, this old fashioned orange Fluffy, soft and moist, this old fashioned orange cake is another @mrsclueless recipe that exceeded all my expectations. So yum! The only thing I did differently was work the orange zest into the sugar and add a tiny splash of orange blossom because I had a bottle just begging to be used. If you are living under a rock and not following @mrsclueless already, go now! Reposted her recipe below:

INGREDIENTS:
 
4 eggs, room temperature and separated (yolk from white)
1 1/2 cups sugar 300 g
1.5 tsp vanilla extract
1-2 tsp orange blossom water
zest of 2 oranges
1/2 cup vegetable or canola oil
1/2 cup room temperature butter 113 g
2.5 cups all purpose flour 312 g
2 tsp baking powder
1 cup fresh orange juice

INSTRUCTIONS:
 
Preheat oven to 350 F (180C) and prepare your cake pan by lightly greasing and lining with parchment paper or flouring. I used a 9 inch springform pan, you can also use a bundt cake.
Using your fingertips, work the orange zest into the sugar until the sugar has moistened and turned fragrant and changed into a pale yellow/orange color.
In the bowl of a mixer fitted with paddle or whisk attachment, mix the egg yolks, orange zest scented sugar, vanilla, and orange blossom water on medium high speed for 2-3 minutes or until pale yellow and fluffy.
Add the oil and the butter and mix until well combined.
Add the flour and baking powder and mix until just combined, then add the juice and mix until combined.

In a separate bowl (either with a handheld mixer, or transfer the cake batter to another bowl and thoroughly wash and dry the mixer bowl) use an electric whisk to whisk the egg whites on medium high speed for 2-4 minutes until they form peaks that hold their shape.
Fold the egg whites into the cake batter with a rubber spatula, I like to do this in three additions. Take care not to deflate the egg whites.
Pour batter into prepared cake pan and bake for 50-60 minutes or until skewer inserted in the center comes out clean. If the outside of the cake is browning too rapidly and the inside still isn't cook, cover loosely with foil for the remainder of the baking time. Start checking at 40 minutes, every oven is different.
Load More... Follow on Instagram

Copyright © 2019 on the Seasoned Pro Theme