• Skip to primary navigation
  • Skip to main content
  • Skip to primary sidebar
  • Skip to footer

 logo

  • Recipes
    • Breakfast
    • Sides
    • Soup
    • Main Meals
    • Healthy
    • Dessert
    • Drinks
  • Eating Out
  • About Me
    • Privacy Policy
  • Resources
    • Must Have Kitchen Tools
  • Nav Social Menu

    • Email
    • Facebook
    • Instagram
    • Pinterest

Strawberry Poke Cake

Jun 29, 2019 · 10 Comments

Jump to Recipe
A slice of strawberry poke cake on a plate in front of the remainder of the cake

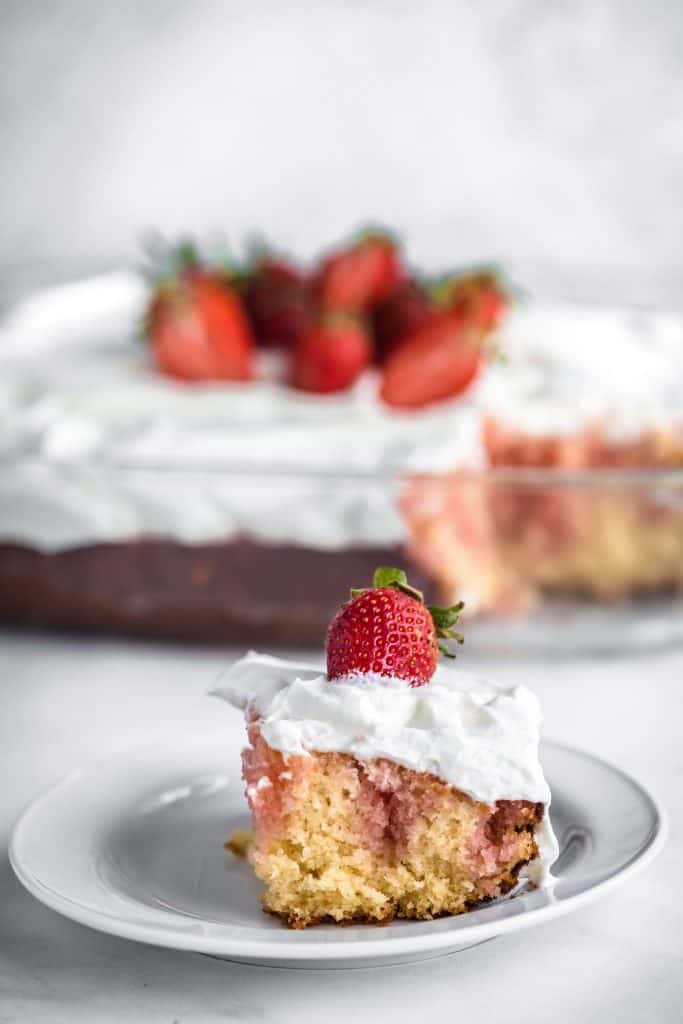
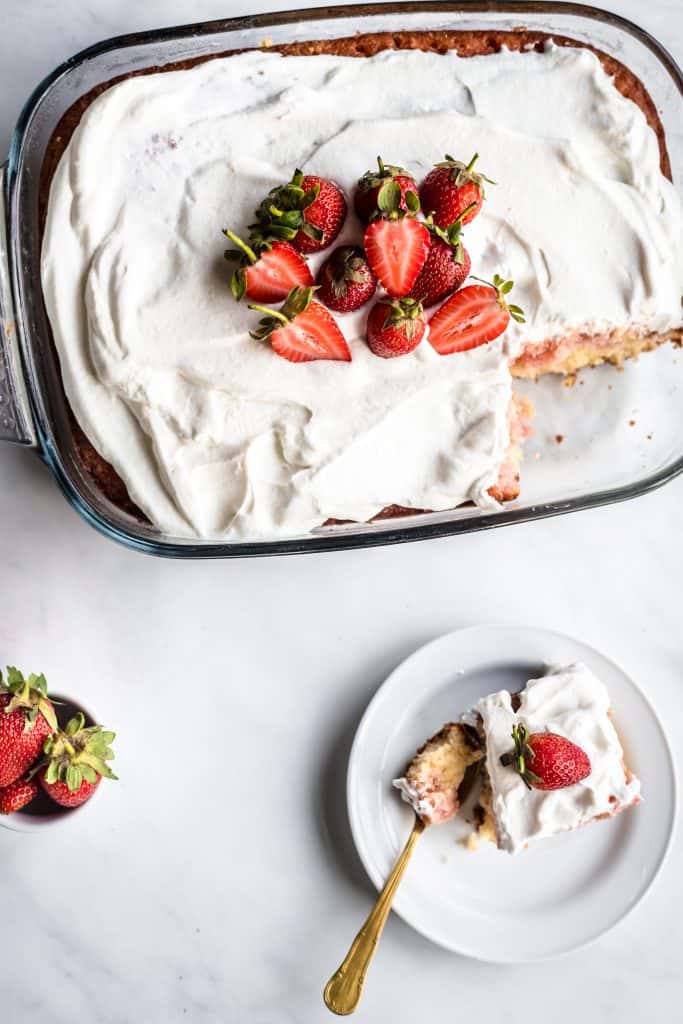
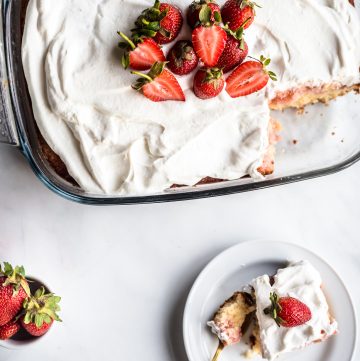
Strawberry poke cake is a soft and fluffy homemade white cake made extra fun with a strawberry jello mix poured in. This gives such a nice effect, both on taste and visually. This summery cake is topped with sweetened whipped cream and strawberries, is so easy to make and such a pleasure to eat! Perfect for the Fourth of July!

Layla and her strawberry requests strike again. You’ll remember them previously from this Strawberry Shortcake recipe . We were making a Father’s day cake and she demanded it be a white cake with strawberries. I knew just what recipe I wanted to use for the base. I had previously made a Nescafe cake from a fellow Instagram food blogger (Rawanshehs) and it turned out great. Light, fluffy, very easy and I just knew it would adapt really well to this recipe. I was right! I omitted the coffee in the batter, upped the vanilla extract, did without the caramelized almonds and instead of soaking the cooked cake with coffee, I soaked it with strawberry jello. Now the recipe is kid friendly and the epitome of summer.

The method:

You’ll cream the eggs with the sugar and vanilla for a full 5 minutes, preferably using a whisk attachment. This gives a fluffy thick batter with lots of lift and spring. You then slowly add the vegetable oil as well as your milk and yogurt. You’ll see the batter get a little looser at this point. In order to not undo all that work, you mix together your dry ingredients in a separate bowl, then fold them in very gently with a spatula, retaining as much air as you can.

What makes this strawberry poke cake so moist and fluffy?

The vegetable oil and the yogurt. Both excellent ways of keeping a cake moist with a fine crumb. Free free to substitute the yogurt for sour cream which has the same effect! As mentioned, the creaming process of the eggs with sugar also plays a big role in the texture.

Strawberry cake photographed from the top with a small white plate holding a slice of cake, and a small bowl of strawberries

Strawberry Poke Cake

A soft and fluffy homemade white cake that's made extra fun with a strawberry jello mix poured in. Topped with sweetened whipped cream and extra strawberries, this delights children and adults alike.
5 from 4 votes
Print Pin
Rate
Course: Dessert
Cuisine: American
Keyword: strawberry, cake
Prep Time: 20 minutes
Cook Time: 30 minutes
Servings: 12 people
Calories: 320kcal
Author: Farah Abumaizar

Ingredients

For the white cake:

  • 2 cups flour
  • 2 tsp baking powder
  • pinch salt
  • 4 eggs, room temperature
  • 3 tsp vanilla extract
  • 1 cup sugar
  • 2/3 cup vegetable oil
  • 2 tbsp yogurt
  • 1/2 cup full fat milk

For the jello mix:

  • 1 cup boiling water
  • 1 packet strawberry jello mix

For the whipped cream topping:

  • 250 ml whipping cream (1 cup)
  • 2 tbsp icing sugar (or regular)
  • 1 tsp vanilla extract

For garnish:

  • whole, halved, or sliced strawberries

Instructions

  • Preheat oven to 180 C (350F) and lightly grease a 9×13 inch pan with baking spray. Set aside.
  • In a bowl, combine flour, baking powder and salt and set aside.
  • In the bowl of a stand mixer fitted with a whisk attachment, or with a handheld mixer, combine the eggs, vanilla, and sugar by mixing on medium speed for 5 minutes or until thick and creamy.
  • While mixing, add in the oil by drizzling it in slowly, followed by the yogurt and milk.
  • Using a spatula, fold in the flour until just combined. Pour into prepared pan and bake for 30-35 minutes or until toothpick inserted in the center comes out clean.
  • When cake comes out of the oven, allow it to cool for 20 minutes, then prepare your jello mix by stirring the jello powder into the boiling water until gelatin dissolves.
  • Poke your cake all over with a wooden skewer or toothpick (holes should be about 2-3 cm apart) then pour the hot jello mix on top evenly. Cool completely, for about 1 hour.
  • While cake is cooling, prepare your sweetened whipped cream by combining the whipping cream, icing sugar, and vanilla in the bowl of a stand mixer. Beat on medium high speed with a whisk attachment until soft peaks form, about 2 -3 minutes.
  • Spread the whipped topping evenly on the cake as thick as you'd like, then garnish with strawberries. Store in the cake until serving.

Notes

White cake recipe adapted from rawanshehs
Tried this recipe?Mention @everylittlecrumb or tag #everylittlecrumb!

Nutrition

Calories: 320kcal


For more summer inspired dessert recipes:

Strawberry Shortcake

Pineapple Pudding Cake

Healthy Blueberry Crisp

Did you make this? Tag @everylittlecrumb or hashtag #everylittlecrumb and I’ll share your images!

Dessert, Recipes cake, strawberry

Previous Post: « Zucchini Brownies
Next Post: Fluffy Homemade Dinner Rolls »

Reader Interactions

Comments

  1. Michelle says

    June 29, 2019 at 10:29 am

    5 stars
    Wy have I never had poke cake before?!! This sounds delicious and looks gorgeous, can’t wait to try this x

    Reply
    • Farah Abumaizar says

      June 29, 2019 at 10:51 am

      Thanks Michelle! The poke-d bits get a little more flavor and moistness . So good!

      Reply
  2. Michelle Miller says

    June 29, 2019 at 10:32 am

    5 stars
    How beautiful!!! Love it! Such a fresh look and sure it’s got a taste just as fresh! Can’t wait to try it.

    Reply
    • Farah Abumaizar says

      June 29, 2019 at 10:51 am

      Thanks Michelle ! Appreciate the kind comment

      Reply
  3. Natalie says

    June 29, 2019 at 12:35 pm

    5 stars
    Looks so delicious! I love Poke cakes – such a great and creative way to infuse different flavors into cakes. Delicious!

    Reply
    • Farah Abumaizar says

      June 29, 2019 at 12:52 pm

      Thanks Natalie! Love your blog name 😊

      Reply
  4. Cathy says

    June 30, 2019 at 4:01 am

    5 stars
    What a pretty cake! Definitely agree this would be perfect for July 4th! On my list of treats to make for the barbeque for sure! Looks deliciously moist, easy and fast to make! Yep added to list!! 🙂

    Reply
    • Farah Abumaizar says

      June 30, 2019 at 12:03 pm

      Glad to hear that Cathy! Hope you get around to making it and love it 😍

      Reply
  5. Lorraine says

    July 27, 2019 at 5:21 pm

    This cake looks amazing and I am sure it tastes just as delicious. I hope to give it a try sometime soon:-)

    Reply
    • Farah Abumaizar says

      July 28, 2019 at 8:30 am

      It’s so simple but such a hit! I really
      hope you try it and love it thanks Lorraine!

      Reply

Leave a Reply Cancel reply

Your email address will not be published. Required fields are marked *

Recipe Rating


Primary Sidebar

Get more stuff

Subscribe to our mailing list and get interesting stuff and updates to your email inbox.

Thank you for subscribing.

Something went wrong.

we respect your privacy and take protecting it seriously

FeedFeed

Featured Recipes

Nana tea

Halal Guys Chicken and Rice

Aish El Saraya

Instant Pot Enchilada Soup

Death By Chocolate Zucchini Bread

More

Footer

everylittlecrumb

Farah Abu Maizar | Food Lover
How I spend a lot of my weekends😂. Nothing like How I spend a lot of my weekends😂. Nothing like a big bowl of cookie dough to say weekend mode on! Are you like me and end up eating more dough than actual cookies? My foolproof recipe I use and post time and time again 👇🏼(and often double the batch so I can store some in the freezer!)

Ingredients:
1 stick butter, softened 113 g
3/4 cup tightly packed brown sugar (I like using 1/2 cup light brown and 1/4 cup dark brown, but you can use either or) 150 g total
1/4 cup white sugar 50 g
1 egg, room temperature
1 tsp vanilla extract
1 3/4 cup all purpose flour 220 g
3/4 tsp baking soda
1/4 tsp salt
1 cup semi-sweet chocolate chips or chunks
flaky salt for topping, optional

Instructions:
-In the bowl of a stand mixer fitted with a paddle attachment, or a handheld mixer, cream together butter, brown sugar, and white sugar for 5 minutes on medium speed until light and fluffy.
-Once five minutes is over, add in egg and vanilla and mix until combined.
In a separate bowl, mix flour, baking soda, and salt, and mix until combined. Add these dry ingredients to the butter mixture on low speed, and mix until just combined.
-Using a wooden spoon or spatula, mix in chocolate chips or chunks until just combined. Place bowl of dough in fridge for at least 30 minutes to chill.
-While dough is chilling, heat oven to 180 C (350F). Portion dough out into heaped 1 tbsp-2 tbsp sized dough pieces on parchment paper lined baking sheets. 
-Bake for 11-12 minutes or until golden brown on the edges but still soft in the center. Cool until cookies firm up, then enjoy, still warm.
.
.
.
.
.

#chocolatecake #cookiemonster #cakestagram #cakephotos #layercake #chocolate #weekendbaking #foodblog #instayum #yummy #bakery #foodporn #foodtographyschool #foodphotography #chocolatechips #delish #foodfluffer #damnthatsdelish #cookiedough #chocatechipcookies #bakes #bakestagram #doughbowl #chocolatechips #hersheys
Bbq salmon bowls with mango avocado salsa- unbelie Bbq salmon bowls with mango avocado salsa- unbelievable! And start to finish, you can be eating these in 15-20 minutes. Save this recipe for your next meal, you don’t want to miss out!

I’ve partnered with @kilosamak to produce a few recipes with their quality seafood- I’ve tried several of their items and genuinely loved them all! They deliver seafood straight to your door for you to enjoy and cook at home. Takes all the guesswork out of trying to choose and clean fish yourself, perfect solution for someone like me who loves seafood but isn’t so great at prepping it! Check out their Instagram page on how to order, or head to the link in my bio.

This salmon has a smoky slightly sweet rub, is baked in the oven for ultimate ease, and gets piled on to rice and topped with an easy, addictive, zingy mango and avocado salsa. Adapted from @pinchofyum , I’ll make this again and again!

Ingredients:
For the salmon:
2 fillets, about 250 g each 
Spice Rub:
2 tbsp brown sugar
1.5 tsp paprika 
1 tsp garlic powder
1 tsp onion powder, optional 
1/2 tsp chili powder
1/2 tsp salt 
2 tbsp olive oil 

Mango avocado salsa:
1 diced mangos 
1 diced avocado
1/4 cup finely diced coriander 
1/4 cup finely diced red onion 
1 inch spicy green chili pepper, finely chopped
1 tsp honey
Juice and zest of one lime
Salt to taste

Method:
- Make the salsa by mixing together all the salsa ingredients and placing bowl in fridge while you make the salmon.
- Heat oven to 240C, and line a baking sheet with parchment paper. 
-Mix together all the ingredients for the salmon rub, and rub thoroughly all over the salmon, both sides.
- Bake for 10-12 minutes until salmon is opaque and cooked all the way through.
-Assemble bowls with rice, flaked pieces of salmon,and plenty of mango avocado salsa. Enjoy 😍

Catch the steps in my story!
Have you tried this pasta yet? Save this for your Have you tried this pasta yet? Save this for your next weeknight meal! Saucy macarona iltaybeen, can’t get much more comforting.  Adapted from @jedir3waish , makes for an easy delicious main that’ll make your family including kids very happy! Can find a step by step linked bio, or at https://everylittlecrumb.com/macarona/ , or in my story!

INGREDIENTS:
 
2 tbsp olive oil, divided
big pinch of salt
3 heaped tbsp tomato paste, divided 2 oz or 70 g
1 pack elbow macaroni 14 oz or 400 g
1 onion, very finely diced
1 zucchini, finely diced
1 carrot, finely diced
4-5 garlic cloves, minced
250 g ground beef
1 tsp seven spices
1 tsp turmeric
1/2 tsp paprika powder
1/4 tsp basil
1/4 tsp cinnamon powder
1/4 tsp garlic powder
1/2 tsp black pepper
1 tsp salt
1 can crushed tomatoes 14.5oz (400g)

NSTRUCTIONS
 
Bring a large pot of water to boil, add 1 tbsp olive oil and the salt, one tbsp of tomato paste, then the pack of pasta. Cook until al dente, then drain the pasta, reserving the pasta water. Set cooked pasta aside.

In a large skillet, heat the remaining tbsp of olive oil. Once hot, add the diced onion, and cook for 4-5 minutes until softened. Add the diced zucchini and carrots, and garlic and cook for a further 4-5 minutes until softened slightly.

Add the ground beef, and cook, smushing with a wooden spoon to break up the meat. Keep cooking until the beef is browned and cooked through, then optionally, drain the fat.
Add in the salt, pepper, and all the spices. Cook for another minute or so. Add the remaining 2 tbsp of tomato paste, and stir.

Add the can of crushed tomatoes and stir to combine. Bring to a simmer, then add a big ladleful of the reserved pasta water and simmer for 2-3 minutes on low heat.

Add the pasta to the sauce (I don't always add all the pasta, maybe 3/4 of the cooked amount until the finished dish is as saucy as I like). Stir to coat, cook for another minute or so until the pasta is warmed through, then enjoy!
This gorgeous tiramisu was so kindly sent to me by This gorgeous tiramisu was so kindly sent to me by @cadysweets.sa on my birthday, and we enjoyed every light fluffy bite of it. Their old account got hacked so follow along and support their new account ! They have a bunch of cakes and sweets for every occasion, so make someone or yourself happy and order one for a treat🤩! Send this to the tiramisu lover in your life 🍰.
.
.
.
.
.

#chocolatecake #magnoliabakery #cakestagram #cakephotos #layercake #chocolate #ganache #foodblog #instayum #yummy #bakery #foodporn #foodtographyschool #foodphotography #slice #delish #foodfluffer #damnthatsdelish #tiramisu #birthdaytreat #dessertbae #dessertoftheday #scoop #foodstyling #foodstylingandphotography
Easiest at home crusty bread with a great open cru Easiest at home crusty bread with a great open crumb texture. It’s the no knead bread from @breadin5 and has yet to fail me. Check my story for the step by step, and swipe for a video reveal.

Ingredients for two small loaves:
1.5 cups lukewarm water 
1/2 tbsp any type of yeast
1/2 tbsp salt
3 1/4 cup plain flour (450g)

Method:
In a large bowl, stir together the water with the yeast and salt. Try to dissolve but it’s fine if you have clumps.
2. Add flour all at once and stir, just until no flour patches remain.
3. Cover loosely with a kitchen cloth and leave it to rest for 2 hours in a warm place until risen and bubbly.
After this rest you can:
- Use dough immediately if impatient, but it’s easier to work with if cold, so maybe pop in fridge briefly
- Or, their recommended method and the one I do, leave in the fridge loosely covered for 12 hours or overnight. 
Refrigerated dough lasts up to two weeks, and flavor depends over time!
4. The next day, the dough might look deflated. That’s fine! When ready to bake, divide dough in half (I got two 400g dough balls)- it might be easier to handle if you sprinkle the dough lightly with flour, and take the half you are going to bake out of the fridge. Let it rest on a parchment paper lined baking sheet 40-90 minutes. The longer the more interior bubbles you should have. Preheat oven to 235C (450F), and after rest, make a few deep slashes in the dough with a sharp knife.
5. Place in the middle rack of the oven, and on the bottom rack place a roasting pan that had about a cup of hot water in it. This will create steam which gives a crustier crust!
6. Bake for 30-35 minutes or until deep golden brown.
7. Let it cool completely before enjoying!
.
.

.
.
.

#damnthatsdelish #foodfluffer #thebakefeed #feedfeed #tastingtable #forthemaking #BHGfood #foodblogfeed #bakedfromscratch #bakinglove #f52grams #foodbloggerpro #bakersofinstagram #TOHfoodie #foodphotography #canonphotos #bread #instayummy #kitchn #huffposttaste #food #dough #foodie #nokneadbread #homemadebread #doughter
Good morning! With dine in still closed in Saudi, Good morning! With dine in still closed in Saudi, Friday pancakes are fast becoming a tradition. And honestly, I don’t think I’ve had better pancakes at any restaurant recently! The easiest, fluffiest diner style pancakes are a huge hit in our family, find the recipe below adapted from @allrecipes . I like to barely warm the oven (110C or so) and keep the finished pancakes in a pan in the oven until I’m done with all the batter so they stay warm and perfect 👌🏼.

Ingredients
3/4 cup milk 170g
1 tbsp white vinegar
1 cup flour 125g
2 tbsp sugar 25g
1 tsp baking powder
1/2 tsp baking soda
1/4 tsp salt
1 egg room temperature
1/2 tsp vanilla
2 tbsp butter, melted 28g

Instructions:
-In a large bowl, combine the milk and vinegar, and let aside to stand for 5 minutes until curdled. Whisk to combine.
-In a separate large bowl, mix together the flour, sugar, baking powder, baking soda and salt.
-Add an egg, the vanilla and the melted butter to the buttermilk and whisk to combine.
-Add the dry ingredients all at once to the wet, and whisk until flour patches disappear. A few lumps are fine, but don't over mix.
-Let the batter rest for 5-10 minutes while you heat a pan on the stove.
lightly grease the pan with nonstick spray or butter, and pour about 1/4 cup of batter on the pan. Cook for 2-3 minutes on each side or until golden brown. (Flip the first time once you see bubbles form and the edges of the pancake dry up).
-Enjoy with toppings of your choice!
.
.
.
.
.
#pancakes #pancakerecipe #blueberrypancakes #maplesyrup #breakfast #morningslikethese #fridaymorning #flatlay #foodfluffer #breakfastrecipes #breakfastfood #breakfastofchampions #pancakelover #food #foodtography #foodtographyschool #foodphotography #delish #foodphotos #weekendbreakfast #eatingathome #recipeoftheday #foodporn #foodflatlay #blueberries #trayoftheday
One of my photos from my shoot @tackle.baks . How One of my photos from my shoot @tackle.baks . How insane does this tom yum soup look? For those who haven’t tried this casual seafood spot yet, you really should! The food is great and priced very reasonably, and they have some menu items I’m obsessed with like their crispy fish burger, the salmon poke salad and the creamy truffle shrimp👌🏼. They currently have a delivery offer going for only 5SAR on HungerStation, so no time like the present! Have I tempted you with this photo of the tom yum soup? I’m hungry just writing this caption🤤.
.
.
.
.
.
#soup #tomyum #tomyumsoup #food #foodphotography #canonphotography #canon #seafood #seafoodlover #shrimp #delish #beautifulcuisines #foodtographyschool #foodtography #foodblogger #instayum #lonelyplanetfood #dametravelerfoodie #soupseason #restaurantphotography #khobar #tastemade #tastingtable #foodfluffer
I wanted to take a really pretty photo of the choc I wanted to take a really pretty photo of the chocolate fondants and post it with the recipe but I gave into peer pressure and am posting the recipe with this horribly lit and not at all beautifully set up video🤷🏻‍♀️. At least the video really demonstrates how gooey and perfect the center of these chocolate lava cakes are, and how unbelievably delicious they are. You won’t believe how easy it is to make these! And you may never order this at a restaurant again! You can even use muffin cups instead of ramekins. Save this recipe for when you want to be extra fancy with your dessert 👩‍🍳 I looked at a bunch of recipes online and compiled my favorite steps from each, this is most influenced from @gordongram 

Ingredients:
For greasing the ramekins:
1 tbsp melted butter
1 tbsp cocoa powder

For the fondants:
1 stick butter 115 g
2 eggs
2 egg yolks
170 g chocolate bittersweet chocolate (I used Lindt 70%)
1/2 cup caster sugar or regular sugar
Pinch salt 
3 tbsp flour (41g)
25 g butter melted

Method:
-Spray ramekins with nonstick spray, then dust with cocoa powder and shake until evenly coated, or brush inside of ramekins with melted butter, chill into butter sets, grease again with more melted butter and dust with cocoa powder (Gordon Ramsay’s fancy method)

-Melt together the butter and chocolate over a pan of simmering water (Bain marie ). Set aside melted chocolate to cool for 10 minutes.

-In an electric mixer, whisk the eggs, egg yolks, and sugar until thick and pale about 3-4 min. Sift in the flour and beat again until mixed.

-Pour melted chocolate into the egg mixture in 3 additions, mixing well between each until combined.

-Pour fondant batter evenly into prepared ramekins. If baking immediately, let them chill in the fridge while you preheat the oven to 200C. You can also store in the fridge for up to two days before baking.

- Bake 10-12 minute or until top just looks set. If using muffin pans, they’ll take less time, 8-10 minutes. Remove from oven and cool 1 minute before inverting onto a plate. Enjoy immediately with vanilla ice cream and berries!
Load More... Follow on Instagram

Copyright © 2019 on the Seasoned Pro Theme