• Skip to primary navigation
  • Skip to main content
  • Skip to primary sidebar
  • Skip to footer

 logo

  • Recipes
    • Breakfast
    • Sides
    • Soup
    • Main Meals
    • Healthy
    • Dessert
    • Drinks
  • Eating Out
  • About Me
    • Privacy Policy
  • Resources
    • Must Have Kitchen Tools
  • Nav Social Menu

    • Email
    • Facebook
    • Instagram
    • Pinterest

Chocolate Orange Cake

Jun 30, 2020 · Leave a Comment

Jump to Recipe
cut up slices of chocolate orange cake with a knife in the frame

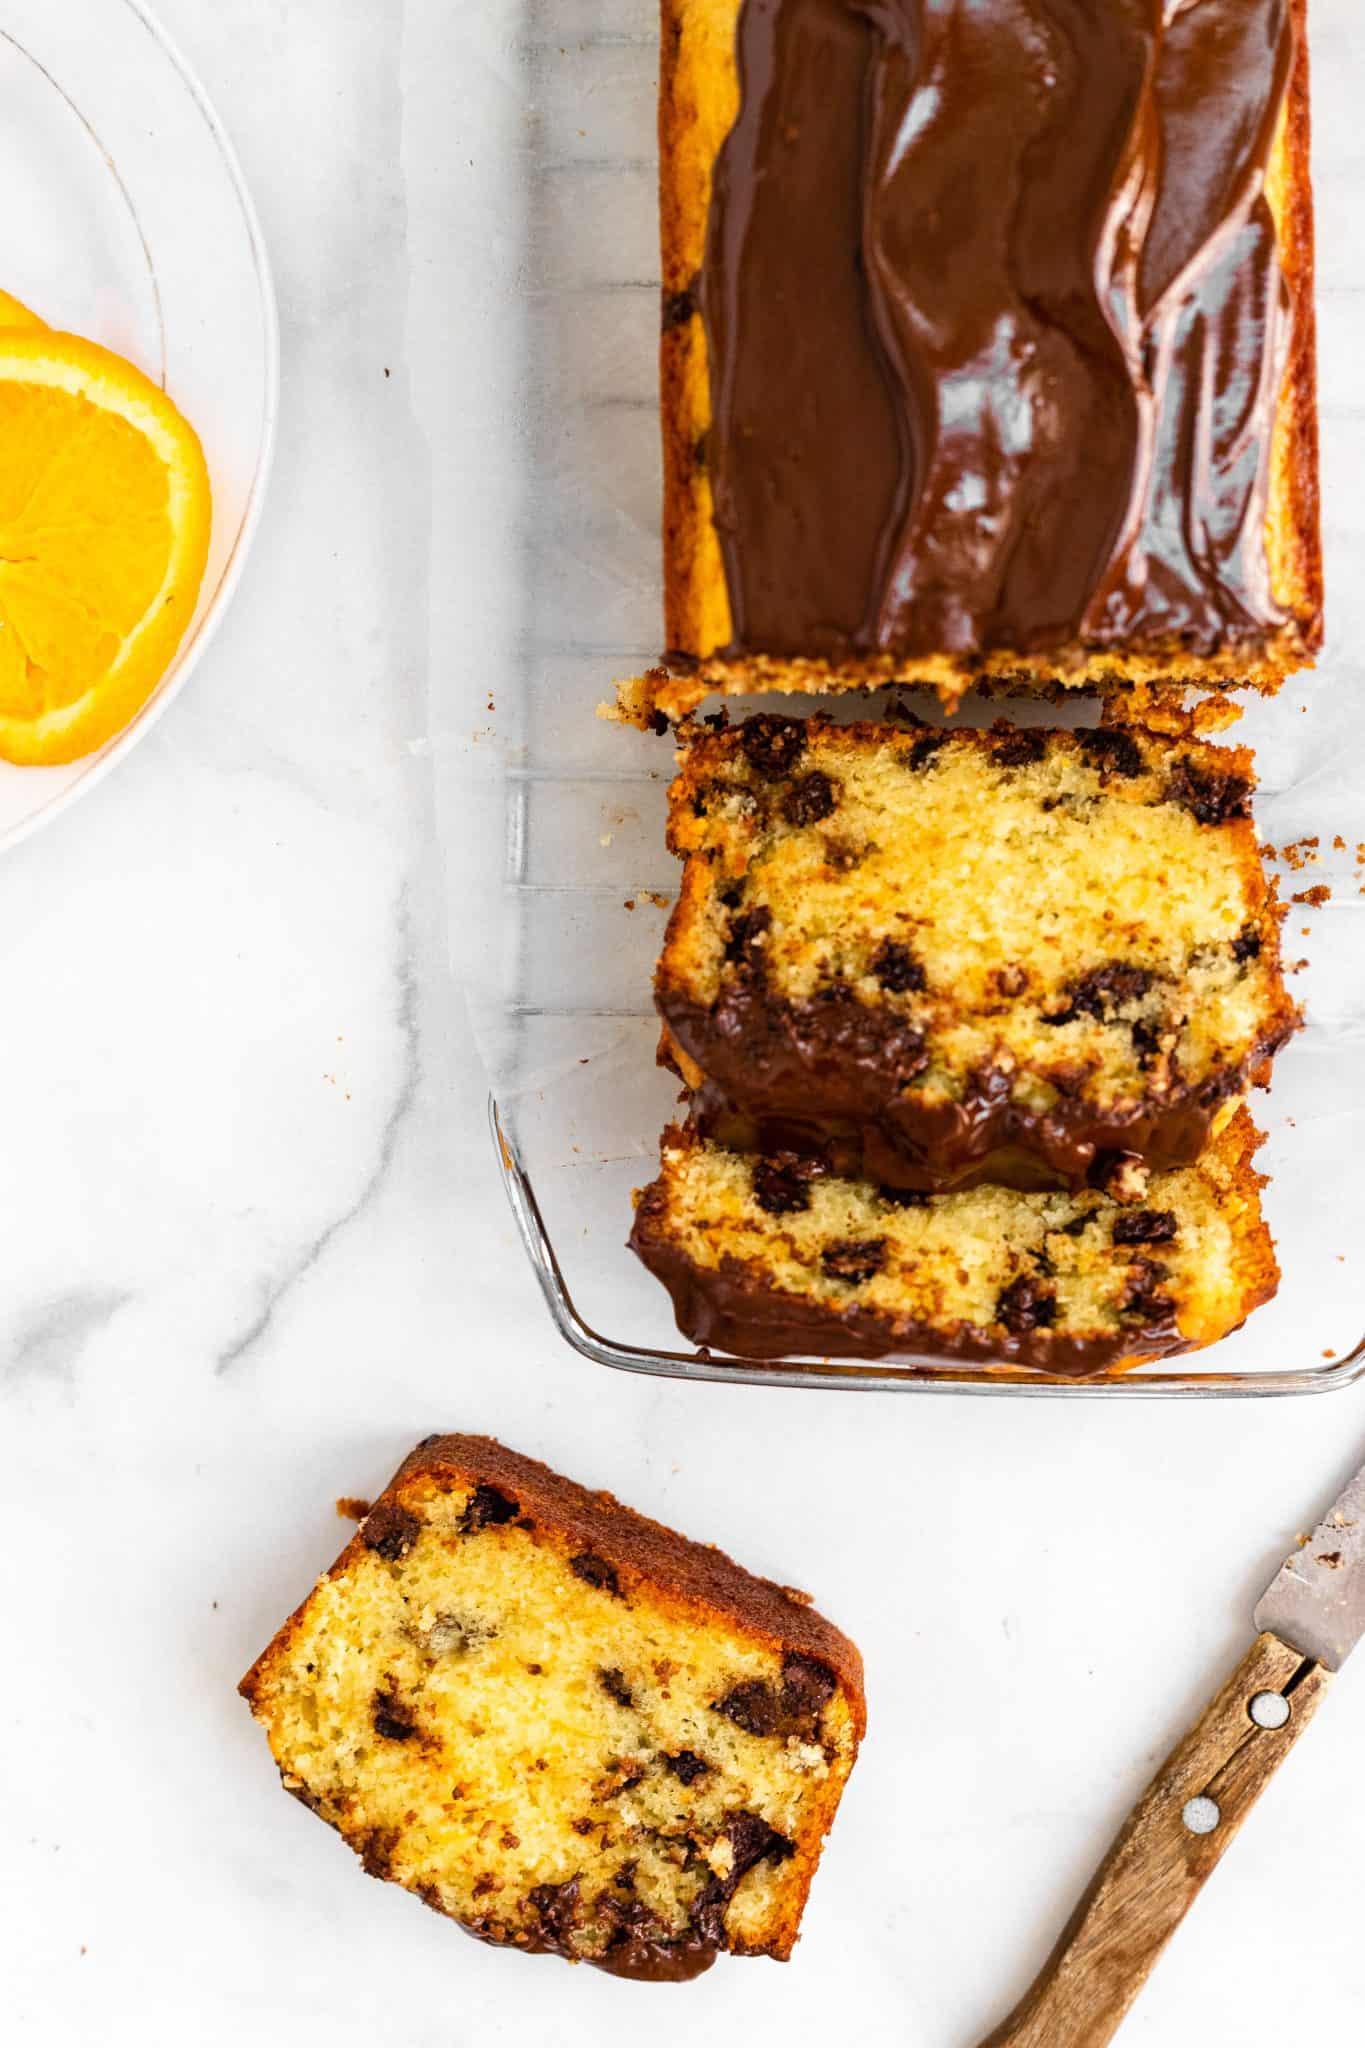
This chocolate orange cake is delicious! A moist orange loaf cake with chocolate chunks, topped with the easiest and most decadent chocolate glaze. Easy, and one of the best cakes I’ve ever made!

I was watching the Great British Bake Off- the most comforting show on the world, and they had an episode on citrus cakes. I saw so many gorgeous lemon and orange cakes and I just HAD to make one- but I also had to deal with an intense chocolate craving!

chocolate orange cake sliced with a slice on the plate

What makes this chocolate orange cake so good?

It’s the best flavor combination! Orange and chocolate are a match made in heaven, especially when the flavors are subtle enough to complement each other perfectly.

The cake itself is an easy, one bowl type of cake, and you don’t need an electric mixer.

It’s also so moist and fluffy and the perfect texture.

It’s based off a very popular Alison Roman lemon cake, that I’ve adapted into this lemon turmeric cake on my website, one of my most visited recipes ever! I’ve always absolutely loved that cake, it’s one of the best loaf cakes I’ve tried.

When I started thinking of an orange loaf cake, I figured why reinvent the wheel! I just replaced the lemon zest and juice with orange. Total win!

The chocolate glaze is sinfully good and so easy!

Ingredients in the chocolate orange cake:

flatlay ingredients for the making of the chocolate orange cake

Dry ingredients:

All purpose (plain) flour, baking powder for lift, a pinch of salt

Orange scented sugar:

orange zest with sugar in a bowl

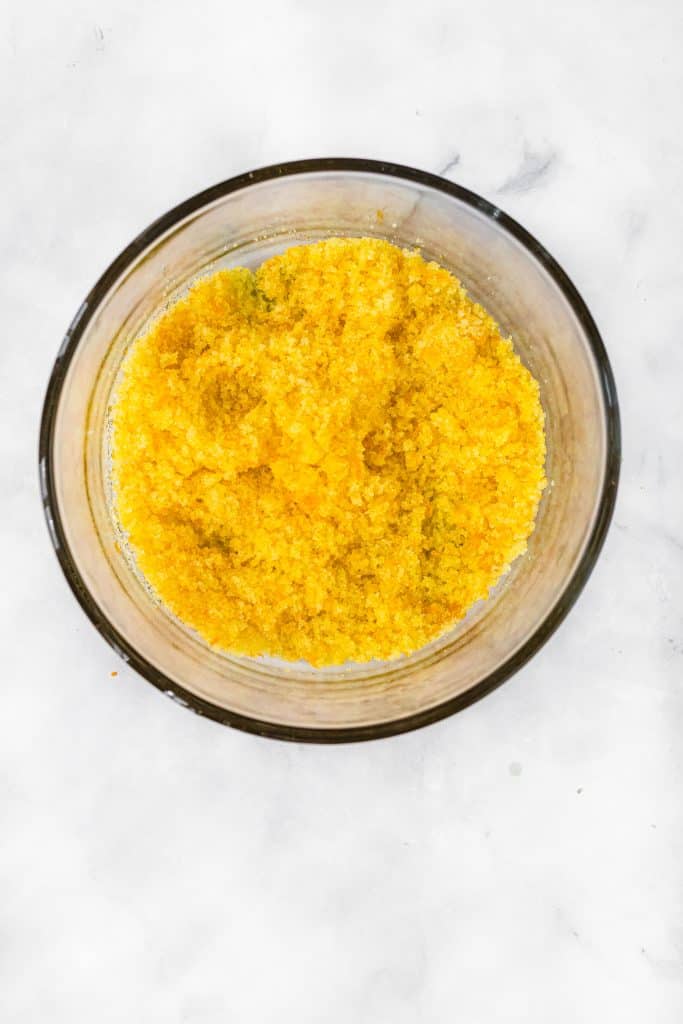
Make by rubbing orange zest into white sugar until moist and fragrant and. lightly tinted orange.

Wet ingredients:

Fresh squeezed orange juice, from the same oranges you zested, yogurt or sour cream (I used plain yogurt), eggs and melted butter. Melted butter gives the moistness of vegetable oil, with the wonderful flavor of butter.

orange chocolate cake batter in a bowl with a spatula

How to make the cake:

Whisk the dry ingredients into a bowl!

Make the most delicious fragrant sugar by rubbing the orange zest into the sugar with your finger tips. Adds so much flavor!

Using a whisk, add the yogurt, eggs and orange juice into the sugar runtil combined.

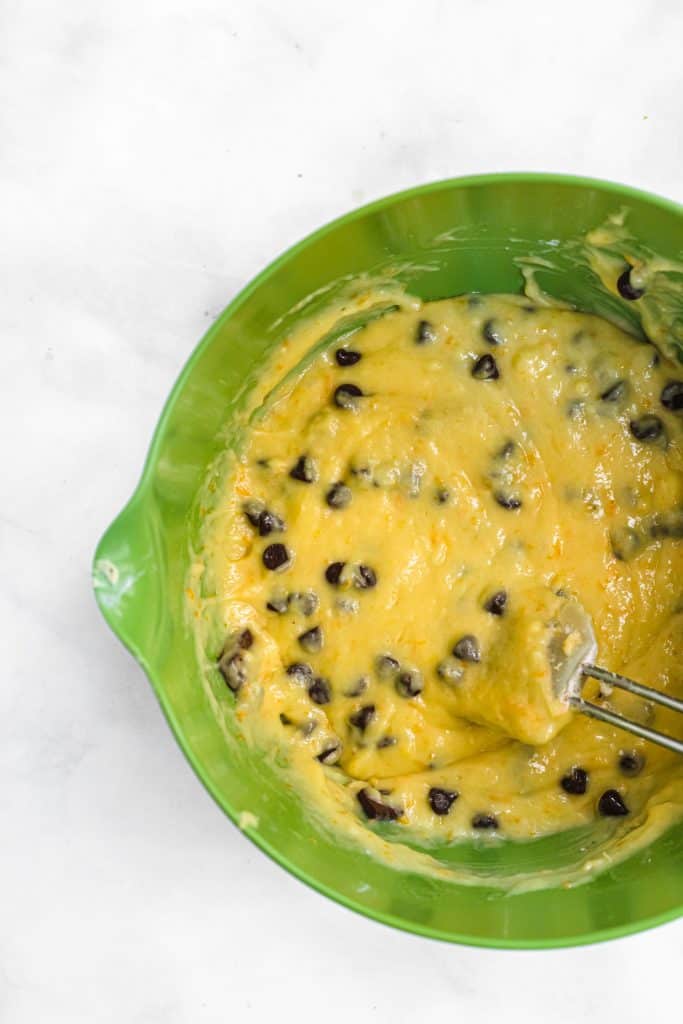
Add these wet ingredients to the dry ingredients and fold until combined. Add melted butter, and fold that until combined, and finally add in the chocolate chunks until just combined.

Bake until golden brown on top, and a toothpick comes out clean

How to make a chocolate glaze for the orange chocolate cake:

baked orange cake with chocolate glaze on the side

It’s the easiest glaze ever! I like that it doesn’t call for heavy cream like many chocolate ganache/glaze recipes, because I don’t always have that in my fridge.

You simply need to gently melt together chocolate, butter, and corn syrup. You can sub honey or maple syrup for the corn syrup, it’s just a tbsp so it won’t make a difference.

I use a bain marie ( a double boiler, where a bowl is set over a pot of simmering water). The chocolate is melted along with the butter and corn syrup in that bowl, and since it doesn’t directly touch the boiling water, it melts gently enough that the chocolate won’t seize up.

Alternately, you can microwave, but do this with caution. I’d do medium power, and every 20-30 seconds take the bowl out of the microwave and stir.

Once the chocolate has JUST melted, you can stop microwaving as the residual heat will smooth out the mix.

The warm glaze should coat the cooled cake, so you can start making the glaze once the cake has had a chance to cool.

How to store the cake:

The cake would store well at room temperature for a few days in a Tupperware or tightly covered, you. can also store in the fridge.

A baked cake would store wonderfully in the freezer for 4-6 months.

chocolate orange cake sliced and cut up with a glass of orange juice on the background with oranges on a plate

Chocolate Orange Cake

A perfectly moist and delicious orange loaf cake studded with chocolate chips and topped with an easy decadent chocolate glaze
Print Pin
Rate
Course: Dessert
Cuisine: American
Keyword: chocolate, orange, cake
Prep Time: 15 minutes
Cook Time: 50 minutes
Servings: 8 people
Calories: 441kcal
Author: Farah Abumaizar

Ingredients

For the cake:

  • 1.5 cups flour 210 g
  • 2 tsp baking powder
  • scant 1/2 tsp salt
  • 1 cup sugar 200 g
  • 2 tbsp orange zest
  • 2 tbsp orange juice
  • 3/4 cup yogurt or sour cream
  • 2 large eggs
  • 1/2 cup butter, melted 115 g
  • 1/2 cup semi-sweet chocolate chips, tossed in a tablespoon of flour tossing them with a little flour helps to prevent them from sinking

For the chocolate glaze:

  • 3/4 cup semisweet or dark chocolate chips or chunks
  • 3 tbsp unsalted butter
  • 1 tbsp light corn syrup or honey
  • 1/4 tsp vanilla extract

Instructions

For the cake:

  • Preheat the oven to 180 C (350F). Grease a 9×5 inch loaf pan with non stick spray, then line with parchment paper with some overhang so you can lift the finished cake out easily.
  • Whisk the flour, baking powder, and salt in a bowl.
  • In a large bowl, combine the one cup of sugar with the orange zest, rubbing the orange zest into the sugar with your fingertips until the sugar is moistened and pale orange. Whisk in the yogurt or sour cream, eggs, and orange juice until well combined.
  • Use a spatula and add the wet ingredients to the flour mixture, stirring until just combined. Fold in the melted butter until just combined, then fold in the chocolate chips/chunks. Pour the batter into the prepared loaf pan, smoothing out the top.
  • Bake for 45-50 minutes or until light golden brown and toothpick inserted in the center comes out clean. Cool before topping with glaze.

For the chocolate glaze:

  • In a double boiler over simmering water, combine chocolate chips, butter, and corn syrup. Stir until chocolate melts and mixture is smooth (you can also choose to microwave but do it gently, stirring every 20 seconds or so) then add vanilla.
  • Spread the warm glaze on the top of the cake.

Notes

Cake recipe adapted from this highly rated Lemon Turmeric Cake recipe on my website, which is adopted from Alison Roman.
 
Chocolate glaze from All Recipes.
Tried this recipe?Mention @everylittlecrumb or tag #everylittlecrumb!

Nutrition

Calories: 441kcal

Chocolate Orange Cake by everylittlecrumb on Jumprope.

If you liked this recipe, you might like:

Lemon Turmeric Cake

Gluten Free Orange Cake

Unbelievably Moist Chocolate Bundt Cake

Dessert, Recipes

Previous Post: « Creme Brulee Bread Pudding
Next Post: Turkish Pide »

Reader Interactions

Leave a Reply Cancel reply

Your email address will not be published. Required fields are marked *

Recipe Rating


Primary Sidebar

Get more stuff

Subscribe to our mailing list and get interesting stuff and updates to your email inbox.

Thank you for subscribing.

Something went wrong.

we respect your privacy and take protecting it seriously

FeedFeed

Featured Recipes

Nana tea

Halal Guys Chicken and Rice

Aish El Saraya

Instant Pot Enchilada Soup

Death By Chocolate Zucchini Bread

More

Footer

everylittlecrumb

Farah Abu Maizar | Food Lover
Bbq salmon bowls with mango avocado salsa- unbelie Bbq salmon bowls with mango avocado salsa- unbelievable! And start to finish, you can be eating these in 15-20 minutes. Save this recipe for your next meal, you don’t want to miss out!

I’ve partnered with @kilosamak to produce a few recipes with their quality seafood- I’ve tried several of their items and genuinely loved them all! They deliver seafood straight to your door for you to enjoy and cook at home. Takes all the guesswork out of trying to choose and clean fish yourself, perfect solution for someone like me who loves seafood but isn’t so great at prepping it! Check out their Instagram page on how to order, or head to the link in my bio.

This salmon has a smoky slightly sweet rub, is baked in the oven for ultimate ease, and gets piled on to rice and topped with an easy, addictive, zingy mango and avocado salsa. Adapted from @pinchofyum , I’ll make this again and again!

Ingredients:
For the salmon:
2 fillets, about 250 g each 
Spice Rub:
2 tbsp brown sugar
1.5 tsp paprika 
1 tsp garlic powder
1 tsp onion powder, optional 
1/2 tsp chili powder
1/2 tsp salt 
2 tbsp olive oil 

Mango avocado salsa:
1 diced mangos 
1 diced avocado
1/4 cup finely diced coriander 
1/4 cup finely diced red onion 
1 inch spicy green chili pepper, finely chopped
1 tsp honey
Juice and zest of one lime
Salt to taste

Method:
- Make the salsa by mixing together all the salsa ingredients and placing bowl in fridge while you make the salmon.
- Heat oven to 240C, and line a baking sheet with parchment paper. 
-Mix together all the ingredients for the salmon rub, and rub thoroughly all over the salmon, both sides.
- Bake for 10-12 minutes until salmon is opaque and cooked all the way through.
-Assemble bowls with rice, flaked pieces of salmon,and plenty of mango avocado salsa. Enjoy 😍

Catch the steps in my story!
Have you tried this pasta yet? Save this for your Have you tried this pasta yet? Save this for your next weeknight meal! Saucy macarona iltaybeen, can’t get much more comforting.  Adapted from @jedir3waish , makes for an easy delicious main that’ll make your family including kids very happy! Can find a step by step linked bio, or at https://everylittlecrumb.com/macarona/ , or in my story!

INGREDIENTS:
 
2 tbsp olive oil, divided
big pinch of salt
3 heaped tbsp tomato paste, divided 2 oz or 70 g
1 pack elbow macaroni 14 oz or 400 g
1 onion, very finely diced
1 zucchini, finely diced
1 carrot, finely diced
4-5 garlic cloves, minced
250 g ground beef
1 tsp seven spices
1 tsp turmeric
1/2 tsp paprika powder
1/4 tsp basil
1/4 tsp cinnamon powder
1/4 tsp garlic powder
1/2 tsp black pepper
1 tsp salt
1 can crushed tomatoes 14.5oz (400g)

NSTRUCTIONS
 
Bring a large pot of water to boil, add 1 tbsp olive oil and the salt, one tbsp of tomato paste, then the pack of pasta. Cook until al dente, then drain the pasta, reserving the pasta water. Set cooked pasta aside.

In a large skillet, heat the remaining tbsp of olive oil. Once hot, add the diced onion, and cook for 4-5 minutes until softened. Add the diced zucchini and carrots, and garlic and cook for a further 4-5 minutes until softened slightly.

Add the ground beef, and cook, smushing with a wooden spoon to break up the meat. Keep cooking until the beef is browned and cooked through, then optionally, drain the fat.
Add in the salt, pepper, and all the spices. Cook for another minute or so. Add the remaining 2 tbsp of tomato paste, and stir.

Add the can of crushed tomatoes and stir to combine. Bring to a simmer, then add a big ladleful of the reserved pasta water and simmer for 2-3 minutes on low heat.

Add the pasta to the sauce (I don't always add all the pasta, maybe 3/4 of the cooked amount until the finished dish is as saucy as I like). Stir to coat, cook for another minute or so until the pasta is warmed through, then enjoy!
This gorgeous tiramisu was so kindly sent to me by This gorgeous tiramisu was so kindly sent to me by @cadysweets.sa on my birthday, and we enjoyed every light fluffy bite of it. Their old account got hacked so follow along and support their new account ! They have a bunch of cakes and sweets for every occasion, so make someone or yourself happy and order one for a treat🤩! Send this to the tiramisu lover in your life 🍰.
.
.
.
.
.

#chocolatecake #magnoliabakery #cakestagram #cakephotos #layercake #chocolate #ganache #foodblog #instayum #yummy #bakery #foodporn #foodtographyschool #foodphotography #slice #delish #foodfluffer #damnthatsdelish #tiramisu #birthdaytreat #dessertbae #dessertoftheday #scoop #foodstyling #foodstylingandphotography
Easiest at home crusty bread with a great open cru Easiest at home crusty bread with a great open crumb texture. It’s the no knead bread from @breadin5 and has yet to fail me. Check my story for the step by step, and swipe for a video reveal.

Ingredients for two small loaves:
1.5 cups lukewarm water 
1/2 tbsp any type of yeast
1/2 tbsp salt
3 1/4 cup plain flour (450g)

Method:
In a large bowl, stir together the water with the yeast and salt. Try to dissolve but it’s fine if you have clumps.
2. Add flour all at once and stir, just until no flour patches remain.
3. Cover loosely with a kitchen cloth and leave it to rest for 2 hours in a warm place until risen and bubbly.
After this rest you can:
- Use dough immediately if impatient, but it’s easier to work with if cold, so maybe pop in fridge briefly
- Or, their recommended method and the one I do, leave in the fridge loosely covered for 12 hours or overnight. 
Refrigerated dough lasts up to two weeks, and flavor depends over time!
4. The next day, the dough might look deflated. That’s fine! When ready to bake, divide dough in half (I got two 400g dough balls)- it might be easier to handle if you sprinkle the dough lightly with flour, and take the half you are going to bake out of the fridge. Let it rest on a parchment paper lined baking sheet 40-90 minutes. The longer the more interior bubbles you should have. Preheat oven to 235C (450F), and after rest, make a few deep slashes in the dough with a sharp knife.
5. Place in the middle rack of the oven, and on the bottom rack place a roasting pan that had about a cup of hot water in it. This will create steam which gives a crustier crust!
6. Bake for 30-35 minutes or until deep golden brown.
7. Let it cool completely before enjoying!
.
.

.
.
.

#damnthatsdelish #foodfluffer #thebakefeed #feedfeed #tastingtable #forthemaking #BHGfood #foodblogfeed #bakedfromscratch #bakinglove #f52grams #foodbloggerpro #bakersofinstagram #TOHfoodie #foodphotography #canonphotos #bread #instayummy #kitchn #huffposttaste #food #dough #foodie #nokneadbread #homemadebread #doughter
Good morning! With dine in still closed in Saudi, Good morning! With dine in still closed in Saudi, Friday pancakes are fast becoming a tradition. And honestly, I don’t think I’ve had better pancakes at any restaurant recently! The easiest, fluffiest diner style pancakes are a huge hit in our family, find the recipe below adapted from @allrecipes . I like to barely warm the oven (110C or so) and keep the finished pancakes in a pan in the oven until I’m done with all the batter so they stay warm and perfect 👌🏼.

Ingredients
3/4 cup milk 170g
1 tbsp white vinegar
1 cup flour 125g
2 tbsp sugar 25g
1 tsp baking powder
1/2 tsp baking soda
1/4 tsp salt
1 egg room temperature
1/2 tsp vanilla
2 tbsp butter, melted 28g

Instructions:
-In a large bowl, combine the milk and vinegar, and let aside to stand for 5 minutes until curdled. Whisk to combine.
-In a separate large bowl, mix together the flour, sugar, baking powder, baking soda and salt.
-Add an egg, the vanilla and the melted butter to the buttermilk and whisk to combine.
-Add the dry ingredients all at once to the wet, and whisk until flour patches disappear. A few lumps are fine, but don't over mix.
-Let the batter rest for 5-10 minutes while you heat a pan on the stove.
lightly grease the pan with nonstick spray or butter, and pour about 1/4 cup of batter on the pan. Cook for 2-3 minutes on each side or until golden brown. (Flip the first time once you see bubbles form and the edges of the pancake dry up).
-Enjoy with toppings of your choice!
.
.
.
.
.
#pancakes #pancakerecipe #blueberrypancakes #maplesyrup #breakfast #morningslikethese #fridaymorning #flatlay #foodfluffer #breakfastrecipes #breakfastfood #breakfastofchampions #pancakelover #food #foodtography #foodtographyschool #foodphotography #delish #foodphotos #weekendbreakfast #eatingathome #recipeoftheday #foodporn #foodflatlay #blueberries #trayoftheday
One of my photos from my shoot @tackle.baks . How One of my photos from my shoot @tackle.baks . How insane does this tom yum soup look? For those who haven’t tried this casual seafood spot yet, you really should! The food is great and priced very reasonably, and they have some menu items I’m obsessed with like their crispy fish burger, the salmon poke salad and the creamy truffle shrimp👌🏼. They currently have a delivery offer going for only 5SAR on HungerStation, so no time like the present! Have I tempted you with this photo of the tom yum soup? I’m hungry just writing this caption🤤.
.
.
.
.
.
#soup #tomyum #tomyumsoup #food #foodphotography #canonphotography #canon #seafood #seafoodlover #shrimp #delish #beautifulcuisines #foodtographyschool #foodtography #foodblogger #instayum #lonelyplanetfood #dametravelerfoodie #soupseason #restaurantphotography #khobar #tastemade #tastingtable #foodfluffer
I wanted to take a really pretty photo of the choc I wanted to take a really pretty photo of the chocolate fondants and post it with the recipe but I gave into peer pressure and am posting the recipe with this horribly lit and not at all beautifully set up video🤷🏻‍♀️. At least the video really demonstrates how gooey and perfect the center of these chocolate lava cakes are, and how unbelievably delicious they are. You won’t believe how easy it is to make these! And you may never order this at a restaurant again! You can even use muffin cups instead of ramekins. Save this recipe for when you want to be extra fancy with your dessert 👩‍🍳 I looked at a bunch of recipes online and compiled my favorite steps from each, this is most influenced from @gordongram 

Ingredients:
For greasing the ramekins:
1 tbsp melted butter
1 tbsp cocoa powder

For the fondants:
1 stick butter 115 g
2 eggs
2 egg yolks
170 g chocolate bittersweet chocolate (I used Lindt 70%)
1/2 cup caster sugar or regular sugar
Pinch salt 
3 tbsp flour (41g)
25 g butter melted

Method:
-Spray ramekins with nonstick spray, then dust with cocoa powder and shake until evenly coated, or brush inside of ramekins with melted butter, chill into butter sets, grease again with more melted butter and dust with cocoa powder (Gordon Ramsay’s fancy method)

-Melt together the butter and chocolate over a pan of simmering water (Bain marie ). Set aside melted chocolate to cool for 10 minutes.

-In an electric mixer, whisk the eggs, egg yolks, and sugar until thick and pale about 3-4 min. Sift in the flour and beat again until mixed.

-Pour melted chocolate into the egg mixture in 3 additions, mixing well between each until combined.

-Pour fondant batter evenly into prepared ramekins. If baking immediately, let them chill in the fridge while you preheat the oven to 200C. You can also store in the fridge for up to two days before baking.

- Bake 10-12 minute or until top just looks set. If using muffin pans, they’ll take less time, 8-10 minutes. Remove from oven and cool 1 minute before inverting onto a plate. Enjoy immediately with vanilla ice cream and berries!
I can’t stop myself from craving over the top de I can’t stop myself from craving over the top decadent desserts when it’s cloudy and a little chilly. One of my favorites in Bahrain is @joesbahrain ‘s sticky date cake that comes swimming in a pool of caramel sauce. It’s a drool worthy dessert! Their warm chocolate brownie is also unbelievable. I always end up confused on which to order and usually give in to ordering both 😂. Their coffee pairs perfectly with either👌🏼. Definitely miss this spot and wish I could be dining outdoors @theavenuesbh now indulging on this ultimate treat. Do you agree with my review? 
.
.
.
.

#chocolatecake #magnoliabakery #cakestagram #cakephotos #layercake #chocolate #ganache #foodblog #instayum #yummy #bakery #foodporn #foodtographyschool #foodphotography #slice #delish #foodfluffer #damnthatsdelish #datecake #caramel #stickytoffee
Load More... Follow on Instagram

Copyright © 2019 on the Seasoned Pro Theme