• Skip to primary navigation
  • Skip to main content
  • Skip to primary sidebar
  • Skip to footer

 logo

  • Recipes
    • Breakfast
    • Sides
    • Soup
    • Main Meals
    • Healthy
    • Dessert
    • Drinks
  • Eating Out
  • About Me
    • Privacy Policy
  • Resources
    • Must Have Kitchen Tools
  • Nav Social Menu

    • Email
    • Facebook
    • Instagram
    • Pinterest

Chicken fatteh

Sep 7, 2020 · 11 Comments

Jump to Recipe
assembled chicken fatteh with toasted pita bread and nuts in bowls in the corner

Chicken fatteh is a Middle Eastern dish of rice, chicken, garlicky yogurt, crispy pita bread and toasted nuts. It’s a complete comfort food, and truly delicious!

What is chicken fatteh?

large plate of assembled and garnished fatteh

Fatteh is a Levantine dish that usually consists of stale or toasted bread, topped with a protein of sorts and a yogurt sauce. A very popular version made with chickpeas is usually eaten for breakfast, while eggplant fatteh makes a delicious appetizer, and chicken fatteh is typically a main dish.

Chicken fatteh usually also includes rice, where the other versions might just be bread with yogurt. The best part is when you have homemade chicken broth to soak the rice in which gives so much flavor to the dish.

Why is this the best chicken fatteh?

It’s packed full of flavor with the broth soaked rice, shredded chicken, garlic yogurt and all the accompanying garnishes.

Fatteh is flexible! Traditionally it was a way to use up leftovers, and this is a great way to use up leftover chicken and rice, and change up the toppings however you like.

It’s such an enjoyable dish to serve to family or friends. Very vibrant and comfort!

Ingredients in fatteh:

all the ingredients needed to make chicken fatteh

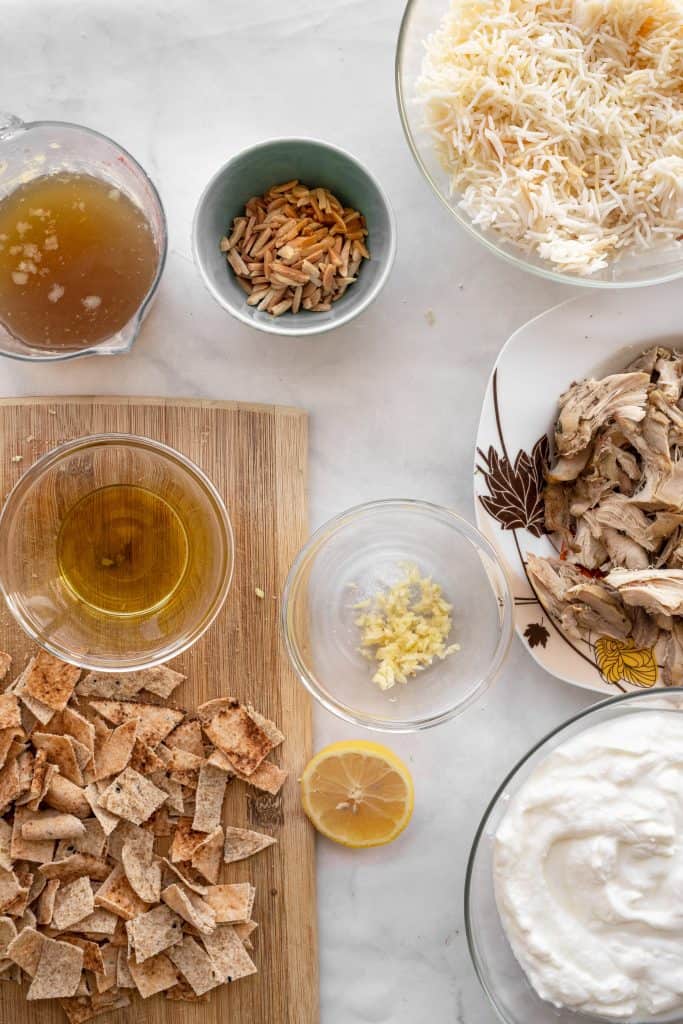
Bread: Usually pita bread. Instead of stale bread, We like to crisp up pita bread.

Rice: I usually use basmati rice, that I have leftover. You just need about 2 cups of cooked rice or so. If you don’t have any cooked rice, prepare the basmati rice:

Soak rice for about 20 minutes, then drain and rinse. Place in a saucepan with 1.5 cups of water (or until the water covers the rice by about an inch). Add a little salt and oil to the water, bring to a boil, then reduce heat to a low simmer and cover tightly.

Leave to simmer for about 15-20 minutes or until all the water has been absorbed. Set off the heat but still covered for 10 minutes, then remove the lid and fluff with a fork.

Chicken: This is a great way to use up leftover cooked chicken, which is what I usually do. Whenever I make chicken broth or Mulukhiya, I save some of the shredded chicken and chicken broth and use it in this dish. If you don’t have any cooked chicken, it’s easy enough to make!

Place your chicken pieces (skin removed) in a large pot. They can be all bone in chicken breasts, whole chicken pieces, or even boneless chicken breasts. Cover with water and add aromatics like whole cinnamon sticks, cloves, bay leaves, and I like adding an onion cut into wedges.

Bring to a boil, then reduce the heat to a simmer. Some foam will accumulate on the surface, just skim that off and discard (you can keep doing this throughout the cooking process).

Simmer until chicken is cooked through- depending on the top of chicken you are using, it’ll take a different amount of time. I like a low and slow cooking process with bone in chicken, at least a good hour or so.

Once chicken is cooked, remove to the side, and drain the stock through a colander. You can use the broth in the dish, and once the chicken cools, shred it to use also!

I have a full tutorial on making chicken stock here, and I like making big batches and freezing it to use in dishes like this.

Garlic Yogurt: Simple mix together plain yogurt (regular, not Greek style) with crushed garlic -amount to your taste, salt and fresh lemon juice. You can also a drizzle of some tahini too which gives a great rich flavor.

Garnishes: Toasted nuts are essential in my opinion. I do pine nuts, slivered almonds or whole skinless almonds, or a mix. Chopped parsley also gives great flavor and color, as well as a few sprinkles of paprika powder and dried mint.

How to prepare the fatteh:

rice in a bowl, garlic yogurt in a bowl and toasted pita bread in a plate

Once all your individual components are ready, assembling is a breeze.

Keep in mind, fatteh is definitely best prepared fresh right before serving. Any earlier and the bread gets too soggy, and the yogurt starts to dry up and congeal.

I actually really prefer crispy bread to soggy broth soaked bread, so I have a little trick I do. Traditionally, bread is always the base layer of fatteh, and everything else goes on top.

I like to flip the order. I pour the shredded chicken and broth over the rice (broth soaked rice is delicious!), then top with the garlic yogurt sauce, THEN the toasted bread, and all the garnishes. That’s just my preference but feel free to do it the classic way!

scoop being taken out of a large dish of chicken fatteh

Tips and tricks for the best ever fatteh:

Have your ingredients toasted in advance- the bread, the nuts. It’ll make it really easy when it comes time to assemble

You can mix up the yogurt in advance with the garlic, salt and lemon and store it in the fridge for a couple hours. This really infuses it with the garlic flavor.

Make this vegetarian! Swap out the chicken for roasted eggplant cubes, or whole chickpeas.

Similarly, you can try using beef mince or lamb mince if you have any leftover. Check out this post for Middle Eastern style lamb mince.

You can use different types of rice like vermicelli rice or hashweh rice (rice with minced ground meat and spices). You can even omit the rice all together!

a plate of chicken fatteh with the rest of the fatteh in the background

Chicken Fatteh

A delicious Middle Eastern dish of rice, chicken broth, shredded chicken, a garlicky yogurt and toasted bread. Absolutely comforting and delicious!
5 from 5 votes
Print Pin Rate
Course: Main Course
Cuisine: Middle Eastern
Keyword: chicken, chicken, rice
Prep Time: 10 minutes
Cook Time: 30 minutes
Calories: 485kcal
Author: Farah Abumaizar

Ingredients

  • 1 rotisserie chicken, skin and bones removed and shredded, or 1 whole chicken cut into pieces boiled or 4 bone in chicken breasts boiled see the post for instructions on boiling the chicken
  • 2 cups chicken broth (from the boiled chicken, or store-bought chicken stock or 1 chicken bouillon cube dissolved in water)
  • 1-2 tsp olive oil
  • 2 loaves pita bread, cut into cubes
  • 3 cups yogurt
  • 2-3 garlic cloves, crushed
  • 1 tsp salt
  • squeeze lemon juice
  • 1 cup cooked rice

For garnish:

  • dried mint and paprika
  • 1/4 cup pine nuts or almond slivers, toasted
  • 3 tbsp chopped parsley

Instructions

  • Prepare the chicken by either shredding ready cooked chicken, or boiling raw chicken pieces in a large pot of water until cooked, then shredding (with aromatics like a cinnamon stick, a couple bay leaves, whole cloves, cardamom pods and I like to add an onion sliced into wedges). Warm the chicken broth in a small saucepan, and add the cooked shredded chicken to the broth, and keep it on low heat until serving so the chicken warms through.
  • Meanwhile, toast the pita bread in the oven by placing in a single layer on a parchment lined baking sheet, and drizzling well with olive oil and tossing to combine. Bake at 350 F for 8-10 minutes or until crispy and golden brown, and set aside.
  • Mix together the yogurt with the crushed garlic, salt, and lemon juice. Stir well to combine.
  • Assemble by placing the rice in the base of a deep serving dish. Pour the chicken broth over the top, and scatter the shredded chicken evenly. Dollop the garlic yogurt on top and smooth out, then top with the crispy pita bread. Garnish with dried mint, paprika, and generously with chopped parsley and toasted nuts.

Notes

Recipe adapted from Ya Baladi, a wonderful cookbook about simple Middle Eastern dishes
Tried this recipe?Mention @everylittlecrumb or tag #everylittlecrumb!

Nutrition

Calories: 485kcal

Chicken Fatteh by everylittlecrumb on Jumprope.

If you liked this recipe, you might like:

Lebanese Chicken and Potatoes

Persian Saffron Chicken with Barberry Rice

Eggplant Pomegranate Salad

Mulukhiya


Did you make this? Tag @everylittlecrumb or hashtag #everylittlecrumb and I’ll share your images!

Main Meals, Recipes

Previous Post: « Oreo Truffle Stuffed Cookies
Next Post: Instant Pot Oatmeal »

Reader Interactions

Comments

  1. Dannii says

    September 7, 2020 at 2:03 pm

    5 stars
    I have never heard of this before, but it looks like a delicious chicken dish. I can’t wait to try it.

    Reply
    • Farah Abumaizar says

      September 7, 2020 at 2:43 pm

      Thanks so much Dannii

      Reply
  2. Jacqueline Meldrum says

    September 7, 2020 at 2:20 pm

    5 stars
    I love the pitta bread and the toppings. Little touches like that make all the difference.

    Reply
    • Farah Abumaizar says

      September 7, 2020 at 2:43 pm

      Absolutely!! Toasted bread is so good

      Reply
  3. Caitlyn Erhardt says

    September 7, 2020 at 2:41 pm

    5 stars
    This made the perfect family dinner. Simple to make and packed with flavor, you can never go wrong! MY favorite part was the sauce!

    Reply
    • Farah Abumaizar says

      September 7, 2020 at 2:43 pm

      Thanks so much Caitlyn! So glad you enjoyed

      Reply
    • Farah Abumaizar says

      September 7, 2020 at 5:29 pm

      Thats so good to hear!!! Thanks Caitlyn

      Reply
  4. Mahy says

    September 7, 2020 at 3:06 pm

    5 stars
    I guess chicken fatteh is the recipe I haven’t cooked in quite a while. So definitely the recipe I am excited to make some time soon!

    Reply
    • Farah Abumaizar says

      September 7, 2020 at 5:29 pm

      thanks Mahy!

      Reply
  5. Sue says

    September 7, 2020 at 4:11 pm

    5 stars
    Delicious meal, all in a bowl. So fun to play with the toppings!

    Reply
    • Farah Abumaizar says

      September 7, 2020 at 5:29 pm

      Thank you so much Sue!

      Reply

Leave a Reply Cancel reply

Your email address will not be published. Required fields are marked *

Recipe Rating


Primary Sidebar

Get more stuff

Subscribe to our mailing list and get interesting stuff and updates to your email inbox.

Thank you for subscribing.

Something went wrong.

we respect your privacy and take protecting it seriously

FeedFeed

Featured Recipes

Nana tea

Halal Guys Chicken and Rice

Aish El Saraya

Instant Pot Enchilada Soup

Death By Chocolate Zucchini Bread

More

Footer

everylittlecrumb

Farah Abu Maizar | Food Lover
Good morning! If there’s one thing we like doing Good morning! If there’s one thing we like doing, it’s experimenting with breakfast dishes 🍳.These beauties are froached eggs- poached eggs that are lightly fried and seasoned with breadcrumbs. Best of both worlds! Creamy poached eggs, runny yolk but a little crisp on the white part of the eggs. So good! Inspired by @sveverything , we used our sous vide machine for this but you can do this with regular poached eggs. Recipe can be found linked in bio or at https://everylittlecrumb.com/froached-eggs/ . Team runny yolk anyone? 
.
.
.
.
.
#eggs #poachedeggs #poachedegg #eggsontoast #beautifulcuisines #tasty #delish #foodphotography #foodstyling #foodstylingandphotography #cheeseontoast #foodblogger #foodie #breakfast #brunch #instayum #yum #brunch #tastingtable #f52community #food52 #yolkporn #friday
How I spend a lot of my weekends😂. Nothing like How I spend a lot of my weekends😂. Nothing like a big bowl of cookie dough to say weekend mode on! Are you like me and end up eating more dough than actual cookies? My foolproof recipe I use and post time and time again 👇🏼(and often double the batch so I can store some in the freezer!)

Ingredients:
1 stick butter, softened 113 g
3/4 cup tightly packed brown sugar (I like using 1/2 cup light brown and 1/4 cup dark brown, but you can use either or) 150 g total
1/4 cup white sugar 50 g
1 egg, room temperature
1 tsp vanilla extract
1 3/4 cup all purpose flour 220 g
3/4 tsp baking soda
1/4 tsp salt
1 cup semi-sweet chocolate chips or chunks
flaky salt for topping, optional

Instructions:
-In the bowl of a stand mixer fitted with a paddle attachment, or a handheld mixer, cream together butter, brown sugar, and white sugar for 5 minutes on medium speed until light and fluffy.
-Once five minutes is over, add in egg and vanilla and mix until combined.
In a separate bowl, mix flour, baking soda, and salt, and mix until combined. Add these dry ingredients to the butter mixture on low speed, and mix until just combined.
-Using a wooden spoon or spatula, mix in chocolate chips or chunks until just combined. Place bowl of dough in fridge for at least 30 minutes to chill.
-While dough is chilling, heat oven to 180 C (350F). Portion dough out into heaped 1 tbsp-2 tbsp sized dough pieces on parchment paper lined baking sheets. 
-Bake for 11-12 minutes or until golden brown on the edges but still soft in the center. Cool until cookies firm up, then enjoy, still warm.
.
.
.
.
.

#chocolatecake #cookiemonster #cakestagram #cakephotos #layercake #chocolate #weekendbaking #foodblog #instayum #yummy #bakery #foodporn #foodtographyschool #foodphotography #chocolatechips #delish #foodfluffer #damnthatsdelish #cookiedough #chocatechipcookies #bakes #bakestagram #doughbowl #chocolatechips #hersheys
Bbq salmon bowls with mango avocado salsa- unbelie Bbq salmon bowls with mango avocado salsa- unbelievable! And start to finish, you can be eating these in 15-20 minutes. Save this recipe for your next meal, you don’t want to miss out!

I’ve partnered with @kilosamak to produce a few recipes with their quality seafood- I’ve tried several of their items and genuinely loved them all! They deliver seafood straight to your door for you to enjoy and cook at home. Takes all the guesswork out of trying to choose and clean fish yourself, perfect solution for someone like me who loves seafood but isn’t so great at prepping it! Check out their Instagram page on how to order, or head to the link in my bio.

This salmon has a smoky slightly sweet rub, is baked in the oven for ultimate ease, and gets piled on to rice and topped with an easy, addictive, zingy mango and avocado salsa. Adapted from @pinchofyum , I’ll make this again and again!

Ingredients:
For the salmon:
2 fillets, about 250 g each 
Spice Rub:
2 tbsp brown sugar
1.5 tsp paprika 
1 tsp garlic powder
1 tsp onion powder, optional 
1/2 tsp chili powder
1/2 tsp salt 
2 tbsp olive oil 

Mango avocado salsa:
1 diced mangos 
1 diced avocado
1/4 cup finely diced coriander 
1/4 cup finely diced red onion 
1 inch spicy green chili pepper, finely chopped
1 tsp honey
Juice and zest of one lime
Salt to taste

Method:
- Make the salsa by mixing together all the salsa ingredients and placing bowl in fridge while you make the salmon.
- Heat oven to 240C, and line a baking sheet with parchment paper. 
-Mix together all the ingredients for the salmon rub, and rub thoroughly all over the salmon, both sides.
- Bake for 10-12 minutes until salmon is opaque and cooked all the way through.
-Assemble bowls with rice, flaked pieces of salmon,and plenty of mango avocado salsa. Enjoy 😍

Catch the steps in my story!
Have you tried this pasta yet? Save this for your Have you tried this pasta yet? Save this for your next weeknight meal! Saucy macarona iltaybeen, can’t get much more comforting.  Adapted from @jedir3waish , makes for an easy delicious main that’ll make your family including kids very happy! Can find a step by step linked bio, or at https://everylittlecrumb.com/macarona/ , or in my story!

INGREDIENTS:
 
2 tbsp olive oil, divided
big pinch of salt
3 heaped tbsp tomato paste, divided 2 oz or 70 g
1 pack elbow macaroni 14 oz or 400 g
1 onion, very finely diced
1 zucchini, finely diced
1 carrot, finely diced
4-5 garlic cloves, minced
250 g ground beef
1 tsp seven spices
1 tsp turmeric
1/2 tsp paprika powder
1/4 tsp basil
1/4 tsp cinnamon powder
1/4 tsp garlic powder
1/2 tsp black pepper
1 tsp salt
1 can crushed tomatoes 14.5oz (400g)

NSTRUCTIONS
 
Bring a large pot of water to boil, add 1 tbsp olive oil and the salt, one tbsp of tomato paste, then the pack of pasta. Cook until al dente, then drain the pasta, reserving the pasta water. Set cooked pasta aside.

In a large skillet, heat the remaining tbsp of olive oil. Once hot, add the diced onion, and cook for 4-5 minutes until softened. Add the diced zucchini and carrots, and garlic and cook for a further 4-5 minutes until softened slightly.

Add the ground beef, and cook, smushing with a wooden spoon to break up the meat. Keep cooking until the beef is browned and cooked through, then optionally, drain the fat.
Add in the salt, pepper, and all the spices. Cook for another minute or so. Add the remaining 2 tbsp of tomato paste, and stir.

Add the can of crushed tomatoes and stir to combine. Bring to a simmer, then add a big ladleful of the reserved pasta water and simmer for 2-3 minutes on low heat.

Add the pasta to the sauce (I don't always add all the pasta, maybe 3/4 of the cooked amount until the finished dish is as saucy as I like). Stir to coat, cook for another minute or so until the pasta is warmed through, then enjoy!
This gorgeous tiramisu was so kindly sent to me by This gorgeous tiramisu was so kindly sent to me by @cadysweets.sa on my birthday, and we enjoyed every light fluffy bite of it. Their old account got hacked so follow along and support their new account ! They have a bunch of cakes and sweets for every occasion, so make someone or yourself happy and order one for a treat🤩! Send this to the tiramisu lover in your life 🍰.
.
.
.
.
.

#chocolatecake #magnoliabakery #cakestagram #cakephotos #layercake #chocolate #ganache #foodblog #instayum #yummy #bakery #foodporn #foodtographyschool #foodphotography #slice #delish #foodfluffer #damnthatsdelish #tiramisu #birthdaytreat #dessertbae #dessertoftheday #scoop #foodstyling #foodstylingandphotography
Easiest at home crusty bread with a great open cru Easiest at home crusty bread with a great open crumb texture. It’s the no knead bread from @breadin5 and has yet to fail me. Check my story for the step by step, and swipe for a video reveal.

Ingredients for two small loaves:
1.5 cups lukewarm water 
1/2 tbsp any type of yeast
1/2 tbsp salt
3 1/4 cup plain flour (450g)

Method:
In a large bowl, stir together the water with the yeast and salt. Try to dissolve but it’s fine if you have clumps.
2. Add flour all at once and stir, just until no flour patches remain.
3. Cover loosely with a kitchen cloth and leave it to rest for 2 hours in a warm place until risen and bubbly.
After this rest you can:
- Use dough immediately if impatient, but it’s easier to work with if cold, so maybe pop in fridge briefly
- Or, their recommended method and the one I do, leave in the fridge loosely covered for 12 hours or overnight. 
Refrigerated dough lasts up to two weeks, and flavor depends over time!
4. The next day, the dough might look deflated. That’s fine! When ready to bake, divide dough in half (I got two 400g dough balls)- it might be easier to handle if you sprinkle the dough lightly with flour, and take the half you are going to bake out of the fridge. Let it rest on a parchment paper lined baking sheet 40-90 minutes. The longer the more interior bubbles you should have. Preheat oven to 235C (450F), and after rest, make a few deep slashes in the dough with a sharp knife.
5. Place in the middle rack of the oven, and on the bottom rack place a roasting pan that had about a cup of hot water in it. This will create steam which gives a crustier crust!
6. Bake for 30-35 minutes or until deep golden brown.
7. Let it cool completely before enjoying!
.
.

.
.
.

#damnthatsdelish #foodfluffer #thebakefeed #feedfeed #tastingtable #forthemaking #BHGfood #foodblogfeed #bakedfromscratch #bakinglove #f52grams #foodbloggerpro #bakersofinstagram #TOHfoodie #foodphotography #canonphotos #bread #instayummy #kitchn #huffposttaste #food #dough #foodie #nokneadbread #homemadebread #doughter
Good morning! With dine in still closed in Saudi, Good morning! With dine in still closed in Saudi, Friday pancakes are fast becoming a tradition. And honestly, I don’t think I’ve had better pancakes at any restaurant recently! The easiest, fluffiest diner style pancakes are a huge hit in our family, find the recipe below adapted from @allrecipes . I like to barely warm the oven (110C or so) and keep the finished pancakes in a pan in the oven until I’m done with all the batter so they stay warm and perfect 👌🏼.

Ingredients
3/4 cup milk 170g
1 tbsp white vinegar
1 cup flour 125g
2 tbsp sugar 25g
1 tsp baking powder
1/2 tsp baking soda
1/4 tsp salt
1 egg room temperature
1/2 tsp vanilla
2 tbsp butter, melted 28g

Instructions:
-In a large bowl, combine the milk and vinegar, and let aside to stand for 5 minutes until curdled. Whisk to combine.
-In a separate large bowl, mix together the flour, sugar, baking powder, baking soda and salt.
-Add an egg, the vanilla and the melted butter to the buttermilk and whisk to combine.
-Add the dry ingredients all at once to the wet, and whisk until flour patches disappear. A few lumps are fine, but don't over mix.
-Let the batter rest for 5-10 minutes while you heat a pan on the stove.
lightly grease the pan with nonstick spray or butter, and pour about 1/4 cup of batter on the pan. Cook for 2-3 minutes on each side or until golden brown. (Flip the first time once you see bubbles form and the edges of the pancake dry up).
-Enjoy with toppings of your choice!
.
.
.
.
.
#pancakes #pancakerecipe #blueberrypancakes #maplesyrup #breakfast #morningslikethese #fridaymorning #flatlay #foodfluffer #breakfastrecipes #breakfastfood #breakfastofchampions #pancakelover #food #foodtography #foodtographyschool #foodphotography #delish #foodphotos #weekendbreakfast #eatingathome #recipeoftheday #foodporn #foodflatlay #blueberries #trayoftheday
One of my photos from my shoot @tackle.baks . How One of my photos from my shoot @tackle.baks . How insane does this tom yum soup look? For those who haven’t tried this casual seafood spot yet, you really should! The food is great and priced very reasonably, and they have some menu items I’m obsessed with like their crispy fish burger, the salmon poke salad and the creamy truffle shrimp👌🏼. They currently have a delivery offer going for only 5SAR on HungerStation, so no time like the present! Have I tempted you with this photo of the tom yum soup? I’m hungry just writing this caption🤤.
.
.
.
.
.
#soup #tomyum #tomyumsoup #food #foodphotography #canonphotography #canon #seafood #seafoodlover #shrimp #delish #beautifulcuisines #foodtographyschool #foodtography #foodblogger #instayum #lonelyplanetfood #dametravelerfoodie #soupseason #restaurantphotography #khobar #tastemade #tastingtable #foodfluffer
Load More... Follow on Instagram

Copyright © 2019 on the Seasoned Pro Theme