• Skip to primary navigation
  • Skip to main content
  • Skip to primary sidebar
  • Skip to footer

 logo

  • Recipes
    • Breakfast
    • Sides
    • Soup
    • Main Meals
    • Healthy
    • Dessert
    • Drinks
  • Eating Out
  • About Me
    • Privacy Policy
  • Resources
    • Must Have Kitchen Tools
  • Nav Social Menu

    • Email
    • Facebook
    • Instagram
    • Pinterest

Sour Milk Pancakes

May 27, 2020 · 16 Comments

Jump to Recipe
Stack of fluffy and delicious sour milk pancakes with strawberries on the side and bite taken out

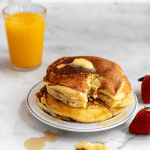
Sour milk pancakes are the fluffiest pancakes you could have, made with a homemade version of buttermilk that gives them just a little tang and so much tenderness. Baking powder and baking soda work together to give these pancakes a lot of lift, and they are fantastic!

This recipe is barely adapted from an allrecipes one, with over 11,000 reviews. Great reviews, so I knew it would be a winning recipe. I’ve been making it for years now and it’s never failed to please!

How to sour milk at home:

Sour milk is the equivalent of buttermilk, but instead of buying ready made buttermilk that you might not have so many uses for, just make your own easily at home!

The way you sour milk is to add vinegar or lemon juice (I always prefer vinegar so I don’t have to juice a lemon) to regular milk. Let it stand for 5 minutes or so at which point you’ll start to see some curdled clumps form. Whisk briefly to combine, and you can use as directed in recipes.

Why use sour milk or buttermilk in pancakes?

The acidity of the soured milk helps to activate the baking soda in the pancakes, giving them that fluffy height that is a trademark of this recipe. It also helps to break down the gluten in the flour, which also gives a tender crumb.

Ingredients in sour milk pancakes:

Ingredients needed to make pancake batter

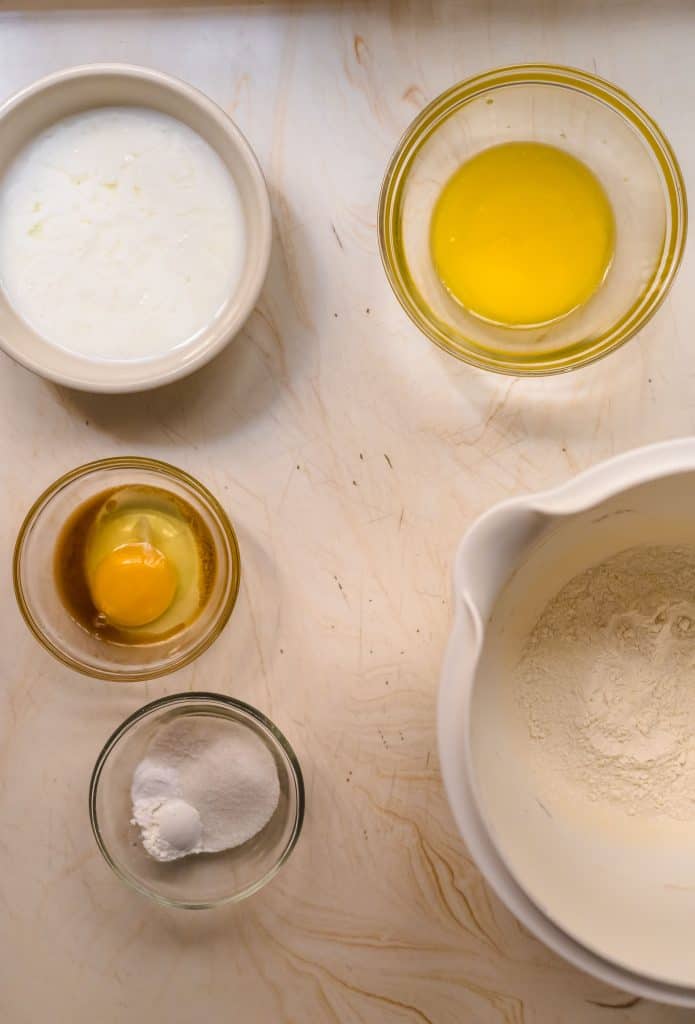
Milk+ White Vinegar to give us the sour milk

All Purpose Flour

Granulated Sugar- just a little for sweetness

Baking Powder + Baking Soda- using both together is another way to get great lift and fluffiness

Salt: I reduced the amount slightly from the original recipe, I found 1/4 tsp to be just enough for me!

Egg: Make sure it’s room temperature so it combines with the rest of the batter easier. Just take it out of the fridge about 30 min before starting your batter, or you can dunk a cold egg in some warm water for 5 minutes

Vanilla: The original recipe didn’t have this but I love adding vanilla to my pancakes for a little flavor.

Butter: melted, plus I recommend extra grease your skillet with. Gives a great flavor, just make sure the heat isn’t too high so the butter doesn’t burn.

Pancake batter in a mixing bowl

How to make pancakes:

First make your sour milk. In another bowl combine all the dry ingredients. Once the milk has soured, add the remaining wet ingreients to it )the egg, vanilla and melted butter).

Finally, add the dry ingredients to the wet ingredients all at once and stir until just combined. Lumps are ok!

I like to let the batter rest, just 5- 10 minutes. This gives me enough time to heat the skillet, and also allows the gluten in the batter to relax and the batter to hydrate evenly. This also helps any lumps in the batter to ease!

I like to cook 1/4 cup measures of pancakes at a time, this gives you really uniform sized pancakes. Wait until bubbles form and edges set before flipping the pancakes.

For the most flavor, cook your pancakes in melted butter. Just make sure the heat isn’t too high so the butter doesn’t burn. You might need to add a little more butter to the pan as you go on.

Pancake batter being cooked in a pan

Tips for pancake success:

Ingredient temperature: Make sure your egg is at room temperature so they combine well with the other ingredients. The milk can be room temperature too, which will tend to happen anyway since you are letting it sit for five minutes to combine with the vinegar.

Mixing: Don’t over mix the ingredients! That’s what will give you tough and chewy pancakes. Mix just enough so that ingredients are combined, and don’t worry too much about lumps.

It’s really hard to get these pancakes wrong!

Scale up: If making these pancakes for a crowd, scale up. Double the recipe. This makes six pancakes, so in my book its perfect for two!

Keeping pancakes warm while you finish cooking:

One of the best pancake making tips I got from Joy the Baker . Heat the oven on really low heat, 200 F (100C), and place a baking sheet in the oven. As soon as a pancake is done, transfer it to the baking sheet. Spread them out so they aren’t on top of each other so they don’t get moist. This will keep them warm without drying them out until you are ready to eat!

How to store leftover pancakes:

Leftover pancakes last 2-3 days in the fridge, or you can freeze them (first on a baking sheet separately so they don’t stick, then once solid you can transfer them to a freezer bag) for 2-3 months.

You can heat them in a microwave, an oven at low heat, or even in a toaster. They’ll still taste really good!

What to serve pancakes with:

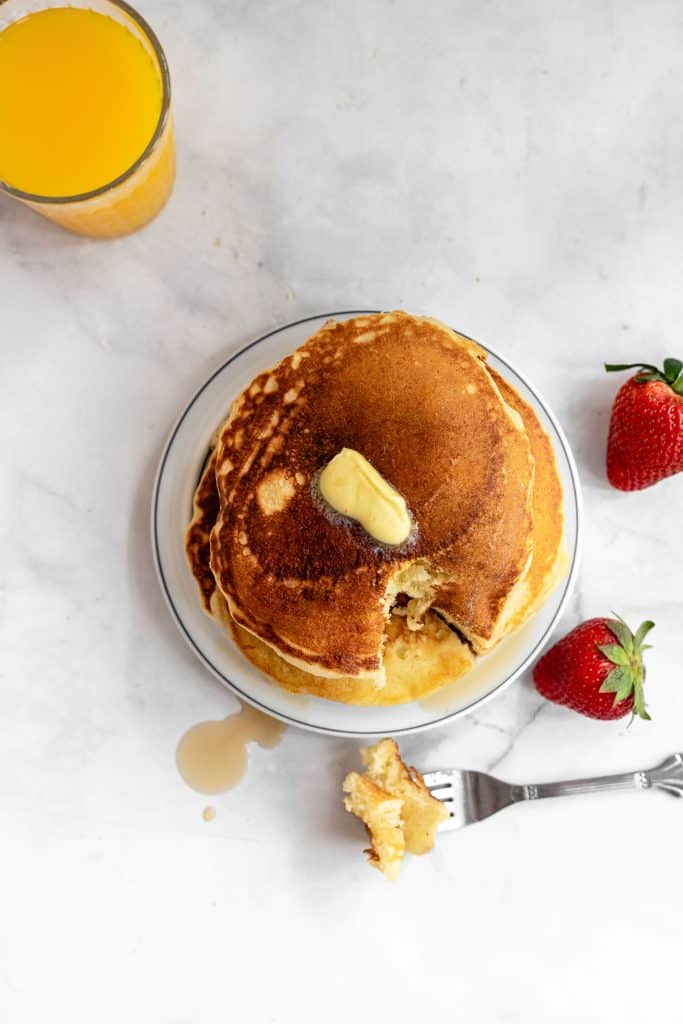
You can keep them simple with maple syrup and a pat of butter.

You can top with chocolate chips (and even dot chocolate chips to the batter once it’s on the skillet), and pecans.

Sliced bananas, berries, greek yogurt.

These are extremely versatile!

Stack of fluffy buttermilk pancaks with strawberries on the side

Sour Milk Pancakes

The fluffiest pancakes you'll ever have, these use sour milk (homemade buttermilk) to give tenderness. Fluffy and soft and absolutely delicious, you'll probably never make pancakes another way again!
5 from 8 votes
Print Pin
Rate
Course: Breakfast
Cuisine: American
Keyword: pancakes
Prep Time: 5 minutes
Cook Time: 10 minutes
Servings: 3 people
Calories: 205kcal
Author: Farah Abumaizar

Ingredients

  • 3/4 cup milk 170g
  • 1 tbsp white vinegar
  • 1 cup flour 125g
  • 2 tbsp sugar 25g
  • 1 tsp baking powder
  • 1/2 tsp baking soda
  • 1/4 tsp salt
  • 1 egg room temperature
  • 1/2 tsp vanilla
  • 2 tbsp butter, melted 28g

Instructions

  • In a large bowl, combine the milk and vinegar, and let aside to stand for 5 minutes until curdled. Whisk to combine.
  • In a separate large bowl, mix together the flour, sugar, baking powder, baking soda and salt.
  • Add an egg, the vanilla and the melted butter to the buttermilk and whisk to combine.
  • Add the dry ingredients all at once to the wet, and whisk until flour patches disappear. A few lumps are fine, but don't over mix.
  • Let the batter rest for 5-10 minutes while you heat a pan on the stove.
  • lightly grease the pan with nonstick spray or butter, and pour about 1/4 cup of batter on the pan. Cook for 2-3 minutes on each side or until golden brown. (Flip the first time once you see bubbles form and the edges of the pancake dry up)

Notes

Recipe adapted from Allrecipes.
Tried this recipe?Mention @everylittlecrumb or tag #everylittlecrumb!

Nutrition

Calories: 205kcal

If you liked this recipe, you might like:

Sparkling Water Pancakes

Lemon Poppy Seed Pancakes

Sourdough French Toast

Did you make this? Tag @everylittlecrumb or hashtag #everylittlecrumb and I’ll share your images! Don’t forget to pin for later!

Breakfast, Recipes

Previous Post: « Date Nut Bars
Next Post: Chicken Mushroom Pie »

Reader Interactions

Comments

  1. Anjali says

    May 28, 2020 at 8:18 am

    5 stars
    These pancakes turned out to be absolutely delicious! They were light, fluffy and just slightly sweet. Perfect for a weekend brunch!

    Reply
    • Farah Abumaizar says

      May 28, 2020 at 8:19 am

      So glad you enjoyed them Anjali!

      Reply
  2. Shashi says

    May 28, 2020 at 12:27 pm

    5 stars
    I usually save pancakes for the weekend and you are making me rethink that with this fluffy stack!

    Reply
    • Farah Abumaizar says

      May 28, 2020 at 12:27 pm

      Every day can be pancake day 😍

      Reply
  3. Jo says

    May 28, 2020 at 12:43 pm

    5 stars
    I totally agree, you cannot beat buttermilk pancakes, so fluffy and just delicious! Weekend is almost here and so is pancake breakfast!

    Reply
    • Farah Abumaizar says

      May 28, 2020 at 1:25 pm

      Thanks so much Jo!

      Reply
  4. Danielle Wolter says

    May 28, 2020 at 1:42 pm

    5 stars
    These pancakes were awesome! So light and fluffy and delicious I am already ready for my next batch 🙂

    Reply
    • Farah Abumaizar says

      May 28, 2020 at 2:17 pm

      Thanks Danielle!

      Reply
  5. Roxana says

    May 28, 2020 at 2:24 pm

    5 stars
    Oh my, these pancakes look so soft and fluffy. Going to try these now for breakfast. Easy recipe too.

    Reply
    • Farah Abumaizar says

      May 28, 2020 at 7:25 pm

      So easy and so good!!

      Reply
  6. Amarie says

    November 19, 2020 at 9:30 pm

    5 stars
    Made these this morning. Added some leftover blueberries I was trying to use up. A. Ma. Zing. Saving this recipe. My husband said “Hmm. These are good pancakes.” He usually likes what I make but these were extra delicious. I also added a little more milk as they got kind of thick but were definitely light and fluffy.

    Reply
    • Farah Abumaizar says

      November 19, 2020 at 9:40 pm

      I’m so glad to hear that! Thanks for your comment and for letting me know about that splash of extra milk- hope you enjoy these for many more breakfasts to come!

      Reply
  7. MarieTherese says

    November 19, 2020 at 9:34 pm

    5 stars
    Oh my. Best ever. Husband loved them. Light and fluffy.

    Reply
    • Farah Abumaizar says

      November 19, 2020 at 9:40 pm

      I’m so glad to hear that!! So glad you had a great breakfast, these pancakes are definitely one of my fave breakfasts ever. Thanks Marie!

      Reply
  8. Kathy Lasky says

    February 8, 2021 at 7:20 pm

    5 stars
    Taste very good and easy.

    Reply
    • Farah Abumaizar says

      February 8, 2021 at 7:23 pm

      Thanks for the comment Kathy! So glad you enjoyed the pancakes

      Reply

Leave a Reply Cancel reply

Your email address will not be published. Required fields are marked *

Recipe Rating


Primary Sidebar

Get more stuff

Subscribe to our mailing list and get interesting stuff and updates to your email inbox.

Thank you for subscribing.

Something went wrong.

we respect your privacy and take protecting it seriously

FeedFeed

Featured Recipes

Nana tea

Halal Guys Chicken and Rice

Aish El Saraya

Instant Pot Enchilada Soup

Death By Chocolate Zucchini Bread

More

Footer

everylittlecrumb

Farah Abu Maizar | Food Lover
Good morning! If there’s one thing we like doing Good morning! If there’s one thing we like doing, it’s experimenting with breakfast dishes 🍳.These beauties are froached eggs- poached eggs that are lightly fried and seasoned with breadcrumbs. Best of both worlds! Creamy poached eggs, runny yolk but a little crisp on the white part of the eggs. So good! Inspired by @sveverything , we used our sous vide machine for this but you can do this with regular poached eggs. Recipe can be found linked in bio or at https://everylittlecrumb.com/froached-eggs/ . Team runny yolk anyone? 
.
.
.
.
.
#eggs #poachedeggs #poachedegg #eggsontoast #beautifulcuisines #tasty #delish #foodphotography #foodstyling #foodstylingandphotography #cheeseontoast #foodblogger #foodie #breakfast #brunch #instayum #yum #brunch #tastingtable #f52community #food52 #yolkporn #friday
How I spend a lot of my weekends😂. Nothing like How I spend a lot of my weekends😂. Nothing like a big bowl of cookie dough to say weekend mode on! Are you like me and end up eating more dough than actual cookies? My foolproof recipe I use and post time and time again 👇🏼(and often double the batch so I can store some in the freezer!)

Ingredients:
1 stick butter, softened 113 g
3/4 cup tightly packed brown sugar (I like using 1/2 cup light brown and 1/4 cup dark brown, but you can use either or) 150 g total
1/4 cup white sugar 50 g
1 egg, room temperature
1 tsp vanilla extract
1 3/4 cup all purpose flour 220 g
3/4 tsp baking soda
1/4 tsp salt
1 cup semi-sweet chocolate chips or chunks
flaky salt for topping, optional

Instructions:
-In the bowl of a stand mixer fitted with a paddle attachment, or a handheld mixer, cream together butter, brown sugar, and white sugar for 5 minutes on medium speed until light and fluffy.
-Once five minutes is over, add in egg and vanilla and mix until combined.
In a separate bowl, mix flour, baking soda, and salt, and mix until combined. Add these dry ingredients to the butter mixture on low speed, and mix until just combined.
-Using a wooden spoon or spatula, mix in chocolate chips or chunks until just combined. Place bowl of dough in fridge for at least 30 minutes to chill.
-While dough is chilling, heat oven to 180 C (350F). Portion dough out into heaped 1 tbsp-2 tbsp sized dough pieces on parchment paper lined baking sheets. 
-Bake for 11-12 minutes or until golden brown on the edges but still soft in the center. Cool until cookies firm up, then enjoy, still warm.
.
.
.
.
.

#chocolatecake #cookiemonster #cakestagram #cakephotos #layercake #chocolate #weekendbaking #foodblog #instayum #yummy #bakery #foodporn #foodtographyschool #foodphotography #chocolatechips #delish #foodfluffer #damnthatsdelish #cookiedough #chocatechipcookies #bakes #bakestagram #doughbowl #chocolatechips #hersheys
Bbq salmon bowls with mango avocado salsa- unbelie Bbq salmon bowls with mango avocado salsa- unbelievable! And start to finish, you can be eating these in 15-20 minutes. Save this recipe for your next meal, you don’t want to miss out!

I’ve partnered with @kilosamak to produce a few recipes with their quality seafood- I’ve tried several of their items and genuinely loved them all! They deliver seafood straight to your door for you to enjoy and cook at home. Takes all the guesswork out of trying to choose and clean fish yourself, perfect solution for someone like me who loves seafood but isn’t so great at prepping it! Check out their Instagram page on how to order, or head to the link in my bio.

This salmon has a smoky slightly sweet rub, is baked in the oven for ultimate ease, and gets piled on to rice and topped with an easy, addictive, zingy mango and avocado salsa. Adapted from @pinchofyum , I’ll make this again and again!

Ingredients:
For the salmon:
2 fillets, about 250 g each 
Spice Rub:
2 tbsp brown sugar
1.5 tsp paprika 
1 tsp garlic powder
1 tsp onion powder, optional 
1/2 tsp chili powder
1/2 tsp salt 
2 tbsp olive oil 

Mango avocado salsa:
1 diced mangos 
1 diced avocado
1/4 cup finely diced coriander 
1/4 cup finely diced red onion 
1 inch spicy green chili pepper, finely chopped
1 tsp honey
Juice and zest of one lime
Salt to taste

Method:
- Make the salsa by mixing together all the salsa ingredients and placing bowl in fridge while you make the salmon.
- Heat oven to 240C, and line a baking sheet with parchment paper. 
-Mix together all the ingredients for the salmon rub, and rub thoroughly all over the salmon, both sides.
- Bake for 10-12 minutes until salmon is opaque and cooked all the way through.
-Assemble bowls with rice, flaked pieces of salmon,and plenty of mango avocado salsa. Enjoy 😍

Catch the steps in my story!
Have you tried this pasta yet? Save this for your Have you tried this pasta yet? Save this for your next weeknight meal! Saucy macarona iltaybeen, can’t get much more comforting.  Adapted from @jedir3waish , makes for an easy delicious main that’ll make your family including kids very happy! Can find a step by step linked bio, or at https://everylittlecrumb.com/macarona/ , or in my story!

INGREDIENTS:
 
2 tbsp olive oil, divided
big pinch of salt
3 heaped tbsp tomato paste, divided 2 oz or 70 g
1 pack elbow macaroni 14 oz or 400 g
1 onion, very finely diced
1 zucchini, finely diced
1 carrot, finely diced
4-5 garlic cloves, minced
250 g ground beef
1 tsp seven spices
1 tsp turmeric
1/2 tsp paprika powder
1/4 tsp basil
1/4 tsp cinnamon powder
1/4 tsp garlic powder
1/2 tsp black pepper
1 tsp salt
1 can crushed tomatoes 14.5oz (400g)

NSTRUCTIONS
 
Bring a large pot of water to boil, add 1 tbsp olive oil and the salt, one tbsp of tomato paste, then the pack of pasta. Cook until al dente, then drain the pasta, reserving the pasta water. Set cooked pasta aside.

In a large skillet, heat the remaining tbsp of olive oil. Once hot, add the diced onion, and cook for 4-5 minutes until softened. Add the diced zucchini and carrots, and garlic and cook for a further 4-5 minutes until softened slightly.

Add the ground beef, and cook, smushing with a wooden spoon to break up the meat. Keep cooking until the beef is browned and cooked through, then optionally, drain the fat.
Add in the salt, pepper, and all the spices. Cook for another minute or so. Add the remaining 2 tbsp of tomato paste, and stir.

Add the can of crushed tomatoes and stir to combine. Bring to a simmer, then add a big ladleful of the reserved pasta water and simmer for 2-3 minutes on low heat.

Add the pasta to the sauce (I don't always add all the pasta, maybe 3/4 of the cooked amount until the finished dish is as saucy as I like). Stir to coat, cook for another minute or so until the pasta is warmed through, then enjoy!
This gorgeous tiramisu was so kindly sent to me by This gorgeous tiramisu was so kindly sent to me by @cadysweets.sa on my birthday, and we enjoyed every light fluffy bite of it. Their old account got hacked so follow along and support their new account ! They have a bunch of cakes and sweets for every occasion, so make someone or yourself happy and order one for a treat🤩! Send this to the tiramisu lover in your life 🍰.
.
.
.
.
.

#chocolatecake #magnoliabakery #cakestagram #cakephotos #layercake #chocolate #ganache #foodblog #instayum #yummy #bakery #foodporn #foodtographyschool #foodphotography #slice #delish #foodfluffer #damnthatsdelish #tiramisu #birthdaytreat #dessertbae #dessertoftheday #scoop #foodstyling #foodstylingandphotography
Easiest at home crusty bread with a great open cru Easiest at home crusty bread with a great open crumb texture. It’s the no knead bread from @breadin5 and has yet to fail me. Check my story for the step by step, and swipe for a video reveal.

Ingredients for two small loaves:
1.5 cups lukewarm water 
1/2 tbsp any type of yeast
1/2 tbsp salt
3 1/4 cup plain flour (450g)

Method:
In a large bowl, stir together the water with the yeast and salt. Try to dissolve but it’s fine if you have clumps.
2. Add flour all at once and stir, just until no flour patches remain.
3. Cover loosely with a kitchen cloth and leave it to rest for 2 hours in a warm place until risen and bubbly.
After this rest you can:
- Use dough immediately if impatient, but it’s easier to work with if cold, so maybe pop in fridge briefly
- Or, their recommended method and the one I do, leave in the fridge loosely covered for 12 hours or overnight. 
Refrigerated dough lasts up to two weeks, and flavor depends over time!
4. The next day, the dough might look deflated. That’s fine! When ready to bake, divide dough in half (I got two 400g dough balls)- it might be easier to handle if you sprinkle the dough lightly with flour, and take the half you are going to bake out of the fridge. Let it rest on a parchment paper lined baking sheet 40-90 minutes. The longer the more interior bubbles you should have. Preheat oven to 235C (450F), and after rest, make a few deep slashes in the dough with a sharp knife.
5. Place in the middle rack of the oven, and on the bottom rack place a roasting pan that had about a cup of hot water in it. This will create steam which gives a crustier crust!
6. Bake for 30-35 minutes or until deep golden brown.
7. Let it cool completely before enjoying!
.
.

.
.
.

#damnthatsdelish #foodfluffer #thebakefeed #feedfeed #tastingtable #forthemaking #BHGfood #foodblogfeed #bakedfromscratch #bakinglove #f52grams #foodbloggerpro #bakersofinstagram #TOHfoodie #foodphotography #canonphotos #bread #instayummy #kitchn #huffposttaste #food #dough #foodie #nokneadbread #homemadebread #doughter
Good morning! With dine in still closed in Saudi, Good morning! With dine in still closed in Saudi, Friday pancakes are fast becoming a tradition. And honestly, I don’t think I’ve had better pancakes at any restaurant recently! The easiest, fluffiest diner style pancakes are a huge hit in our family, find the recipe below adapted from @allrecipes . I like to barely warm the oven (110C or so) and keep the finished pancakes in a pan in the oven until I’m done with all the batter so they stay warm and perfect 👌🏼.

Ingredients
3/4 cup milk 170g
1 tbsp white vinegar
1 cup flour 125g
2 tbsp sugar 25g
1 tsp baking powder
1/2 tsp baking soda
1/4 tsp salt
1 egg room temperature
1/2 tsp vanilla
2 tbsp butter, melted 28g

Instructions:
-In a large bowl, combine the milk and vinegar, and let aside to stand for 5 minutes until curdled. Whisk to combine.
-In a separate large bowl, mix together the flour, sugar, baking powder, baking soda and salt.
-Add an egg, the vanilla and the melted butter to the buttermilk and whisk to combine.
-Add the dry ingredients all at once to the wet, and whisk until flour patches disappear. A few lumps are fine, but don't over mix.
-Let the batter rest for 5-10 minutes while you heat a pan on the stove.
lightly grease the pan with nonstick spray or butter, and pour about 1/4 cup of batter on the pan. Cook for 2-3 minutes on each side or until golden brown. (Flip the first time once you see bubbles form and the edges of the pancake dry up).
-Enjoy with toppings of your choice!
.
.
.
.
.
#pancakes #pancakerecipe #blueberrypancakes #maplesyrup #breakfast #morningslikethese #fridaymorning #flatlay #foodfluffer #breakfastrecipes #breakfastfood #breakfastofchampions #pancakelover #food #foodtography #foodtographyschool #foodphotography #delish #foodphotos #weekendbreakfast #eatingathome #recipeoftheday #foodporn #foodflatlay #blueberries #trayoftheday
One of my photos from my shoot @tackle.baks . How One of my photos from my shoot @tackle.baks . How insane does this tom yum soup look? For those who haven’t tried this casual seafood spot yet, you really should! The food is great and priced very reasonably, and they have some menu items I’m obsessed with like their crispy fish burger, the salmon poke salad and the creamy truffle shrimp👌🏼. They currently have a delivery offer going for only 5SAR on HungerStation, so no time like the present! Have I tempted you with this photo of the tom yum soup? I’m hungry just writing this caption🤤.
.
.
.
.
.
#soup #tomyum #tomyumsoup #food #foodphotography #canonphotography #canon #seafood #seafoodlover #shrimp #delish #beautifulcuisines #foodtographyschool #foodtography #foodblogger #instayum #lonelyplanetfood #dametravelerfoodie #soupseason #restaurantphotography #khobar #tastemade #tastingtable #foodfluffer
Load More... Follow on Instagram

Copyright © 2019 on the Seasoned Pro Theme