• Skip to primary navigation
  • Skip to main content
  • Skip to primary sidebar
  • Skip to footer

 logo

  • Recipes
    • Breakfast
    • Sides
    • Soup
    • Main Meals
    • Healthy
    • Dessert
    • Drinks
  • Eating Out
  • About Me
    • Privacy Policy
  • Resources
    • Must Have Kitchen Tools
  • Nav Social Menu

    • Email
    • Facebook
    • Instagram
    • Pinterest

Chocolate Chip Brownies

Apr 16, 2020 · 2 Comments

Jump to Recipe
Crinkle topped fudgy brownies on parchment paper

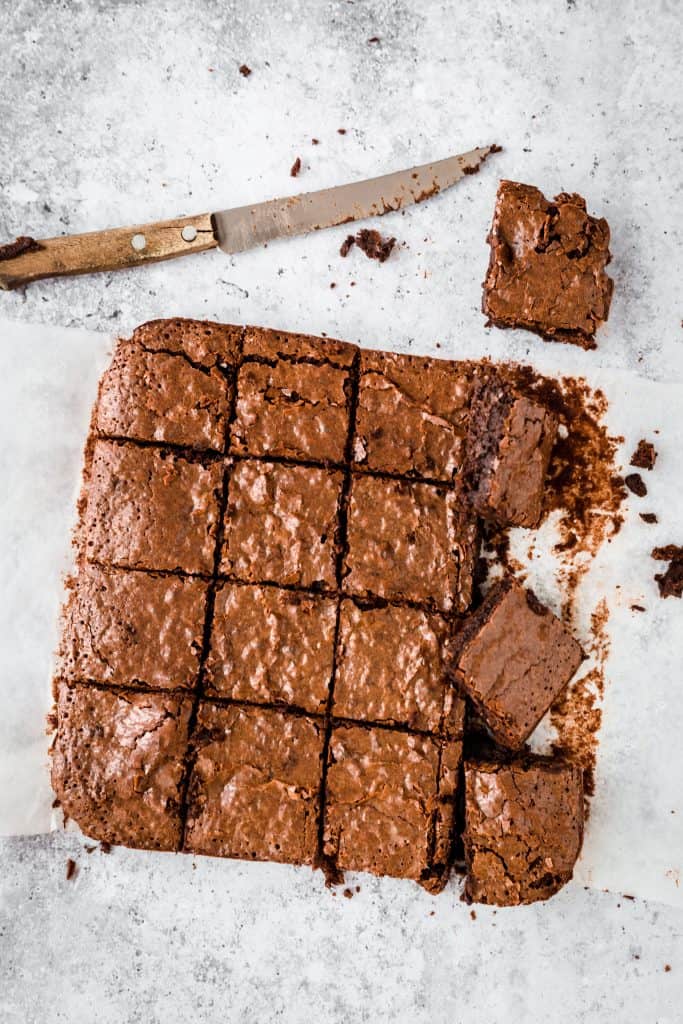
These chocolate chip brownies are bomb. They are made with just a simple bag of chocolate chips- nothing fancy, and they result in the perfect fudgy/chewy brownies with a crinkle top. You’ll fall in love with this recipe!

What are chocolate chip brownies?

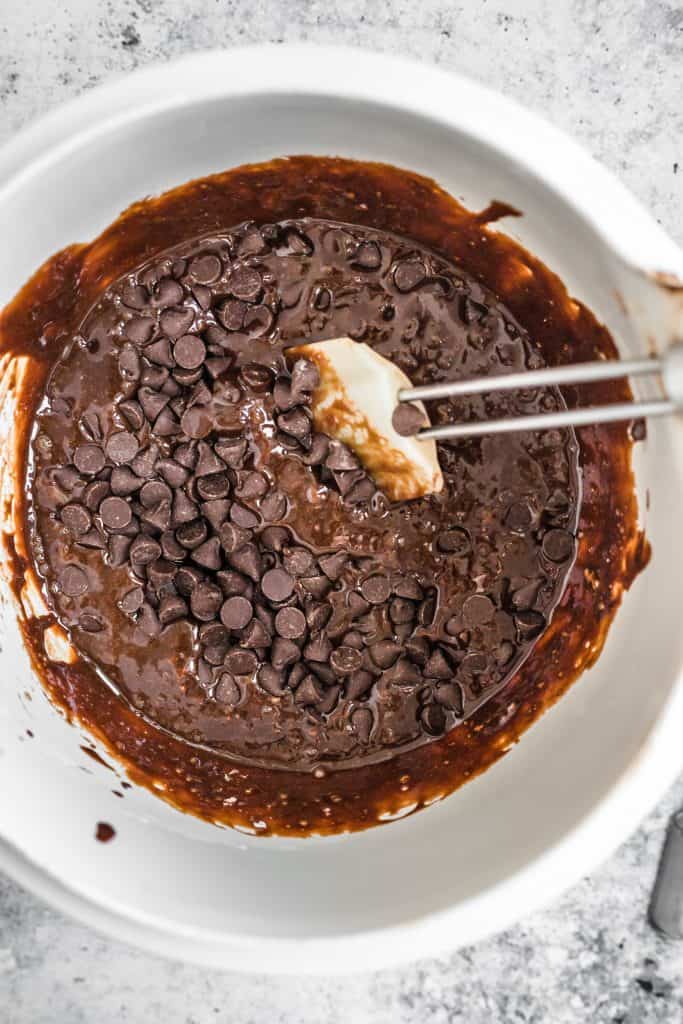
Quite simply, brownies made with melted chocolate chips (instead of baking chocolate or fancier chocolate) with additional chocolate chips mixed in. This is a great recipe for all brownie lovers, who want to be able to throw together a pan with basic pantry ingredients and no advanced preparation necessary.

What makes these brownies so good?

They strike that perfect balance between fudgy and chewy for me. Not so fudgy that they are basically just melted chocolate, and not so chewy that they are dry. It’s the perfect marriage.

Another thing is how easy this is. In just a few simple steps, you’ll have brownies ready for the oven.

This recipe was born out of quarantine necessity! I needed to make do with the chocolate chips I had in the fridge when a brownie craving hit and these did perfectly!

Steps in making brownies:

Start off by assembling your ingredients. I find it much easier to have everything measured out and ready before proceeding with the recipe.

Ingredients to prep brownies with chocolate chips

Chocolate chip brownie ingredients:

Chocolate chips: Any commercial brand will work well in this. I used Hershey’s because that’s what I had on hand. Nestle will be good too, something more premium like Ghirardelli will be fabulous.

Butter: I always use unsalted, and you might find it easier to cut the stick into thirds so it melts quicker with the chocolate, but it isn’t necessary.

Cocoa Powder: You can use either natural (like Hershey’s) or Dutch Processed (the darker usually European stuff) cocoa powder, because there’s no leavening agents in this recipe so it won’t make a difference.

Flour: There’s just a trace amount of flour in these, which is what makes them so fudgy and good. I always find it easier to weight out my ingredients, but if using measuring cups, use a spoon and sprinkle flour into the measuring cup until full instead of just scooping flour out of the pack with the measuring cup. That will lead to an overpacked cup.

Salt: A pinch of salt always brings the flavor of flour out.

Eggs: Room temperature, take these out of the fridge at least 30 minutes before using.

Brown sugar: I prefer brown sugar for the more intense molasses flavor it brings, but any soft moist brown sugar will work (light brown, muscovado). The funny thing is I was basing this recipe on a few I saw around the internet, all of which called for brown sugar and white sugar, and I completely forgot to add white sugar in. This recipe basically has half the sugar you’ll find in others, and it’s PERFECTLY SWEET! I couldn’t believe it till after I tasted them. I’ll always make them this way!

Vanilla: Anything will do, I didn’t have my fancy vanilla extract on hand and used imitation vanilla flavoring.

Mixing method:

You first melt together the chocolate, butter and cocoa powder in a double boiler.

What is a double boiler and how do I make one?

It basically means a heatproof bowl set over a pan of simmering water. I’ll fill a pot of water with several inches of tap water, bring to a boil, then reduce to medium heat so that the water continues to simmer without boiling over. The concept is that the bowl shouldn’t directly touch the water, but rather hover above it and get heated from the bottom.

Why use a double boiler? To melt the chocolate more gently, so that it doesn’t burn. You don’t want to burn your chocolate and start over!

What if I don’t want to use a double boiler?

Fine, don’t. Lol. You can also microwave the mix, just be careful and do it on medium power in increments. I’d go for 20-30 seconds at a time, stirring in between, until just melted.

After the chocolate melts with the butter, stir until smooth and set aside to cool slightly while you proceed with the rest of your ingredients. This is so that the chocolate doesn’t start cooking the eggs or anything like that.

Melted chocolate for brownie batter

You just have two more steps. One is whisking together the eggs, sugar and vanilla until well combined (1-2 minutes in an electric mixer). This is referred to as ribboning- it’s when the eggs and sugar start to lighten to a pale yellow hue. You can whisk eggs and sugar by hand, but be vigorous about it and it’ll probably take double the time. The next thing is simple to stir together flour and salt.

To combine, you’ll add the melted chocolate to the egg/sugar mix and whisk until combined, then sprinkle the flour mix on top of this batter and fold in with a spatula.

One very important tip, DON’T OVERMIX. If you mix too much, you are developing the gluten in the brownies too much and they’ll be hard and tough.

Brownie batter being mixed in a bowl with chocolate chips

Baking the brownies:

DO. NOT. OVERBAKE. That is crucial to maintaining the perfect fudgy texture of a delicious brownie- otherwise, you’re just getting mediocre cake. I start checking at 20 minutes, then check every 2 minutes from that point on. If the toothpick comes out with totally raw batter- wet goo- the brownies still need time. If it comes out with some wet crumbs attached, that’s good enough.

Tips to know if brownies are done baking:

The top will be set, and should be crinkly.

The edges might have started to pull away from the pan

A toothpick inserted near the center comes out with wet moist crumbs, but not completely thin and raw batter.

Pan of baked Brownies being cut into

FAQs:

Can I use other forms of chocolate?

Yes, you can use chopped up chocolate bars, or even milk chocolate if you like that flavor. Don’t go for a very high percentage dark chocolate, because these don’t have a lot of sugar in them in the first place, so you need the sweetness from the chocolate.

Can I use white sugar?

I haven’t tried it but it should be fine- the texture will be different though. The brown sugar helps add to that chew.

Can I double the recipe?

Yes you can, and bake them in a 9×13 inch pan. They might need an extra 5-10 minutes of baking time, so just keep checking and refer to the tips above for determining doneness.

Can I frost these?

Go for it! Try the ganache from this chocolate cake for a real treat. Or just spread with some Nutella and call it a day.

Stack of baked brownies

Chocolate Chip Brownies

Fudgy, chewy brownies studded with chocolate chips and with the perfect crinkle top. You honestly don't need any fancy chocolate for these to taste incredible!
Print Pin
Rate
Course: Dessert
Cuisine: American
Keyword: brownies, chocolate
Prep Time: 5 minutes
Cook Time: 25 minutes
Servings: 16 people
Calories: 200kcal
Author: Farah Abumaizar

Ingredients

For the batter:

  • heaped 1/2 cup semi-sweet chocolate chips or chunks 115 g
  • 2 tbsp cocoa powder, sift if lumpy
  • 1 stick butter 113g
  • 1/2 cup flour 63g
  • 1/4 tsp salt
  • 2 eggs
  • 1/2 cup brown sugar 105 g
  • 1 tsp vanilla

To mix in:

  • extra 1 cup chocolate chips 170 g

Instructions

  • Heat oven to 350 F (180C) and prepare an 8×8 inch pan by lightly greasing it and lining it with parchment paper. This will make for much easier removal and cutting of the brownies.
  • Place the chocolate chips for the batter, butter, and cocoa powder in a heatproof bowl set over a pan of simmering water. Keep stirring with a spatula until the chocolate and butter melt and texture is smooth and combined. Set aside to cool while you prepare the rest of the ingredients.
  • In a small bowl, whisk together flour and salt. Set aside.
  • In the bowl of an electric mixer, add the eggs, brown sugar, and vanilla. Whisk on medium low speeed until combined, 1-2 minutes. Use a spatula to scrape the sides of the bowl if you need to. Increase the mixer to medium and slowly pour in the chocolate mixture. Continue whisking on medium until the batter is smooth, about 1 minute.
  • Sprinkle the dry ingredients over the batter all at once and use spatula to fold until JUST combined. A few flour streaks are fine. Add the chocolate chips for the mix in, and stir to just combine.
  • Pour the brownie batter into the prepared pan, smoothing out the top. Bake for 25-30 minutes or until a toothpick inserted in the center comes out with a few moist crumbs attached. It shouldn't be completely dry at all- the brownies will set further out of the oven.
  • Cool completely in the pan, then lift out brownies with the parchment paper overhang and slice. I got 16 squares!
Tried this recipe?Mention @everylittlecrumb or tag #everylittlecrumb!

Nutrition

Calories: 200kcal
 

If you liked this recipe, you might like:

Unbelievably Moist Chocolate Bundt Cake

No Fuss Chocolate Chip Cookies

Chocolate Loaf Cake

Did you make this? Tag @everylittlecrumb or hashtag #everylittlecrumb and I’ll share your images!

Dessert, Recipes brownies, chocolate

Previous Post: « Egg and Toast Cups
Next Post: Chicken and Beef Tacos »

Reader Interactions

Comments

  1. raida says

    April 25, 2020 at 7:53 am

    Looks like a winner…Can’t wait to try.
    Can I use gluten-free flour, although I’m willing to take the risk with regular 🙂

    Reply
    • Farah Abumaizar says

      April 25, 2020 at 1:33 pm

      I think this would be great with gluten free flour, since it’s such a small amount of flour in the first place! Do let me know if you try it

      Reply

Leave a Reply Cancel reply

Your email address will not be published. Required fields are marked *

Recipe Rating


Primary Sidebar

Get more stuff

Subscribe to our mailing list and get interesting stuff and updates to your email inbox.

Thank you for subscribing.

Something went wrong.

we respect your privacy and take protecting it seriously

FeedFeed

Featured Recipes

Nana tea

Halal Guys Chicken and Rice

Aish El Saraya

Instant Pot Enchilada Soup

Death By Chocolate Zucchini Bread

More

Footer

everylittlecrumb

Farah Abu Maizar | Food Lover
Bbq salmon bowls with mango avocado salsa- unbelie Bbq salmon bowls with mango avocado salsa- unbelievable! And start to finish, you can be eating these in 15-20 minutes. Save this recipe for your next meal, you don’t want to miss out!

I’ve partnered with @kilosamak to produce a few recipes with their quality seafood- I’ve tried several of their items and genuinely loved them all! They deliver seafood straight to your door for you to enjoy and cook at home. Takes all the guesswork out of trying to choose and clean fish yourself, perfect solution for someone like me who loves seafood but isn’t so great at prepping it! Check out their Instagram page on how to order, or head to the link in my bio.

This salmon has a smoky slightly sweet rub, is baked in the oven for ultimate ease, and gets piled on to rice and topped with an easy, addictive, zingy mango and avocado salsa. Adapted from @pinchofyum , I’ll make this again and again!

Ingredients:
For the salmon:
2 fillets, about 250 g each 
Spice Rub:
2 tbsp brown sugar
1.5 tsp paprika 
1 tsp garlic powder
1 tsp onion powder, optional 
1/2 tsp chili powder
1/2 tsp salt 
2 tbsp olive oil 

Mango avocado salsa:
1 diced mangos 
1 diced avocado
1/4 cup finely diced coriander 
1/4 cup finely diced red onion 
1 inch spicy green chili pepper, finely chopped
1 tsp honey
Juice and zest of one lime
Salt to taste

Method:
- Make the salsa by mixing together all the salsa ingredients and placing bowl in fridge while you make the salmon.
- Heat oven to 240C, and line a baking sheet with parchment paper. 
-Mix together all the ingredients for the salmon rub, and rub thoroughly all over the salmon, both sides.
- Bake for 10-12 minutes until salmon is opaque and cooked all the way through.
-Assemble bowls with rice, flaked pieces of salmon,and plenty of mango avocado salsa. Enjoy 😍

Catch the steps in my story!
Have you tried this pasta yet? Save this for your Have you tried this pasta yet? Save this for your next weeknight meal! Saucy macarona iltaybeen, can’t get much more comforting.  Adapted from @jedir3waish , makes for an easy delicious main that’ll make your family including kids very happy! Can find a step by step linked bio, or at https://everylittlecrumb.com/macarona/ , or in my story!

INGREDIENTS:
 
2 tbsp olive oil, divided
big pinch of salt
3 heaped tbsp tomato paste, divided 2 oz or 70 g
1 pack elbow macaroni 14 oz or 400 g
1 onion, very finely diced
1 zucchini, finely diced
1 carrot, finely diced
4-5 garlic cloves, minced
250 g ground beef
1 tsp seven spices
1 tsp turmeric
1/2 tsp paprika powder
1/4 tsp basil
1/4 tsp cinnamon powder
1/4 tsp garlic powder
1/2 tsp black pepper
1 tsp salt
1 can crushed tomatoes 14.5oz (400g)

NSTRUCTIONS
 
Bring a large pot of water to boil, add 1 tbsp olive oil and the salt, one tbsp of tomato paste, then the pack of pasta. Cook until al dente, then drain the pasta, reserving the pasta water. Set cooked pasta aside.

In a large skillet, heat the remaining tbsp of olive oil. Once hot, add the diced onion, and cook for 4-5 minutes until softened. Add the diced zucchini and carrots, and garlic and cook for a further 4-5 minutes until softened slightly.

Add the ground beef, and cook, smushing with a wooden spoon to break up the meat. Keep cooking until the beef is browned and cooked through, then optionally, drain the fat.
Add in the salt, pepper, and all the spices. Cook for another minute or so. Add the remaining 2 tbsp of tomato paste, and stir.

Add the can of crushed tomatoes and stir to combine. Bring to a simmer, then add a big ladleful of the reserved pasta water and simmer for 2-3 minutes on low heat.

Add the pasta to the sauce (I don't always add all the pasta, maybe 3/4 of the cooked amount until the finished dish is as saucy as I like). Stir to coat, cook for another minute or so until the pasta is warmed through, then enjoy!
This gorgeous tiramisu was so kindly sent to me by This gorgeous tiramisu was so kindly sent to me by @cadysweets.sa on my birthday, and we enjoyed every light fluffy bite of it. Their old account got hacked so follow along and support their new account ! They have a bunch of cakes and sweets for every occasion, so make someone or yourself happy and order one for a treat🤩! Send this to the tiramisu lover in your life 🍰.
.
.
.
.
.

#chocolatecake #magnoliabakery #cakestagram #cakephotos #layercake #chocolate #ganache #foodblog #instayum #yummy #bakery #foodporn #foodtographyschool #foodphotography #slice #delish #foodfluffer #damnthatsdelish #tiramisu #birthdaytreat #dessertbae #dessertoftheday #scoop #foodstyling #foodstylingandphotography
Easiest at home crusty bread with a great open cru Easiest at home crusty bread with a great open crumb texture. It’s the no knead bread from @breadin5 and has yet to fail me. Check my story for the step by step, and swipe for a video reveal.

Ingredients for two small loaves:
1.5 cups lukewarm water 
1/2 tbsp any type of yeast
1/2 tbsp salt
3 1/4 cup plain flour (450g)

Method:
In a large bowl, stir together the water with the yeast and salt. Try to dissolve but it’s fine if you have clumps.
2. Add flour all at once and stir, just until no flour patches remain.
3. Cover loosely with a kitchen cloth and leave it to rest for 2 hours in a warm place until risen and bubbly.
After this rest you can:
- Use dough immediately if impatient, but it’s easier to work with if cold, so maybe pop in fridge briefly
- Or, their recommended method and the one I do, leave in the fridge loosely covered for 12 hours or overnight. 
Refrigerated dough lasts up to two weeks, and flavor depends over time!
4. The next day, the dough might look deflated. That’s fine! When ready to bake, divide dough in half (I got two 400g dough balls)- it might be easier to handle if you sprinkle the dough lightly with flour, and take the half you are going to bake out of the fridge. Let it rest on a parchment paper lined baking sheet 40-90 minutes. The longer the more interior bubbles you should have. Preheat oven to 235C (450F), and after rest, make a few deep slashes in the dough with a sharp knife.
5. Place in the middle rack of the oven, and on the bottom rack place a roasting pan that had about a cup of hot water in it. This will create steam which gives a crustier crust!
6. Bake for 30-35 minutes or until deep golden brown.
7. Let it cool completely before enjoying!
.
.

.
.
.

#damnthatsdelish #foodfluffer #thebakefeed #feedfeed #tastingtable #forthemaking #BHGfood #foodblogfeed #bakedfromscratch #bakinglove #f52grams #foodbloggerpro #bakersofinstagram #TOHfoodie #foodphotography #canonphotos #bread #instayummy #kitchn #huffposttaste #food #dough #foodie #nokneadbread #homemadebread #doughter
Good morning! With dine in still closed in Saudi, Good morning! With dine in still closed in Saudi, Friday pancakes are fast becoming a tradition. And honestly, I don’t think I’ve had better pancakes at any restaurant recently! The easiest, fluffiest diner style pancakes are a huge hit in our family, find the recipe below adapted from @allrecipes . I like to barely warm the oven (110C or so) and keep the finished pancakes in a pan in the oven until I’m done with all the batter so they stay warm and perfect 👌🏼.

Ingredients
3/4 cup milk 170g
1 tbsp white vinegar
1 cup flour 125g
2 tbsp sugar 25g
1 tsp baking powder
1/2 tsp baking soda
1/4 tsp salt
1 egg room temperature
1/2 tsp vanilla
2 tbsp butter, melted 28g

Instructions:
-In a large bowl, combine the milk and vinegar, and let aside to stand for 5 minutes until curdled. Whisk to combine.
-In a separate large bowl, mix together the flour, sugar, baking powder, baking soda and salt.
-Add an egg, the vanilla and the melted butter to the buttermilk and whisk to combine.
-Add the dry ingredients all at once to the wet, and whisk until flour patches disappear. A few lumps are fine, but don't over mix.
-Let the batter rest for 5-10 minutes while you heat a pan on the stove.
lightly grease the pan with nonstick spray or butter, and pour about 1/4 cup of batter on the pan. Cook for 2-3 minutes on each side or until golden brown. (Flip the first time once you see bubbles form and the edges of the pancake dry up).
-Enjoy with toppings of your choice!
.
.
.
.
.
#pancakes #pancakerecipe #blueberrypancakes #maplesyrup #breakfast #morningslikethese #fridaymorning #flatlay #foodfluffer #breakfastrecipes #breakfastfood #breakfastofchampions #pancakelover #food #foodtography #foodtographyschool #foodphotography #delish #foodphotos #weekendbreakfast #eatingathome #recipeoftheday #foodporn #foodflatlay #blueberries #trayoftheday
One of my photos from my shoot @tackle.baks . How One of my photos from my shoot @tackle.baks . How insane does this tom yum soup look? For those who haven’t tried this casual seafood spot yet, you really should! The food is great and priced very reasonably, and they have some menu items I’m obsessed with like their crispy fish burger, the salmon poke salad and the creamy truffle shrimp👌🏼. They currently have a delivery offer going for only 5SAR on HungerStation, so no time like the present! Have I tempted you with this photo of the tom yum soup? I’m hungry just writing this caption🤤.
.
.
.
.
.
#soup #tomyum #tomyumsoup #food #foodphotography #canonphotography #canon #seafood #seafoodlover #shrimp #delish #beautifulcuisines #foodtographyschool #foodtography #foodblogger #instayum #lonelyplanetfood #dametravelerfoodie #soupseason #restaurantphotography #khobar #tastemade #tastingtable #foodfluffer
I wanted to take a really pretty photo of the choc I wanted to take a really pretty photo of the chocolate fondants and post it with the recipe but I gave into peer pressure and am posting the recipe with this horribly lit and not at all beautifully set up video🤷🏻‍♀️. At least the video really demonstrates how gooey and perfect the center of these chocolate lava cakes are, and how unbelievably delicious they are. You won’t believe how easy it is to make these! And you may never order this at a restaurant again! You can even use muffin cups instead of ramekins. Save this recipe for when you want to be extra fancy with your dessert 👩‍🍳 I looked at a bunch of recipes online and compiled my favorite steps from each, this is most influenced from @gordongram 

Ingredients:
For greasing the ramekins:
1 tbsp melted butter
1 tbsp cocoa powder

For the fondants:
1 stick butter 115 g
2 eggs
2 egg yolks
170 g chocolate bittersweet chocolate (I used Lindt 70%)
1/2 cup caster sugar or regular sugar
Pinch salt 
3 tbsp flour (41g)
25 g butter melted

Method:
-Spray ramekins with nonstick spray, then dust with cocoa powder and shake until evenly coated, or brush inside of ramekins with melted butter, chill into butter sets, grease again with more melted butter and dust with cocoa powder (Gordon Ramsay’s fancy method)

-Melt together the butter and chocolate over a pan of simmering water (Bain marie ). Set aside melted chocolate to cool for 10 minutes.

-In an electric mixer, whisk the eggs, egg yolks, and sugar until thick and pale about 3-4 min. Sift in the flour and beat again until mixed.

-Pour melted chocolate into the egg mixture in 3 additions, mixing well between each until combined.

-Pour fondant batter evenly into prepared ramekins. If baking immediately, let them chill in the fridge while you preheat the oven to 200C. You can also store in the fridge for up to two days before baking.

- Bake 10-12 minute or until top just looks set. If using muffin pans, they’ll take less time, 8-10 minutes. Remove from oven and cool 1 minute before inverting onto a plate. Enjoy immediately with vanilla ice cream and berries!
I can’t stop myself from craving over the top de I can’t stop myself from craving over the top decadent desserts when it’s cloudy and a little chilly. One of my favorites in Bahrain is @joesbahrain ‘s sticky date cake that comes swimming in a pool of caramel sauce. It’s a drool worthy dessert! Their warm chocolate brownie is also unbelievable. I always end up confused on which to order and usually give in to ordering both 😂. Their coffee pairs perfectly with either👌🏼. Definitely miss this spot and wish I could be dining outdoors @theavenuesbh now indulging on this ultimate treat. Do you agree with my review? 
.
.
.
.

#chocolatecake #magnoliabakery #cakestagram #cakephotos #layercake #chocolate #ganache #foodblog #instayum #yummy #bakery #foodporn #foodtographyschool #foodphotography #slice #delish #foodfluffer #damnthatsdelish #datecake #caramel #stickytoffee
Load More... Follow on Instagram

Copyright © 2019 on the Seasoned Pro Theme