• Skip to primary navigation
  • Skip to main content
  • Skip to primary sidebar
  • Skip to footer

 logo

  • Recipes
    • Breakfast
    • Sides
    • Soup
    • Main Meals
    • Healthy
    • Dessert
    • Drinks
  • Eating Out
  • About Me
    • Privacy Policy
  • Resources
    • Must Have Kitchen Tools
  • Nav Social Menu

    • Email
    • Facebook
    • Instagram
    • Pinterest

Egg and Toast Cups

Apr 13, 2020 · 11 Comments

Jump to Recipe
egg cups piled up with salt and pepper shakers

Breakfast in a delicious little package, these egg and toast cups can be made with whatever you have on hand and are a fun and easy way to enjoy breakfast a little differently.

What are egg and toast cups?

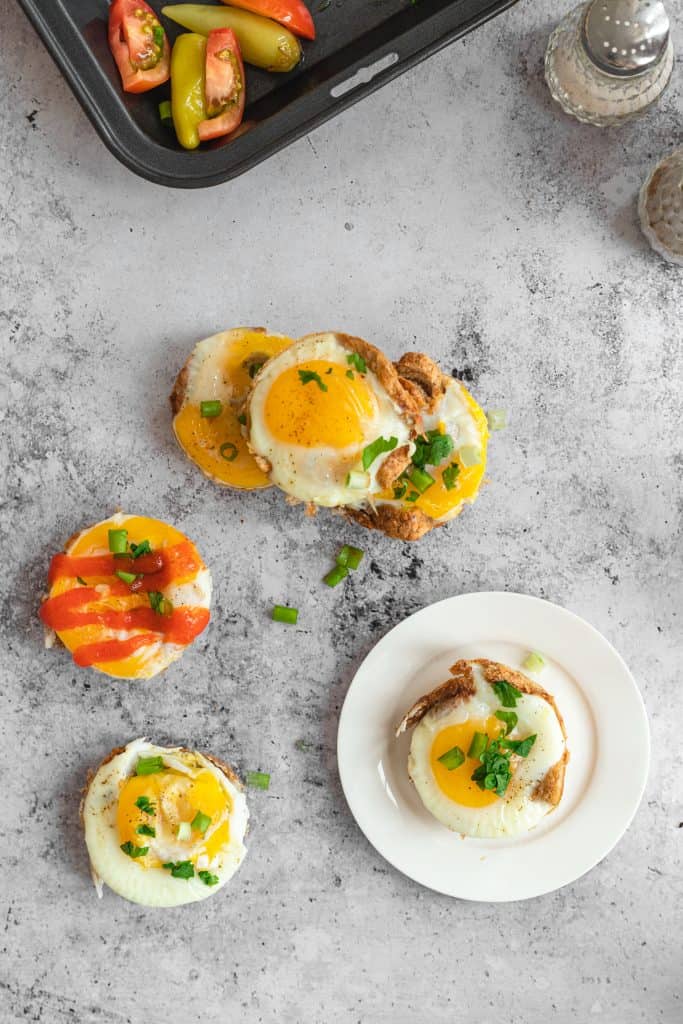
Quite simply, muffin tins lined with toast that have a whole egg cracked into them that are then baked. When you pop them out of the muffin tin, you get egg in a convenient little bread cup. This is a lot of fun with kids and adults and makes for a special little breakfast or brunch,.

egg cups on a plate with more on a tray

What ingredients do I need for this?

To keep it simple, eggs and bread! I like to make them a little more fun, so I usually add some mix- ins.

Bread: Typically, I grab some toast from the freezer. It defrosts within minutes on the counter. We usually always have whole wheat or multi-grain bread on hand, but use whatever bread you prefer.

Eggs: I always crack the eggs in whole and let them break, but this would be great with scrambled eggs too. They’ll take less time to bake, maybe 8-10 minutes.

Mix ins: Since these are small in their own right, it’s best to dice up the mix-ins very finely so they aren’t too prominent in your bite. I think onions and mushrooms and bell peppers are always great! Sometimes we fry up some bacon strips, and wrap them around the sides of the muffin tin before cracking the eggs in- now those are EPIC!

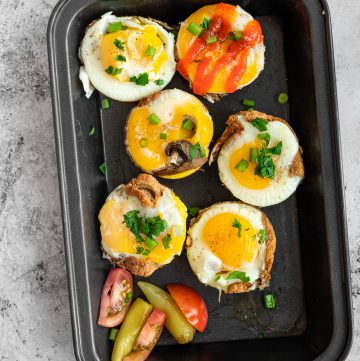
Seasoning and topping: We season very simply, with salt and pepper. Once these are out of the oven I liked to add a little chopped parsley and/or green onions for a little flavor, texture and visual appeal. Sriracha drizzled over the top is how my husband and I enjoy these!

ingredients to make egg toast cups

How to make toast cups:

If your bread has been in the freezer, let it thaw so that it’s easier to work with. Then, take a rolling pin, and go over the bread a couple of times. This is so the bread stretches out and becomes thinner. You don’t want it too thick and bready, so there’s enough space for the egg in the muffin cup!

One slice of bread will be enough for two toast cups, so if making six eggs, you need three slices of bread.

If you want the toast extra crispy, you can pop the pan with the bread in the oven for 3-4 minutes before cracking in the eggs. I do this recipe both with pre baking the bread and without and like both very much!

I would oil or butter the muffin compartments slightly so that the bread doesn’t stick, helping the toast cups pop easily out of the muffin tins once they are ready.

toast pressed into muffin cups

Baking the eggs:

Before finishing off the egg cups, make sure the oven has been preheated so it’s hot once the muffin pan goes in. Crack an egg into the well of each toast cup. If some egg sploshes out over the side, just clean it up a little with a paper towel- it’ll be easier to clean up then after it cooks.

Alternately, you could scramble the eggs with a fork and pour some scrambled eggs into each well. Bake for less if doing this (8-10 minutes is sufficient).

Egg cups can take anywhere between 15-20 minutes to be ready. The white needs to be totally cooked through, and the yolk can be as runny or firm as you like it. They will set just a little bit more outside the oven, but not so much that it’ll make much of a difference. Once the eggs are set to your liking, just take them out.

Cool slightly, enough that you can pop them out of the muffin tin without burning yourself, and enjoy warm!

eggs cracked into toast cups

Doubling the recipe:

This is easily doubled for a crowd, so you can fill a whole 12 cup muffin pan by using 12 eggs and six slices of bread, and any extra mix-ins/toppings that you like.

Are these egg cups healthy?

You can see the nutritional information below under the recipe, but in my book these are a great source of protein and fiber (if choosing a healthier bread). You can add in some hidden veggies that kids won’t even notice, or have your kids design their own egg cup to their liking. They also have just half a slice of bread per portion, so it’s a good way of carb controlling. Eggs tend to be filling too, so they make a good hearty breakfast!

Can I store leftover egg cups?

Yes, absolutely! We’ve enjoyed leftovers of these many times. Store tightly covered in the fridge for 1-2 days, and reheat in the microwave.

I haven’t tried freezing these myself, so am not quite sure how they well they’d freeze. I envision scrambled egg versions of these freezing very well, but not as sure about whole eggs. If anyone does try, I’d love your comments below!

baked egg cups in a pan with toppings

Egg and Toast Cups

Easy baked egg and toast cups that are completely customizable and so much fun to make and eat!
5 from 6 votes
Print Pin
Rate
Course: Breakfast
Cuisine: American
Keyword: eggs, toast
Prep Time: 5 minutes
Cook Time: 15 minutes
Servings: 6 people
Calories: 175kcal
Author: Farah Abumaizar

Equipment

  • Muffin tin

Ingredients

  • 2 tbsp olive oil
  • 3 slices whole wheat or white bread
  • assortment of whatever chopped garnishes. you want, very finely diced bell peppers, onions, mushrooms, green onions, bacon bits, etc.
  • 2-3 tbsp shredded cheese of choice
  • 6 eggs
  • chopped green onion for garnish

Instructions

  • Preheat oven to 375F (190C).
  • Lightly grease 6 muffin tins with olive oil. I like to use a paper towel to brush a little bit equally around each cavity.
  • Using a rolling pin, roll each slice of bread out thinner so that it stretches out.
  • Tear each slice of rolled bread in half, making six slices total. Press each bread portion into the cavity of a muffin tin using your fingers to make a sort of toast boat inside the muffin tin, like shown in the photos above.
  • Add whatever toppings you like, you can make each different or make them all the same. We added bell pepper, mushroom, red onion. Sprinkle with cheese.
  • Crack an egg into each toast cup. It might get a little messy, that's ok. Once you are done, just wipe down the edges of the muffin container if any egg gets on them
  • Bake in hot oven for anywhere between 15-20 minutes, or until whites are fully cooked through and egg yolk is as visibly set as you like it. You can use a butter knife to pop these out of the muffin tins and enjoy warm. We like drizzling with sriracha!

Notes

My husbands creation!
Tried this recipe?Mention @everylittlecrumb or tag #everylittlecrumb!

Nutrition

Calories: 175kcal
 

If you liked this recipe, you might like:

Gordon Ramsay’s Scrambled Eggs

Sous Vide Eggs

Super Healthy Blueberry Muffins

Did you make this? Tag @everylittlecrumb or hashtag #everylittlecrumb and I’ll share your images!

Breakfast, Recipes

Previous Post: « One Layer Carrot Cake
Next Post: Chocolate Chip Brownies »

Reader Interactions

Comments

  1. Erika says

    April 14, 2020 at 5:41 pm

    5 stars
    I love how easy these are to make. They are so delicious too!

    Reply
    • Farah Abumaizar says

      April 14, 2020 at 5:42 pm

      Thank you Erika !

      Reply
  2. Beth says

    April 14, 2020 at 6:37 pm

    5 stars
    Such an easy, delicious recipe! My son just loves them! If I made them everyday they would all be gone! Thanks!

    Reply
    • Farah Abumaizar says

      April 14, 2020 at 6:39 pm

      Aw it’s my pleasure Beth!

      Reply
  3. Marlynn says

    April 14, 2020 at 6:43 pm

    5 stars
    These are adorable and I love all of the different fillings! Plus, what a great way to make enough for leftovers too. So delicious!

    Reply
    • Farah Abumaizar says

      April 14, 2020 at 8:14 pm

      Thanks so much Marlynn !

      Reply
  4. Romina says

    April 14, 2020 at 6:43 pm

    5 stars
    These are delicious and so easy. Perfect for a family brunch.

    Reply
  5. Dannii says

    April 14, 2020 at 6:53 pm

    5 stars
    One of my favourite breakfasts, and so much that you can do with them too.

    Reply
    • Farah Abumaizar says

      April 14, 2020 at 8:20 pm

      Yes totally agree!!

      Reply
  6. Cookilicious says

    April 14, 2020 at 7:52 pm

    5 stars
    Love how easy this is! Great breakfast recipe!

    Reply
    • Farah Abumaizar says

      April 14, 2020 at 8:21 pm

      Thank you!!

      Reply

Leave a Reply Cancel reply

Your email address will not be published. Required fields are marked *

Recipe Rating


Primary Sidebar

Get more stuff

Subscribe to our mailing list and get interesting stuff and updates to your email inbox.

Thank you for subscribing.

Something went wrong.

we respect your privacy and take protecting it seriously

FeedFeed

Featured Recipes

Nana tea

Halal Guys Chicken and Rice

Aish El Saraya

Instant Pot Enchilada Soup

Death By Chocolate Zucchini Bread

More

Footer

everylittlecrumb

Farah Abu Maizar | Food Lover
Good morning! If there’s one thing we like doing Good morning! If there’s one thing we like doing, it’s experimenting with breakfast dishes 🍳.These beauties are froached eggs- poached eggs that are lightly fried and seasoned with breadcrumbs. Best of both worlds! Creamy poached eggs, runny yolk but a little crisp on the white part of the eggs. So good! Inspired by @sveverything , we used our sous vide machine for this but you can do this with regular poached eggs. Recipe can be found linked in bio or at https://everylittlecrumb.com/froached-eggs/ . Team runny yolk anyone? 
.
.
.
.
.
#eggs #poachedeggs #poachedegg #eggsontoast #beautifulcuisines #tasty #delish #foodphotography #foodstyling #foodstylingandphotography #cheeseontoast #foodblogger #foodie #breakfast #brunch #instayum #yum #brunch #tastingtable #f52community #food52 #yolkporn #friday
How I spend a lot of my weekends😂. Nothing like How I spend a lot of my weekends😂. Nothing like a big bowl of cookie dough to say weekend mode on! Are you like me and end up eating more dough than actual cookies? My foolproof recipe I use and post time and time again 👇🏼(and often double the batch so I can store some in the freezer!)

Ingredients:
1 stick butter, softened 113 g
3/4 cup tightly packed brown sugar (I like using 1/2 cup light brown and 1/4 cup dark brown, but you can use either or) 150 g total
1/4 cup white sugar 50 g
1 egg, room temperature
1 tsp vanilla extract
1 3/4 cup all purpose flour 220 g
3/4 tsp baking soda
1/4 tsp salt
1 cup semi-sweet chocolate chips or chunks
flaky salt for topping, optional

Instructions:
-In the bowl of a stand mixer fitted with a paddle attachment, or a handheld mixer, cream together butter, brown sugar, and white sugar for 5 minutes on medium speed until light and fluffy.
-Once five minutes is over, add in egg and vanilla and mix until combined.
In a separate bowl, mix flour, baking soda, and salt, and mix until combined. Add these dry ingredients to the butter mixture on low speed, and mix until just combined.
-Using a wooden spoon or spatula, mix in chocolate chips or chunks until just combined. Place bowl of dough in fridge for at least 30 minutes to chill.
-While dough is chilling, heat oven to 180 C (350F). Portion dough out into heaped 1 tbsp-2 tbsp sized dough pieces on parchment paper lined baking sheets. 
-Bake for 11-12 minutes or until golden brown on the edges but still soft in the center. Cool until cookies firm up, then enjoy, still warm.
.
.
.
.
.

#chocolatecake #cookiemonster #cakestagram #cakephotos #layercake #chocolate #weekendbaking #foodblog #instayum #yummy #bakery #foodporn #foodtographyschool #foodphotography #chocolatechips #delish #foodfluffer #damnthatsdelish #cookiedough #chocatechipcookies #bakes #bakestagram #doughbowl #chocolatechips #hersheys
Bbq salmon bowls with mango avocado salsa- unbelie Bbq salmon bowls with mango avocado salsa- unbelievable! And start to finish, you can be eating these in 15-20 minutes. Save this recipe for your next meal, you don’t want to miss out!

I’ve partnered with @kilosamak to produce a few recipes with their quality seafood- I’ve tried several of their items and genuinely loved them all! They deliver seafood straight to your door for you to enjoy and cook at home. Takes all the guesswork out of trying to choose and clean fish yourself, perfect solution for someone like me who loves seafood but isn’t so great at prepping it! Check out their Instagram page on how to order, or head to the link in my bio.

This salmon has a smoky slightly sweet rub, is baked in the oven for ultimate ease, and gets piled on to rice and topped with an easy, addictive, zingy mango and avocado salsa. Adapted from @pinchofyum , I’ll make this again and again!

Ingredients:
For the salmon:
2 fillets, about 250 g each 
Spice Rub:
2 tbsp brown sugar
1.5 tsp paprika 
1 tsp garlic powder
1 tsp onion powder, optional 
1/2 tsp chili powder
1/2 tsp salt 
2 tbsp olive oil 

Mango avocado salsa:
1 diced mangos 
1 diced avocado
1/4 cup finely diced coriander 
1/4 cup finely diced red onion 
1 inch spicy green chili pepper, finely chopped
1 tsp honey
Juice and zest of one lime
Salt to taste

Method:
- Make the salsa by mixing together all the salsa ingredients and placing bowl in fridge while you make the salmon.
- Heat oven to 240C, and line a baking sheet with parchment paper. 
-Mix together all the ingredients for the salmon rub, and rub thoroughly all over the salmon, both sides.
- Bake for 10-12 minutes until salmon is opaque and cooked all the way through.
-Assemble bowls with rice, flaked pieces of salmon,and plenty of mango avocado salsa. Enjoy 😍

Catch the steps in my story!
Have you tried this pasta yet? Save this for your Have you tried this pasta yet? Save this for your next weeknight meal! Saucy macarona iltaybeen, can’t get much more comforting.  Adapted from @jedir3waish , makes for an easy delicious main that’ll make your family including kids very happy! Can find a step by step linked bio, or at https://everylittlecrumb.com/macarona/ , or in my story!

INGREDIENTS:
 
2 tbsp olive oil, divided
big pinch of salt
3 heaped tbsp tomato paste, divided 2 oz or 70 g
1 pack elbow macaroni 14 oz or 400 g
1 onion, very finely diced
1 zucchini, finely diced
1 carrot, finely diced
4-5 garlic cloves, minced
250 g ground beef
1 tsp seven spices
1 tsp turmeric
1/2 tsp paprika powder
1/4 tsp basil
1/4 tsp cinnamon powder
1/4 tsp garlic powder
1/2 tsp black pepper
1 tsp salt
1 can crushed tomatoes 14.5oz (400g)

NSTRUCTIONS
 
Bring a large pot of water to boil, add 1 tbsp olive oil and the salt, one tbsp of tomato paste, then the pack of pasta. Cook until al dente, then drain the pasta, reserving the pasta water. Set cooked pasta aside.

In a large skillet, heat the remaining tbsp of olive oil. Once hot, add the diced onion, and cook for 4-5 minutes until softened. Add the diced zucchini and carrots, and garlic and cook for a further 4-5 minutes until softened slightly.

Add the ground beef, and cook, smushing with a wooden spoon to break up the meat. Keep cooking until the beef is browned and cooked through, then optionally, drain the fat.
Add in the salt, pepper, and all the spices. Cook for another minute or so. Add the remaining 2 tbsp of tomato paste, and stir.

Add the can of crushed tomatoes and stir to combine. Bring to a simmer, then add a big ladleful of the reserved pasta water and simmer for 2-3 minutes on low heat.

Add the pasta to the sauce (I don't always add all the pasta, maybe 3/4 of the cooked amount until the finished dish is as saucy as I like). Stir to coat, cook for another minute or so until the pasta is warmed through, then enjoy!
This gorgeous tiramisu was so kindly sent to me by This gorgeous tiramisu was so kindly sent to me by @cadysweets.sa on my birthday, and we enjoyed every light fluffy bite of it. Their old account got hacked so follow along and support their new account ! They have a bunch of cakes and sweets for every occasion, so make someone or yourself happy and order one for a treat🤩! Send this to the tiramisu lover in your life 🍰.
.
.
.
.
.

#chocolatecake #magnoliabakery #cakestagram #cakephotos #layercake #chocolate #ganache #foodblog #instayum #yummy #bakery #foodporn #foodtographyschool #foodphotography #slice #delish #foodfluffer #damnthatsdelish #tiramisu #birthdaytreat #dessertbae #dessertoftheday #scoop #foodstyling #foodstylingandphotography
Easiest at home crusty bread with a great open cru Easiest at home crusty bread with a great open crumb texture. It’s the no knead bread from @breadin5 and has yet to fail me. Check my story for the step by step, and swipe for a video reveal.

Ingredients for two small loaves:
1.5 cups lukewarm water 
1/2 tbsp any type of yeast
1/2 tbsp salt
3 1/4 cup plain flour (450g)

Method:
In a large bowl, stir together the water with the yeast and salt. Try to dissolve but it’s fine if you have clumps.
2. Add flour all at once and stir, just until no flour patches remain.
3. Cover loosely with a kitchen cloth and leave it to rest for 2 hours in a warm place until risen and bubbly.
After this rest you can:
- Use dough immediately if impatient, but it’s easier to work with if cold, so maybe pop in fridge briefly
- Or, their recommended method and the one I do, leave in the fridge loosely covered for 12 hours or overnight. 
Refrigerated dough lasts up to two weeks, and flavor depends over time!
4. The next day, the dough might look deflated. That’s fine! When ready to bake, divide dough in half (I got two 400g dough balls)- it might be easier to handle if you sprinkle the dough lightly with flour, and take the half you are going to bake out of the fridge. Let it rest on a parchment paper lined baking sheet 40-90 minutes. The longer the more interior bubbles you should have. Preheat oven to 235C (450F), and after rest, make a few deep slashes in the dough with a sharp knife.
5. Place in the middle rack of the oven, and on the bottom rack place a roasting pan that had about a cup of hot water in it. This will create steam which gives a crustier crust!
6. Bake for 30-35 minutes or until deep golden brown.
7. Let it cool completely before enjoying!
.
.

.
.
.

#damnthatsdelish #foodfluffer #thebakefeed #feedfeed #tastingtable #forthemaking #BHGfood #foodblogfeed #bakedfromscratch #bakinglove #f52grams #foodbloggerpro #bakersofinstagram #TOHfoodie #foodphotography #canonphotos #bread #instayummy #kitchn #huffposttaste #food #dough #foodie #nokneadbread #homemadebread #doughter
Good morning! With dine in still closed in Saudi, Good morning! With dine in still closed in Saudi, Friday pancakes are fast becoming a tradition. And honestly, I don’t think I’ve had better pancakes at any restaurant recently! The easiest, fluffiest diner style pancakes are a huge hit in our family, find the recipe below adapted from @allrecipes . I like to barely warm the oven (110C or so) and keep the finished pancakes in a pan in the oven until I’m done with all the batter so they stay warm and perfect 👌🏼.

Ingredients
3/4 cup milk 170g
1 tbsp white vinegar
1 cup flour 125g
2 tbsp sugar 25g
1 tsp baking powder
1/2 tsp baking soda
1/4 tsp salt
1 egg room temperature
1/2 tsp vanilla
2 tbsp butter, melted 28g

Instructions:
-In a large bowl, combine the milk and vinegar, and let aside to stand for 5 minutes until curdled. Whisk to combine.
-In a separate large bowl, mix together the flour, sugar, baking powder, baking soda and salt.
-Add an egg, the vanilla and the melted butter to the buttermilk and whisk to combine.
-Add the dry ingredients all at once to the wet, and whisk until flour patches disappear. A few lumps are fine, but don't over mix.
-Let the batter rest for 5-10 minutes while you heat a pan on the stove.
lightly grease the pan with nonstick spray or butter, and pour about 1/4 cup of batter on the pan. Cook for 2-3 minutes on each side or until golden brown. (Flip the first time once you see bubbles form and the edges of the pancake dry up).
-Enjoy with toppings of your choice!
.
.
.
.
.
#pancakes #pancakerecipe #blueberrypancakes #maplesyrup #breakfast #morningslikethese #fridaymorning #flatlay #foodfluffer #breakfastrecipes #breakfastfood #breakfastofchampions #pancakelover #food #foodtography #foodtographyschool #foodphotography #delish #foodphotos #weekendbreakfast #eatingathome #recipeoftheday #foodporn #foodflatlay #blueberries #trayoftheday
One of my photos from my shoot @tackle.baks . How One of my photos from my shoot @tackle.baks . How insane does this tom yum soup look? For those who haven’t tried this casual seafood spot yet, you really should! The food is great and priced very reasonably, and they have some menu items I’m obsessed with like their crispy fish burger, the salmon poke salad and the creamy truffle shrimp👌🏼. They currently have a delivery offer going for only 5SAR on HungerStation, so no time like the present! Have I tempted you with this photo of the tom yum soup? I’m hungry just writing this caption🤤.
.
.
.
.
.
#soup #tomyum #tomyumsoup #food #foodphotography #canonphotography #canon #seafood #seafoodlover #shrimp #delish #beautifulcuisines #foodtographyschool #foodtography #foodblogger #instayum #lonelyplanetfood #dametravelerfoodie #soupseason #restaurantphotography #khobar #tastemade #tastingtable #foodfluffer
Load More... Follow on Instagram

Copyright © 2019 on the Seasoned Pro Theme