• Skip to primary navigation
  • Skip to main content
  • Skip to primary sidebar
  • Skip to footer

 logo

  • Recipes
    • Breakfast
    • Sides
    • Soup
    • Main Meals
    • Healthy
    • Dessert
    • Drinks
  • Eating Out
  • About Me
    • Privacy Policy
  • Resources
    • Must Have Kitchen Tools
  • Nav Social Menu

    • Email
    • Facebook
    • Instagram
    • Pinterest

Air Fryer Salmon

Dec 2, 2019 · 10 Comments

Jump to Recipe
Air Fryer salmon on a plate and a kitchen towel

Perfectly cooked, crispy on the outside, soft on the inside, lightly seasoned salmon fillets made in less than 10 minutes in an air fryer. No mess, no fuss, I don’t think I’ll ever cook salmon another way again!

Is Air Fryer Salmon any good?

YES. I was reluctant too. My head filled with images of dried out rubbery salmon. I fretted over whether to risk my lovely salmon fillets. Should I just bake them like I always do? Or pan sear them? But nope. My air fryer had been purchased and all that was left was to just go for it.

The salmon was perfect. Being cooked like this gives it a lovely crusty exterior, the kind I always have to broil in the oven for minutes at the end of cooking in order to achieve, and a soft and tender interior. Not overcooked at all! Better yet, no roasting pans to line with parchment paper, no skillets to scrub after cooking, no fishy smell in the air. So much less mess and effort!! I cannot emphasize enough how EASY it is to make salmon this way. If I never make anything else in that handy contraption again, it’ll still be worth it for these perfect salmon fillets.

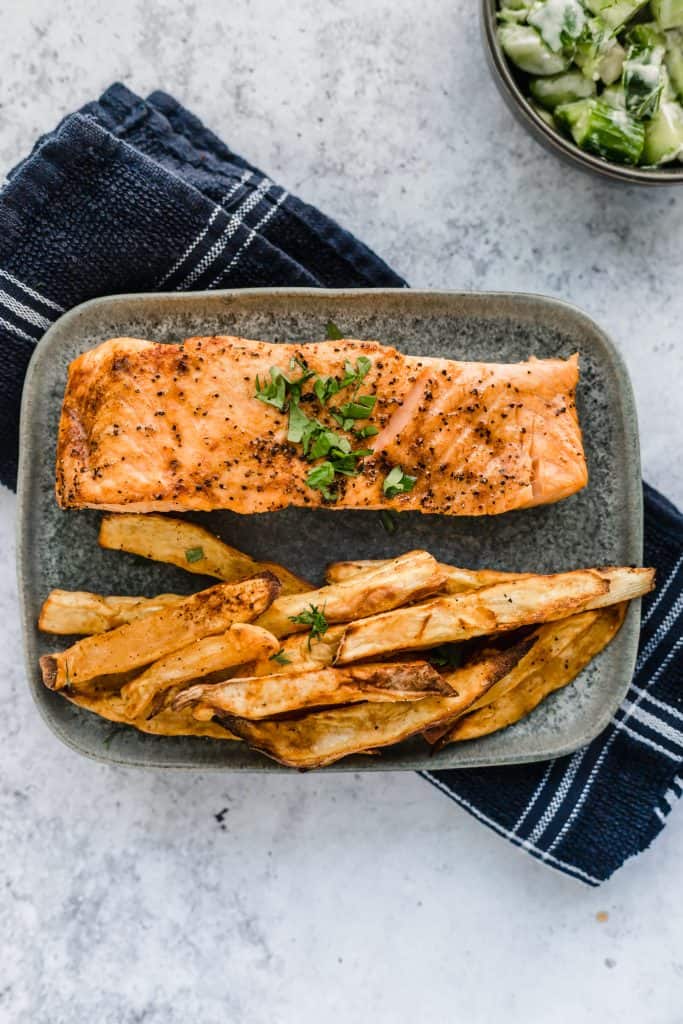
By the way- I have made something else in the air fryer. So far, my count is up to two! These salmon fillets and these sweet potato fries which I actually made for the same meal and went perfectly together.

How do you cook salmon in an air fryer?

Preheat the fryer for a few minutes to make sure the temperature is adequate. Rub the salmon fillets with a little oil with a high smoke point. I used avocado oil here, but you can also use regular (not extra virgin) olive oil, vegetable oil, etc.

Season the salmon very simply with the seasoning of your choice. Salt and pepper is a must, anything else is fair game!

Air fryer salmon cooked in air fryer basket

How long do you cook air fried salmon ?

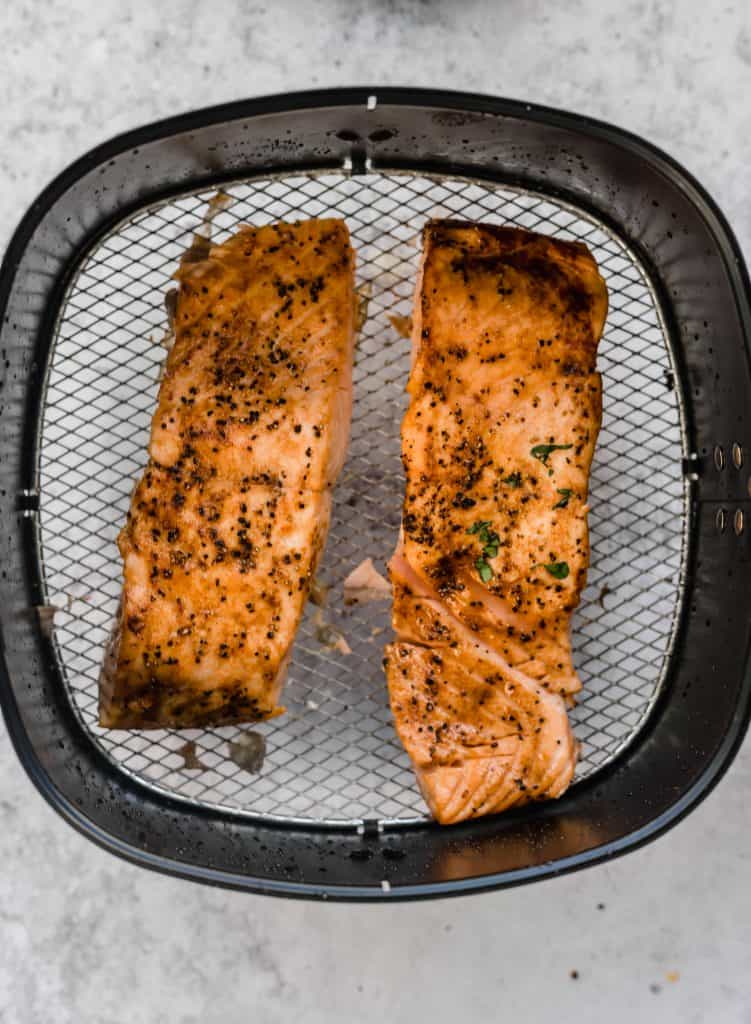
Place the seasoned salmon fillets skin side down in the fryer basket, then start cooking. You could cook them anywhere between 7-9 minutes. I like a more well done salmon, so 9 minutes was perfect for me. Don’t be afraid to pull out the basket and check on the progress by flaking the salmon with a fork.

Can you reheat cooked salmon?

Yes. But do it with caution.

  1. Avoid the microwave, go for the oven instead.
  2. Reheat it slowly over low temperatures to avoid it drying out- think 135 C (275 F) for 15 minutes.
  3. Cover the salmon loosely with foil to keep it juicy.

Alternately, enjoy any leftover salmon cold! Flaked over a salad, or even heaped on some toast.

What side dishes to have with salmon?

Air Fryer salmon on pan with corn, broccoli and sweet potato fries

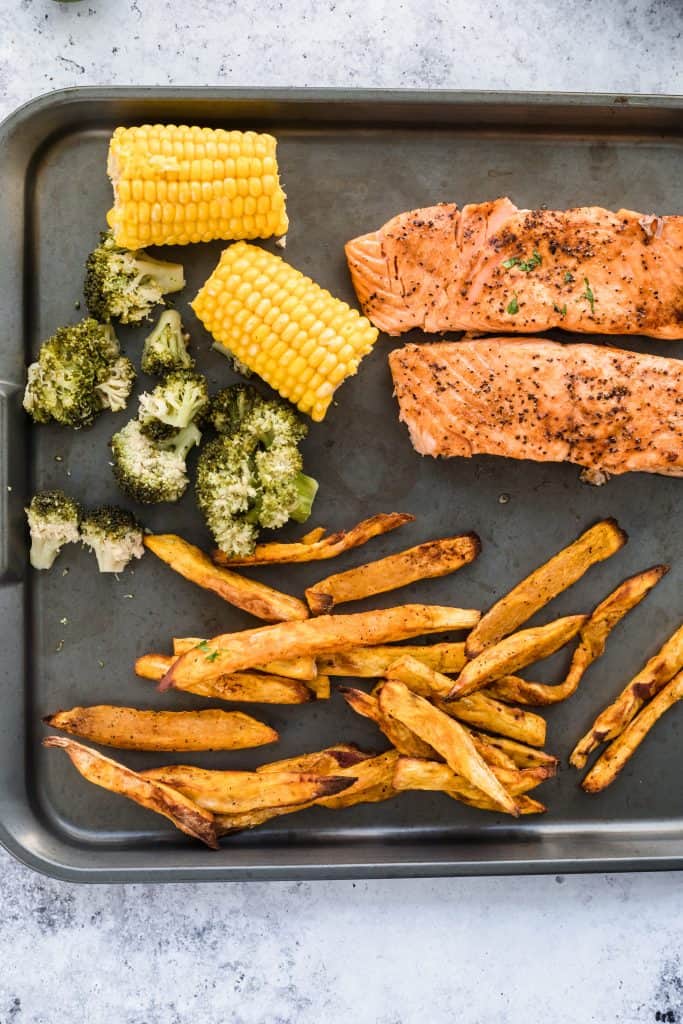
I like me some starch, so I think this pairs perfectly with:

Sweet Potato Fries

Mashed Potatoes

Cauliflower Mashed Potatoes

A simple side salad

and definitely with steamed veggies like broccoli, corn on the cob, etc., preferably with lots of garlic on them

This salmon would go PERFECTLY in this very popular salad recipe I have for salmon sesame soba noodle salad.

Air Fryer Salmon

Perfectly cooked crispy on the outside, tender on the inside salmon made easy in an air fryer in less than 10 minutes!
5 from 5 votes
Print Pin
Rate
Course: Main Course
Cuisine: American
Keyword: salmon, air fryer
Prep Time: 5 minutes
Cook Time: 8 minutes
Servings: 2 people
Calories: 359kcal
Author: Farah Abumaizar

Equipment

  • Air Fryer

Ingredients

  • 2 salmon fillets, about 1 1/2 inch thick
  • 2 tsp olive oil or avocado oil
  • salt and pepper to taste
  • 1-2 tsp paprika
  • 1/4 tsp garlic powder, optional
  • lemon to taste
  • parsley for garnish, optional

Instructions

  • Preheat air fryer to 200 C (390 F ).
  • Pat salmon fillets dry with a paper towel, then rub each fillet with oil. Sprinkle with salt and pepper generously, then sprinkle evenly with paprika and garlic powder if using.
  • Place in the basket of the air fryer, skin side down, and cook for 8-9 minutes. Check salmon with a fork to make sure it's cooked to your liking, then remove from air fryer.
  • Squeeze cooked salmon with lemon and sprinkle with parsley and enjoy!

Notes

Recipe adapted from The Noble Pig
Tried this recipe?Mention @everylittlecrumb or tag #everylittlecrumb!

Nutrition

Calories: 359kcal

If you like this recipe, you might like

Air Fryer Sweet Potato Fries

Shrimp and Clam Pasta

Garlic Honey Prawns

Did you make this? Tag @everylittlecrumb or hashtag #everylittlecrumb and I’ll share your images!

Healthy, Main Meals, Recipes air fryer, salmon

Previous Post: « Roasted Garlic Mashed Cauliflower
Next Post: Slow Cooker BBQ Beef Brisket »

Reader Interactions

Comments

  1. Adrianne says

    December 2, 2019 at 11:12 am

    5 stars
    I love salmon and you definitely have me on this one. YUM!! It looks so good. Perfect for dinner, I can’t wait to give it a go, cheers!

    Reply
    • Farah Abumaizar says

      December 2, 2019 at 5:15 pm

      Thanks Adrianne! Hope you enjoy it!

      Reply
  2. Kushigalu says

    December 2, 2019 at 2:18 pm

    5 stars
    I have never tried it this way. Looks awesome. Can’t wait to try this method.

    Reply
    • Farah Abumaizar says

      December 2, 2019 at 5:14 pm

      Thanks Kushigalu!

      Reply
  3. Danielle says

    December 2, 2019 at 2:46 pm

    5 stars
    Just another reason to buy an air fryer. Love how simple the flavors are here so the flavor of the salmon really shines through. Sounds delicious!

    Reply
    • Farah Abumaizar says

      December 2, 2019 at 5:14 pm

      Thanks Danielle! I find that simple is best for salmon 🙂

      Reply
  4. Katherine says

    December 2, 2019 at 3:03 pm

    5 stars
    So easy in the air fryer and really tasty. Thanks for the recipe.

    Reply
    • Farah Abumaizar says

      December 2, 2019 at 5:13 pm

      Thanks Katherine! It’s a good and easy way to increase salmon in your diet 🙂

      Reply
  5. kim says

    December 2, 2019 at 4:07 pm

    5 stars
    This looks fabulous and I love how easy it is! I must try salmon in the air fryer!

    Reply
    • Farah Abumaizar says

      December 2, 2019 at 5:13 pm

      It’s a winning formula!

      Reply

Leave a Reply Cancel reply

Your email address will not be published. Required fields are marked *

Recipe Rating


Primary Sidebar

Get more stuff

Subscribe to our mailing list and get interesting stuff and updates to your email inbox.

Thank you for subscribing.

Something went wrong.

we respect your privacy and take protecting it seriously

FeedFeed

Featured Recipes

Nana tea

Halal Guys Chicken and Rice

Aish El Saraya

Instant Pot Enchilada Soup

Death By Chocolate Zucchini Bread

More

Footer

everylittlecrumb

Farah Abu Maizar | Food Lover
Bbq salmon bowls with mango avocado salsa- unbelie Bbq salmon bowls with mango avocado salsa- unbelievable! And start to finish, you can be eating these in 15-20 minutes. Save this recipe for your next meal, you don’t want to miss out!

I’ve partnered with @kilosamak to produce a few recipes with their quality seafood- I’ve tried several of their items and genuinely loved them all! They deliver seafood straight to your door for you to enjoy and cook at home. Takes all the guesswork out of trying to choose and clean fish yourself, perfect solution for someone like me who loves seafood but isn’t so great at prepping it! Check out their Instagram page on how to order, or head to the link in my bio.

This salmon has a smoky slightly sweet rub, is baked in the oven for ultimate ease, and gets piled on to rice and topped with an easy, addictive, zingy mango and avocado salsa. Adapted from @pinchofyum , I’ll make this again and again!

Ingredients:
For the salmon:
2 fillets, about 250 g each 
Spice Rub:
2 tbsp brown sugar
1.5 tsp paprika 
1 tsp garlic powder
1 tsp onion powder, optional 
1/2 tsp chili powder
1/2 tsp salt 
2 tbsp olive oil 

Mango avocado salsa:
1 diced mangos 
1 diced avocado
1/4 cup finely diced coriander 
1/4 cup finely diced red onion 
1 inch spicy green chili pepper, finely chopped
1 tsp honey
Juice and zest of one lime
Salt to taste

Method:
- Make the salsa by mixing together all the salsa ingredients and placing bowl in fridge while you make the salmon.
- Heat oven to 240C, and line a baking sheet with parchment paper. 
-Mix together all the ingredients for the salmon rub, and rub thoroughly all over the salmon, both sides.
- Bake for 10-12 minutes until salmon is opaque and cooked all the way through.
-Assemble bowls with rice, flaked pieces of salmon,and plenty of mango avocado salsa. Enjoy 😍

Catch the steps in my story!
Have you tried this pasta yet? Save this for your Have you tried this pasta yet? Save this for your next weeknight meal! Saucy macarona iltaybeen, can’t get much more comforting.  Adapted from @jedir3waish , makes for an easy delicious main that’ll make your family including kids very happy! Can find a step by step linked bio, or at https://everylittlecrumb.com/macarona/ , or in my story!

INGREDIENTS:
 
2 tbsp olive oil, divided
big pinch of salt
3 heaped tbsp tomato paste, divided 2 oz or 70 g
1 pack elbow macaroni 14 oz or 400 g
1 onion, very finely diced
1 zucchini, finely diced
1 carrot, finely diced
4-5 garlic cloves, minced
250 g ground beef
1 tsp seven spices
1 tsp turmeric
1/2 tsp paprika powder
1/4 tsp basil
1/4 tsp cinnamon powder
1/4 tsp garlic powder
1/2 tsp black pepper
1 tsp salt
1 can crushed tomatoes 14.5oz (400g)

NSTRUCTIONS
 
Bring a large pot of water to boil, add 1 tbsp olive oil and the salt, one tbsp of tomato paste, then the pack of pasta. Cook until al dente, then drain the pasta, reserving the pasta water. Set cooked pasta aside.

In a large skillet, heat the remaining tbsp of olive oil. Once hot, add the diced onion, and cook for 4-5 minutes until softened. Add the diced zucchini and carrots, and garlic and cook for a further 4-5 minutes until softened slightly.

Add the ground beef, and cook, smushing with a wooden spoon to break up the meat. Keep cooking until the beef is browned and cooked through, then optionally, drain the fat.
Add in the salt, pepper, and all the spices. Cook for another minute or so. Add the remaining 2 tbsp of tomato paste, and stir.

Add the can of crushed tomatoes and stir to combine. Bring to a simmer, then add a big ladleful of the reserved pasta water and simmer for 2-3 minutes on low heat.

Add the pasta to the sauce (I don't always add all the pasta, maybe 3/4 of the cooked amount until the finished dish is as saucy as I like). Stir to coat, cook for another minute or so until the pasta is warmed through, then enjoy!
This gorgeous tiramisu was so kindly sent to me by This gorgeous tiramisu was so kindly sent to me by @cadysweets.sa on my birthday, and we enjoyed every light fluffy bite of it. Their old account got hacked so follow along and support their new account ! They have a bunch of cakes and sweets for every occasion, so make someone or yourself happy and order one for a treat🤩! Send this to the tiramisu lover in your life 🍰.
.
.
.
.
.

#chocolatecake #magnoliabakery #cakestagram #cakephotos #layercake #chocolate #ganache #foodblog #instayum #yummy #bakery #foodporn #foodtographyschool #foodphotography #slice #delish #foodfluffer #damnthatsdelish #tiramisu #birthdaytreat #dessertbae #dessertoftheday #scoop #foodstyling #foodstylingandphotography
Easiest at home crusty bread with a great open cru Easiest at home crusty bread with a great open crumb texture. It’s the no knead bread from @breadin5 and has yet to fail me. Check my story for the step by step, and swipe for a video reveal.

Ingredients for two small loaves:
1.5 cups lukewarm water 
1/2 tbsp any type of yeast
1/2 tbsp salt
3 1/4 cup plain flour (450g)

Method:
In a large bowl, stir together the water with the yeast and salt. Try to dissolve but it’s fine if you have clumps.
2. Add flour all at once and stir, just until no flour patches remain.
3. Cover loosely with a kitchen cloth and leave it to rest for 2 hours in a warm place until risen and bubbly.
After this rest you can:
- Use dough immediately if impatient, but it’s easier to work with if cold, so maybe pop in fridge briefly
- Or, their recommended method and the one I do, leave in the fridge loosely covered for 12 hours or overnight. 
Refrigerated dough lasts up to two weeks, and flavor depends over time!
4. The next day, the dough might look deflated. That’s fine! When ready to bake, divide dough in half (I got two 400g dough balls)- it might be easier to handle if you sprinkle the dough lightly with flour, and take the half you are going to bake out of the fridge. Let it rest on a parchment paper lined baking sheet 40-90 minutes. The longer the more interior bubbles you should have. Preheat oven to 235C (450F), and after rest, make a few deep slashes in the dough with a sharp knife.
5. Place in the middle rack of the oven, and on the bottom rack place a roasting pan that had about a cup of hot water in it. This will create steam which gives a crustier crust!
6. Bake for 30-35 minutes or until deep golden brown.
7. Let it cool completely before enjoying!
.
.

.
.
.

#damnthatsdelish #foodfluffer #thebakefeed #feedfeed #tastingtable #forthemaking #BHGfood #foodblogfeed #bakedfromscratch #bakinglove #f52grams #foodbloggerpro #bakersofinstagram #TOHfoodie #foodphotography #canonphotos #bread #instayummy #kitchn #huffposttaste #food #dough #foodie #nokneadbread #homemadebread #doughter
Good morning! With dine in still closed in Saudi, Good morning! With dine in still closed in Saudi, Friday pancakes are fast becoming a tradition. And honestly, I don’t think I’ve had better pancakes at any restaurant recently! The easiest, fluffiest diner style pancakes are a huge hit in our family, find the recipe below adapted from @allrecipes . I like to barely warm the oven (110C or so) and keep the finished pancakes in a pan in the oven until I’m done with all the batter so they stay warm and perfect 👌🏼.

Ingredients
3/4 cup milk 170g
1 tbsp white vinegar
1 cup flour 125g
2 tbsp sugar 25g
1 tsp baking powder
1/2 tsp baking soda
1/4 tsp salt
1 egg room temperature
1/2 tsp vanilla
2 tbsp butter, melted 28g

Instructions:
-In a large bowl, combine the milk and vinegar, and let aside to stand for 5 minutes until curdled. Whisk to combine.
-In a separate large bowl, mix together the flour, sugar, baking powder, baking soda and salt.
-Add an egg, the vanilla and the melted butter to the buttermilk and whisk to combine.
-Add the dry ingredients all at once to the wet, and whisk until flour patches disappear. A few lumps are fine, but don't over mix.
-Let the batter rest for 5-10 minutes while you heat a pan on the stove.
lightly grease the pan with nonstick spray or butter, and pour about 1/4 cup of batter on the pan. Cook for 2-3 minutes on each side or until golden brown. (Flip the first time once you see bubbles form and the edges of the pancake dry up).
-Enjoy with toppings of your choice!
.
.
.
.
.
#pancakes #pancakerecipe #blueberrypancakes #maplesyrup #breakfast #morningslikethese #fridaymorning #flatlay #foodfluffer #breakfastrecipes #breakfastfood #breakfastofchampions #pancakelover #food #foodtography #foodtographyschool #foodphotography #delish #foodphotos #weekendbreakfast #eatingathome #recipeoftheday #foodporn #foodflatlay #blueberries #trayoftheday
One of my photos from my shoot @tackle.baks . How One of my photos from my shoot @tackle.baks . How insane does this tom yum soup look? For those who haven’t tried this casual seafood spot yet, you really should! The food is great and priced very reasonably, and they have some menu items I’m obsessed with like their crispy fish burger, the salmon poke salad and the creamy truffle shrimp👌🏼. They currently have a delivery offer going for only 5SAR on HungerStation, so no time like the present! Have I tempted you with this photo of the tom yum soup? I’m hungry just writing this caption🤤.
.
.
.
.
.
#soup #tomyum #tomyumsoup #food #foodphotography #canonphotography #canon #seafood #seafoodlover #shrimp #delish #beautifulcuisines #foodtographyschool #foodtography #foodblogger #instayum #lonelyplanetfood #dametravelerfoodie #soupseason #restaurantphotography #khobar #tastemade #tastingtable #foodfluffer
I wanted to take a really pretty photo of the choc I wanted to take a really pretty photo of the chocolate fondants and post it with the recipe but I gave into peer pressure and am posting the recipe with this horribly lit and not at all beautifully set up video🤷🏻‍♀️. At least the video really demonstrates how gooey and perfect the center of these chocolate lava cakes are, and how unbelievably delicious they are. You won’t believe how easy it is to make these! And you may never order this at a restaurant again! You can even use muffin cups instead of ramekins. Save this recipe for when you want to be extra fancy with your dessert 👩‍🍳 I looked at a bunch of recipes online and compiled my favorite steps from each, this is most influenced from @gordongram 

Ingredients:
For greasing the ramekins:
1 tbsp melted butter
1 tbsp cocoa powder

For the fondants:
1 stick butter 115 g
2 eggs
2 egg yolks
170 g chocolate bittersweet chocolate (I used Lindt 70%)
1/2 cup caster sugar or regular sugar
Pinch salt 
3 tbsp flour (41g)
25 g butter melted

Method:
-Spray ramekins with nonstick spray, then dust with cocoa powder and shake until evenly coated, or brush inside of ramekins with melted butter, chill into butter sets, grease again with more melted butter and dust with cocoa powder (Gordon Ramsay’s fancy method)

-Melt together the butter and chocolate over a pan of simmering water (Bain marie ). Set aside melted chocolate to cool for 10 minutes.

-In an electric mixer, whisk the eggs, egg yolks, and sugar until thick and pale about 3-4 min. Sift in the flour and beat again until mixed.

-Pour melted chocolate into the egg mixture in 3 additions, mixing well between each until combined.

-Pour fondant batter evenly into prepared ramekins. If baking immediately, let them chill in the fridge while you preheat the oven to 200C. You can also store in the fridge for up to two days before baking.

- Bake 10-12 minute or until top just looks set. If using muffin pans, they’ll take less time, 8-10 minutes. Remove from oven and cool 1 minute before inverting onto a plate. Enjoy immediately with vanilla ice cream and berries!
I can’t stop myself from craving over the top de I can’t stop myself from craving over the top decadent desserts when it’s cloudy and a little chilly. One of my favorites in Bahrain is @joesbahrain ‘s sticky date cake that comes swimming in a pool of caramel sauce. It’s a drool worthy dessert! Their warm chocolate brownie is also unbelievable. I always end up confused on which to order and usually give in to ordering both 😂. Their coffee pairs perfectly with either👌🏼. Definitely miss this spot and wish I could be dining outdoors @theavenuesbh now indulging on this ultimate treat. Do you agree with my review? 
.
.
.
.

#chocolatecake #magnoliabakery #cakestagram #cakephotos #layercake #chocolate #ganache #foodblog #instayum #yummy #bakery #foodporn #foodtographyschool #foodphotography #slice #delish #foodfluffer #damnthatsdelish #datecake #caramel #stickytoffee
Load More... Follow on Instagram

Copyright © 2019 on the Seasoned Pro Theme